Pages

Sunday, 29 April 2018

Celebrate- Inking with Tape


Hello and Welcome.
Today I have the pleasure of hosting the Technique Lovers Challenge at Splitcoast.
I had such fun with this one, it's an oldie but goodie for creating quick, simple backgrounds.

In the past, it was referred to as 'Magical Masking Tape' technique.  With that technique you needed to use masking tape on glossy paper.  Well since many of us don't own any glossy paper and masking tape would tear regular cardstock, I decided to re-name it.

Here is a short picture tutorial to show you how to do this.  I always find seeing it helps me better understand.


Step #1 Gather your supplies
I used Distress Oxide inks for my card because I love how they layer, but you could use any inks for this technique.  It helps the layering look if you dry the inks between the layers.
I also used a painter's tape because it has a low tack and won't tear your regular cardstock.


Step #2- Ink your tape
Take a piece of tape and press it directly onto the ink pad.


Step #3- Press inked tape onto your paper
I started with my lightest colour first.  After pressing the tape onto the ink pad, press and
rub it onto your paper to transfer the ink.  Lift carefully and ink again.
Note: I just used my Misti as a inking surface and I like to mask my cards fronts
using the grid paper inside my Misti but it is not needed to do this technique!


Step #4- Finish adding ink with the tape
Continue to add ink until you are happy with the coverage.
Now you can stamp over your background to create a card.

After I had finished the inking with tape, I stamped the leaves randomly over my card front using my Misti.  I then removed the tape masking the edges and stamped my sentiment and clear heat embossed it to help make it pop.


Thanks so much for coming by and taking a look.
I hope you will give it a try.

Adding my card to these challenges:
Simon Says Wed.- ANYTHING GOES
Inkspirational- PLAY
(play with a technique)
Crafting With Friends- ANYTHING GOES


Supplies
Stamps- Birthday Letter It (Ranger); Leaf Prints (TH)
Inks- Tuxedo Black Memento; Distress Oxides- Fossilized Amber, Spiced Marmalade,
Candied Apple, Walnut Stain (TH)
Paper- heavy white
Accessories and Tools- Painter's Tape; clear eb powder; heat tool; Misti

Saturday, 28 April 2018

Rainy Garden View


Happy Saturday.
I had some 'play' time and I just got a new Distress Oxide ink colour I just had to try...Blueprint Sketch.  Let's just say that I wasn't disappointed! 

I wanted a simple card with an irregular inside edge, so I took strips of Post-It Tape and tore them down the middle to use as my masks, giving me a nice white border.
Next, I inked up an acetate sheet with Peacock Feathers, sprayed with water and pressed onto my paper.  I repeated that process using some Salty Ocean DOX as well.  It gave me a rainy style background.
When that was dry, I inked up the flowers with the Blueprint Sketch and stamped using my Misti. and sponged in the edges and some of the background with more Peacock Feathers.  
I removed the tape that I used to mask and simply mounted it onto a blue piece of cardstock.


Hope you have a great weekend and thanks so much for coming to take a look.

Adding my card to these challenges:
Simon Says Wed.- ANYTHING GOES
Cardz for Gals- APRIL SHOWERS
Crafty Creations- ANYTHING GOES

Supplies
Stamps- Nature Flowers (Art Journey); Dans la Nature (Carabelle)
Inks- Salty Ocean, Peacock Feathers, Blueprint Sketch Distress Oxides (TH)
Paper- heavy white and blue cs.
Accessories and Tools- acetate sheet, Mister (TH), Misti; Sponging Tool (TH)


Sunday, 22 April 2018

Sending Smiles


Meet today's card.
I am having fun using this new stamp from Penny Black called Blossom Branch.
It is a pretty one.

I began by masking the edges of my card front with some Post-It Tape, I like the look of a crisp, white border.
I placed the flowers into my Misti, coloured them with my Tombow markers, sprayed with water and stamped.  I repeated that process building colours as I went along.  I find it works best if I start with the lightest colour first and add darker colour after that. 
I dried the piece then watercoloured in the background using some Worn Lipstick Distress ink.  I just rub the ink pad directly onto my non-stick craft mat, spray with water and pick up the colour.
I splattered with some water over the whole front to lift the ink as well.  Distress inks work so well for this technique.
I placed the sentiment from the PB set called Smile Today and stamped that using some black Memento ink.


Thanks so much for coming by and taking a look.

Adding my card to these challenges:
Time Out- SPRING
Crafty Friends- FLOWERS
Penny Black Saturday- ANYTHING GOES/SPRING FLOWERS


Supplies
Stamps- Blossom Branch, Smile Today (Penny Black)
Ink- Tuxedo Black Memento; Worn Lipstick Distress (TH); Tombow markers
Paper- heavy white
Accessories and Tools- Misti (My Sweet Petunia); Mister (TH); Post-It Tape


Saturday, 21 April 2018

Bonsai Trees


Happy Saturday.
I love to look and see what kind of Inspiration Challenge is happening over at Splitcoast Stampers.
Today, we were being inspired by the Smithsonian Galleries.  I came across a lovely Bonsai tree for sale and decided to use this lovely stamp from Technique Junkies with this 'bonsai' looking tree on it for my card.  
As I was trying to figure out what kind of background I would stamp it onto, I remembered that I had an inked up a piece of Yupo paper with alcohol inks.  It reminded me of a cloudy night sky, so
I placed the inked piece into my Misti, masked the stamp (this stamp also has the image of a giraffes which I didn't want for this card), and stamped using Archival black ink.  I moved the piece inside my Misti and stamped the tree again moving it down slightly to overlap the first one.
I cut a square frame to place over the stamping and I liked how it really helped to draw the eye in.
I stamped the sentiment and put it all together.


I hope you find some inspiration around you.
Thanks for coming by and taking a look.

Adding my card to these challenge:
Simon Says Wed.- SPARKLE AND SHINE
(shiny Yupo paper with the alcohol inks)
Craft Stamper Magazine- ANYTHING STAMPED GOES


Supplies
Stamps- Savannah Giraffes (Technique Junkies); Art Journey
Inks- Archival Black (Ranger); Tuxedo Black Memento; Alcohol inks (Ranger)
Paper- heavy white; Yupo
Accessories and Tools- Misti; Blending Solution (Ranger); die- MFT; Sharpie Markers

Monday, 16 April 2018

For the Birds- CAS Watercolour Challenge


Hello and Welcome.
It's time for another card for the 

Our theme this month is 'bird'.

I am using these great stamps from Frog's Whiskers Ink of the cranes.
I love the silhouettes they create.

So onto my card.
I die-cut a piece of heavy white cardstock using a die from MFT then I inked up the background with Distress Oxide inks and a piece of acetate. I rubbed the ink onto the acetate, sprayed with water and pressed onto my paper.
Next, I placed the piece into my Misti and stamped the bird silhouettes with black Memento ink.

After I was done inking my bird background with the DOX, there was still quite a bit of ink left on my sheet of acetate that I didn't want to go to waste, so I grabbed an extra piece of cardstock and pressed the ink onto that to create a watery looking piece to mount the birds onto.
In the top corner and on one side you will see where I did a bit of stenciling to add some interest.  I just used a baby wipe and rubbed over the ink already on my paper.  It lifted the ink in some places and deposited it in others and I was left with the impressions.  


I hope you will come and play along with us.
Thanks for coming by and taking a look.

Adding my card to these challenges:
Crazy for CAS- STENCIL
Stamps & Fun- MAN/BOY
Craft Stamper Magazine- ANYTHING GOES STAMPED


Supplies
Stamps- Flying Crane, Standing Crane (Frog's Whiskers)
Ink- Tuxedo Black Memento; Distress Oxide (Salty Ocean, Peacock Feather; Blueprint Sketch)
Paper- heavy white (local store)
Accessories and Tools- Misti; stencil-Leaves (STAMPlorations); script (TCW); piece of acetate;
In and Out Diagonal Stitch (MFT)

Sunday, 15 April 2018

Shaped Cards- The Flower Challenge

Good Morning.
Time for another card at
Our theme this month is shaped cards which I had a lot of fun with.


I decided  to create a hexagon shaped card so I looked online and found a 4" pattern to use for my card design and printed that out to use as my pattern.
I cut out the shape onto my heavy white cardstock, then masked the edges to leave me with a nice clean, white border.
I added some stenciling first with Peeled Paint Distress ink, then stamped the clock face and the other elements using the same ink to create my collage style background.  By stamping and stenciling all with the same colour, it is a great way to feature more of your stamps on one card.  I sponged all around the edges to help accentuate the shape of the card.
Last, I placed this Magenta flower stamp into my Misti, inked with Black Memento ink and added the sentiment for my finished card.


Thanks so much for coming by and taking a look.
Hope you will join us for some fun.

Adding my card to these challenges:
Allsorts- SPRING FLOWERS or SHOWERS
Craft Rocket- FLOWERS

Supplies
Stamps- Clover Silhouette (Magenta); Weathered Clock (Hampton Arts);
Script (PB); Mixed Media Elements (STAMPlorations);
Enjoy the Moment (Daisy Bucket)
Ink- Tuxedo Black Memento; Peeled Paint Distress (TH)
Paper- heavy white (local store)
Accessories and Tools- pattern from online; Misti; sponging tool (TH)

Saturday, 14 April 2018

Special Friend Birthday

Hello...meet today's card.
I am playing with some new stamps from Penny Black.  
My first time playing with this wonderful stamp called Blossom Branch and I love it.

To create my card, I placed the stamp inside my Misti and coloured using my Memento and my Tombow markers directly onto my stamp.  I sprayed with water then pressed onto my paper.  I repeated that process, adding more colour where I wanted it to look like shading.  My Misti is an invaluable tool for using this kind of technique on a card.
After that was dry, I stamped the sentiment from the PB set called Grateful Heart using black Memento ink and clear embossed it to help make it pop.  I stamped it a bit over the inked image to help pull the whole design together.
When I was done, I looked at my card front thinking that it needed something more, so using a fine line marker, I added little dashed lines around the flower centers and splattered with black ink.  So much better as the black seemed to be what it needed to help ground it all.


Thanks so much for coming by and taking a look.

Adding my card to these challenges:
As You Like It- FAV COLOURING MEDIUM
(I love using my Memento and Tombow markers especially to colour
directly onto my stamps.  Since they are waterbased, I can spray them with water 
to get the look of a watercoloured image which I love the look of)
Crafting With Attitude- ANYTHING GOES
Penny Black Saturday- FLOWERS/ANYTHING GOES

Supplies
Stamps- Blossom Branch, Grateful Heart (Penny Black)
Inks- Tuxedo Black Memento; Tombow and Memento markers
Paper- heavy white (local store)
Accessories and Tools- Misti (My Sweet Petunia); Mister (TH); clear eb powder; heat tool;
fine line black marker; paintbrush

Friday, 13 April 2018

Watercolored Birthday Greetings

Hello and Welcome.
Today, I have the pleasure of being the Guest at
Here is the card I created for the theme 'Take a Stamp'.

I began by watercolouring the background with some of my Distress Oxide inks.  To do that, I pressed the pads directly onto my non-stick mat, sprayed with a bit of water and picked up the colour with a paintbrush.  I also used my 'acetate inking' technique to add colour to the background.
To see how I do that, go here.
When I was happy with the inking, I stenciled with some Black Soot Distress Oxide ink and then stamped the clock face and the birthday greeting.  
BTW....my husband loved his card.


Thanks so much for coming by and taking a look.

Adding my card to these challenges:
Addicted to CAS- BUBBLES
Aud Sentiments- HAPPY BIRTHDAY
Seize the Birthday- VIBRANT BIRTHDAY


Supplies
Stamps- Birthday (Studio G); Weathered Clock (Hampton Arts); 
Inks- Tuxedo Black Memento; Distress Oxide (Peacock Feather, Fossilized Amber, 
Seedless Preserves, Salty Ocean)
Paper- heavy white (local store)
Accessories and Tools- acetate sheet; stencil(TCW); paintbrush; non-stick craft mat (TH)
Mister (TH)


Saturday, 7 April 2018

Sweet Flowers

Good Morning and Happy Saturday.
Meet today's card....just me playing around with my Distress Oxide inks again.
Slight addiction.

I began by stamping these beautiful coneflowers which has been in my collection for years not seeing the light of day, with Versamark ink then white heat embossed them to one side of my white card front.
I wanted to create a background using some of the wonderful reds and oranges so here's what I did.
I used a piece of acetate, rubbed on some Spiced Marmalade Distress Oxide ink, sprayed with water and pressed onto my white piece of cardstock.  I repeated that process using some Picked Raspberry, Worn Lipstick and Fired Brick.  I like to dry each layer in between with my heat tool.
When I was happy with the colour coverage of my cardstock, I did a bit of stenciling using some drywall tape and stamped a bit of script around the edges just to add further interest and depth to my piece.
Lastly, I stamped the sentiment from Rubbernecker and mounted the whole thing onto a card.


Have a great weekend and thanks so much for coming by to take a look.

Adding my card to these challenges:
Craft Stamper Magazine- ANYTHING STAMPED GOES
Crafty Catz- SPRING COLOURS/ANYTHING GOES
SumMore Fun- MOOD BOARD COLOURS
4 Crafty Chicks- FLOWERS


Supplies
Stamps- Brushed Coneflowers (Paper Inspirations); Friendship Message (Hero Arts); 
Sketch Poppies sentiment (Rubbernecker)
Inks- Tuxedo Black Memento; Distress Oxides; Versamark
Paper- heavy white
Accessories and Tools- Misti; white eb powder; heat tool; drywall tape; sponge applicator;
sheet of acetate; Mister (TH)

Friday, 6 April 2018

Everyday

Meet today's card.
This is what happened when I got a few new stamps and decided to sit down and just freestyle stamp.
I just love this fun sentiment I picked up by Impression Obsession.  It has such a fun and whimsical looking font and I wanted to make it the 'star' of the show.

So to begin my card, I placed my cardstock into my Misti and stamped the background script then the circles in London Fog Memento ink.  By stamping the background all in the same colour, it helps create the look of a collage theme and it is a great way to get more use of your stamps by combining them on one card.  Then I stamped the flowers from Magenta to one side, leaving room for my sentiment.
Lastly, I stamped the sentiment in a bright red with Fired Brick Distress ink to help make it pop.


Thanks so much for coming by and taking a look.

Adding my card to these challenges:
Simon Says Wed.- HAPPY BIRTHDAY
4 Crafty Chicks- FLOWERS
Craft Rocket- FLOWERS

Supplies
Stamps- Smile Often(Impression Obsession); Circle (Wendy Vecchi);
Collage Des Rond (Carabelle); Texture (Prima); Wildflowers (Magenta) 
Ink- London Fog Memento; Fired Brick Distress
Paper- heavy white; red
Accessories and Tools- Misti

Wednesday, 4 April 2018

Coffee or Tea? - The Flower Challenge

Good Morning and Welcome to another card for 

Our theme is Shaped Cards


I don't normally make shaped cards but it was fun to take myself out of my comfort zone and try and come up with something.  I decided to create a coffee cup shaped card.

I began by following the tutorial on Splitcoast to create the shape of the cup.  It was very easy to do and it's nice that it fits into a regular sized envelope.
The white strip along the cup edge was cut and scored using a ScorPal which adds nice texture.
The blue panel was cut then dry embossed using the Tim Holtz eb folder called Snowfall Speckles.  I like the interest it adds to an otherwise plain panel.

So...onto my flowers.
I recently saw an interesting technique done by Lydia Fiedler called Stamp Etching.  
This is a very easy technique and one that you can do while sitting and watching TV or just relaxing.

I placed the flowers from the Sketchy Florals Altenew set into my Misti, inked with black Memento then stamped.  Next, using a black fineline marker, I added the 'flicked' lines all over my flowers.  To add the 'flicked' lines, I began at the inside edge and flicked away from myself letting the marker rest on the edge and then lift as I flicked.  
You can stop at that point but I decided to add some coloured 'flicks' using a Copic marker.  
When I was happy with the look, I fussy cut out the flowers and mounted them using pop dots over the embossed panel.
I stamped some leaves as well but left them plain to add some contrast.


Thanks so much for coming by and taking a look.
I hope you will come join us.

Adding my card to these challenges:
CASology- START
(I start each day with a cup of coffee!!)
Simon Says Monday- A TRIO OF SOMETHING
Shopping Our Stash- BLACK/WHITE and ONE OTHER COLOR


Supplies
Stamps- Sketchy Florals (Altenew)
Inks- Tuxedo Black Memento
Paper- heavy white (local store)
Accessories and Tools- Misti; eb folder-Snowfall Speckles (TH); ScorPal;
Micron 03 fineline marker; Copic marker R27; pop dots


Monday, 2 April 2018

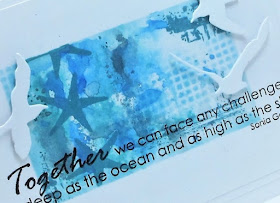
Together- CAS Watercolour Challenge

Welcome and meet today's card.
It's time for another fun challenge at the 


For those of you that are intimidated by having to watercolour, check out the challenge blog as there are always wonderful links for techniques to get started there and the Design Team always adds so much to be inspired by.
We also want to welcome our GD this month, Stef from Perry Papercrafts.

I began my card by masking the edges with some Score Tape. Next, I inked up a sheet of acetate with Salty Ocean, Peacock Feathers and Faded Jeans Distress Oxide inks, sprayed with water and pressed onto my paper.  I repeated that process until I was happy with the ink coverage.
I inked up the stars with more DOX and stamped to the side.  Using some drywall tape, I added some stenciling to add some interest and texture.
I placed the inked piece inside my Misti and stamped this wonderful sentiment from Technique Junkies called Together.  I die-cut the birds then added them with pop dots.


Thanks so much for coming to see what I've been up to.
Hope you get a chance to play along.

Adding my card to these challenges:
Simon Says Wed.- ANYTHING GOES
The Male Room- WATERCOLOR
Addicted to Stamps and More- PHOTO INSPIRATION
Stamping for Autism Awareness- AUTISM AWARENESS DAY


Supplies
Stamps- Together (Technique Junkies); Stars (Stampington)
Ink- Distress Oxide, Tuxedo Black Memento
Paper- heavy white (local store)
Accessories and Tools- Misti; Cuttlebug; Birds in Flight (Memory Box); acetate sheet;
Mister (TH); drywall tape; inking tool (TH); ScoreTape