Pages

Sunday 30 August 2020

Trace Your Stencil


Hello and Welcome.
It's my turn to host the TLC (Technique Lovers Challenge) over at Splitcoast Stampers this week.
So many of us are working on getting cards made to enter the Dare to Get Dirty Event, held each year for all the members there. 
I thought I would keep the challenge really simple and fun.
So my challenge will be 
Trace Your Stencil

So here's what I did to create my card.
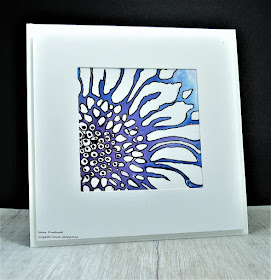
  • I began with a piece of heavy white cardstock and a stencil from The Crafter's Workshop called Mini Joyful Sunflower.
  • I rubbed some Wilted Violet, Salty Ocean and some Blueprint Sketch on the back of my stencil, sprayed with water and pressed onto my card base creating a monoprint.  Remove the inky stencil soon after pressing it onto your paper or the ink may seep under the stencil.
  • I set the piece aside to dry completely before doing the next step.
  • When the piece was dry, I was left with a lovely print of the flower.
  • Using a black Signo pen, I traced around the inked outlines of the flower, giving it more of a defined presence and making the stenciled bkg look a bit different. *For more detailed stencils, lay the stencil back over the pattern and trace inside the stencil.
  • I splattered using my black Posca pen for interest.
  • Using a Spellbinder square die, I cut a frame to place over the flower image using pop dots.
  • I chose not to add a sentiment so I can use this card for so many different occasions.

Thanks so much for coming by and taking a look.

Adding my card to these challenges:
Simon Says Wed.- ANYTHING GOES
My Time to Craft- CLEAN AND SIMPLE
Krafty Chicks- ALL OCCASIONS


Supplies
Stamps- none
Inks- Distress Oxides
Paper- heavy white (Scribes Nook)
Accessories and Tools- Stencil (TCW); mister (TH); Signo #1 pen; Spellbinder Square die;
pop dots

Saturday 29 August 2020

Greetings


Welcome
Hope you are not totally sick of my posting another Christmas card!!
With me getting back to work and having little to no time to stamp, I'm glad I had some time to get ahead of the game during the lockdown and get some cards made.  

I always have a hard time trying to give my cards a name.  I think I should have called this one the power of inking, DOX inks and adding water.  The results you can achieve with water lifting are truly amazing when using these inks on a simple piece of cardstock.  
I've been watching a lot of Vicki Boutin's FB lives and she's such an inspiration.  She loves playing with all the 'stuff' as she calls it.  I love that she's a Canadian too!  She's been doing lots of inking and blending so if that's something you like to do, go check out her videos.

So onto my card details.
  • I began with a piece of heavy white cardstock cut into a panel.  I like to cut them 3 3/4 x 5".
  • Using my Tim Holtz inking tool, I rubbed on Broken China, Speckled Egg, Blueprint Sketch and some Salty Ocean onto the panel, blending as I went along.
  • When I was happy with the inking and the whole piece was inked, I started to water mark.  I lifted some ink using water through the Tim Holtz Mosaic layering stencil, splattered with water and dried.  I also picked some colour up by spraying a script from the Faded Text stamps by TH and stamping it over the inky background. You can continue to layer and lift colour by drying each layer before adding more ink and water. 
  • When I was happy with the look, I placed the dry panel into my Misti and stamped the large snowflake down in the corner with some Versamark ink and then white heat embossed it.  *Be sure your panel is totally dry and rub with an anti-static bag before embossing or the powder will stick to anywhere wet and you won't get a crisp image.
  • While that cooled, I stamped the sentiment with some more Blueprint Sketch and clear heat embossed it.  
  • I splattered my panel with white paint using my Posca Pen.  I just tap it over my project with a heavy duty metal ruler to deposit the paint.  
  • I pop dotted the sentiment over the snowflake.
  • I mounted the piece onto a heavy white card base.

Thanks so much for coming by and taking a look.

Adding my card to these challenges:
Stinkin Inkers- MONOCHROME
Allsorts- GOING ROUND IN CIRCLES
Christmas Card Throwdown- MAKING SHADOWS


Supplies
Stamps- Greetings (Paper Smooches); Faded Text (TH); Warm Wishes Snowflake (Colorado Stamp)
Inks- DOX (TH); Versamark
Paper- heavy white (Scribes Nook)
Accessories and Tools- white EB powder; heat tool; pop dots; inking tool (TH); Posca Pen; 
stencil (TH)


Friday 28 August 2020

For You

 Good Morning Friends
I hope you are all doing well out there.
I am back to work this week....a first since the middle of March.  
I made this background weeks ago and finally got around to making a card using it inspired by a sketch challenge over at Splitcoast Stampers.


So here's what I did for creating my card.
  • I began with a piece of Yupo paper (yupo is a plastic coated paper and great for alcohol inks)
  • I dropped some blue Ranger Alcohol ink onto the Yupo starting right at the center of my panel.
  • I dropped some Rubbing Alcohol onto the drop of AI then using my small blower, I blew the inks outwards from the middle.  This is what my blower looks like:


  • I repeated that process using some purple Alcohol inks and more Rubbing Alcohol. 
  • I cut the panel down to fit onto my card base and glued it all in place. 
  • Using the Zinnia flower stencil from A Colorful Life Designs, I stenciled the smallest flower using Salty Ocean and Seedless Preserves Distress Oxides onto a piece of white card and die cut it into a circle. I splattered the flower with water to lift some of the ink and when dry, I traced around the flower using a fine line pen. 
  • I stamped the sentiment from Your Next Stamp and then clear heat embossed it.
  • I glued on the sentiment, then pop dotted the flower over to the side.
  • I added a black gem to the flower center.


Thanks so much for coming by and taking a look.

Discount Code for A Colorful Life Designs

Adding my card to these challenges:
Simon Says Wed.- ANYTHING GOES
Cardz 4 Galz- JUST SAYING HELLO


Supplies
Stamps- Everyday Sentiments (YNS)
Inks- DOX, Versafine Clair, Ranger Alcohol ink
Paper- Yupo, heavy white (Scribes Nook)
Accessories and Tools- World's Smallest Blower; Rubbing Alcohol; clear eb powder;
Zinnia Stencil (A Colorful Life Designs); black gem; inking foam, black Signa Pen

Monday 24 August 2020

Snowflake Fun


Welcome
Slimline cards are all the rage right now, so I thought I would give it a try and this is what I came up with.
I was pleased at the result and I like the look of working on something different for a change.

So here's what I did to create my card.
  • I began by cutting my card base as a starting point.  My finished card is 3 1/2" x 8 1/2 " and will fit nicely into a legal sized envelope.  Apparently from what I read, postage is the same as a smaller letter so bonus!
  • I cut a piece that I would use as my focal panel.  (Sorry, I didn't measure that)
  • Using some ScorTape...it is very low tack, I laid a piece down the center of my card panel and masked one side.
  • I used my mini Distress ink cubes and swiped along the line.  I didn't go all the way to the outer edge as I wanted some white space left behind.  Here are the colours I used:

  • After one side was all inked along the tape edge, I removed the tape and replaced it one the other side and repeated the same process.
  • I removed the tape, dried and then splattered with some water to lift the colour.
  • While that dried, I die cut the snowflake 2 times and glued them together for stability.
  • The center part of the snowflake was inked with the same colours and pop dotted back into the center of the snowflake.
  • Before gluing on my snowflake, I splattered using my white Posca pen.
  • I place the panel into my Misti to stamp the sentiment and clear heat embossed it. 
  • I added a black gem to the center of the snowflake 
  • I mounted the panel onto a piece of black cardstock, then onto the white card base.


Thanks so much for coming by and taking a look.

Supplies
Stamps- Christmas Greetings (Paper Smooches)
Inks- Versafine Clair; Distress
Paper- heavy white (Scribes Nook)
Accessories and Tools- Misti (My Sweet Petunia); clear eb powder; snowflake die (SSS); 
ScorTape; black gem, white Posca pen

Sunday 23 August 2020

Friends Become Family


Good Morning
Meet today's card.
Something I made using my Gel Plate and some grasses I picked up on my walk.  I love being able to use natural elements on my backgrounds to give interest.
Someone told me this effect is call 'cyanotype'.  I looked it up and it is an old photographing process...interesting.

So here's what I did to create my card.
  • I began with a piece of heavy white cardstock and got out my Gel Plate.
  • Using my Speedball brayer, I rolled on some blue and purple paint that I got from the Dollar Tree.  The paint is a lot more watery then the better quality paints.  I find it doesn't cover as well, leaving some white areas behind which I like.  
  • After I covered the plate, I carefully laid down the grasses onto the paint.  *I found using a tweezers for this process to be most helpful....I didn't want to get my fingerprint in the paint.
  • I immediately laid my cardstock panel over the plate and rubbed all over.  When I lifted off the paper, I was left with a white area where the grasses had been.
  • I let the piece dry completely before going onto the next steps.
  • I placed the dry print into my Misti and stamped the thistles and the sentiment.  I clear heat embossed them to make them pop more over the painted background.
  • I simply mounted the panel onto a heavy white card base.


Thanks so much for coming by and taking a look.

Adding my card to these challenges:
Mix it Up- ANYTHING GOES> embossing
The Artistic Stamper- ANYTHING GOES
Creative Knockouts- SOMETHING TO SAY


Supplies
Stamps- Nature Flowers (Art Journey); Friends (Impression Obsession)
Inks- Acrylic Paint, Versafine Clair
Paper- heavy white (Scribes Nook)
Accessories and Tools- Speedball Brayer; Misti; clear eb powder; heat tool; grasses 

Saturday 22 August 2020

Sending You Peace


Happy Saturday
Another clean and simple card for the holidays.
I was inspired after checking out the IC Challenge today at Splitcoast and found this pin from the inspiration Pinterest Board of these vintage ornaments.

So here is what I did to create my card.
  • I began with a piece of heavy white cardstock, my Misti, Deco Foil Stencil Pat, inks and some small sponge dabbers.
  • I laid down the Stencil Pal and using Distress Oxide inks, I inked the lines on my card panel going in a diagonal fashion.  Super simple. The Distress Oxide colours I used were Shaded Lilac, Cracked Pistachio, Mustard Seed, Abandoned Coral, Broken China and Picked Raspberry.
  • Next, I placed the piece into my Misti and inked up the snowflake with some Versafine Clair and pressed onto my inked panel.
  • I splattered the panel using my black Posca pen to add interest.  I just remove the cap and tap with a ruler over the whole piece.
  • I stamped the sentiment from Impression Obsession on a separate piece of  white cardstock and clear heat embossed it.  I mounted that onto a piece of black and pop dotted it over the bottom of the panel
  • I glued the finished panel onto some black and then onto a heavy white card base.


For those who have asked what a Deco Stencil Pat is, here is a picture of what it looks like:


It is a great tool for applying Gesso, Texture paste etc. through a stencil to get a nice smooth application.  One edge is flat, so that's what I used.  
Hope that helps.

Thanks so much for coming by and taking a look.

Adding my card to these challenges:
Love to Craft- ANYTHING GOES
The Crafters Cafe- DOTS AND OR STRIPES


Supplies
Stamps- Warm Wishes Snowflake (Colorado Stamp); Peace (Impression Obsession)
Inks- Versafine Clair; Distress Oxides
Paper- heavy white (Scribes Nook)
Accessories and Tools- Misti; clear eb powder; Stencil Pal; heat tool; pop dots; Posca pen; ink dabbers (Dollar store)


Friday 21 August 2020

Be the Change


Good Morning
Wow, this month just flew by.  
The nights are getting so much cooler and crisp as September approaches.  I had my acrylic paints out the other day, so decided to paint some leaves.  I love working with leaves as they are so simple to create with and can be found pretty much everywhere.
So here's what I did to create my card.

  • I began with a piece of heavy white cardstock, my acrylic paints, leaves from my tree in the backyard, a brayer and a great new to me sentiment stamp.
  • I laid the leaves with the back, vein side up towards me, onto a piece of newsprint.  
  • I put some yellow, orange and red acrylic paint onto my non-stick mat, being sure to keep the colours side by side but not touching.
  • Using my brayer, I rolled into the paint and then onto the leaves, covering them with the paint.  I took the leaf and pressed it onto my cardstock.  
  • After I printed all the leaves, I set it aside to dry completely.
  • I placed the dry piece into my Misti and stamped the sentiment with some Versafine Clair and clear heat embossed it.
  • I added some lines using my Festive Berries Distress Oxide inks and an old gift card.
  • Lastly, I splattered the panel using my black Posca paint pen.


Thanks so much for coming by and taking a look.

Adding my card to these challenges:
Crafty Creations- ANYTHING GOES
A Bit More Time To Craft- ANYTHING GOES
Try it on Tuesday- SPLASH AND SPLATTER


Supplies
Stamps- Words and Ideas (Impression Obsession)
Inks- Versafine Clair; acrylic paint; DOX
Paper- heavy white (Scribes Nook)
Accessories and Tools- Misti (My Sweet Petunia); old gift card; Speedball Brayer; 
leaves; Posca pen

Sunday 16 August 2020

Fun Ride


Hello and Welcome.
I figured by now you were getting tired of all the Christmas cards I've been posting, so I decided to switch it up and make a collage birthday card.
I love just pulling stamps out and putting them all together to see what I can come up with.  By keeping them in the same colour, I find it helps to make them all work together.

So here's what I did to create my card.
  • I began with a piece of heavy white cardstock.  I chose my main focal image first which I knew I wanted to be the boy on the bike and set that aside.
  • Using some Faded Jeans Distress Archival ink, I began to stamp and add different elements to the white card panel.  The far left is a Distress Dots wheel (super old one) from Stampin Up.  It's the kind you put on a handle, ink and then roll over your paper.  Haven't used it in years but found it again as I cleaned up.
  • I continued to add stamping to the panel using my Misti.
  • I stamped the boy on the bike over the inked background and clear heat embossed it to deepen the colour a bit and help it stand out. I stamped the sentiment the same way.
  • I mounted the finished panel onto a heavy white card base.


Thanks so much for coming by and taking a look.

Adding my card to these challenges:
Just Add Ink- JUST ADD 'T' (tricks)
Allsorts- SUMMER FUN
The Male Room- BIRTHDAY


Supplies
Stamps- Bike Boy (Flonz); Sketchy Chevron Border (Impression Obsession); 
Birthday (Stamping Bellas); Graffiti (Kaisercraft); Grunge Dots Wheel(SU)
Inks- Faded Jeans Distress Archival
Paper- heavy white (Scribes Nook)
Accessories and Tools- Misti (My Sweet Petunia); clear eb powder, heat tool

Saturday 15 August 2020

Multicolour Snowflake


Welcome
Simple Christmas card today that has a colourful, graphic look to it and was easy to create.
This card is similar to how I made this card a few weeks ago.

So onto my card details.
  • I began with a piece of heavy white cardstock, my Stencil Pat (it is a plastic tool with a flat edge), my Distress Oxide inks, and a small sponge dabber.
  • I laid the flat edge of my Pal and rubbed some ink in a line down my card panel. You could also use a ruler, a piece of heavy cardstock or anything that would give you a flat edge.  I repeated that process, then added some lines criss crossing the first ones going down.  The Distress Oxide ink colours I used were Peacock Feathers, Mustard Seed, Cracked Pistachio, Wilted Violet, Blueprint Sketch and Picked Raspberry.
  • When I was happy with the inking, I stamped the snowflake from Stampin Up off to the sided and clear heat embossed it over the inked background.
  • I stamped the sentiment from Penny Black with some Versamark ink, then heat embossed it with some white powder on a piece of black cardstock.
  • I wanted to give this piece a frame, so I die cut it using the In and Out Diagonal frame die from MFT.  
  • I splattered the panel with a white and black Posca pen then by tapping it with my metal ruler, I glued the panel behind the frame and pop dotted it over a heavy white card base.  
  • I added a clear gem to the center of my snowflake and pop dotted the sentiment as well.


Thanks so much for coming by and taking a look.

Adding my card to these challenges:
Cute Card Thursday- BRIGHT COLORS
Jingle Belles- CARDSTOCK CHRISTMAS
Krafty Chicks- CHRISTMAS

Supplies
Stamps- Seasons Greetings (PB); Snowflake (SU)
Inks- Distress Oxides; Versafine Clair Noir; Versamark
Paper- heavy white (Scribes Nook)
Accessories and Tools- Deco Foil Stencil Pal; Posca pens; sponge dabbers; pop dots;
white and clear eb powder; heat tool; clear gem, In and Out Diagonal die (MFT)

Thursday 13 August 2020

Holiday Greetings


Good Morning
Today, I am playing with some cling wrap and my Distress Oxide inks.  You can get some really great looking backgrounds easily using the stuff.

So here's what I did to create my card.
  • I began by inking up a piece of heavy white cardstock, starting at the bottom with the lightest colour and worked my way up.  I added some Tumbled Glass, Salty Ocean, Peacock Feathers, Faded Jeans and Blueprint Sketch.  I used a Ranger Blending tool to add the ink, blending the colours together.
  • Next, I took out a piece of plastic wrap, wrinkled it up, sprayed it with water and laid my inked panel onto the wrap.  (The DOX inks are reactive with water so it lifts the inks.)  
  • There are other ways to use this technique.  Try applying the ink directly to the plastic wrap, spray with water and put your cardstock onto that for a more intense colour lift.
  • I let the wrap sit on the panel for a bit, removed it and then dried with my heat tool.
  • When the panel was completely dry, I placed it into my Misti and stamped the trees from Impression Obsession.
  • I stamped the sentiment from Studio G and clear heat embossed it. then using my Posca white pen, I splattered the panel with some white to look like snow.  
  • I mounted the panel on a piece of white, then black, then onto a heavy white card base.  I think it has a nice peaceful feeling.

Thanks so much for coming by and taking a look.

Adding my card to these challenges:
CAS on Fridays- NATURE
Shopping Our Stash- KISS
ABC Christmas- 'P' PINE TREES


Supplies
Stamps- Season's Greetings (Studio G); Pine Trees (Impression Obsession)
Inks- Distress Oxides (listed above); Versafine Clair
Paper- heavy white (Scribes Nook)
Accessories and Tools- Cling Wrap; Ranger Inking Tool; Posca pen; Misti; clear eb powder; heat tool

Monday 10 August 2020

Frosty for Christmas


Welcome
Today's card is a frosty one which is too funny considering we have a heat warning.
Anyways, I am really pleased to be getting some holiday cards done. 

So here's what I did to create my card.
  • I began by making the background.  I applied a coat of Gesso over my heavy white cardstock and let that dry.  
  • When it was all dry, I added some Acrylic paint with my brayer and then some Distress inks to give a dark, frosty bkg.  
  • Before stamping the snowflakes, I cut the panel to card size, leaving me with a piece I could later use for the sentiment.
  • I placed the panel into my Misti and stamped the snowflakes from Tim Holtz.  They have a great distressed look to them.
  • I stamped the scripts from the Faded Text set in some of the open areas to add interest.
  • I splattered the panel with my white Posca Pen and set aside to dry.
  • Using the small piece I cut from the panel, I stamped the sentiment, also from the snowflake set, with some Versamark and then white heat embossed it.  
  • I backed the sentiment with a small piece of white, then pop dot mounted it over the frosty panel.
  • I added it all to a heavy white card base.


Thanks so much for coming by and taking a look.

Adding my card to these challenges:
We Love to Create- ANYTHING GOES
Corrosive Challenge- ANYTHING GOES
All Fun- ANYTHING GOES


Supplies
Stamps- Faded Text (TH); Weathered Winter (TH)
Inks- Versamark, DOX (TH); Archival; Acrylic paint (Dollar Store)
Paper- heavy white (Scribes Nook)
Accessories and Tools- Gesso; Misti (My Sweet Petunia); Brayer (Speedball);
Posca Pen; pop dots; white eb powder; heat tool; inking tool (Ranger)