Pages

Tuesday, 31 August 2021

Day-Tripping


Welcome
Meet today's card.
Simple painted piece pulled from my stash.
I had rolled off the excess green paint from my brayer while using my Gel Plate.  I like to save them all for future use and also I don't like to waste the paint on my brayer.
I love the sentiment with this card too since we have all missed being together and doing things.

So here's what I did to create my card.
  • Like I mentioned above, I pulled out this brayered painted background and placed it into my Misti.
  • Using some Vintage Photo Archival Distress ink, I inked up the Country Life stamp from Penny Black and pressed it onto the paper. * By stamping using the Misti, it gives you the chance to stamp more then once which is sometimes necessary when stamping over a painted bkg.*
  • I removed and cleaned the stamp, then positioned the sentiment from the Destination Sentiments set also from PB and inked and stamped it with the same colour.
  • I glued the finished panel onto a matching piece of brown cardstock, then onto a heavy white card base.

Thanks a lot for coming by and taking a look.

Adding my card to these challenges:
Simon Says Wed.- ANYTHING GOES
Shopping Our Stash- SUMMER LOVIN

Supplies
Stamps- Penny Black
Inks- Vintage Photo Archival Distress ink
Paper- heavy white- (Scribes Nook- Waterloo, Ont.); brown cs (Michaels)
Accessories and Tools- Misti (My Sweet Petunia); brayer; acrylic paint


Monday, 30 August 2021

Wrapped Yarn Resist Birch Trees


Hello and Welcome
It's my turn to host the TLC (Technique Lovers Challenge) over at Splitcoast Stampers.  
For my challenge, I have chosen to do a simple technique using some yarn, a clothespin and a cotton ball. 
 I did create 2 cards just so you could see the difference between using Acrylic Paint and Inks.

Above is Card #1 created using Acrylic Paints
Card #2 below is created using Distress Oxide inks.

Both cards are made using the same technique.

So here's what I did to create
Card #1
  • I began by cutting a piece of white cardstock that I wanted to use for my front panel.
  • I wrapped some scrap yarn around the panel from top to bottom, overlapping and randomly winding the yarn.  
  • Next, I used a clothespin and a cotton ball and dipped it into some acrylic paint that I had squeezed out onto my non-stick craft mat.
  • I sponged the paint over the yarn wrapped cardstock as you can see from the picture below.

  • I started at the top sponging on the paint, changed the cotton ball for the next colour and continued dabbing over the yarn until my whole panel was covered with paint.  Don't forget to change the cotton ball so you don't end up with a muddy background.
  • When I was happy with the paint coverage, I carefully removed the yarn and let the paint dry.
  • When the paint was dry, I used a Signa Fine Line marker to trace along the edges of the white area left behind by the yarn, defining the tree trunks.  I added some dashed lines for the bark details.
  • I splattered with my white Posca pen, then die cut the sentiment from the panel.
  • I glued the painted panel onto a heavy white card base, then pop dot mounted the sentiment back into place, matching it up.


Card #2

  • Again, I used the same technique as mentioned above, but this time I used my Distress Oxide inks to see how it would work and to give a different kind of look to the panel. This background doesn't have as much texture that the paint gives, but I was still able to achieve a nice look.
  • I rubbed my Distress Oxide ink pads onto my non-stick craft mat, sprayed with water and then dipped my cotton ball into the wet ink to dab over the panel.
Here is what the diluted DOX inks looked like dabbed onto the cardstock.
  • I die cut the sentiment from a piece of white cardstock that I covered with some clear packing tape.  (I have mentioned this technique before in previous blog posts.  I like to do this as it gives the sentiment a nice shine and adds to the stability.
  • I splattered with my black Posca pen, then glued the inked panel onto a white card base.
  • I glued the sentiment on top and then added the black gems.


Here is the comparison of the two different backgrounds side by side.

This is where I first found this technique if you want to check it out:

Thanks so much for coming by and taking a look.
I hope you get a chance to try it out.

Supplies
Stamps- none
Inks- DOX (shown above)
Paper- heavy white cardstock (Scribes Nook- Waterloo, Ont.)
Accessories and Tools- cotton balls, string, clothespin, Basics Acrylic Paint, Posca pens, 
Awesome die (Neat and Tangled);  Live, Love, Laugh die (Frantic Stamper); pop dots; 
black gems; clear packing tape

Sunday, 29 August 2021

Flowers for a Friend


Welcome
Meet today's card.
So glad to be using some of the Gel Plate prints I made....you know the ones that didn't quite work out the way you had planned.  
They work so well for die-cutting.

So here's what I did to create my card.
  • I began by cutting the front panel from some white cardstock and embossed it using a folder from Sizzix.
  • I glued that onto an A2 card base and set it aside.
  • Next, using one of my 'not so good' Gel Plate prints, I die cut the flowers using Brushstrokes 1 & 2 die from Tim Holtz.  I stacked them together in order and glued them all down over the white card base.
  • Using some matching cardstock, I cut out the leaves with dies from the same sets and glued them behind the flowers.
  • I stamped the sentiment onto another small piece of cardstock with some black Versafine and pop dotted it over the embossed background near the top.

Thanks for taking a look.

Supplies
Stamps- Everyday Sentiments (YNS)
Inks- Versafine Clair black
Paper- heavy white (Scribes Nook- Waterloo, Ont.)
Accessories and Tools- Brushstrokes 1&2 (TH); Spellbinder Platinum machine; 

Saturday, 28 August 2021

Monochromatic Christmas


Welcome
Another holiday card coming your way inspired by one of the challenges over at Splitcoast Stampers.
The challenge was to use only ONE piece of cardstock, any colour.
I went for this navy piece I had in my stash.

So here's what I did to create my card.
  • Like I mentioned above, I got out one piece of navy cardstock.  I cut and scored one piece to make a A2 size card.  
  • Using the other  piece of that cardstock, I embossed it with the Lumber 3D Embossing folder (Tim Holtz). I rubbed over it with my Versamark ink pad and added some clear embossing to add interest.
  • Next, I took the embossed panel and die-cut it using the Nordic Winter die and set all the pieces aside.
  • I glued the die-cut/embossed piece onto the card base I had made from the navy cardstock and pop dotted a few of the elements I had die cut from the panel back in place.  It gave a lot more interest and added dimension to my card front.
  • I stamped the sentiment on a small leftover piece of the navy cardstock with Versamark and then white heat embossed it.  I pop dotted that over the background.  
  • This turned out to be a fun challenge....so fun to see how we can challenge ourselves to try something different.


Thanks so much for coming by and taking a look.

Adding my card to these challenges:
Simon Says Wed.- ANYTHING GOES
Just Add Ink- STARTS WITH 'N'  (Nordic die)

Supplies
Stamps- Warm Wishes (TE)
Inks- Versamark
Paper- navy cardstock 
Accessories and Tools- Nordic Winter die (TH); Lumber eb folder (TH); Lawn Fawn clear eb powder;
pop dots; heat tool

Friday, 27 August 2021

Missing You


Hello and Welcome
Meet today's simple card.  
It's so fun to try something new...again, another challenge over at Splitcoast Stampers.
As so many of us are missing our friends and family, I thought this card would be great to send out to a special friend.

So here's what I did to create my card.
  • I began by looking through my stash of backgrounds.  This one was done with a brayer and some Distress Ink as I rolled off ink from my Gel Plate....I love the little hint of the purple down in the corner.
  • I got out a large size paper clip and fashioned it into a heart shape.  I placed that onto a piece of white cardstock and ran it through my die-cutting machine. (each machine is different so you will have to play around to find out what sandwiches work best in your machine)  I was left with this impression.
  • Next, I rubbed some Blueprint Sketch Distress Oxide directly onto my non-stick craft mat, sprayed with water and then using my brayer, I picked the ink up and rolled it over the embossed paper clip heart.  
  • I placed the main panel into my Misti and stamped the sentiment with some Versamark ink, then white heat embossed it.  
  • I die-cut a circle from some white cardstock, then die cut the heart into a smaller circle and glued them both together.
  • I splattered with my white Posca pen before pop dotting it over the main panel.
  • I glued it onto a heavy white card base.

Thanks so much for coming by and taking a look.

Supplies
Stamps- Everyday Sentiments (YNS)
Inks- Distress Oxides, Versamark
Paper- heavy white (Scribes Nook- Waterloo, Ont.)
Accessories and Tools- paper clip; Spellbinders Platinum; brayer; Lawn Fawn white eb powder;
pop dots; white Posca pen

Thursday, 26 August 2021

Joy Christmas


Hello
I hope you are doing well and enjoying some crafting time.
Meet today's card.
Super simple to create using a very easy technique with Distress Oxide inks. 

So here's what I did to create my card.
  • I began by cutting my card front panel with some heavy white cardstock to fit on an A2 size card base.
  • I rubbed some Blueprint Sketch Distress Oxide ink onto my non-stick craft mat, sprayed with water and pressed the cardstock into the wet ink.  I repeated that process, drying in between colour applications using some Peacock Feathers and then some Wilted Violet.  
  • When the ink was all dry, I rubbed the piece with my anti-static bag and then stamped the snowflake with some Versamark ink and white heat embossed it.  This snowflake stamp is one of my favs.
  • Next, I covered a piece of white cardstock with some clear packing tape and die cut the JOY letters.  I have mentioned this technique before as it gives the die-cut sentiments some extra stability and gives a great shine without having to heat emboss.  
  • I splattered with my white and black Posca pen (of course!)
  • I glued the inked piece onto some white cardstock, then onto a heavy white card base.  
  • I glued the JOY sentiment to the bottom and then added a blue gem to the snowflake center.


Thanks so very much for coming by and taking a look.

ps.  I am way behind at visiting your blogs, but I will try my best to get there next week.  I'm back at work and my time is so limited.  I apologize for being so behind.

Supplies
Stamps- Winter Wishes Snowflake (Colorado Craft)
Inks- Versamark, Distress Oxides (mentioned above)
Paper- heavy white (Scribes Nook- Waterloo, Ont.)
Accessories and Tools- JOY die (Penny Black); clear packing tape; 
Lawn Fawn white embossing powder; non-stick craft mat; blue gem; heat tool; Anti-static bag

Wednesday, 25 August 2021

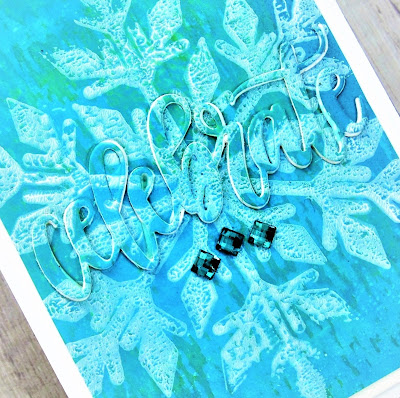
Elegant Snowflake


Welcome
I hope you are having a good week.
I was on holidays so I had time to create which has been so great.
I've been so inspired by the DTGD Challenges over at Splitcoast Stampers.  They host this huge event every year with so many challenges and new techniques to try.  
It's been so fun to play along and I'm especially happy to be adding to my stash of cards for the holidays.

So here's what I did to create my card.
  • I wanted to make a snowflake card using my Gel Plate so I got out all my supplies.  Acrylic paint, brayer and my Gel Plate.  I brayered some blues and greens onto my plate and then pressed the Big Snowflake mask from A Colorful Life Designs onto the plate.  It is one of my favs! (I like to use the handle end of a paintbrush to gently press in all areas of the mask so it gets good contact.)
  • I carefully removed the mask and set it in the sink to soak. TIP: I soak mine in Oxiclean to get all the reside and paint off.  I let the paint dry for a bit on the plate, then I brayered on some white acrylic paint, covering the plate, then rubbed my cardstock over that to lift the print. I let is all dry completely before moving onto the next steps.  
  • I die-cut the 'Celebrate' sentiment from the panel, set that aside and die-cut it 3 more times from some white cardstock so I could stack them all together.  
  • Next, I glued the snowflake panel onto a piece of cardstock, leaving the die-cut portion out.
  • I glued the white die-cuts together, stacking them together as best I could, then glued the one I had cut from the snowflake panel on the very top of the stack.  
  • I glued the stacked sentiment back into place over the snowflake.
  • I glued it all onto a heavy white card base, then added the 3 little square gems.


Here is the mask I used for my card:

Discount Code for A Colorful Life Designs

Thanks so much for coming by and taking a look.

Adding my card to these challenges:
Simon Says Wed.- ANYTHING GOES


Supplies
Stamps- none
Inks- none
Paper- heavy white (Scribes Nook-Waterloo, Ont.)
Accessories and Tools- Gel Plate, Brayer, Basics Acrylic paint, Big Snowflake mask (ACLD); 
Celebrate die- MFT, square gems

Tuesday, 24 August 2021

Tropical Leaves


Welcome
Meet today's card.
Just a fun one I made while playing with my Gel Plate again.
Instead of using paint this time on my plate, I used my Distress Oxide inks.

So here's what I did to create my card.
  • I began by getting out my Gel plate.  I recently bought a 8x10" plate for a class I was taking.  I have a smaller one but I have to say, I love the bigger size that gives me more working room.
  • I got out my 2 favourite colours of DOX inks....Blueprint Sketch and Peacock Feathers and pressed the pads directly onto my Gel Plate.  I like to keep them slightly apart when I press them on the plate so as not to contaminate the pads with the other colour.  Using a brayer, I smoothed them out and blended them together.
  • Next, I pressed on the beautiful Tropical Leaves stencil from A Colorful Life Designs over the ink on the plate.  I used the end of a paint brush to push the stencil gently into the plate so it would make good contact.  
  • I carefully lifted the stencil off and rubbed my cardstock over the inked background and my print was born.
  • When the print was dry, I splattered using my white Posca pen, then I die-cut multiple circles from the print and some white cardstock using HA Infinity circle dies. (no affiliation- For anyone needing some basic circle dies I would highly recommend these dies)
  • I glued the panel onto a white card base, then fitted and pop dotted the circles back into place, matching them up with the inked background.
  • Using a small piece of a leftover, I die-cut the leaf and glued that over the popped up circles.
  • I stamped the sentiment in my Misti and glued that over the leaf.


Here is the stencil I used:

Discount Code for A Colorful Life Designs
Thanks so much for coming by and taking a look.

Supplies
Stamps- Everyday Sentiments (YNS)
Inks- Versafine Clair; Distress Oxides
Paper- heavy white (Scribes Nook- Waterloo, Ont)
Accessories and Tools- Tropical Leaves stencil (ACLD); Gel Plate, brayer, Circle dies (Hero Arts); 
pop dots; leaf die (Dee's Distinctively Dies - Trio Tropical Leaves)