Pages

Tuesday, 31 May 2022

Life Changing


Welcome
Today's card was a fun one to create using the Corner Rays stencil and the Cloud Edger from A Colorful Life Designs.  I thought they worked well together.

So here's what I did to create my card.
  • I cut a piece of white cardstock and laid the Corner Rays stencil over that. Then, I inked it up with some Picked Raspberry Distress Oxide ink in the center, next some Carved Pumpkin and then some Mustard Seed, working my way out on each side of the stencil.
  • Next, I shifted the stencil slightly and inked again using the same colours as I mentioned above.
  • After I was happy with the inking, I got out my Cloud Edger stencil and inked up the top of my card with some Salty Ocean Distress Oxide ink.  * The Cloud Edger is used by inking along the edge, turning it and moving it down to give the look of clouds. This stencil/ mask combo are a really great investment and are so easy to create wonderful looking skies or backgrounds for scenes.*
  • I placed the inked piece into my Misti and stamped the sentiment with some Versafine Clair ink.
  • I glued the panel onto some black cardstock, then onto a heavy white card base.


Here are the stencils I used:


Discount Code for A Colorful Life Designs
(affiliate with not extra cost to you)

Thanks so much for coming by and taking a look.

Adding my card to these challenges:
Simon Says Wed.- ANYTHING GOES
Use Your Stuff- ANYTHING GOES
Addicted to Stamps and More- DIE CUT AND/ OR STENCILS
Simon Says Monday- IT'S UP IN THE AIR

Supplies
Stamp- Footprints (Inkylicious)
Inks- DOX, Versafine Clair
Paper- Scribes Nook- Waterloo, Ont.
Accessories and Tools- Cloud Edger, Corner Rays stencils (A Colorful Life Designs);
Misti (My Sweet Petunia); TE Blending Brushes; Make Art Stay-ation (Ranger)

Sunday, 29 May 2022

Stacked Die Cuts or Faux Embossing

Hello and Welcome

It's my turn to host the TLC Challenge over at Splitcoast Stampers.
Every week there is a new and fun technique to try.  
I chose a simple one that everyone could play along with as most would likely have all the needed supplies to do the challenge.
So I'm calling my challenge:

So here's what I did to create my card.
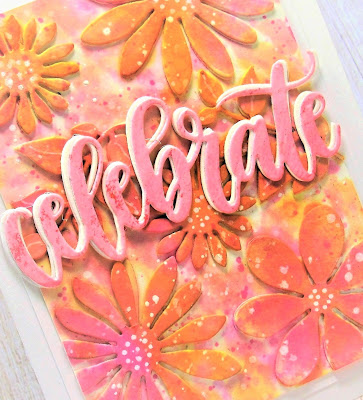
  • I began by looking through my dies and found these flowers and leaves.  Chose some fairly simple dies for this project.
  • Next, I die cut each flower three times, stacked and glued them together.
  • I repeated that process until I had 5 stacked flowers for my card front.  I did the same with the leaves.
  • I positioned the flowers and the leaves on my card base that was 3 3/4 x 5" and when I was happy with the spacing, I glued them all down into place. NOTE: some of the flowers hung over my card front panel and had to be trimmed a bit.
  • To add some colour to the panel, I pressed some Carved Pumpkin, Mustard Seed and some Picked Raspberry Distress Oxide ink onto a piece of acetate and sprayed with water to dilute it.  I press the panel directly into the wet ink to add the colour.  There were still a lot of white areas, so I added some more of the leftover ink using a wet paintbrush.
  • While the panel dried, I die cut the 'Celebrate' sentiment 3 times, glued them together and added colour in the same way as I did on the panel.  It was a bit lost when I held it over the panel, so I glued a white die cut offset behind it to make it be more visible.
  • When all was dry, I splattered the panel with my white Posca pen and added dots to the flower centers.
  • I glued the panel onto a heavy white card base, then glued the sentiment over that.


Thanks so much for coming by and taking a look.

Adding my card to these challenges:
Simon Says Wed.- ANYTHING GOES
Little Red Wagon- SENTIMENT AS MAIN FOCUS
Alphabet Challenge- 'D' FOR DIE CUTS


Supplies
Stamps- none
Inks- DOX
Paper- heavy white (Scribes Nook- Waterloo, Ont.)
Accessories and Tools- die cuts (unknown, gifted to me); die cutting machine,
white Posca pen; Nuvo glue; Celebrate die (MFT) 

Saturday, 28 May 2022

Collaged Butterfly


Welcome
Meet today's card.
I am loving this new Drippy Butterfly stencil from A Colorful Life Designs.  
This one comes with a stencil and a mask and I used both for my card.

So here's what I did to create my card.
  • I began by cutting a piece of white cardstock 3 3/4" x 5" for my card front.  I laid the Drippy Butterfly stencil over the paper, and inked it up with some  Broken China Distress Oxide inks.  
  • I removed the stencil and placed the mask over the butterfly and lightly inked around the outside edges of my card with some Peacock Feathers DOX ink.
  • Next, leaving the mask in place, I randomly stamped the Friends Script and the Texture around the outer edges with some Blueprint Sketch DOX ink.
  • I place the panel into my Misti and stamped the sentiment with some black ink.
  • I added some white splatters using my white Posca pen.
  • Lastly, I glued it onto a heavy white card base and added 3 black gems under the sentiment.

Here is the stencil I used:

Discount Code for A Colorful Life Designs
(affiliate with not extra cost to you)

Thanks so much for coming by and taking a look.

Adding my card to these challenges:
Simon Says Wed.- ANYTHING GOES
Little Red Wagon- SENTIMENT AS MAIN FOCUS
Try it on Tuesday- BUTTERFLIES
Double D - MONOCHROMATIC


Supplies
Stamps- Texture (Carabelle); Footprints (Inkylicious); Friends Bkg (Hero Arts)
Inks- DOX ink; Versafine Clair
Paper- heavy white (Scribes Nook- Waterloo, Ont.)
Accessories and Tools- Drippy Butterfly stencil (ACLD); Misti (My Sweet Petunia);
black gems, Posca pen

Thursday, 26 May 2022

Here for You


Hello and Welcome
Today's card is a very simple one. 
I think sympathy cards should be that way, simplicity at a time of grief. 

So here's what I did to create my card.
  • I began by going out into the garden and I found this leaf from one of my plants that I thought would make a great print and it did.  It has a lot of texture which adds interest.
  • Next, I got out my Gel Plate and pressed some Wilted Violet and Shaded Lilac Distress Oxide inks directly onto the plate.  I sprayed with a bit of water to bring out the chalkiness of the inks, then brayered the colours together covering the plate.
  • I pressed the leaf onto my plate and used the rounded end of a paint brush handle to help the leaf make good contact with the plate.  By doing this step, it helps to transfer more details to your final print.
  • I carefully removed the leaves with a pair of tweezers, then rubbed a piece of white cardstock onto the plate to get the print.
  • I splattered with my white Posca pen to add interest.
  • I rubbed the print with my anti-static powder tool then placed the piece into my Misti to stamp the sentiment.
  • I glued it onto an A2 white card base.

Thanks so much for coming by and taking a look.

Adding my card to these challenges:
Simon Says Wed.- ANYTHING GOES
Inspiration Station- INSPIRED BY A FLOWER SHOP


Supplies
Stamps- Memory (Verses)
Inks- DOX, Versafine Clair
Paper- heavy white (Scribes Nook- Waterloo, Ont.)
Accessories and Tools- Gel Plate; Speedball Brayer; Misti (My Sweet Petunia);
white Posca pen; leaf from garden, anti static powder tool

Sunday, 22 May 2022

Stencil Layering


Welcome
I love trying to use the things I have in my craft stash in a different way.  
For today's card, I layered 2 newly released stencils from A Colorful Life Designs together to give this beautiful Drippy Butterfly a brand new look.  The Summer Flowers stencil was just perfect layering to get the look I wanted.

So here' what I did to create my card.
  • I cut a piece of white cardstock and positioned the Drippy Butterfly stencil over my cardstock on my Waffle Flower Stencil Mat.  I then placed the Summer Flowers stencil right on the top of the Butterfly.
  • Using some Peacock Feathers Distress Oxide ink, I inked up just the center of the flowers using my TE Blending Brushes.  I moved outwards and inked the flowers with some Blueprint Sketch Distress Oxide inks and then finally added some Cracked Pistachio DOX to the rest of the stencil. 
  • I removed the flowers stencil and added just a bit more Cracked Pistachio ink to the open areas left behind on the butterfly.
  • I splattered with my white Posca pen and set aside to dry.
  • I stamped the TE sentiment onto a piece of black cardstock with some Versamark ink and white heat embossed it.  
  • I used the die that goes with that sentiment set to cut it out.
  • I glued the butterfly onto a piece of navy cardstock, then onto a heavy white card base.
  • I pop dotted the sentiment over the center of the butterfly.


Here are the stencils I used:


Discount Code for A Colorful Life Designs
(affiliate with not extra cost to you)

Thanks so much for coming by and taking a look.

Adding my card to these challenges:
Little Red Wagon- WITH A LITTLE HELP FROM MY FRIENDS
CASology- BOTANICAL

Supplies
Stamps- TE Simple Strips
Inks- DOX; Versamark
Paper- heavy white (Scribes Nook- Waterloo, Ont.)
Accessories and Tools- stencils (ACLD); TE Blending Brushes; TE Simple Strips die;
Posca pen; foam tape; Waffle Flower Blending Brushes