Pages

Wednesday 16 October 2024

Snowy Holiday Greetings


Welcome
Today's card has a very frosty look to it featuring the newly released stencil from A Colorful Life Designs called:

So, here's what I did to create my card.
  • I began by embossing a piece of white cardstock using the Burlap EB folder.
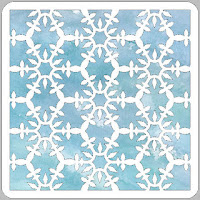
  • I placed the Flake Explosion stencil over the embossed background and inked it up with some Tumbled Glass Distress Oxide ink.  I added some Uncharted Mariner DOX ink just to the center of the snowflakes to give them more interest.
  • I removed the stencil and used the Hemstitch die to cut out the middle area creating a frame.
  • I stamped the sentiment with more of the Uncharted Mariner DOX ink and die cut it out.
  • I glued the stenciled card front onto a piece of navy cardstock and then onto an A2 sized white card base.
  • I used some foam tape to add the sentiment and finally, I added 3 silver gems under the sentiment.

Here is the stencil I used:

Discount Code for A Colorful Life Designs
(Affiliate with no extra cost to you) 

Thanks so much for coming by and taking a look.

Adding my card to these challenges:
Simon Says Wed.- ADD TEXTURE
Everybody Art- SWEATER WEATHER
The Holly and Ivy Christmas- ANYTHING CHRISTMAS 

Supplies
Stamp- Holiday Sentiments (Photoplay)
Inks- DOX
Paper- heavy white (Scribes Nook- Waterloo, Ont.)
Accessories and Tool- stencil (A Colorful Life Designs); Hemstitch die (Spellbinders);
Burlap Embossing folder (Honeybee); TE Blending Brushes; foam tape; silver gems

Sunday 13 October 2024

Grinch Tag

Good Morning
Mr. Grinch is back!!
These fun new stencils from A Colorful Life Designs are just some from the 'Grinch' series this month.
This one is rightly called:
and the sentiment is from the stencil set called:

So, here's what I did to create my tag.
  • I placed the Grinch Season stencil over a piece of white cardstock and inked it up with some Black Soot Distress Oxide ink.
  • Next, I die cut the face using a circle die and then inked the whole face with some Cracked Pistachio and some Rustic Wilderness DOX ink and splattered with my black Posca pen.
  • I used a yellow Paint marker to add a dot to the eyes to make him look more grinchy.
  • I inked up the sentiment with the Stink Stank Stunk stencil and some Rustic Wilderness ink then cut it out.
  • I embossed a piece of red cardstock with the Burlap EB folder, then cut it with the star die.  I cut a piece of printed cardstock with a larger star die and glued the 2 together.
  • I used some foam tape to add the Grinch's face over the stars, then  I added the sentiment using some foam tape as well.
  • Finally, I punched a hole in the top and added some red and white twine.

Here are the stencils I used:


Discount Code for A Colorful Life Designs
(Affiliate with no extra cost to you) 

Thanks so much for coming by and taking a look.

Adding my tag to these challenges:
Simon Says Wed.- ADD SOME TEXTURE
Allsorts- ANYTHING GOES or MAGICAL, MYTHS and/or LEGEND
Krafty Chicks- CHRISTMAS

Supplies
Stamps- none
Inks- DOX
Paper- Scribes Nook- Waterloo, Ont.
Accessories and Tools- stencils (A Colorful Life Designs); inking brushes (Amazon); 
Infinity Circle die (HA); Star die (Scrapbook.com); Burlap EB folder (Honeybee),
paint pen; black Posca pen

Saturday 12 October 2024

Layered Holly Berry Wreath

Good Morning
Meet the new 
from A Colorful Life Designs.

So, here's what I did to create my card
  • I placed the wreath part of the Layered Holly Berry Wreath stencil over a piece of white cardstock and inked it up with some Cracked Pistachio Distress Oxide ink.
  • I wanted to add more variation to the colour so I also added some Rustic Wilderness, Lucky Clover and a hint of Uncharted Mariner DOX ink in random places as well.
  • I splattered the wreath with my white Posca pen to add a snowy effect.
  • I lifted the stencil off, cleaned it and then repositioned the top part of the stencil (the berries) over the wreath and inked with some Lumberjack Plaid DOX ink. 
  • To give the berries more texture and shine, I covered them with some Glossy Accents then set aside to dry.
  • While that dried, I embossed a piece of dark red cardstock with the burlap EB folder and I cut the sentiment from the same red cardstock and glued it onto the die cut white shadow.
  • I glued the red embossed panel onto a piece of white cardstock, then a piece of dark green, then onto an A2 sized card base.
  • After I fussy cut out the wreath, I added it over the embossed panel with some foam tape to pop it up.
  • I used some more foam tape to pop the sentiment under the wreath.

Here is the stencil I used:

Discount Code for A Colorful Life Designs
(Affiliate with no extra cost to you) 

Thanks so much for coming by and taking a look.

Adding my card to these challenges:
Simon Says Wed.- ADD SOME TEXTURE
Krafty Chicks- CHRISTMAS

Supplies
Stamps- none
Inks- Distress Oxides
Paper- Scribes Nook- Waterloo, Ont.
Accessories and Tools- stencil- A Colorful Life Designs; TE Blending Brushes;
Glossy Accents (Ranger); Happy Holidays die (Waffle Flower);
Burlap EB folder (Honey Bee); white Posca pen

Sunday 6 October 2024

Feeling Grinchy

Welcome
Here he is....he's back for the holidays.
Meet the wonderful newly released stencil from A Colorful Life Designs called:
This stencil is just one for this Grinchy release, so if you love the Grinch, he's perfect for creating some fun cards for the holidays.

So, here's what I did to create my card.
  • I began with a piece of white cardstock to use for the Grinch's face.  I embossed it with a Burlap EB folder and then placed the Extra Grinchy stencil over the embossing and inked it up with some Black Soot Distress Oxide ink.
  • I die cut the face with a circle die and then inked it with some Cracked Pistachio and some Rustic Wilderness DOX ink. 
  • Using a yellow ink marker, I added the yellow to the Grinch's eyes and set aside to dry.
  • Next, I inked up the sentiment on a piece of red cardstock with some Versamark ink and white heat embossed it.  
  • I cut out the sentiment and splattered it with my white Posca pen but dragged my finger over the splatters to spread them and add to the 'grinchy' look.
  • I die cut the card front panel with some red cardstock.  I glued that onto a piece of green cardstock and glued a few of the die cut pieces back into place.  I glued that onto an A2 sized white card base.
  • I used some foam tape to pop the face and the sentiment over the die cut panel.

Here is the stencil I used:

Discount Code for A Colorful Life Designs
(Affiliate with no extra cost to you) 

Thanks so much for coming by and taking a look.

Adding my card to these challenges:
Simon Says Monday- CHRISTMAS/WINTER
Cut It Up- INSPIRED BY A SONG
(You're a Mean One Mr. Grinch)
Send A Smile 4 Kids- HOLIDAY/CELEBRATION CARDS 4 KIDS
ABC Christmas- S-STENCIL/T- TRADITIONAL COLORS

Supplies
Stamps- none
Inks- Versamark; DOX
Paper- heavy white (Scribes Nook- Waterloo, Ont.)
Accessories and Tools- stencil (A Colorful Life Designs); Shapes Die (Amazon);
yellow ink marker; Burlap EB folder (Honeybee); white Posca pen

Saturday 5 October 2024

Jingle All the Way


Good Morning
Today's card features the newly released stencil from  A Colorful Life Designs called;
I must say that it did make for a very festive and simple card.

So, here's what I did to create my card.
  • I placed a piece of white cardstock onto my Make Art Station and positioned the Festoons stencil over that. I inked it up with some Lumberjack Plaid Distress Oxide ink.
  • I wiped the stencil off, moved it over and inked with some Fossilized Amber DOX ink. 
  • I repeated that again and inked one more time with some Rustic Wilderness DOX ink, covering my white card front panel.
  • I die cut the sentiment letters in the same colours as the stenciled panel and glued them onto the sentiment shadow that I cut in some white cardstock.
  • I glued my stenciled card front panel onto a piece of red, then green cardstock and then onto a white A2 sized card base.
  • I used some foam tape to pop the sentiment over the background.
  • I die cut 2 red starbursts and added them around the sentiment with 2 shiny gems in the centers.

Here is the stencil I used:

Discount Code for A Colorful Life Designs
(Affiliate with no extra cost to you) 

Thanks so much for coming by and taking a look.

Adding my card to these challenges:
Simon Says Monday- CHRISTMAS/WINTER
Crafty Catz- ANYTHING GOES/STENCIL
ABC Christmas- S - STENCIL/ T- TRADITIONAL COLORS
Cut it Up- INSPIRED BY A SONG
(Deck the Halls)

Supplies
Stamps- none
Inks- DOX
Paper- Scribes Nook (Waterloo, Ont.)
Accessories and Tools- stencil and gems (A Colorful Life Designs); Make Art Station (Ranger);
Jingle Bells die (A Pocketful of Happiness); Big Tidings dies (TH)

Wednesday 2 October 2024

Snowy Christmas Greetings

Welcome
How can it be October already??
Well, a new month means a whole new lineup of great stencils from A Colorful Life Designs.
There are so many great ones this month too, including lots of the 'Grinch' so stay tuned for that!!
So meet the stencil I used today called:

So, here's what I did to create my card.
  • I began by creating the background first.  I got out my Gel Plate and pressed my Salty Ocean Distress Oxide ink pad directly onto my plate.  After I brayered it smooth, I pressed the Simple Christmas Trees stencil onto the plate and rubbed my cardstock over it to get the impression.
  • After I let the background dry, I placed it into my Misti and stamped the large snowflake over the middle of the panel with some Uncharted Mariner DOX ink.
  • I splattered the whole panel with my white Posca pen and set aside to dry.
  • Next, I die cut the shadow from the Snowy Greetings die right from the middle of my card front panel and glued the sentiment die that I cut with white cardstock onto it.
  • I glue the finished panel onto a piece of navy cardstock, then onto an A2 sized white card base.
  • I used some foam tape to pop the sentiment back into place, matching up the pattern.
  • Finally, I added some silver gems around the sentiment to add some sparkle.

Here is the stencil I used:

Discount Code for A Colorful Life Designs
(Affiliate with no extra cost to you) 

Thanks so much for coming by and taking a look.

Adding my card to these challenges:
Simon Says Wed.- ANYTHING GOES
Simon Says Mon.- CHRISTMAS/WINTER
Make My Monday- CREATE YOUR OWN BKG

Supplies
Stamps- Let it Snow (Visible Image)
Inks- DOX
Paper- heavy white (Scribes Nook- Waterloo, Ont.)
Accessories and Tools- stencil (A Colorful Life Designs); Gel Plate; Speedball Brayer;
Snowy Greetings die (SSS); white Posca pen; Misti (My Sweet Petunia); silver gems