
Good Morning.
Today, I am hosting the Technique Lovers Challenge at
I am calling this Challenge 'Swipe Your Credit Card'.
After making this card last week using the Distress Oxide inks and a credit card, I though it would make for a fun mini-tutorial and a challenge. It is pretty simple to do and the nice thing is that you most likely have all the supplies already on hand.
I have 2 cards I made using this technique.
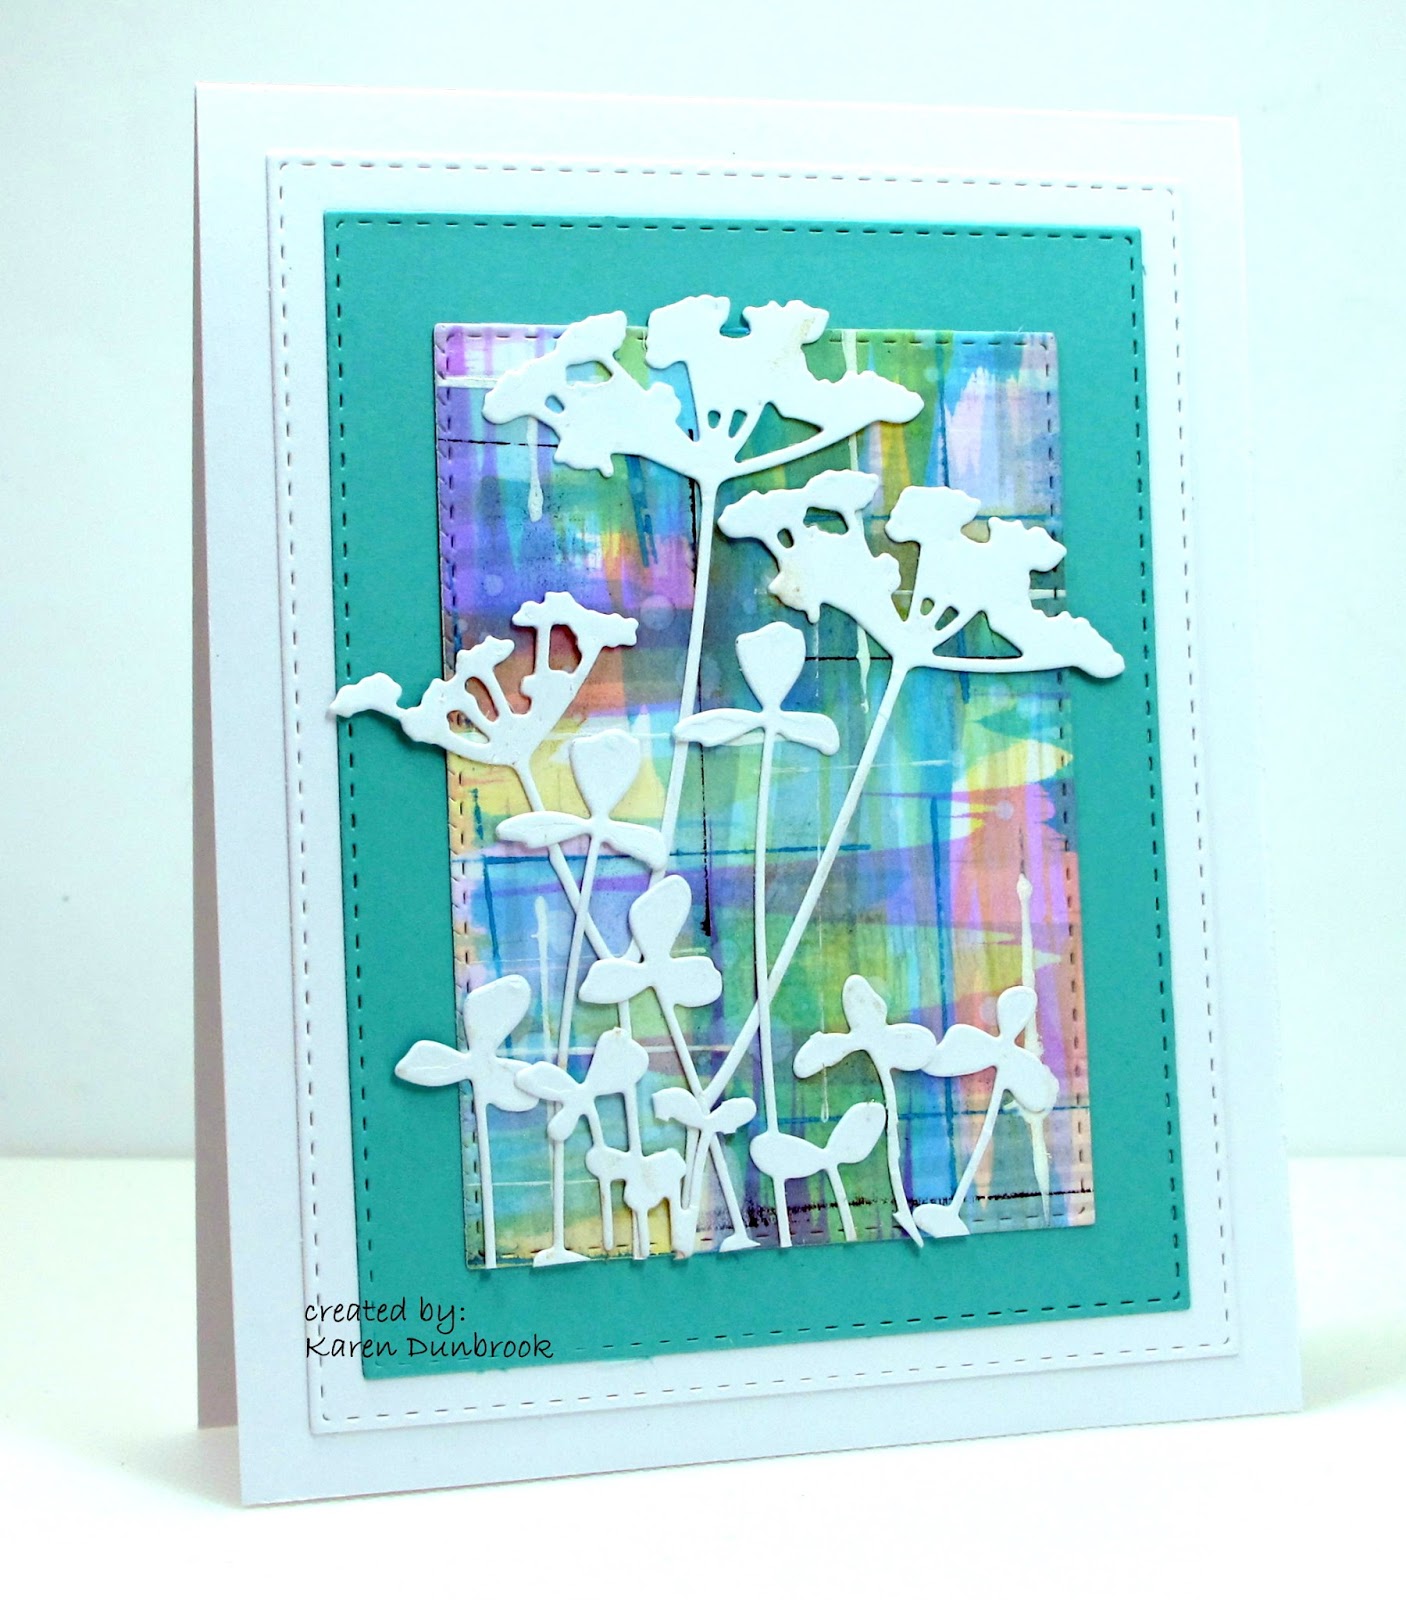
This first one was done using Distress Oxides inks in four different colours.
Just a hint, I used a heavy weight cardstock instead of watercolour paper so the ink would sit on top of the paper and not soak in.
I rubbed the ink directly onto my non-stick craft sheet, sprayed with water and dipped just the edge of my credit card into the ink and then dragged it across my paper.
I touched the edges of my credit card onto my black ink pad to create the black lines on my card and some white acrylic paint for the others.
I added the Tim Holtz die cut flowers some flowers from Memory Box across the bottom and used a stitched frame die on the edges.

So now onto my second card.
For those of you that have not ventured into the world of Oxides, I wanted to give this technique a try using my regular Distress inks. I figured most of you had at least some of these inks on hand or others that were water-based.
I will say that the Oxides do layer better then the regular Distress inks.
I will say that the Oxides do layer better then the regular Distress inks.

I did exactly the same technique as above but this time, I stamped on my card front instead of using the die-cuts. By using the Misti, it was easy to get good coverage when I repeat stamped a few times.
I added some white acrylic paint splatters to this one too and stamped a sentiment as well.

Adding my cards to these challenges:
City Crafter- SUNSHINE
(card #2)
Time Out- INSPIRATION QUOTE
Love to Create- MIXED MEDIA
City Crafter- SUNSHINE
(card #2)
Time Out- INSPIRATION QUOTE
Love to Create- MIXED MEDIA
I hope you will check out my mini tutorial and give it a try.
Thanks again for coming by and taking a look.
Supplies
Supplies
Card #1
Stamps- none
Ink- Broken China, Wilted Violet, Peeled Paint, Iced Spruce Distress Oxides
Paper- heavy weight (bulk from local store)
Accessories and Tools- Cuttlebug, Dies- Wildflowers (TH), Meadow Clover (Poppystamps),
Stitched Frame (Memory Box), credit card, wh acrylic paint
Card #2
Stamps- Clover Silhouette (Magenta), Wildflowers (TH), Live..Laugh..Love (Rubbernecker)
Ink- Ripe Persimmon, Carved Pumpkin, Fired Brick, Fossilized Amber Distress (TH);
Tuxedo Black Memento
Paper- heavy weight (bulk from local store)
Accessories and Tools- MISTI, wh acrylic paint, credit card, paintbrush
Beautiful cards. And the technique looks great. Thanks for the tutorial. Will definitely try this.
ReplyDeleteKaren beautiful backgrounds and cards
ReplyDeleteGr Karin
Fabulous and I only used your technique yesterday from your other post. Hope to post it in next few days when DT schedules are lighter. I used just the DI in the warm colours but love what you have done in the first card. Next one will be with my oxides...x [aNNie]
ReplyDeleteBoth of these are beautiful Karen! I can't wait to try this technique, I love it!
ReplyDeletewaue both are great you did it again swiped Your Credit Card, good thing its on paper and not the bank. love this tec. think i will try it on some of my cards ;O))
ReplyDeleteyou are great inspiration,also i think i will get some oxides and try this ;O))
I saw your first card and just had to give it a try. Love the results! I didn't have any white acrylic paint so I used gesso and it worked great!
ReplyDeletehow fun Karen! Love your plaid creating!
ReplyDeleteHad to laugh! I expected your blog post to be an enabling one where I would be headed to a site where I would indeed be swiping my credit card! In a way, that is happening though. I have not yet gotten any distress oxide inks and I have been feeling the "need". After seeing your cards, well, needless to say, I gotta get some! Love that first card in particular. I have not tried that technique and I am eager to give it a go. Thanks.
ReplyDeleteBeautiful backgrounds and proof that the credit cards are great tools in more ways then one. I know I use one for my art work often too. I don't have the distress oxides so might have to use the credit card in that way to get some soon too.
ReplyDeleteBoth are beautiful colour combinations! And interesting to see the difference between the Oxides and regular Distress inks. I'm looking forward to trying the technique when I get home!!
ReplyDeleteAmazing cards. Love the colours you've used on both. Can't wait to try out this fun technique, Karen! xx
ReplyDeleteThis is such a cool idea and what a lovely finish it gives. I love the warm colours of your TO card and so pleased you joined us x
ReplyDeleteMy jaw hit the floor; you create magic with these Oxide inks. Wow! And you sure know how to nail a theme. I am in awe.....Thanks so much for joining us at CCCB!
ReplyDeleteFabulous backgrounds, Karen ... one all warm and dramatic with the black silhouette, the other fresh and summery with the white die cut ... both cards are gorgeous! Thanks so much for playing along with us again at Time Out! Hugs, Anita :)
ReplyDeleteTwo gorgeous cards Karen and I must try that technique, it does seem especially good with the oxide inks which I do not have at the moment, but intend to try some of the newer colours in them at some point. Both colour combinations are so pretty and love both the white die cut flowers and the dark stamped ones, which look very effective with the added white lines and spatters. x
ReplyDeleteThese look fabulous and I am so going to give this a go. Love it.
ReplyDeleteWow...both cards are so Stunning, Karen! I love the background effects you achieved with your credit card and the added acrylic line with the edge of your card and splatters. Your die cut flowers and stamped silhouette flowers look beautiful too. I really hope to try your technique. I am off to check out your mini tutorial on SCS. TFS my friend. Hugs...
ReplyDeleteOh, how I love the results of this technique! I think I have only seen it done with acrylic paints! Absolutely love how yours came out and the cards you made with them! Thanks for the tutorial!
ReplyDeleteawesome effect with the CC, love the sharp lines you got. thanks for the tutorial :)
ReplyDeleteThese look fab .... the backgrounds look amazing. I've used the credit card technique to add the single lines before but not to colour the whole background ..... must give that a go. Thanks for sharing xx
ReplyDeleteBrilliant, this looks like a must try technique Karen you clever vegemite!!!
ReplyDeleteLove it both ways and your last comment on first post I concur with.
I need more oxides also, I've only two.
But buying ban cos of bills so I used the DI with the Oxides and though not same effect still look great for colour variation if your not too heavy handed with spritzing. I
often mix inks irrespective of type and if careful you get awesome results. I'm loving this... think we're all going to be addicted to oxides.
Crafty hugs from Downunder,
Shaz in Oz.x
{Calligraphy Cards - Shaz in Oz}
I loved the card you posted earlier, and I love these too. I was surprised that the credit card technique worked with oxide inks and wondered if it would work with regular inks as well. Thank you for experimenting and writing out the tutorial.
ReplyDeleteThank you for doing the two cards with the different types of inks. Both look fabulous with such a fun and creative technique. Love the uniqueness of them x
ReplyDeleteYour cards are Amazing! I love the look of your backgrounds. Can you share a video on how to make it? Thank you.
ReplyDeleteI am LOVING this effect, I think you have started a new trend in blogland :)
ReplyDeleteFaith
x
Loving this effect, I think you have started a new trend in blogland.
ReplyDeleteFaith
x
Love this idea Karen, definitely going to give it a go. Two gorgeous cards too
ReplyDeleteWay to go creating a brand-new technique, Karen! These are sensational! Thank you for the tutorial!! Hugs, Darnell
ReplyDeleteThese are beautiful cards and I just love the backgrounds. Very creative.
ReplyDeleteA great idea for background technique, brilliant with the die cuts on top too. Thanks for the tutorial
ReplyDeleteTwo absolutely stunning cards Karen. What a great technique. Thanks for sharing. Barbxx
ReplyDeleteI'm going to try this again but I'll still use the panel I did on a card soon. This technique makes such a cool background.
ReplyDeletePopped over from Di's Snippets Playground to see what you've been up to as Val's card was inspired by your tutorial.
ReplyDeleteGreat technique producing beautiful cards xxx
I love this technuque that you've create Karen. The cards are beautiful.
ReplyDeleteHere to comment at last Karen !, just love your pretty cards and must try that technique too, thanks for the info ;) hugs Viv xx
ReplyDeleteTaeEun sent me Karen, and I'm so glad she did! What a fantastic technique - gorgeous results, and it didn't cost a thing - even if you used your card!!
ReplyDelete=]
Continental Finance Reflex Credit Card
ReplyDeleteLogin Ronaldo Club at Ronaldo-club.cc to access the elite Ronaldo club cc shop. Experience secure, reliable services for ronaldo cc and high-quality data. Join the trusted community at Ronaldo Club today.
ReplyDelete