Welcome
Today's card features a print I did using my Gel Plate.
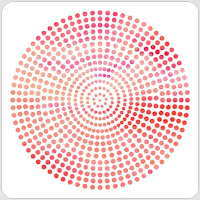
This Dot Circle stencil from A Colorful Life Designs has become a favourite.
So here's what I did to create my card.
- I began by getting out my Gel Plate, brayer, Dot Circle stencil and some blue acrylic paint.
- I added paint to the plate, brayered it nice and smooth, then placed the stencil over the wet paint.
- Using the end of a paint brush handle, I gently pushed the stencil onto the plate, making sure it had really good contact.
- Next, I rubbed a piece of paper over stencil that was still on the plate which helped lift some off some of the paint.
- I took the stencil off carefully, then rubbed a piece of white cardstock to get this print. I set it aside to dry completely.
- I got out this birthday die and cut the letters from some white cardstock.
- I cut the shadow die for the sentiment right from the center area of the print and then glued the Happy Birthday onto that.
- I glued the Gel Plate print to a piece of white cardstock, then onto an A2 card base.
- I pop dotted the sentiment by fitting it back into place in the center.
- I added 3 silver gems to finish off my card.
Here is the stencil I used:
Dot CircleDiscount Code for A Colorful Life Designs
*Just use the code KarenFan10 to get a discount on stencils and masks.*
(affiliate with no extra cost to you)
Thanks so much for coming by and taking a look.
Supplies
Stamps- none
Inks- Basics Acrylic paint
Paper- heavy white (Scribes Nook- Waterloo, Ont.)
Accessories and Tools- stencil (ACLD); Gel Plate; Speedball brayer; silver gems (Dollar Tree);
Happy Birthday die (Amazon); paint brush


Great explanation. I make so many gelliprints and find that 1 of 10 prints turns out the way I want.
ReplyDeleteI love the colors and the circles backgrounds. A great card design!
ReplyDeleteA great way to use it making a print on your gelli plate Karen and the blue is beautiful and a great contrast with the white die cut sentiment over the top. x
ReplyDeleteWhat a great print for your background Karen, and I love the way you cut the shadow of the sentiment from the paper, then raised it when constructing the card. A wonderful result!!
ReplyDeleteBlessings
Maxine
What a fun background, Karen. It reminds me of bubble wrap.
ReplyDelete