Showing posts with label Studio Light. Show all posts

Tuesday, 14 December 2021

Snowy Afternoon


Welcome
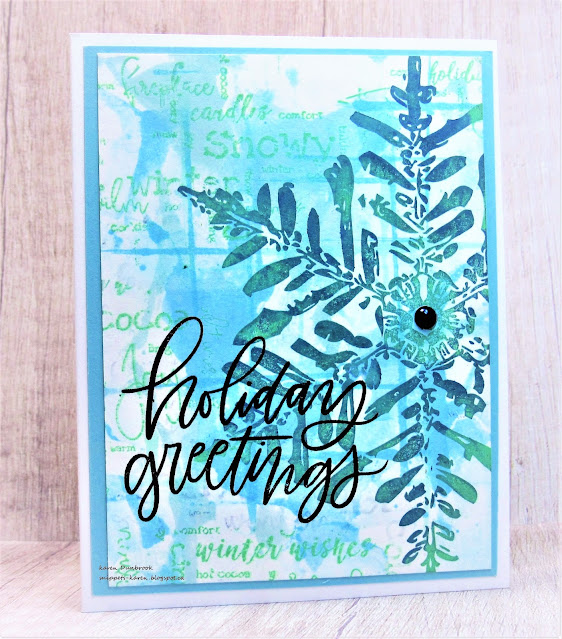
Meet my today's snowflake card.
Lots of inks, smooshing and fun.

So here's what I did to create my card.
  • I cut a piece of white cardstock for my card panel.  I rubbed some Broken China Distress Oxide ink onto my non-stick mat, sprayed with water and rubbed the panel into the wet ink.  I used the leftover ink on my mat to create the lines using the edge of a gift card dipped into the wet ink.
  • After drying the panel, I stamped over it with the Snowy Afternoon background stamp using some Cracked Pistachio DOX ink.  The words added a lot of interest.
  • I placed the dry panel into my Misti and positioned the large snowflake to one side.  I randomly pressed on some more Broken China DOX ink over the snowflake, sprayed with water and stamped.  I repeated that process using some Rustic Wilderness and Lucky Clover ink.
  • Lastly, I stamped the sentiment in the left hand corner with some black Versafine Clair and clear heat embossed it.  I added the black gem to the center of the snowflake.
  • I glued it onto a pale blue piece of cardstock, then onto a heavy white card base.

Thanks so much for coming by and taking a look.
I hope you holiday preparations are going well.

Adding my card to these challenges:
Simon Says Wed.- COLD AS ICE
A Place to Start- ANYTHING GOES OPTION BLUE
Love to Craft- ANYTHING GOES

Supplies
Stamps- Hand Lettered Holiday Greetings (MFT); Snowy Afternoon (Studio Light); 
Warm Wishes Snowflake (Colorado Craft)
Inks- Distress Oxides; Versafine Clair
Paper- heavy white (Scribes Nook- Waterloo, Ont.)
Accessories and Tools- Misti (My Sweet Petunia); old gift card; non- stick craft mat; 
clear eb powder; Mister (TH)

Wednesday, 9 September 2020

Noel


Good Morning
Thanks to so many of you that replied that you weren't getting sick of seeing all my Christmas cards.
If you don't already know, I have a very busy life with 5 little daycare kiddos.  I try and get ahead of the game and with this extra time off, I thought I should take advantage of it so I'm less rushed when holiday time arrives.

This card was inspired by a very talented lady on FB.  Eileen Godwin does some work for Lavinia Stamps and her cards are very clean and simple.  I do enjoy her inking techniques.

So here's what I did to create my card.
  • I began with a 4 3/4 x 4 3/4" square piece of cardstock.  I was making a 5x5" card when finished.
  • I used some ScorTape to mask the edges of my card so I would have a crisp, white border when finished.
  • Using some Distress Oxide inks, (Worn Lipstick, Cracked Pistachio, Tumbled Glass, Spun Sugar, Dried Marigold) and my Stencil Pal (or you could use any flat edge), I rubbed the inks across my card panel with my TH inking Tool, being sure to criss-cross them as I went along.  I also did a circle outline just using a circle die cut, right where I knew I wanted the reindeer to be. 
  • Next, I laid the Lavinia Pods stencil over the panel and did some light stenciling in the background just to add some interest.
  • I placed the inky panel into my Misti and stamped the Reindeer also from Lavinia Stamps, the sentiment and trees. 
  • I added a bit of shading under the reindeer to help ground him with a gray watercolour pencil.
  • Using my white and black Posca pens, I added splatters to my bkg.
  • I mounted the piece onto a coordinating piece of cardstock, then onto a heavy white card base.


Thanks so much for coming by and taking a look.

Adding my card to these challenges:
Simon Says Wed.- STAMP IT
Time Out- SEASON
International Art and Soul- INCLUDE AN ANIMAL

Supplies
Stamps- Sentiment (Studio Light); Small Reindeer (Lavinia); Three Pine Trees (Nellie's Choice)
Inks- DOX (TH); Versafine
Paper- heavy white (Scribes Nook)
Accessories and Tools- Misti (My Sweet Petunia); Pods stencil (Lavinia); 
Stencil Pal; ScorTape; Inking Tool (TH); Posca pens


Monday, 15 April 2019

Flower Trio- The Flower Challenge


Good Morning and welcome.
Time for a reminder card for 


This month we are using a simple sketch as our inspiration.


So this is how I created my card.

I began by masking the left side of my white card front with some Post-It tape.  I inked up my Wanderlust stamp and pressed it over the masked area.  I removed the tape and then scored along the edges of the stamped area with my ScorPal to use as the first panel.
The smaller purple panel was a piece of leftover Yupo paper that I had inked with some Alcohol inks and Blending Solution.  I cut it to size and glued it onto a piece of white cardstock for stability.
Next, I placed the piece into my Misti and stamped the sentiment with more of the blue Archival   ink.
Lastly, I stamped the flowers with some Versamark ink onto more leftover Yupo inked paper and then carefully white heat embossed them.  I say 'carefully' as your Yupo will warp and bubble with too much heat.  I like to get my heat tool really hot then make passes over until the eb powder is melted.  I fussy cut out the flowers, then attached them to my card with some pop dots.


Thanks so much for coming by and taking a look.
Hope you check out the amazing cards our DT's have created.

Adding my card to these challenges:
Simon Says Wed.- NO DESIGNER PAPER
Craft Stamper Magazine- ANYTHING STAMPED GOES
Just Us Girls- OFF THE EDGE

Supplies
Stamps- Wanderlust (Studio Light); sentiment- SSS Sketched Flowers; Fabulous Florets (SU)
Inks- Alcohol (Ranger); Archival (Ranger)
Paper- Yupo; heavy white
Accessories and Tools- Misti (My Sweet Petunia); ScorPal; tape for masking;
heat tool; white eb powder; pop dots