Sunday 31 July 2022

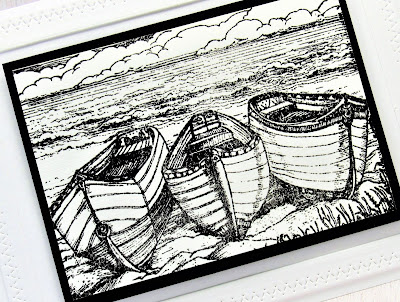
Seashore


Hello and Welcome
Some simple stamping today.  
I decided to just leave my card in black and white.
I think going to the beach is on a lot of minds especially when the weather is sunny and warm.

So here's what I did to create my card.
  • I began by cutting a piece of white cardstock and placed the Fishing Boats stamp into my Misti and stamped with some black. 
  • I cut out the stamped image and glued it onto a piece of black cardstock, then set it aside.
  • Next, I die cut a frame from some white cardstock using a die from Penny Black.
  • I glued the white frame to an A2 card then popped the image inside the frame.

Thanks so much for coming by and taking a look.

Adding my card to these challenges:
Simon Says Wed.- ANYTHING GOES
Little Red Wagon- STITCHING SENSATIONS
Addicted to CAS- NAUTICAL

Supplies
Stamp- Fishing Boats (ISC- discontinued, company gone)
Inks- Versafine Clair
Paper- Scribes Nook- Waterloo, Ont.
Accessories and Tools- Misti (My Sweet Petunia); Zig Zag Stitch die (Penny Black);
foam tape

Friday 29 July 2022

Trash to Treasure


Good Morning
A bit of a different card today as I am playing along with some of the challenges at Splitcoast Stampers.
The challenge was to recycle...I knew I had saved this tissue box for a reason!  
Loved the vibrant colours.

So here's what I did to create my card.
  • Like I mentioned above, my starting point was this beautiful tissue box I had saved.  I took it out, cut it down for my card front panel.
  • I die cut the 'celebrate' right into the middle of the panel.
  • I die cut the sentiment 4 more times with some white cardstock (in hindsight, I should have cut them in black but oh well) stacked them and glued them all together.
  • I glue the panel onto a piece of matching yellow cardstock, then onto some black and then onto an A2 white card base.
  • I glued the sentiment back into place and added 3 black gems.

Thanks so much for coming by and taking a look.

Adding my card to these challenges:
Simon Says Wed.- ANYTHING GOES
Addicted to CAS- ANY OCCASION
Cardz 4 Guys- RECYCLE

Supplies
Stamps- none
Inks- none
Paper- Scribes Nook (Waterloo, Ont.)
Accessories and Tools- die (MFT); black gems

Thursday 28 July 2022

Simple Print


Welcome
Today's card is a simple Gel Plate print using some grasses I picked on a walk.
The grasses make such a lovely, natural looking print.

So here's what I did to create my card.
  • I got out my Gel Plate and pressed some Mustard Seed, Carved Pumpkin and some Fired Brick Distress Oxide ink directly onto the plate.
  • I brayered the colours together loosely, not too concerned about covering the whole plate with ink.  
  • I laid the grasses I have brought home on the plate, then rubbed my cardstock onto the plate and took the print.
  • It dries almost instantly, so I placed it into my Misti and stamped the sentiment to the side.
  • I splattered with my white and black Posca pen to add interest.
  • I glued the print onto a piece of white cardstock, then onto a pale pinkish cardstock, then onto an A2 size card base.

Thanks so much for coming by and taking a look.

Adding my card to these challenges:
Simon Says Wed.- ANYTHING GOES
Fab and Funky- ANYTHING GOES

Supplies
Stamp- Live, Laugh, Love (Rubbernecker)
Inks- DOX, Versafine Clair
Paper- Scribes Nook (Waterloo, Ont.)
Accessories and Tools- Gel Plate; Speedball Brayer; white and black Posca pen;
Misti (My Sweet Petunia); grasses

Wednesday 27 July 2022

Walking With Me


Good Morning
Sympathy cards can be hard to make, that is why I like to have a few made to have on hand.
It was inspired by this background I made and this lovely Eucalyptus stamp.

So here's what I did to create my card.
  • I began by making the background.  I used my brayer and rolled different shades of Distress Oxide inks over the cardstock.  The colours I used were Rustic Wilderness, Peeled Paint and some Bundled Sage.
  • When I was happy with the inking, I splattered with my white Posca pen and set aside to dry.
  • Next, I took a piece of white cardstock and using the Hero Arts Infinity Hexagon dies, I cut out a large hex.
  • I placed the hex into my Misti and stamped the Layered Eucalyptus to one side.
  • I stamped the sentiment from Penny Black to the right side.
  • I glued the brayered background onto a piece of white cardstock, then onto an A2 card base.
  • I popped the stamped hexagon over that.

Thanks so much for coming by and taking a look.

Adding my card to these challenges:
Corrosive Challenge- ANYTHING GOES
The Male Room- MONOCHROME

Supplies
Stamps- Layered Eucalyptus (Gina K); Sympathy Sentiments (Penny Black)
Inks- DOX; Versafine Clair
Paper- Scribes Nook (Waterloo, Ont.)
Accessories and Tools- Speedball brayer; Hexagon die (HA); white Posca pen; 
Misti (My Sweet Petunia)

Tuesday 26 July 2022

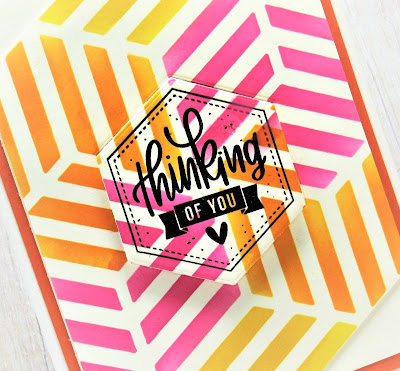
Striped Hexagon


Good Morning
Meet today's card.
Lots of bright, happy feeling colours using this newly released Striped Hexagon stencil from A Colorful Life Designs.  

So here's what I did to create my card.
  • I cut a piece of heavy white cardstock and placed the Striped Hexagon over it. 
  • I masked off the top and bottom area of the stencil and inked that up with some Mustard Seed Distress Oxide ink.
  • I moved the masks to another area and inked with some Carved Pumpkin DOX then finally some Picked Raspberry in the areas left uninked.
  • I took the finished piece and die cut a hexagon right from the center of the panel.
  • I placed the die cut into my Misti and stamped the border and the sentiment onto it.  I splattered over it with my black Posca pen.
  • Next, I decided to cut out the finished stenciled piece and I popped that onto a piece of white cardstock.  I glued that onto some matching orange cardstock, then onto a white card base.
  • I popped the sentiment back into place over the stenciled background.

Here is the stencil I used:

Discount Code for A Colorful Life Designs
(affiliate with no extra cost to you)

Thanks so much for coming by and taking a look.

Adding my card to these challenges:
We Love StampingAnything Stamped with the option of Hot Sunny Colours
Creative Fingers- ANYTHING GOES

Supplies
Stamps- Hexagon Greetings (SSS)
Inks- DOX, Versafine Clair
Paper- Scribes Nook (Waterloo, Ont.)
Accessories and Tools- Striped Hexagon stencil (ACLD); TE Blending Brushes;
low tack tape; Misti; foam tape; black Posca pen; Infinity Hexagon die (HA)

Monday 25 July 2022

Shoreline


Welcome
Meet today's card.
I've been playing along with some of the challenges over at Splitcoast Stampers.
So much inspirations there and the theme for this challenge was Let it Run.

So here's what I did to create my simple card.
  • I began by pulling out a scrap of mixed media paper to work on.  I figured it would be a good paper to work with as the inks would run a bit better then using my regular white cardstock.
  • I placed a few small drops of some Salty Ocean Distress re-inker on my non-stick craft mat, sprayed with water to dilute it and then using an old gift card, I dabbed some ink just along the center of my cardstock.  I sprayed with a bit of water to help the ink run.
  • I dried the blue, turned my panel around and then repeated that process using some Wilted Violet Distress re-inker in the same way.
  • While that dried, I took a piece of white cardstock and embossed it using a folder from Darice.
  • I placed the dried panel into my Misti to stamp the birds.
  • I glued the embossed white cardstock onto a heavy white card base.
  • I glued the inked panel onto some black cardstock and used some foam tape to mount it over the embossing.


Thanks so much for coming by and taking a look.

Adding my card to these challenges:
Addicted to CAS- NAUTICAL
Simon Says Mon.- LET'S GO ON VACATION


Supplies
Stamps- Wetlands (SU)
Inks- Distress re-inkers
Paper- Scribes Nook (Waterloo, Ont.)
Accessories and Tools- old gift card, Mister (TH); Misti (My Sweet Petunia)
EB folder (Darice)

Friday 22 July 2022

Sending Smiles


Welcome
I created today's card by using scraps I had in my stash.
The papers were leftover pieces I had made while Gel Plate printing.  

So here's what I did to create my card.
  • I looked through my stash of scraps and found some pieces leftover when I cut down larger pieces of gel prints.  I found 2 that I thought would look good together.
  • Next, I die cut the Plaid Card Front from some white cardstock.  
  • I measured the size of the openings in the plaid, then cut my scraps into strips the right size.
  • I wove the strips through the die cut, overlapping them until all the openings were filled.
  • I glued that onto a piece of white cardstock and set aside.
  • I found another piece of cardstock that I had inked up with some Distress Oxide inks in my stash and die cut the sentiment using that and then cut out the sentiment shadow from some white.
  • I glued the woven panel onto a piece of purple cs then onto a heavy white A2 size card base.
  • I pop dotted the sentiment over the center of the panel.

Thanks so much for coming by and taking a look.

Adding my card to these challenges:
Love to Craft- ANYTHING GOES


Supplies
Stamps- none
Inks- Basics acrylic paint, DOX ink
Paper- heavy white (Scribes Nook- Waterloo, Ont.)
Accessories and Tools- Plaid Card Front die (Concord and 9th), Speedball Brayer; 
Sending Smiles die (SSS); Gel Plate; foam tape

Monday 18 July 2022

Sympathy


Good Morning
Taking a break from stenciling to use the new to my Foxgloves Embossing folder I picked up from Scrapbook.com.
I so wish I could grow these in my garden, they are so elegant and beautiful.
I used a simple inking technique that can be used with any EB folder and it is a great way to get more mileage from tools you already have on hand.

So here's what I did to create my card.
  • I got out this Foxglove EB folder and inked it up with some Dusty Concord and some Wilted Violet Distress Oxide inks.
  • Next, I gave it a small spray of water and then I placed a piece of white cardstock into the folder and ran it through my Spellbinders Platinum machine.
  • I took the inked panel out of the folder and splattered it with my white Posca pen.
  • While that dried, I stamped the sentiment, clear heat embossed it and then die cut it out.
  • I glued the embossed panel onto a heavy white A2 card base.
  • Lastly, I pop dotted the sentiment along the bottom of the flowers.


Thanks so much for coming by and taking a look.

Adding my card to these challenges:
Simon Says Wed.- MAKE YOUR OWN BKG

Supplies
Stamps- Simple Strips (TE)
Inks- Versafine Clair, Distress Oxides
Paper- heavy white (Scribes Nook- Waterloo, Ont.)
Accessories and Tools- Foxglove eb folder (Lisa Horton); white Posca pen; clear eb powder

Saturday 16 July 2022

So Awesome


Welcome
Today's card features a very unique, cool stencil from A Colorful Life Designs called Floor Perspective.
So many possibilities with this one.
I kept my card super simple in a monochromatic look.

So here's what I did to create my card.
  • I cut a piece of white cardstock and positioned the Floor Perspective stencil along the middle of my panel.  I inked it up with some Peacock Feather Distress Oxide ink.
  • I lifted the stencil off and repositioned it along the first inking, turning it upside down and matching it up.  I inked that with some more Peacock Feathers.
  • Next, I placed the panel into my Misti and stamped the silhouettes near the middle but with their feet touching the floor.
  • I stamped the sentiment just under the images.
  • I glued the finished panel onto a piece of blue cardstock, then onto an A2 white card base.

Here is the stencil I used:

Discount Code for A Colorful Life Designs
(affiliate with no extra cost to you)

Thanks so much for coming by and taking a look.

Supplies
Stamps- Impression Obsession 
Inks- DOX; Versafine Clair
Paper- heavy white (Scribes Nook- Waterloo, Ont.)
Accessories and Tools- stencil (ACLD); TE Blending Brushes; Misti (My Sweet Petunia)