Saturday 30 April 2022

Doodled Flowers


Welcome
Something a bit different for me today.
On Friday night, I like to watch Vicki Boutin's live classes.  They are free and lots of fun.
Last week, she showed us how to make simple, doodled flowers.
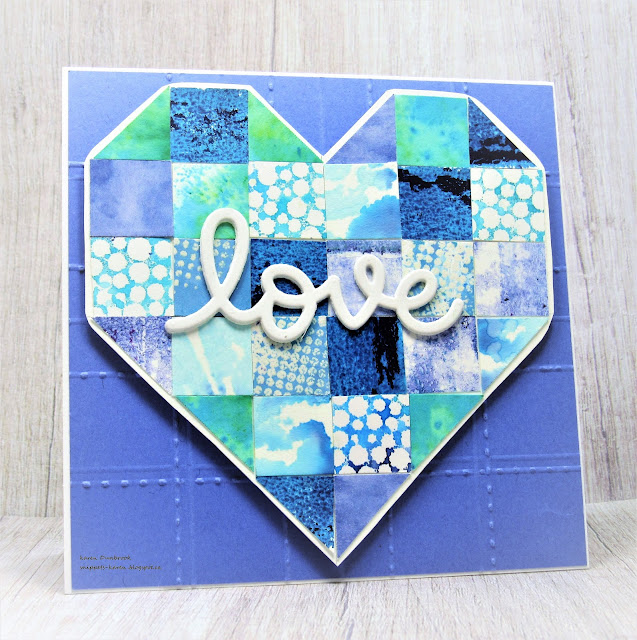
I decided to give it a go and this is what I came up with.

So here's what I did to create my card. 
  • I began by making these doodled flowers...very simple to do.  I used a Pigma waterproof pen to doodle the flowers...that part is important as I wanted to watercolour them.  Check to see if your pen is waterproof before you start to paint them.
  • After I drew a few I was happy with, I started to paint them.  I used Vicki Boutin's Art Crayons to do that.  I rubbed the orange and pink crayon onto a piece of acetate, sprayed with water and picked up the wet ink with a paintbrush to add to my flowers.  
  • I dried the flowers a bit, then stamped over them with the Friends Script stamp using some Shaded Lilac Distress Oxide ink.  I inked up the stamp and then stamped off onto some scrap paper as not to overwhelm the look of the flowers with heavy stamping.  The script added a lot of interest.
  • Next, I drew some leaf shapes and watercoloured them using the Art Crayons again in greens.
  • I splattered them all with my white and black Posca pens and set aside to dry.
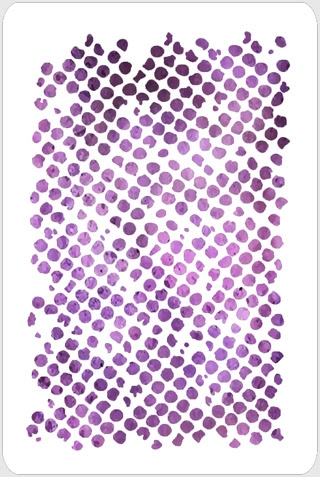
  • I started looking through my stash of previously made backgrounds and came across this one.  It was done on the Gel Plate using some pink acrylic paint and this super stencil from ACLD called Messy Dot Grid.  I thought the colour worked well with the flowers.
  • The flowers were now dry, so I fussy cut them out with the leaves.  
  • I placed the stenciled background into my Misti and stamped the sentiment in the corner.
  • I curled the flowers and leaves a bit, then arranged them with pop dots onto my card front.
  • I glued the finished panel onto a piece of pink cardstock, then onto a white card base and added some small black gems to the flower centers.
  • Finished card is 5 1/2 x 4 1/4".

Here is the stencil I used:


Discount Code for A Colorful Life Designs
(affiliate with not extra cost to you)

Thanks so much for coming by and taking a look.


Adding my card to these challenges:
Simon Says Wed.- ANYTHING GOES
Alphabet Challenge- 'B' FOR BLOOM
Cut it Up- APRIL SHOWERS BRING MAY FLOWERS


Supplies
Stamps- Enjoy the Moment (Daisy Bucket-no longer available); Friends Script (HA)
Inks- Vicki Boutin Art Crayons; DOX inks; Versafine Clair
Paper- heavy white (Scribes Nook- Waterloo, Ontario)
Accessories and Tools- Pigma marker; Posca pens; Basics Acrylic paint; 
Messy Dot stencil (ACLD); Misti (My Sweet Petunia); black gems

Monday 25 April 2022

Your Precious Soul


Welcome
For today's card, I decided to pull out this older stamp from Penny Black called Together.
I haven't used it for so long.

So here's what I did to create my card.
  • I began by looking through my stash of inked backgrounds.  This one was done using the Geometric stencil from ACLD.  I had used it to stencil another card with Distress Oxide inks.  When I went to clean off the stencil, I saw how much ink remained on it, so I pulled out a white card base and cleaned off the stencil onto that using a baby wipe.  It transferred the colour right onto the cardstock giving a more subtle, soft look to the inking.
  • I took the stenciled panel and placed it into my Misti and positioned the flowers along the side edge.  
  • I coloured directly onto the stamp using my Tombow markers in pink first, sprayed with water and pressed onto the panel.  I repeated that process using some red next just in a few places and not all over coloured.
  • I used some green for the stems as well.
  • When I was happy with the inking, I moved the stamp down to ink the last flower at the bottom.
  • I used my white and black Posca pen to splatter just over the flowers, then set aside to dry.
  • When it was all dry, I placed it back into my Misti to stamp the sentiment.
  • I glued the panel onto a piece of orange cardstock, then onto a heavy white card base.

Here is the stencil I used:

Discount Code for A Colorful Life Designs
(affiliate with not extra cost to you)


Thanks so much for coming by and taking a look.

Adding my card to these challenges:
Inkspirational- WATERCOLOR
The Creative Crafters- ANYTHING GOES

Supplies
Stamps- Together (Penny Black); Be Still (Impression Obsession)
Inks- Tombow Watercolour Markers; Distress Oxide, Versafine Clair
Paper- heavy white (Scribes Nook- Waterloo, Ont.)
Accessories and Tools- Geometric stencil (ACLD); Misti (My Sweet Petunia);
baby wipe; Posca pens

Sunday 24 April 2022

Scrappy Heart


Welcome
Today, I have another card to add to the series of cards featuring
USE YOUR SCRAPS

This one looks complicated but it really isn't. 
It is just a series of squares and triangles made using my little leftover strips cut into pieces.

So here's what I did to create my card.
  • I started by cutting a piece of white cardstock that I would use for the base of the heart to glue all my squares onto. My finished card is a 5 x 5" square.
  • I cut all my scrap pieces into 3/4" squares using colours that I thought would work well together.
  • I started the heart shape by gluing the center squares first, then continued on outwards with the pattern till I completed the heart shape.  Here is the pattern I used for my card:
I added this as it is easier to see the pattern that I followed.

  • After I had all the pieces glued into place, I fussy cut around the heart, leaving a bit of a white border from the cardstock underneath.
  • Next, I found a piece of matching cardstock for the base of my card,  I used my ScorPal and my ScorBug to draw some lines onto the cardstock to add interest, then glued that onto a 5" square white card base.
  • I die cut the 'love' 3 times and glued them all together.  I glued that over the heart.


Thanks so very much for coming by and taking a look.

Adding my card to these challenges:
Daring Cardmakers- THE TIME OF YOUR LIFE
(vintage inspiration- quilt)
Crafting Happiness- ANYTHING GOES

Supplies
Stamps- none
Inks- Distress Oxides, Acrylic paint
Paper- white (Scribes Nook- Waterloo, Ont.)
Accessories and Tools- TH paper cutter; Love die (Paper Smooches); ScorPal; ScorBug

Friday 22 April 2022

Birthday Wishes


Welcome
Today's card is made using some more of the many scraps I have saved to repurpose.
It made for a colourful, happy feeling card and was simple to create.

Here's what I did to create my card.
  • I pulled out my container with all my paper strips and found the ones I thought would work well together.  Most of the strips were made by inking and on my Gel Plate.
  • I cut a piece of white cardstock that was 4" square that would be my base.  
  • I folded the strips in half and then cut the flag ends on each one.  I did have to cut some down in length to fit on the card base.  
  • Next, I glued all the pieces onto the white cardstock in a circular shape, alternating the colours as I went around.  Here is what it looked like:

  • When I was happy with the positioning of all the strip, I set it aside to dry.
  • I cut a white cardstock circle and stamped it using the Snowflakes Texture in my Misti with lots of Distress Oxide ink colours that matched the paper strips.  I glued that onto a black cardstock circle that was slightly bigger.
  • I used some foam tape to stick the circle over the paper strip background.
  • I die cut the sentiment from Penny Black in some orange and then some white cardstock and glued them offset.
  • I glued the finished panel onto a 4 1/4" square card base.

Thanks so very much for coming by and taking a look.

Adding my card to these challenges:
Seize the Birthday- SIGNS OF SPRING
(Spring colours on my strips)
Crafting Happiness- ANYTHING GOES
Corrosive Challenge- ANYTHING GOES


Supplies
Stamps- Snowflake Texture (Nellie's Choice)
Inks- Distress Oxides
Paper- heavy white (Scribes Nook- Waterloo, Ont.); black cs (Michaels)
Accessories and Tools- paper scraps, Happy Birthday die (PB); Misti (My Sweet Petunia)

Wednesday 20 April 2022

Big Birthday Wishes


Good Morning and Welcome
Meet my 10 minute card....so simple and fun to create.  
I was inspired by the Technique Lovers Challenge over at Splitcoast Stampers called Faux Tearing. I haven't done this one in a long time.
This technique uses torn paper strips that give the look of layers without adding extra bulk to your card.  Simple to do and so many possibilities.

So here's what I did to create my card.
  • I began by tearing a few strips of scrap paper and placed one of them onto my white card stock base.  By tearing a few different strips, you can vary the look of the background.
  • I began at the bottom and inked with some Peacock Feathers Distress ink.  I placed another strip up higher and inked with some Salty Ocean DOX ink.  I repeated that process, moving up the card with some Cracked Pistachio ink.  I stayed with just the 3 colours to help keep the look simple.
  • When I was done inking over the torn paper strips, I placed the inked panel into my Misti and stamped the trees along the bottom and clear heat embossed them.
  • I stamped the sentiment and clear heat embossed that too.
  • I glued the finished panel onto a piece of black cardstock, then onto a heavy white card base.


Thanks so much for coming by and taking a look.

Adding my card to these challenges:
Get Creative- SPRINGTIME
Use Your Stuff- SPRING/EASTER
Allsorts- MASCULINE

Supplies
Stamps- A Big Birthday (Stamping Bella); Pine Trees (Impression Obsession)
Inks- DOX, Versafine Clair
Paper- heavy white (Scribes Nook- Waterloo, Ont.)
Accessories and Tools- Misti (My Sweet Petunia); torn paper strips, Hero Arts clear eb powder;
TE Blending Brushes