Saturday, 5 July 2025

Let's Get Creative

Good Morning
How fun is this! 
I used the newly released stencil from A Colorful Life Designs called 

I enjoyed creating this one and here's what I did.
  • I decided to go with a 'rainbow' theme and began by placing the Nautilus Swirl stencil over the outside edge of my white cardstock. I inked with some Fossilized Amber, Ripe Persimmon, Picked Raspberry, Wilted Violet and some Salty Ocean Distress Oxide ink.
  • I lifted the stencil, moved it to the side and repeated the process with the same colours.
  • I splattered the panel with my black Posca pen and set it aside to dry.
  • When it was dry, I stamped the sentiment and clear heat embossed it to help make it pop against the colourful background.  
  • I glued the panel onto a piece of white cardstock, then onto a piece of purple the finally onto a A2 sized card base.
  • I added some black gems around the sentiment to finish off my card.

Here is the stencil I used:

Thanks for taking a look.

Supplies
Stamps- Just Be Happy (Visible Image)
Inks- DOX; Versafine Clair
Paper- Solar White
Accessories and Tools- stencil (A Colorful Life Designs); TE Blending Brushes;
Make Art Station (Ranger); black Posca pen, clear EB powder; black gems 

Wednesday, 2 July 2025

Good Times


Good Morning

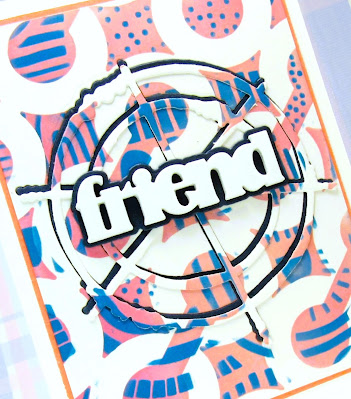
A new month means a whole new release of stencils at A Colorful Life Designs.  
Lots of summer inspired designs for creating beach/ocean designs as well as many more.
Meet one of the new stencils for July called:

So here are my card details.
  • I placed a piece of white cardstock onto my Make Art Station first.  I started inking the Maelstrom stencil with some Peacock Feathers, then some Salty Ocean and then some Prize Ribbon Distress Oxide inks.
  • The middle area of this stencil reminded me of a beach ball, so after it was all inked up, I used a circle die to cut out just that area.
  • I took the circle and stamped the sentiment onto it in my Misti.  I clear heat embossed it to help make it pop, then splattered with my black Posca pen.
  • I stamped another sentiment onto my card front and clear heat embossed that too.
  • I glue the panel onto a piece of white cardstock, then onto a piece of navy cardstock and then onto an A2 sized card base.
  • I used some foam tape to pop the circle die cut back into place, rotating it.
  • I finished my card off by adding 3 black gems under the bottom sentiment.

Here is the new stencil:


Thanks for coming and taking a look.

Adding my card to these challenges;
Little Red Wagon- TO BOLDLY GO
The Crafters Cafe- MASCULINE/Anything Goes
The Creative Crafters- ANYTHING GOES

Supplies
Stamps- Good Vibes (SSS)
Inks- DOX; Versafine Clair
Paper- Solar White
Accessories and Tools- stencil (A Colorful Life Designs); Make Art Station (Ranger);
Misti (My Sweet Petunia); black Posca pen; Infinity Circle die (HA);
clear EB powder (Lawn Fawn)

Sunday, 29 June 2025

TLC- Flowers for My Friend


Welcome

It's my turn to host the TLC Challenge (Technique Lovers) over at Splitcoast Stampers this week.
I've been noticing a trend of many card makers as they look back and remember some of the older techniques we haven't visited in awhile so....
We are revisiting an older challenge that I did about 3 years ago called Stripped Down, also known as 

So, here's what I did to create my card.
  • First, I randomly inked up a piece of white cardstock with some Broken China, Wilted Violet and some Prize Ribbon Distress Oxide inks.
  • I dried the ink on the panel and used a die to cut it into strips.  It helps to keep them together in the order that I had inked them up, by placing a piece of low tack tape along the back. This will be important for the next steps.
  • When they were all cut, I peeled them off the tape from the back and glued them onto another piece of white cardstock, flipping every other strip around to face in the opposite direction.
  • After I had them all glued down, I splattered the panel with my white Posca pen and then set it aside to dry.
  • I die cut the flowers with another piece of white cardstock, I also die cut the 'friend' sentiment 5 times and glued them on top of each other, stacking them together.
  • I glued my strip panel card front onto a piece of white cardstock, then blue, then onto a white A2 sized card base.
  • Lastly, I glued the flowers and the sentiment over the strips.

Thanks so much for coming by and taking a look.

To see the other card I made using this technique go here:
and

Adding my card to these challenges:
Simon Says Wed.- ANYTHING GOES
Crafty Catz- ANYTHING GOES

Supplies
Stamps- none
Inks- Distress Oxides
Paper- Solar White
Accessories and Tools- Weaving die strips (Hero Arts); white Posca pen;
Wildflowers (TH); friend die (Amazon)

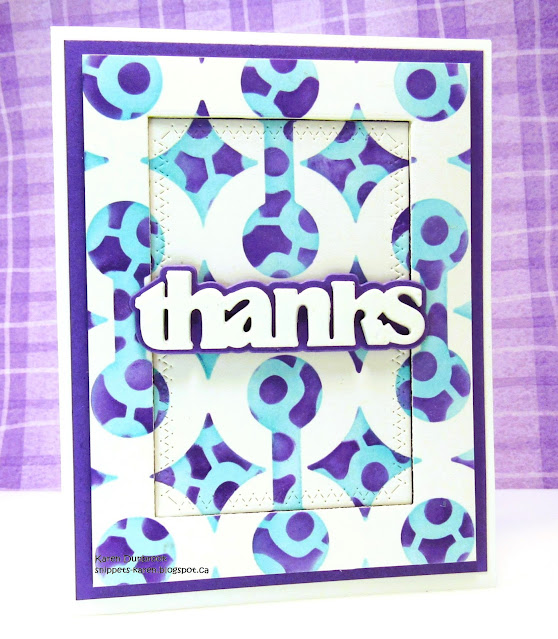
Layered Stencils- Thanks

Good Morning
It's the end of the month already but I wanted to post one more card I made doing some fun stencil layering using 2 of the newly released stencils for June called:
from A Colorful Life Designs

So, here's what I did to create my card.
  • I placed the Open Coils stencil onto my Make Art Station and then inked it up with some Broken China Distress Oxide ink.
  • I left that stencil in place, then put the Connected Cogs stencil over that and inked again with some Villainous Potion DOX ink.  It created such a fun, layered look.
  • I took the stenciled panel and die cut the middle area using the Zig Zag Stackers, creating a frame.
  • I glued the inside of the frame die cut onto a piece of purple cardstock.  
  • Next, I added foam tape all along the outside edge of the the frame die cut, and placed it over the middle area.  It gave so much interest to the card front.  I glued that onto a white A2 sized card base.
  • I die cut the 'thanks' with some white cardstock, then glued it onto the white word shadow.  I used some foam tape to pop it over the card front.


Here are the stencils I used:


Thanks for coming and taking a look.

Adding my card to these challenges:
Simon Says Wed.- ANYTHING GOES
Krafty Chicks- MASCULINE
Just Us Girls- STENCIL WEEK

Supplies
Stamps- none
Inks- DOX
Paper- Solar White
Accessories and Tools- stencils (A Colorful Life Designs); Thanks die (Amazon);
Zig Zag Stackers Frame (Penny Black); Blending Brushes (TE)

Monday, 23 June 2025

Sending You Happy Rainbows


Welcome
Quick and simple card today using one of the new for June stencils from A Colorful Life Designs called:

Here is what I did.
  • I placed the Gears stencil down first and then I put a piece of the Rainbow Scratch paper over that and secured well.
  • Using the side of a popsicle stick, I rubbed back and forth over the paper to reveal the pattern of the stencil.  It is so fun!
  • I set that aside for a moment and took another small piece of the Scratch paper and rubbed over the whole piece to use for my large Hello sentiment.
  • I glued the stenciled card front panel onto a piece of black, then yellow and then onto a white A2 sized card base.
  • I added a piece of black cardstock along the bottom edge and then glued the Hello over that.

Here is the stencil I used:

Thanks a lot for coming by and taking a look.

Adding my card to these challenges:
Crafter's Cafe- ANYTHING GOES/optional MASCULINE
Simon Says Wed.- WE'RE GOING AROUND IN CIRCLES
Inspiration Station- INSPIRATION PHOTO

Supplies
Stamps- none
Inks- none
Paper- Rainbow Scratch paper (Dollarama)
Accessories and Tools- stencil (A Colorful Life Designs); Hello die (Amazon);
popsicle stick for scratching

Sunday, 22 June 2025

I'm Thinking of You

For June we have welcomed lots of newly released stencils from A Colorful Life Designs.  
Meet just one of the new ones called:

So, here's what I did to create this CAS card.
  • I began by securing the Tiki Room stencil on my desk and then laid a piece of white cardstock over the stencil.
  • Using a blue Crayola crayon, I removed the paper wrapping it has on it, laid the crayon on it's side and rubbed over just the middle section of the stencil to reveal the pattern.
  • I repeated that process using a purple crayon along both sides.  It is such a fun and very easy technique to do with your stencils.
  • Using my white Posca pen, I splattered the whole panel.
  • Next, I stamped and die cut the sentiment with some Wilted Violet Distress Oxide ink.
  • I glued my stenciled card front to a piece of white, then blue and then onto a white A2 sized card base.
  • I used some foam tape to pop the sentiment over the middle and then added silver gems around it.

Here is the stencil I used:


Thanks a lot for taking a look.

Adding my card to these challenges:
Simon Says Monday- SPRITZ and/or SPLATTER
Craft Rocket- NO DESIGNER PAPER
Krafty Chicks- CLEAN AND SIMPLE

Supplies
Stamps- Big and Bold Stamp and die (SSS)
Inks-DOX
Paper- Solar White
Accessories and Tools- stencil (A Colorful Life Designs); Crayola crayons;
Make Art Station (Ranger); silver gems (Dollar Store); white Posca pen

Saturday, 21 June 2025

For the Guys


Welcome
Today's card is featuring a fun new stencil for June from A Colorful Life Designs called:
Great stencil for making more masculine looking cards. I used it with an older release called:

So, here's what I did to create my card.
  • I began with a piece of white cardstock on my Make Art Station.  I placed the Square Cutout stencil down and inked over that with some Peacock Feathers Distress Oxide ink.
  • Leaving that stencil in place, I put the Gears stencil right over the top and inked it up again with some Dusty Concord DOX ink.
  • Next, I splattered the panel with my white Posca pen and set aside to dry.
  • I cut out the 'hello' sentiment 5 times from white cardstock and glued them together to create a stacked look.
  • I glued the stenciled panel onto a piece of purple cardstock and then onto a white A2  sized card base.
  • I cut 2 squares using a stitched square die and glued them into the middle area, added my sentiment last, over that.

Here are the stencils I used:


Thanks so much for coming by and taking a look.

Adding my card to these challenges:
Simon Says Wed.- WE'RE GOING AROUND IN CIRCLES
Simon Says Monday- SPRITZ and/or SPLATTER
Cut it Up- MASCULINE /ANYTHING GOES

Supplies
Stamps- none
Inks- DOX
Paper- Solar White
Accessories and Tools- stencils (A Colorful Life Designs); TE Blending Brushes;
Friend die (Amazon); white Posca pen; Stitched Squares (Amazon)

Thursday, 19 June 2025

Celebrate Your Day!


Welcome
Here's a fun one for you today using this newly released stencil for June from A Colorful Life Designs called:

So, here's what I did to create this simple card.
  • I placed the Open Coils stencil over a piece of white cardstock and inked it with some Mustard Seed, Ripe Persimmon, Picked Raspberry and some Cracked Pistachio Distress Oxide ink.
  • I cleaned the stencil off, flipped it over and placed it onto another piece of white cardstock and repeated the same above process, creating a mirror image.
  • I cut each panel on a diagonal and then glued them onto a white piece of cardstock.  
  • Next, I die cut the sentiment with some yellow cardstock and glued that onto the orange word shadow.
  • I glued my card front onto another piece of orange cardstock, then onto a white A2 sized card base.
  • I added the sentiment with some foam tape and lastly, added a few silver gems under the sentiment.

Here is the stencil I used:

Thanks so much for coming by and taking a look.

Adding my card to these challenges:
Simon Says Wed.- WE'RE GOING AROUND IN CIRCLES
Crazy is Our Fame, Stencils are Our Game- ANYTHING GOES/optional- SUMMERTIME FUN
Allsorts- ANYTHING GOES or WHAT MAKES YOU HAPPY
(sunny days, bright colours make me happy)

Supplies
Stamps-none
Inks- DOX
Paper- Solar White
Accessories and Tools- stencil (A Colorful Life Designs); TE Blending Brushes;
Bold Birthday die (TE); silver gems (Dollar Store)

Sunday, 15 June 2025

To My Friend

 
Welcome
Meet today's card I made by doing some stencil layering using 2 new stencils from A Colorful Life Designs called:
***Rainbow Roads is our Mid-month release and is on sale***

So, here's what I did to create my card.
  • I placed the Open Coils stencil over a piece of white cardstock and inked it up with some Picked Raspberry and some Tattered Rose Distress Oxide ink.
  • Leaving that stencil in place, I layered the Rainbow Roads stencil right over it and inked again using some Prize Ribbon DOX ink. It created a fun designs behind the coils by layering them.
  • Next, using the Colour Wheel Love die, I cut the large circle from the stenciled panel and then from a piece of navy cardstock as well.  
  • I glued the stenciled panel onto a piece of pale pink, (sorry, it looks orange in the picture) and then onto a white A2 sized card base.
  • I took the piece of navy cardstock that I die cut and positioned it back into the cut area of the front panel.  I took the die cut from the stenciled part and glued it on top, off setting it a bit so I would become more visible.
  • I used some foam tape to pop the sentiment over the die cut middle.

Here are the stencils I used:

Was: $6.99
Now: $4.00


Thanks a lot for taking a look.

Adding my card to these challenges:
Cut it Up- MASCULINE
Crazy Catz- ANYTHING GOES
AAA Birthday- NO STAMPING

Supplies
Stamps- none
Inks- DOX
Paper- Solar White
Accessories and Tools- stencils (A Colorful Life Designs); TE Blending Brushes;
Friend die (Amazon); Colour Wheel die (Paper Rose)

Saturday, 14 June 2025

Notebook Hello


Happy Saturday!
Time for a fun card using the new for June stencil from A Colorful Life Designs called
If you are like me, I wasn't sure what a 'cog' was so I looked it up and it's a sort of gear. 
To me, they looked like connected flowers so that's how I used them.

So, here's how I made my card.
  • I placed a piece of white cardstock onto my Make Art Station and placed the Connected Cogs over the paper.  I inked it up with some Peacock Feathers Distress Oxide ink.
  • I took another piece of cardstock and inked it this time, with some Prize Ribbon DOX ink.
  • I splattered the panels and set aside to dry.
  • I die cut the 'hello' 5 times from white cardstock and stacked and glued them all together.  I glued that onto a blue die cut shadow.
  • When the stenciled pieces were dry, I used the Ripped Notebook die to cut the 2 stenciled pieces and an extra one from white cardstock and glued them all together.
  • I used some foam tape to add them to a piece of dark blue cardstock, then onto an A2 sized white card base.

Here is the stencil I used:

Thanks a lot for coming by to take a look and have a great weekend.

Adding my card to these challenges:
Simon Says Wed.- Fur, Feathers/and or Flowers
Simon Says Monday- MONOCHROME
Allsorts- WHAT MAKES YOU HAPPY or ANYTHING GOES

Supplies 
Stamps- none
Inks- DOX
Paper- Solar White
Accessories and Tools- stencil (A Colorful Life Designs); Make Art Station (Ranger);
Ripped Notebook die (Picket Fence); TE Blending Brushes; white Posca Pen;
foam tape

Friday, 13 June 2025

My Amazing Friend

Welcome
Today's card was created using a fun new for June stencil from A Colorful Life Designs called 

So, here's what I did to create my card.
  • I placed the Tiki Room stencil over a piece of white cardstock and inked up just the center with some Villainous Potion Distress Oxide ink and the rest of the panel with some Peacock Feathers DOX ink.
  • Using another piece of white cardstock, I die cut the Hud Outlines and then I rubbed my Villainous Potion DOX ink pad over the die cut to add the colour.
  • Next, using some blue cardstock, I did cut the 'friend' sentiment and the sentiment shadow with some white cardstock and glued them together.
  • I glued the stenciled panel onto a piece of white cardstock, then a piece of purple and then onto an A2 sized card base.
  • I glued the purple Hud Outlines die cut over my card base and the used some foam tape to pop the sentiment over that to finish my card off.

Here is the stencil I used:

Thanks a lot for coming by to take a look.

Adding my card to these challenges:
Cut It Up- MASCULINE
Fab 'n' Funky- USE YOUR DIE CUTS
Crafty Catz- ANYTHING GOES/OPTION- HOT COLORS

Supplies
Stamps- none
Inks- DOX
Paper- Solar White
Accessories and Tools- stencil (A Colorful Life Designs); Hud Outlines die (Paper Rose); 
TE Blending Brushes; friend die (Amazon)

Tuesday, 10 June 2025

Sending You Flowers


Good Morning
Here's a happy card I made using the new for June stencil from A Colorful Life Designs called 

So here's what I did to create my card.
  • I placed a piece of white cardstock onto my Make Art Station and then placed the Trim Octagon stencil down. I inked with some Picked Raspberry and some Ripe Persimmon Distress Oxide ink in bands across the paper.
  • I lifted the stencil off and die cut it using a flower die I got from Amazon.
  • Next, I stamped the sentiment with more of the Picked Raspberry DOX ink and then die cut it out.
  • I glued my stenciled card front onto a piece of white, then pink cardstock, and then onto a white A2 sized card base.
  • I used some foam tape to add the sentiment over the middle.
  • Lastly, I added some pink bling to finish off my card.

Here is the stencil I used:

Thanks a lot for coming by to take a look.

Adding my card to these challenges:
Little Red Wagon- SEE THROUGH IT
Cardz 4 Galz- FLORAL FRENZY
Word Power- SENTIMENT IS FOCUS

Supplies
Stamps- Big and Bold Stamp and die (SSS)
Inks- DOX
Paper- Solar White
Accessories and Tools- stencil and pink bling (A Colorful Life Designs); TE Blending Brushes;
Flower Die (Amazon)