Showing posts with label masculine. Show all posts

Saturday, 21 June 2025

For the Guys


Welcome
Today's card is featuring a fun new stencil for June from A Colorful Life Designs called:
Great stencil for making more masculine looking cards. I used it with an older release called:

So, here's what I did to create my card.
  • I began with a piece of white cardstock on my Make Art Station.  I placed the Square Cutout stencil down and inked over that with some Peacock Feathers Distress Oxide ink.
  • Leaving that stencil in place, I put the Gears stencil right over the top and inked it up again with some Dusty Concord DOX ink.
  • Next, I splattered the panel with my white Posca pen and set aside to dry.
  • I cut out the 'hello' sentiment 5 times from white cardstock and glued them together to create a stacked look.
  • I glued the stenciled panel onto a piece of purple cardstock and then onto a white A2  sized card base.
  • I cut 2 squares using a stitched square die and glued them into the middle area, added my sentiment last, over that.

Here are the stencils I used:


Thanks so much for coming by and taking a look.

Adding my card to these challenges:
Simon Says Wed.- WE'RE GOING AROUND IN CIRCLES
Simon Says Monday- SPRITZ and/or SPLATTER
Cut it Up- MASCULINE /ANYTHING GOES

Supplies
Stamps- none
Inks- DOX
Paper- Solar White
Accessories and Tools- stencils (A Colorful Life Designs); TE Blending Brushes;
Friend die (Amazon); white Posca pen; Stitched Squares (Amazon)

Friday, 18 April 2025

Winding Paths

Good Morning
This fun stencil is another one of the new releases from A Colorful Life Designs called:

So, here's what I did to create my card.
  • I placed the Winding Paths stencil over a piece of white cardstock and inked with some Dusty Concord and some Shaded Lilac Distress Oxide ink, alternating the colour.
  • I set that aside and inked another piece of white cardstock with some Wilted Violet DOX ink using the same stencil.
  • Next, I die cut the first panel I had inked using a diagonal die and set it aside
  • I die cut the birthday greeting with some dark purple cardstock 5 times, then glued them all together.
  • I glued one of the stenciled panels along the bottom onto a piece of purple cardstock and then I used some foam tape to pop the top one over that.  I glued those onto an A2 sized card base.
  • I glued the sentiment just above the die cut area and finally, added some purple gems.

Here is the stencil I used:

My Discount Code for Your Entire Order from A Colorful Life Designs:

Thanks so much for coming by and taking a look.

Adding my card to these challenges:
Craft Rocket- LAYER IT UP

Supplies
Stamps- none
Inks- DOX
Paper- Solar White
Accessories and Tools- stencil and gems- A Colorful Life Designs; Angle die (Amazon);
TE Blending Brushes; Happy Birthday die (TE)

Saturday, 25 January 2025

Birthday Boy


Welcome

I like to have some masculine cards on hand as I know sometimes it's hard to create them.
This newly released stencil from A Colorful Life Designs and a few shades of blue fit the bill.
The new stencil is called:

So, here's what I did to create my card:
  • I placed a piece of white cardstock onto my Make Art Station and put the MultiShadow stencil over that on an angle.  I inked it up with some Tumbled Glass Distress Oxide ink.
  • I cleaned the stencil off and then repositioned it slightly over and then inked again with some Uncharted Mariner DOX ink. I removed the stencil and was left with a lovely layered look effect.
  • I splattered the whole card front with my white Posca pen and set aside to dry.
  • When it was nice and dry, I die cut the sentiment shadow from the card front and then glued the black die cut sentiment onto that.
  • I glued the finished card front onto a piece of white cardstock, then light blue and then onto an A2 sized white card base.
  • I used some foam tape to pop the sentiment back into place and then finished it all off with 3 black gems around the sentiment.

Here is the stencil I used:


Thanks so much for coming by and taking a look.

Adding my card to these challenges:
My Time to Craft- MAKE IT MALE
Craft Rocket- SOMETHING NEW
Just Us Girls- USE STENCILS 

Supplies
Stamps- none
Inks- DOX
Paper- heavy white (Scribes Nook- Waterloo, Ont.)
Accessories and Tools- stencil (A Colorful Life Designs); TE Blending Brushes; 
black gems; Make Art Station (Ranger); Bold Birthday die (TE)

Monday, 17 June 2024

Happy Father's Day to My Guy


Welcome
Today, I am having fun creating a card for Father's Day for my husband.  I am using the newly released stencil from A Colorful Life Designs called:

So, here's what I did to create my card.
  • I placed the Swirling Droplets stencil over a piece of white cardstock and randomly inked it up with some Cracked Pistachio, Peacock Feathers and some Salty Ocean Distress Oxide ink.
  • I removed the stencil and then rubbed some of the Peacock Feathers DOX ink along the edges of the card front panel.
  • Next, I used my black Posca pen and splattered the whole panel.
  • While that dried, I stamped and clear heat embossed the beer cans and fussy cut them out.
  • To add colour to the cans, I pressed the Cracked Pistachio and the Peacock Feathers ink pads onto a piece of acetate, sprayed with water and dragged the stamped cans through the wet ink.
  • I stamped the sentiment from the same set onto a little piece of inky cardstock and then set aside to dry.
  • I glued the card front panel onto a piece of pale green cardstock, then onto an A2 sized card base.
  • I used some foam tape to add the cans over the center of my card front and then added the sentiment under it using some more of the foam tape.
  • To finish my card off, I added 2 black gems on either side of the sentiment.

Here is the stencil I used:

Discount Code for A Colorful Life Designs
(Affiliate with no extra cost to you) 

Thanks so much for coming by and taking a look.

Adding my card to these challenges:
Sweet Stampin'- FATHER'S DAY/ SPECIAL MAN
Allsorts- MASCULINE
Papercraft Challenges- FOR THE BOYS

Supplies
Stamps- Cheers Bruh (Unity)
Inks- DOX, Versafine Clair
Paper- heavy white (Scribes Nook, Waterloo, Ont.)
Accessories and Tools- stencil (A Colorful Life Designs); TE Blending Brushes;
black Posca pen; acetate sheet; black gems

Sunday, 26 May 2024

Rockin' Out


Good Morning

Today's card is more on the masculine side featuring the newly released for May stencil from 
A Colorful Life Designs called:

So, here's what I did to create my card.
  • I placed a piece of white cardstock onto my Make Art Station and put the Right Angles stencil over that. I inked with some Black Soot Distress Oxide ink.
  • I lifted the stencil off and then repositioned it and then inked again creating this fun pattern.
  • I splattered with my black Posca pen and set aside to dry.
  • While that dried, I die cut the guitar and the Burlap Texture die with some red cardstock.
  • I stamped the sentiment with some black and then glued it onto a piece of red cardstock.
  • Next, I glued the stenciled panel onto a piece of red cardstock and then onto an A2 sized card base.
  • I glued the Burlap die cut onto the panel, then added the guitar over that.  
  • Lastly, I used some foam tape to add the sentiment across the bottom.

Here is the stencil I used:

Discount Code for A Colorful Life Designs
(Affiliate with no extra cost to you) 

Thanks so very much for coming by and taking a look.

Adding my card to these challenges:
Dragonfly Dreams- USE A STENCIL
SAS4Kids- CARD FOR DAD/SPECIAL GUYS
Just Us Girls- ANYTHING GOES STENCIL WEEK

Supplies
Stamps- Rock On (High Hopes)
Inks- DOX, Versafine Clair
Paper- heavy white (Scribes Nook- Waterloo, Ont.)
Accessories and Tools- stencil (A Colorful Life Designs); Large Guitar die (Paper Rose);
Burlap Texture (Altenew); foam tape; black Posca pen

Sunday, 12 May 2024

Oh Boy, It's Your Birthday!

Welcome
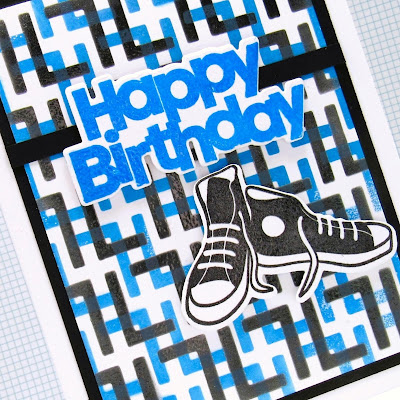
I really enjoy making masculine cards and when I saw this newly released stencil from A Colorful Life Designs, I knew what I wanted to do.  Love how it turned out!
So meet the new for May stencil called 

So, here's what I did to create my card.
  • I cut a piece of white cardstock and placed the Right Angles stencil over that.  I inked the whole panel with some Salty Ocean Distress Oxide ink.
  • I removed the stencil, cleaned it off and repositioned it again.  This time I inked with some Versafine Clair Nocturne ink.
  • Next, I stamped the running shoes with more of the black, then die cut them out.  
  • I stamped the sentiment with some more of the Salty Ocean DOX ink and die cut that out too.
  • I glued the stenciled panel onto a piece of black cardstock, then onto and A2 sized card base.
  • To help bring attention to my sentiment, I cut a strip of black cardstock and added the sentiment over that with some foam tape.
  • Finally, I used some more foam tape to add the running shoes under the sentiment.

Here is the stencil I used:

Discount Code for A Colorful Life Designs
(Affiliate with no extra cost to you) 

Thanks so much for coming by and taking a look.

Adding my card to these challenges:
Little Red Wagon- CREATE YOUR OWN BKG
Simon Says Wed.- USE DIE CUTS
Fab 'n' Funky- FOR A CHILD, BABY or TEEN

Supplies
Stamps- Sock Hop (Catherine Pooler); Big and Bold Sentiment and die (SSS)
Inks- DOX, Versafine Clair
Paper- heavy white (Scribes Nook- Waterloo, Ont.)
Accessories and Tools- stencil (A Colorful Life Designs); Misti (My Sweet Petunia)

Wednesday, 16 August 2023

Monochromatic Celebrate


Welcome
Today's card features the new for August stencil from A Colorful Life Designs called 
Such an innovative look with a great geometric design.

So, here's what I did to create my simple card.
  • I cut a piece of white cardstock and placed it onto my Make Art Station.  I positioned the Mid Century Angles stencil over it, centering it from side to side and top to bottom.
  • I added some Lucky Clover Distress Oxide ink into the middle of the shapes and then some Cracked Pistachio around the edges to give a 2-tone effect.
  • I removed the stencil and placed it into my Misti to stamp the sentiment along the bottom.
  • I glued the stenciled panel onto a piece of green cardstock, then onto an A2 sized card base.
  • I added some black gems for extra interest.

Here is the stencil I used:

Discount Code for A Colorful Life Designs
(Affiliate with no extra cost to you) 

I so appreciated that you came by to take a look.

Adding my card to these challenges:
Simon Says Monday- USE YOUR FAV TECHNIQUE- (stenciling)
Crafting Happiness- ANYTHING GOES
Crazy is Our Fame- Stencils are Our Game- ANYTHING STENCILED/OPT BUTTERFLIES

Supplies
Stamp- Celebrate (IO- retired)
Inks- DOX, Versafine Clair
Paper- heavy white (Scribes Nook- Waterloo, Ont.)
Accessories and Tools- stencil (A Colorful Life Designs); TE Blending Brushes; 
Make Art Station (Ranger); black gems

Friday, 11 August 2023

You Are a Classic


Happy Friday and Welcome!
Today's card is a simple one using and old pair of jeans and my Gel Plate.
A good masculine card to have on hand.

So, here's what I did to create my card.
  • I cut a piece of white cardstock first and got out my Gel Plate.
  • I pressed some Uncharted Mariner Distress Oxide ink onto my Gel Plate and using a brayer, I smoothed it all out on the plate. 
  • Next, I took an old pair of my husband's jeans and pressed them onto the plate to transfer the details of the pants.
  • I lifted the pants off and took my white cardstock and rubbed over my plate to take the print.
  • When the piece was dry, I stamped the sentiment into the corner.
  • I glued the card front onto a piece of black cardstock, then onto an A2 card base.
  • To finish the card off, I added 5 silver gems under the sentiment.

Thanks so much for coming by and taking a look.

Adding my card to these challenges:
Simon Says Monday- Happy Birthday
Use Your Stuff- RECYCLED/ UPCYCLED
Time Out- MONOCHROMATIC

Supplies
Stamp- Feelin Fizzy (Catherine Pooler)
Ink- Distress Oxide
Paper- heavy white- (Scribes Nook- Waterloo, Ont.)
Accessories and Tools- old jeans; Gel Plate; brayer; silver Gems

Monday, 5 June 2023

Forever Chasing the Sun


Welcome
Today's card was a fun one, using the new stencil called Waterspout from A Colorful Life Designs and the sentiment from the new Chasing the Sun clear stamp set.
I used it as part of my 'collage' style card.

So, here's what I did to create my card.
  • I laid a piece of white cardstock onto my Make Art Station and then I tore a piece of scrap paper to use as my masks for the top and bottom of my cardstock.
  • I positioned the Waterspout stencil along the middle of the masked area and inked that with some Blueprint Sketch Distress Oxide ink.
  • I turned the stencil upside down and inked the stencil again along the top edge with some Salty Ocean DOX ink.  I think the stencil gave a nice sense of movement to my background.
  • Using some Broken China DOX ink, I inked up the background so the torn edge would become more visible.
  • I did some stamping over the stenciled background to help provide more interest.
  • Next, I removed the masking paper and placed the stenciled panel into my Misti and stamped the image of the biker and stamped the sentiment from the Chasing The Sun stamp set.
  • I glued the finished panel onto a piece of navy cardstock, then onto an A2 sized card base.

Here is the stencil and stamp set I used:


Discount Code for A Colorful Life Designs
(Affiliate with no extra cost to you) 

Thanks so much for coming by and taking a look.

Adding my card to these challenges:
Simon Says Wed.- ANYTHING GOES
2 Sisters on the Blog- MEN'S CARD AND HOBBY
Pearly Sparkles- MAKE IT MASCULINE


Supplies
Stamps- Chasing the Sun (ACLD); Friendship Script (HA); Graffiti Grunge (Kaiser Craft);
Bike Boy (Flonz)
Inks- DOX, Versafine Clair
Paper- heavy white (Scribes Nook, Waterloo, Ont.)
Accessories and Tools- stencil (ACLD); Make Art Station (Ranger); Misti;
scrap paper; TE inking Brushes

Thursday, 23 February 2023

Rock and Roll


Welcome
Today's card is a masculine one, pretty simple one to create.
I used the new Sound Waves stencil from A Colorful Life Designs for the background.

So here's what I did to create my card.
  • I got out my Waffle Flower Stencil Mat and positioned the Sound Waves stencil over a piece of white cardstock.
  • I inked over the stencil with some Broken China Distress ink and covered the whole piece of cardstock.
  • I took another scrap of white cardstock and stenciled that next.  
  • I cut the scrap down so it would match up with the background stenciling, then placed that into my Misti to stamp the image of the guitar player.  I stamped using Archival Black so the stripes wouldn't show on the image.
  • I clear heat embossed the image to help make it pop.
  • I took the larger panel and placed that into my Misti to stamp the sentiment and clear heat embossed that as well.
  • I glued the larger stenciled panel onto a piece of matching blue cardstock and then onto an A2 sized card base.
  • I pop dotted the guitar player over to the side, matching the lines up with the background.
  • Finally, I added 3 black gems just under the sentiment.


Here is the stencil I used:

Discount Code for A Colorful Life Designs
(Affiliate with no extra cost to you) 

Thanks so very much for taking a look.

Adding my card to these challenges:
Simon Says Wed.- ANYTHING GOES
Krafty Chicks- ALL OCCASIONS

Supplies
Stamps- Rock On (High Hopes); Rocker (IO- retired)
Inks- Distress Oxide; Archival Black
Paper- heavy white (Scribes Nook- Waterloo, Ont.)
Accessories and Tools- Stencil (ACLD); TE Blending Brushes; Misti; black gems;
Clear EB powder; Waffle Flower Stencil Mat