Saturday 25 February 2023

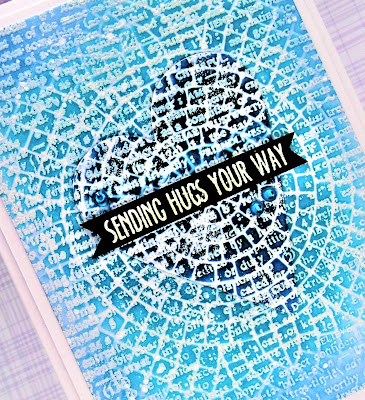
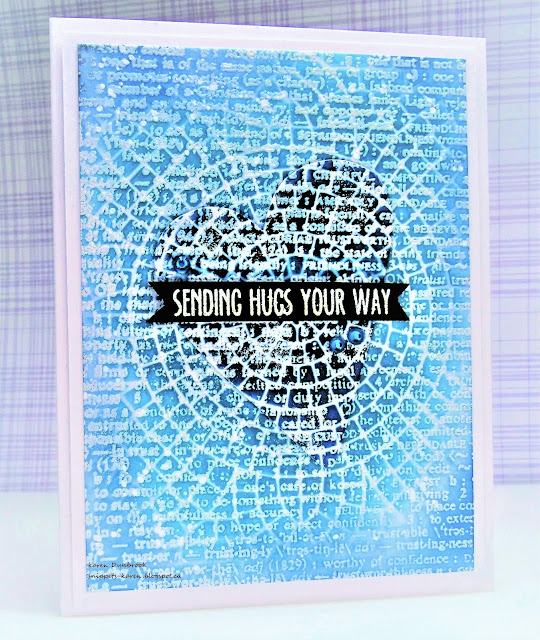
Flower Mosaic


Welcome
Meet today's card using another February release from A Colorful Life Designs called Flower Mosaic.
I combined the stenciling with some white heat embossing as a resist to create my card.

So, here's what I did to create my card.
  • I took a piece of white cardstock, placed it into my Misti and stamped this Friendship script stamp over my cardstock with some Versamark ink, then white heat embossed the entire background.
  • I placed the white embossed panel onto my Make Art Station and positioned the Flower Mosaic stencil over that.  I rubbed on some Uncharted Mariner Distress Oxide ink just into the center of my panel, then inked the rest of the panel with Peacock Feathers Distress Oxide ink.
  • I removed the stencil and wiped over the embossing to lift the excess ink with a paper towel.
  • Next, I took the panel and die cut the heart from the center.
  • I glued the piece onto some white cardstock, then onto an A2 sized card base.
  • I pop dotted the heart back into place over the large main panel.
  • I took a scrap of black cardstock, stamped the sentiment and white heat embossed that as well.
  • I popped the sentiment right over the middle of the heart.

Here is the stencil I used:

Discount Code for A Colorful Life Designs
(Affiliate with no extra cost to you) 

Thanks so much for coming by and taking a look.

Adding my card to these challenges:
Simon Says Wed.- ANYTHING GOES

Supplies
Stamps- Everyday Sentiments (Your Next Stamp); Friendship Background (Hero Arts)
Inks- Versamark; Distress Oxides
Paper- heavy white (Scribes Nook- Waterloo, Ont.)
Accessories and Tools- Flower Mosaic stencil (ACLD); heart die (Hero Arts);
white embossing powder; Make Art Station (Ranger); TE inking Brushes;
foam tape; Misti (My Sweet Petunia)

Thursday 23 February 2023

Rock and Roll


Welcome
Today's card is a masculine one, pretty simple one to create.
I used the new Sound Waves stencil from A Colorful Life Designs for the background.

So here's what I did to create my card.
  • I got out my Waffle Flower Stencil Mat and positioned the Sound Waves stencil over a piece of white cardstock.
  • I inked over the stencil with some Broken China Distress ink and covered the whole piece of cardstock.
  • I took another scrap of white cardstock and stenciled that next.  
  • I cut the scrap down so it would match up with the background stenciling, then placed that into my Misti to stamp the image of the guitar player.  I stamped using Archival Black so the stripes wouldn't show on the image.
  • I clear heat embossed the image to help make it pop.
  • I took the larger panel and placed that into my Misti to stamp the sentiment and clear heat embossed that as well.
  • I glued the larger stenciled panel onto a piece of matching blue cardstock and then onto an A2 sized card base.
  • I pop dotted the guitar player over to the side, matching the lines up with the background.
  • Finally, I added 3 black gems just under the sentiment.


Here is the stencil I used:

Discount Code for A Colorful Life Designs
(Affiliate with no extra cost to you) 

Thanks so very much for taking a look.

Adding my card to these challenges:
Simon Says Wed.- ANYTHING GOES
Krafty Chicks- ALL OCCASIONS

Supplies
Stamps- Rock On (High Hopes); Rocker (IO- retired)
Inks- Distress Oxide; Archival Black
Paper- heavy white (Scribes Nook- Waterloo, Ont.)
Accessories and Tools- Stencil (ACLD); TE Blending Brushes; Misti; black gems;
Clear EB powder; Waffle Flower Stencil Mat

Tuesday 21 February 2023

Offbeat Circles


Welcome
Meet today's card.
This new February released stencil called Offbeat Circles from A Colorful Life Designs is a fun one.

So, here's what I did to create my card.
  • I laid a piece of white cardstock onto my Make Art Station and positioned the Offbeat Circles over that.  
  • To give my card a bit of a different stenciled look, I applied the inks using a baby wipe over the stencil.  The colours I used from left to right were:  Lumberjack Plaid, Carved Pumpkin and Mustard Seed Distress Oxide ink.
  • To help get a bit more definition to the look of the stenciling, I went back over with a blending brush and bit more of the inks mentioned above.
  • Leaving the stencil in place, I stamped over with some text to help add interest.
  • I removed the stencil and stamped the grid pattern over that.
  • I die cut a circle from the center of the finished panel and stamped the sentiment from Avery Elle onto that.
  • I glued the panel onto a piece of heavy white cardstock, then onto an A2 sized card base.

Here is the stencil I used:

Discount Code for A Colorful Life Designs
(Affiliate with no extra cost to you) 

Thanks so much for coming by and taking a look.

Adding my card to these challenges:
We Love Stamping- ANYTHING STAMPED/OPTION- STENCIL
AAA Birthday- USE A STENCIL
Inkspirational- USE A STENCIL

Supplies
Stamps- Everyday Circle Tags (Avery Elle); Faded Text (TH); Grid (SSS)
Inks- DOX, Versafine Clair
Paper- heavy white (Scribes Nook- Waterloo, Ont.)
Accessories and Tools- Offbeat Circles stencil (A Colorful Life Designs); Make Art Station (Ranger);