Monday 30 January 2023

In Our Thoughts


Hello and Welcome
I can't believe it's the end of January already and how fast the month flew by!  
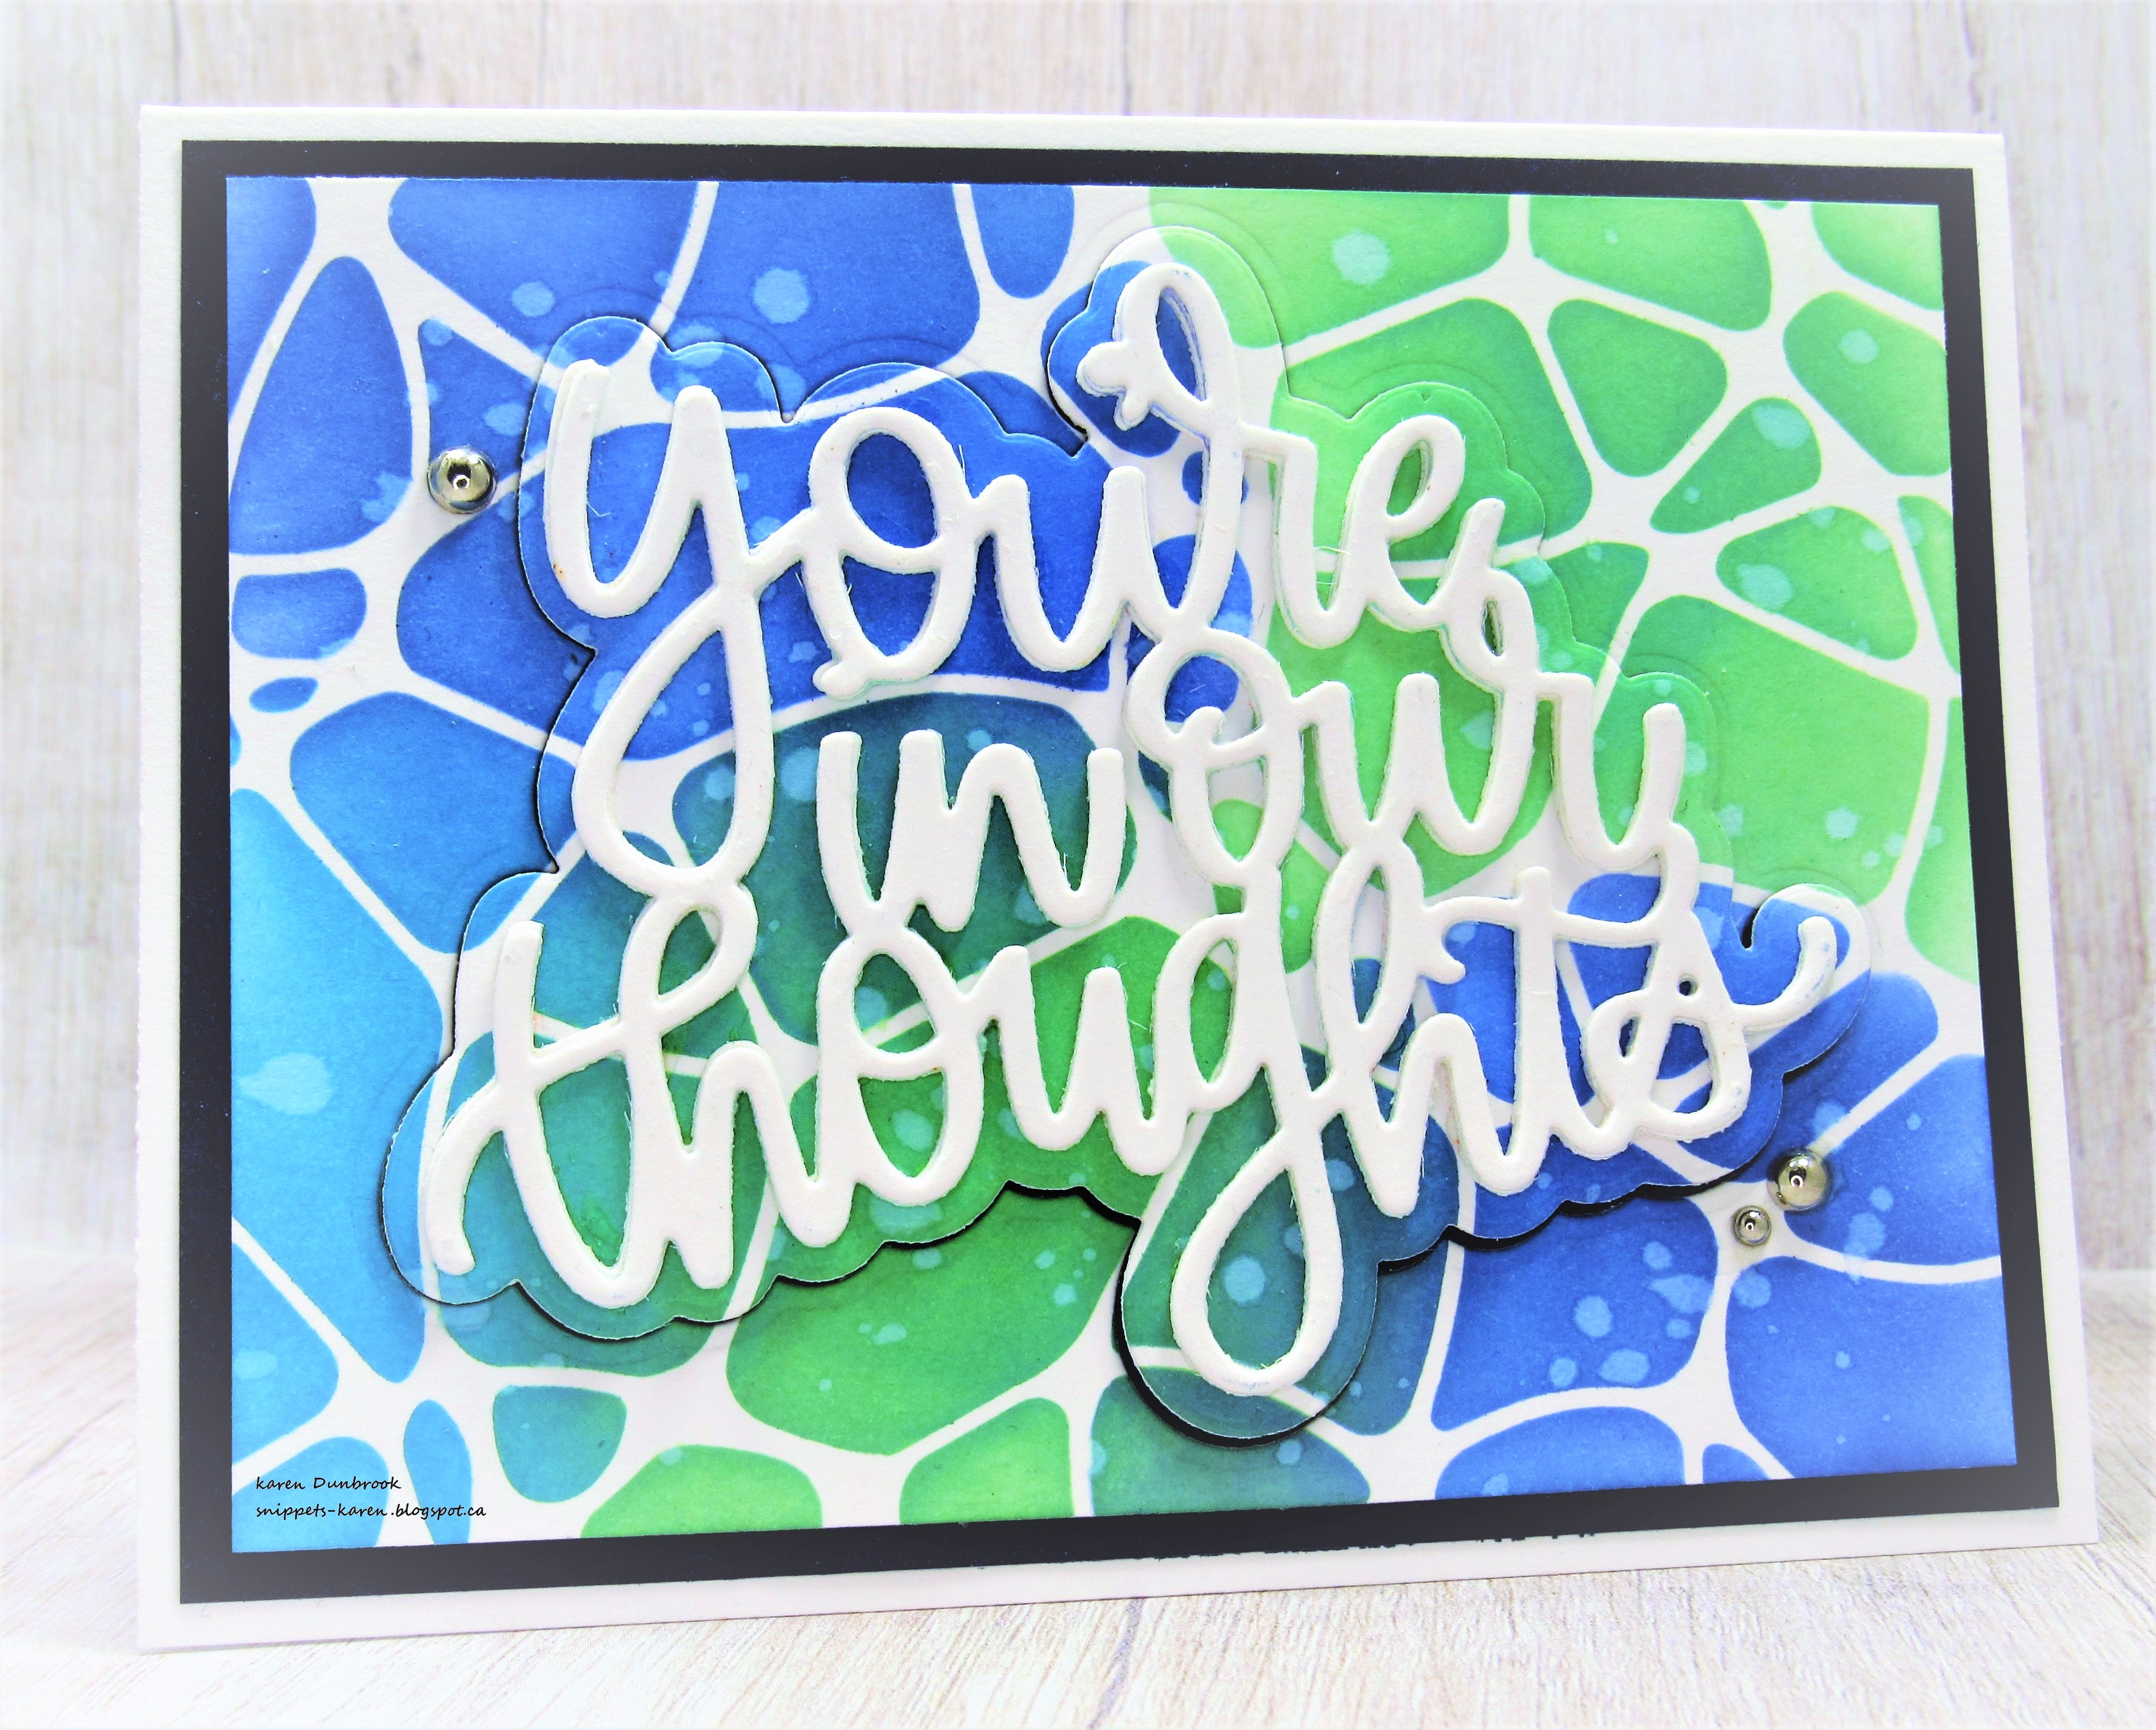
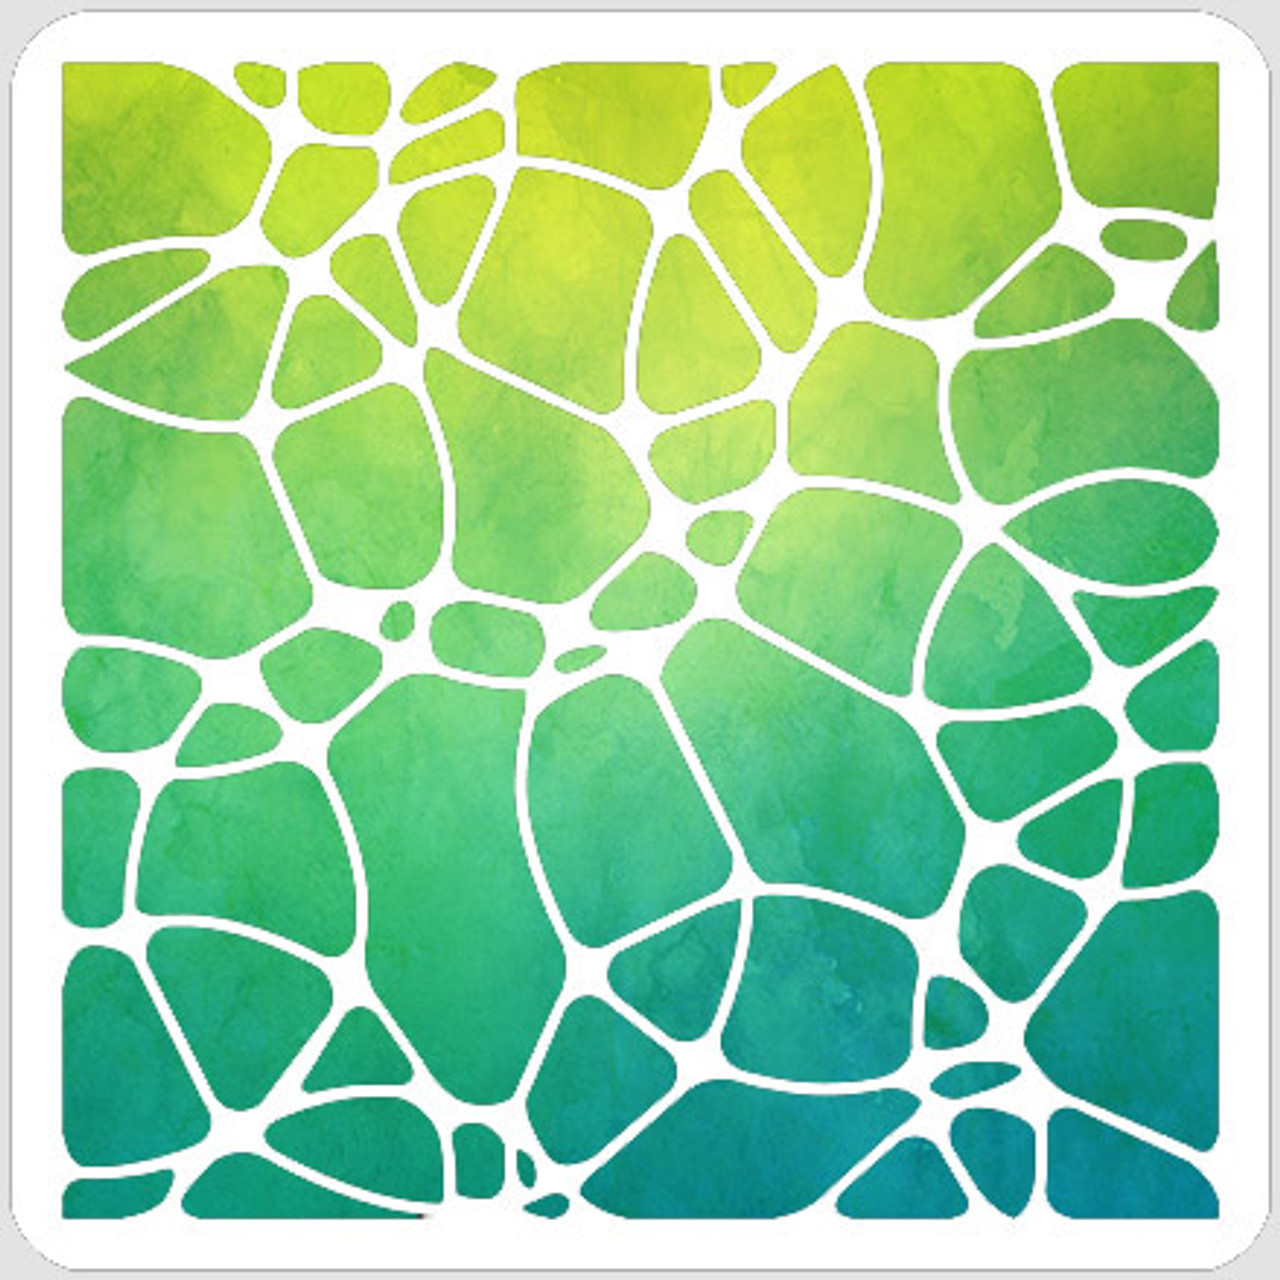
Today's card features the newly released stencil called Three Circles from A Colorful Life Designs.  A little masking and some inking and my card was born.

So, here's what I did to create my card.
  • I placed a piece of white cardstock onto my Make Art Station and secured the Three Circles stencil over it.  I masked off an area, trying to keep with the circle shape of the stencil in the top area and inked that up with some Broken China and Uncharted Mariner Distress Oxide ink.
  • Next, I masked off the bottom corner, again trying to somewhat follow the shape of the circle and inked up with some more of the same ink colours.
  • I moved the masks to the top right hand corner and inked that with some Cracked Pistachio and some Lucky Clover DOX ink and did the same to the bottom area.  
  • I splattered the whole panel with water to lift some of the ink and add interest.
  • After that dried, I positioned the outline of the sentiment die into the center of the inked panel and die cut that out. 
  • I die cut the sentiment with some white cardstock and glued it over the outlined piece.
  • I glued the whole thing onto some dark navy cardstock, then onto an A2 card base.
  • I pop dotted the sentiment back into place, matching up the pattern.
  • Finally, to finish it all off, I added 3 silver gems around the sentiment.

Here is the stencil I used:

Discount Code for A Colorful Life Designs
(Affiliate with no extra cost to you) 

Thanks so much for coming by and taking a look.

Adding my card to these challenges:
A Place to Start- ANYTHING GOES
Get Creative Challenge- SOMETHING NEW (die and stencil)
Simon Says Wed.- ANYTHING GOES

Supplies
Stamps- none
Inks- Versafine Clair; DOX
Paper- Scribes Nook- Waterloo, Ont.
Accessories and Tools- die (SSS); TE Blending Brushes; stencil (ACLD); silver gems;
Make Art Station (Ranger)

Sunday 29 January 2023

Snowflake Hello


Welcome
It's my turn to host the TLC- Technique Lovers Challenge at Splitcoast Stampers.
My challenge is called:
For this one, we will be stamping with the front and back side of our stamps.

So, here's what I did to create my card.
  • I began by looking through my stamps to see what set would work well for this technique.  I pulled out this Snowflake Flurry set and got out my Misti to start stamping.
  • I picked out some fun snowflakes I wanted to stamp with and positioned the back part of the stamps, facing up in my Misti.  The image part was pressed against the door of the Misti instead of facing outwards.
  • I inked up the backs of the stamps with some Distress Oxide ink and pressed onto my cardstock.  I repeated that process until I was happy with the inking.  The colours I used were:  Worn Lipstick, Shaded Lilac, Cracked Pistachio and Peacock Feathers
  • Next, I cleaned off the backs of all the stamps and turned them over to the image side to stamp them over their matching backsides.  I used the smallest snowflakes from the same set, to fill in the empty areas.  
  • I glued the inked up panel onto a piece of black cardstock, then onto an A2 sized card base and set it aside.
  • I die cut the hello and the shadow and glued them together.
  • I glued the die cut sentiment over the snowflakes and then finally, added black gems to the center of my snowflakes.

Thanks so much for coming by and taking a look.
I hope you give it a try!

Adding my card to these challenges:
Simon Says Wed.- ANYTHING GOES
Allsorts- FOR MEN/BOYS


Supplies
Stamps- Snowflake Flurries (MFT)
Inks- Versafine Clair, Distress Oxide
Paper- Scribes Nook- Waterloo, Ont.
Accessories and Tools- Misti (My Sweet Petunia); Hello die (SSS); black gems

Friday 27 January 2023

Lots of Love


Welcome
Meet today's card.
I had fun playing with 2 new stencils from A Colorful Life Designs called Heart Wreath and Big Bows.
Super simple card to make.

So, here's what I did to create my card.
  • I laid a piece of white cardstock onto my Make Art Station and positioned the Heart Wreath stencil over my paper.  I inked it up with some Picked Raspberry Distress Oxide ink.
  • I wanted to add some shading to the hearts, so leaving the stencil in place, I inked areas with some Lumberjack Plaid DOX ink.
  • Before I removed the stencil, I splattered with my white Posca pen.
  • I set that aside to dry and then inked up the Big Bows stencil with the same inks as mentioned above and fussy cut that out.
  • I placed the inked wreath panel into my Misti and stamped the sentiment into the center of the wreath.
  • I glued the panel onto a piece of pink cardstock, then onto an 4 1/4" square notecard.
  • I pop dotted the bow onto the bottom part of the wreath.  


Here are the stencils I used:


Discount Code for A Colorful Life Designs
(Affiliate with no extra cost to you) 

Thanks so much for coming by and taking a look.

Adding my card to these challenges:
Simon Says Wed.- ANYTHING GOES
Paper Craft Crew- LOVE IS IN THE AIR

Time Out- INSPIRED BY WORDS

Supplies
Stamp- Laugh and Love (IO- retired)
Inks- Versafine Clair; DOX 
Paper- Scribes Nook, Waterloo, Ont.
Accessories and Tools- stencils (ACLD); Make Art Station (Ranger); 
TE Blending Brushes; Misti

Tuesday 24 January 2023

Happy Mail


Welcome
Who doesn't like getting some Happy Mail?
Today's card features the newly released Love Letters from A Colorful Life Designs and is a good one for those of us that love to send out happy mail.

So, here's what I did to create my card.
  • I placed a piece of white cardstock onto my Make Art Station and using some love tack tape, I masked around the center envelope of the Love Letters stencil, then inked it up with some Cracked Pistachio Distress Oxide ink.
  • I moved the masks around each time and inked all the envelopes with these colours:  Shaded Lilac, Broken China, Picked Raspberry, Mustard Seed and some Carved Pumpkin DOX ink.  Moving the masks around to ink around each envelope wasn't that difficult.
  • When I was happy with the inking, I placed the piece into my Misti and stamped the big Hello in the corner.
  • I glued the panel onto a piece of blue cardstock, then onto an A2 sized card base.
  • Finally, I added 3 black gems around the sentiment.

Here is the stencil I used:

Discount Code for A Colorful Life Designs
(Affiliate with no extra cost to you) 

Thanks so much for coming by and taking a look.

Adding my card to these challenges:
Send a Smile 4 Kids- VALENTINES/ LOVE
Crafty Calendar- ADD A SENTIMENT
Get Creative- SOMETHING NEW (stencil and stamp)

Supplies
Stamp- XL Greetings (SSS)
Inks- Versafine Clair, DOX
Paper- Scribes Nook, Waterloo, Ont
Accessories and Tools- stencil (ACLD); TE Blending Brushes; Make Art Station (Ranger);
black gems (Dollar Store); Misti