Showing posts with label Thinking of You. Show all posts

Saturday, 22 April 2023

You're on my Mind


Hello and Welcome
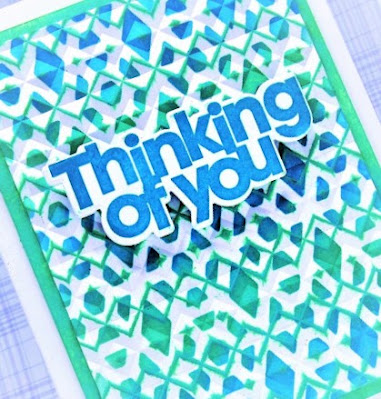
Today's card features a new stencil from A Colorful Life Designs called Graphic Lace.

So, here's what I did to create my card.
  • I placed the Graphic Lace stencil over a piece of white cardstock on my Make Art Station.
  • I inked along the top part with some Peacock Feathers, moved down,, then added some Cracked Pistachio Distress Oxide ink after that. I kept moving my way down the panel inking with just those 2 colours over the stencil until the whole piece of cardstock was inked.
  • Next, I took the piece and embossed it with the Angled Mosaic eb folder from Altenew.  It was really amazing how much it changed the look.
  • To help add more interest, I gently rubbed the Cracked Pistachio ink pad over the raised areas to help reveal even more of the pattern.
  • I stamped the sentiment and then die cut it out. 
  • I glued the panel onto a piece of green cardstock, then onto an A2 sized card base.
  • I used some foam tape to pop up the sentiment.

Here is the stencil I used:

Discount Code for A Colorful Life Designs
(Affiliate with no extra cost to you) 

Thanks so much for coming by and taking a look.

Adding my card to these challenges:
Beyond the Blue- HAPPY BIRTHDAY
The Male Room- STENCILS/and or DIES

Supplies
Stamps- Big and Bold Sentiment (SSS)
Inks- DOX
Paper- Scribes Nook- Waterloo, Ont.
Accessories and Tools- stencil (ACLD); Angled Mosaic EB folder (Altenew);
die (SSS); TE Blending Brushes; Make Art Station (Ranger)

Monday, 30 January 2023

In Our Thoughts


Hello and Welcome
I can't believe it's the end of January already and how fast the month flew by!  
Today's card features the newly released stencil called Three Circles from A Colorful Life Designs.  A little masking and some inking and my card was born.

So, here's what I did to create my card.
  • I placed a piece of white cardstock onto my Make Art Station and secured the Three Circles stencil over it.  I masked off an area, trying to keep with the circle shape of the stencil in the top area and inked that up with some Broken China and Uncharted Mariner Distress Oxide ink.
  • Next, I masked off the bottom corner, again trying to somewhat follow the shape of the circle and inked up with some more of the same ink colours.
  • I moved the masks to the top right hand corner and inked that with some Cracked Pistachio and some Lucky Clover DOX ink and did the same to the bottom area.  
  • I splattered the whole panel with water to lift some of the ink and add interest.
  • After that dried, I positioned the outline of the sentiment die into the center of the inked panel and die cut that out. 
  • I die cut the sentiment with some white cardstock and glued it over the outlined piece.
  • I glued the whole thing onto some dark navy cardstock, then onto an A2 card base.
  • I pop dotted the sentiment back into place, matching up the pattern.
  • Finally, to finish it all off, I added 3 silver gems around the sentiment.

Here is the stencil I used:

Discount Code for A Colorful Life Designs
(Affiliate with no extra cost to you) 

Thanks so much for coming by and taking a look.

Adding my card to these challenges:
A Place to Start- ANYTHING GOES
Get Creative Challenge- SOMETHING NEW (die and stencil)
Simon Says Wed.- ANYTHING GOES

Supplies
Stamps- none
Inks- Versafine Clair; DOX
Paper- Scribes Nook- Waterloo, Ont.
Accessories and Tools- die (SSS); TE Blending Brushes; stencil (ACLD); silver gems;
Make Art Station (Ranger)

Sunday, 25 July 2021

In My Thoughts


Welcome
Meet today's card.
Playing with a new stencil called Lace Panel from A Colorful Life Designs...so pretty.

So here's what I did to create my card.
  • I cut a piece of white cardstock for my main panel.  I got out my Gel Plate and pressed on some Cracked Pistachio and some Rustic Wilderness Distress Oxide inks directly onto my plate just leaving a bit of space between them as not to contaminate the pads with the other colour.  I brayered the colours together to blend them.
  • Next, I laid the Lace Panel stencil onto the plate making sure that the stencil had good contact with the plate.  I then lifted off the stencil and rubbed a piece of white cardstock over the plate to lift the print.  I was left with this lovely background.
  • Next, I rubbed the print with my anti-static bag and then placed it into my Misti.
  • Using the dragonfly from the Dragonfly Reflections set, I stamped it using some Versafine Clair ink.
  • I stamped the sentiment in the corner then to add interest to the Dragonfly wings, I covered them with some Nuvo Crystal Glaze to add shine and dimension.
  • I splattered with my Posca black pen and then glued it onto a heavy white card base.

Here is the stencil I used:

 Discount Code for A Colorful Life Designs

Thanks so much for coming by and taking a look.

Adding my card to these challenges:
Shopping Our Stash- QUIT BUGGING ME
Crafty Calendar- ANYTHING GOES
Sweet Stampin'- CREATE YOUR OWN BKG

Supplies
Stamps- In My Thoughts (Hero Arts); Dragonfly Reflections (Visible Image)
Inks- Distress Oxides (colours mentioned above)
Paper- heavy white (Scribes Nook- Waterloo, Ontario)
Accessories and Tools- Lace Panel stencil (ACLD); Nuvo Crystal Glaze; Gel Plate; 
Brayer (TH); Misti

Tuesday, 11 May 2021

Delicate Flowers


Welcome
Meet today's card.
It has such a textural, unique look and was all done with the help of a piece of bubble wrap.  I watched a video by Tracy Evans and I was off to try it out.  I will be doing it again for sure.

So here's what I did to create my card.
  • I began with a piece of heavy white cardstock.  I took out some Dina Wakely acrylic paint and squeezed a small blob onto my TH Glass mat.  Using a small piece of bubble wrap, I picked up some of the paint and dabbed it onto my cardstock.
  • I continued that process, changing colours until the whole panel was painted up.  I set that aside to dry completely.
  • When it was totally dry, I rubbed the whole panel with an anti-static bag, then I pulled out this beautiful set called Fragile Foliage from Altenew.  I placed the painted panel into my Misti and stamped the flowers with some Versamark ink.  
  • I white heat embossed the flowers.  (Be sure to use the anti-static bag or you will have white embossing powder stuck all over the front of your card panel.)
  • Using a small leftover piece, I stamped the sentiment from the same set with some black and clear heat embossed that.
  • I glued the main panel onto a heavy white card base, then pop dotted the sentiment into the corner. 


Thanks so much for coming by and taking a look.

Supplies
Stamp- Fragile Foliage (Altenew)
Inks- Dina Wakely paint, Versamark, Versafine Clair
Paper- heavy white (Scribes Nook- Waterloo, Ontario)
Accessories and Tools- bubble wrap, Misti (My Sweet Petunia); Wow eb powder; 
anti-static bag, TH Glass Mat

Friday, 23 April 2021

Feeling Blue


Hello and Welcome
Meet today's card.
I called it Feeling Blue because of the colour and not because of the way I feel although we are in another lockdown as the third wave here in Ontario is proving to be the worst so far!
I always try and stay positive and look ahead to happier days.

So onto my card details...here's what I did.
  • I began with a piece from my stash. I had inked and stenciled it I think.  Since I'm always using my Distress Oxide inks, I'm guessing I used some of my favourite colours....Peacock Feathers, Salty Ocean and some Blueprint Sketch.  I placed it into the Letters Embossing folder from Carabelle and ran it through my Cuttlebug.  I sanded off the letters to give it a more unique look.
  • I set that aside and got out my Misti.  Using this new to me stamp called Fragile Foliage, I inked it up with some more of the colours of Distress inks mentioned above, then I die-cut it out.
  • I die-cut the 'Thinking of You' sentiment 3 times on some heavy white cardstock and glued them together for stability.
  • I glued the sanded background onto a heavy white card base, then glued on the flowers and the sentiment.


Thanks so much for coming by and taking a look.

Daisy Chain- MONOCHROMATIC


Supplies
Stamp- Fragile Foliage
Inks- Distress Oxides (TH)
Paper- heavy white (Scribes Nook-Waterloo, Ontario)
Accessories and Tools- Misti (My Sweet Petunia); Thinking of You die (Echo Park); 
Letters EB Folder (Carabelle); sandpaper; Cuttlebug

Tuesday, 30 March 2021

Plaid Thinking of You


Welcome
Meet today's card.
I'm always excited to get time to play especially with some new stencils.
This one is a great one called Tic Tac Toe from ACLD.
The great thing about this stencil is that it has no edge so is perfect for also creating slimline cards.

So here's what I did to create my card.
  • I decided to make a print on my Gel Plate so I got that out and some of my Distress Oxide inks and my brayer.  The Oxides work so well for this simple technique.  I took some Blueprint Sketch and brayered that onto my plate.  I laid the stencil down and then rubbed over my cardstock to pick up the print.  (you can see some of that ink in the background)
  • Without wiping the plate off, I brayered on some Broken China DOX ink onto the plate and using the same inked panel, I pulled another print right on top of the first one.  It gave a fun shadow like effect to my cardstock.
  • I took the inked panel and dried it completely.  I then placed it into my Cuttlebug and die cut the 'Thinking of You' sentiment.  I set all of that aside and die cut the sentiment again 4 times more from some white cardstock.  I glued the sentiments together and set them aside to dry.
  • I placed the inked background into my Misti, and stamped the Wildflowers Rest and Refresh from Simon Says with some Versafine Clair ink along the bottom.  I clear heat embossed the flowers to help them stand out more against the inked bkg.
  • I glued the panel onto a piece of white cardstock, then fit the layered sentiment back into the cut away area of the background for an Embedded Sentiment.  (I love using this technique as it doesn't cover up the background)
  • I glue it onto a heavy white card base.
 

Thanks so much for coming by and taking a look.


Discount Code for A Colorful Life Designs


Supplies
Stamps- Wildflowers (SSS)
Inks- DOX, Versafine Clair Noir
Paper- heavy white (Scribes Nook- Waterloo, Ont.)
Accessories and Tools- Tic Tac Toe stencil (A Colorful Life Designs); Wow clear eb powder;
heat tool; Misti (My Sweet Petunia); Gel Plate; Brayer (Speedball), Thinking of You die (Echo Park)