Wednesday 31 August 2022

Mix It Up Birthday


Welcome
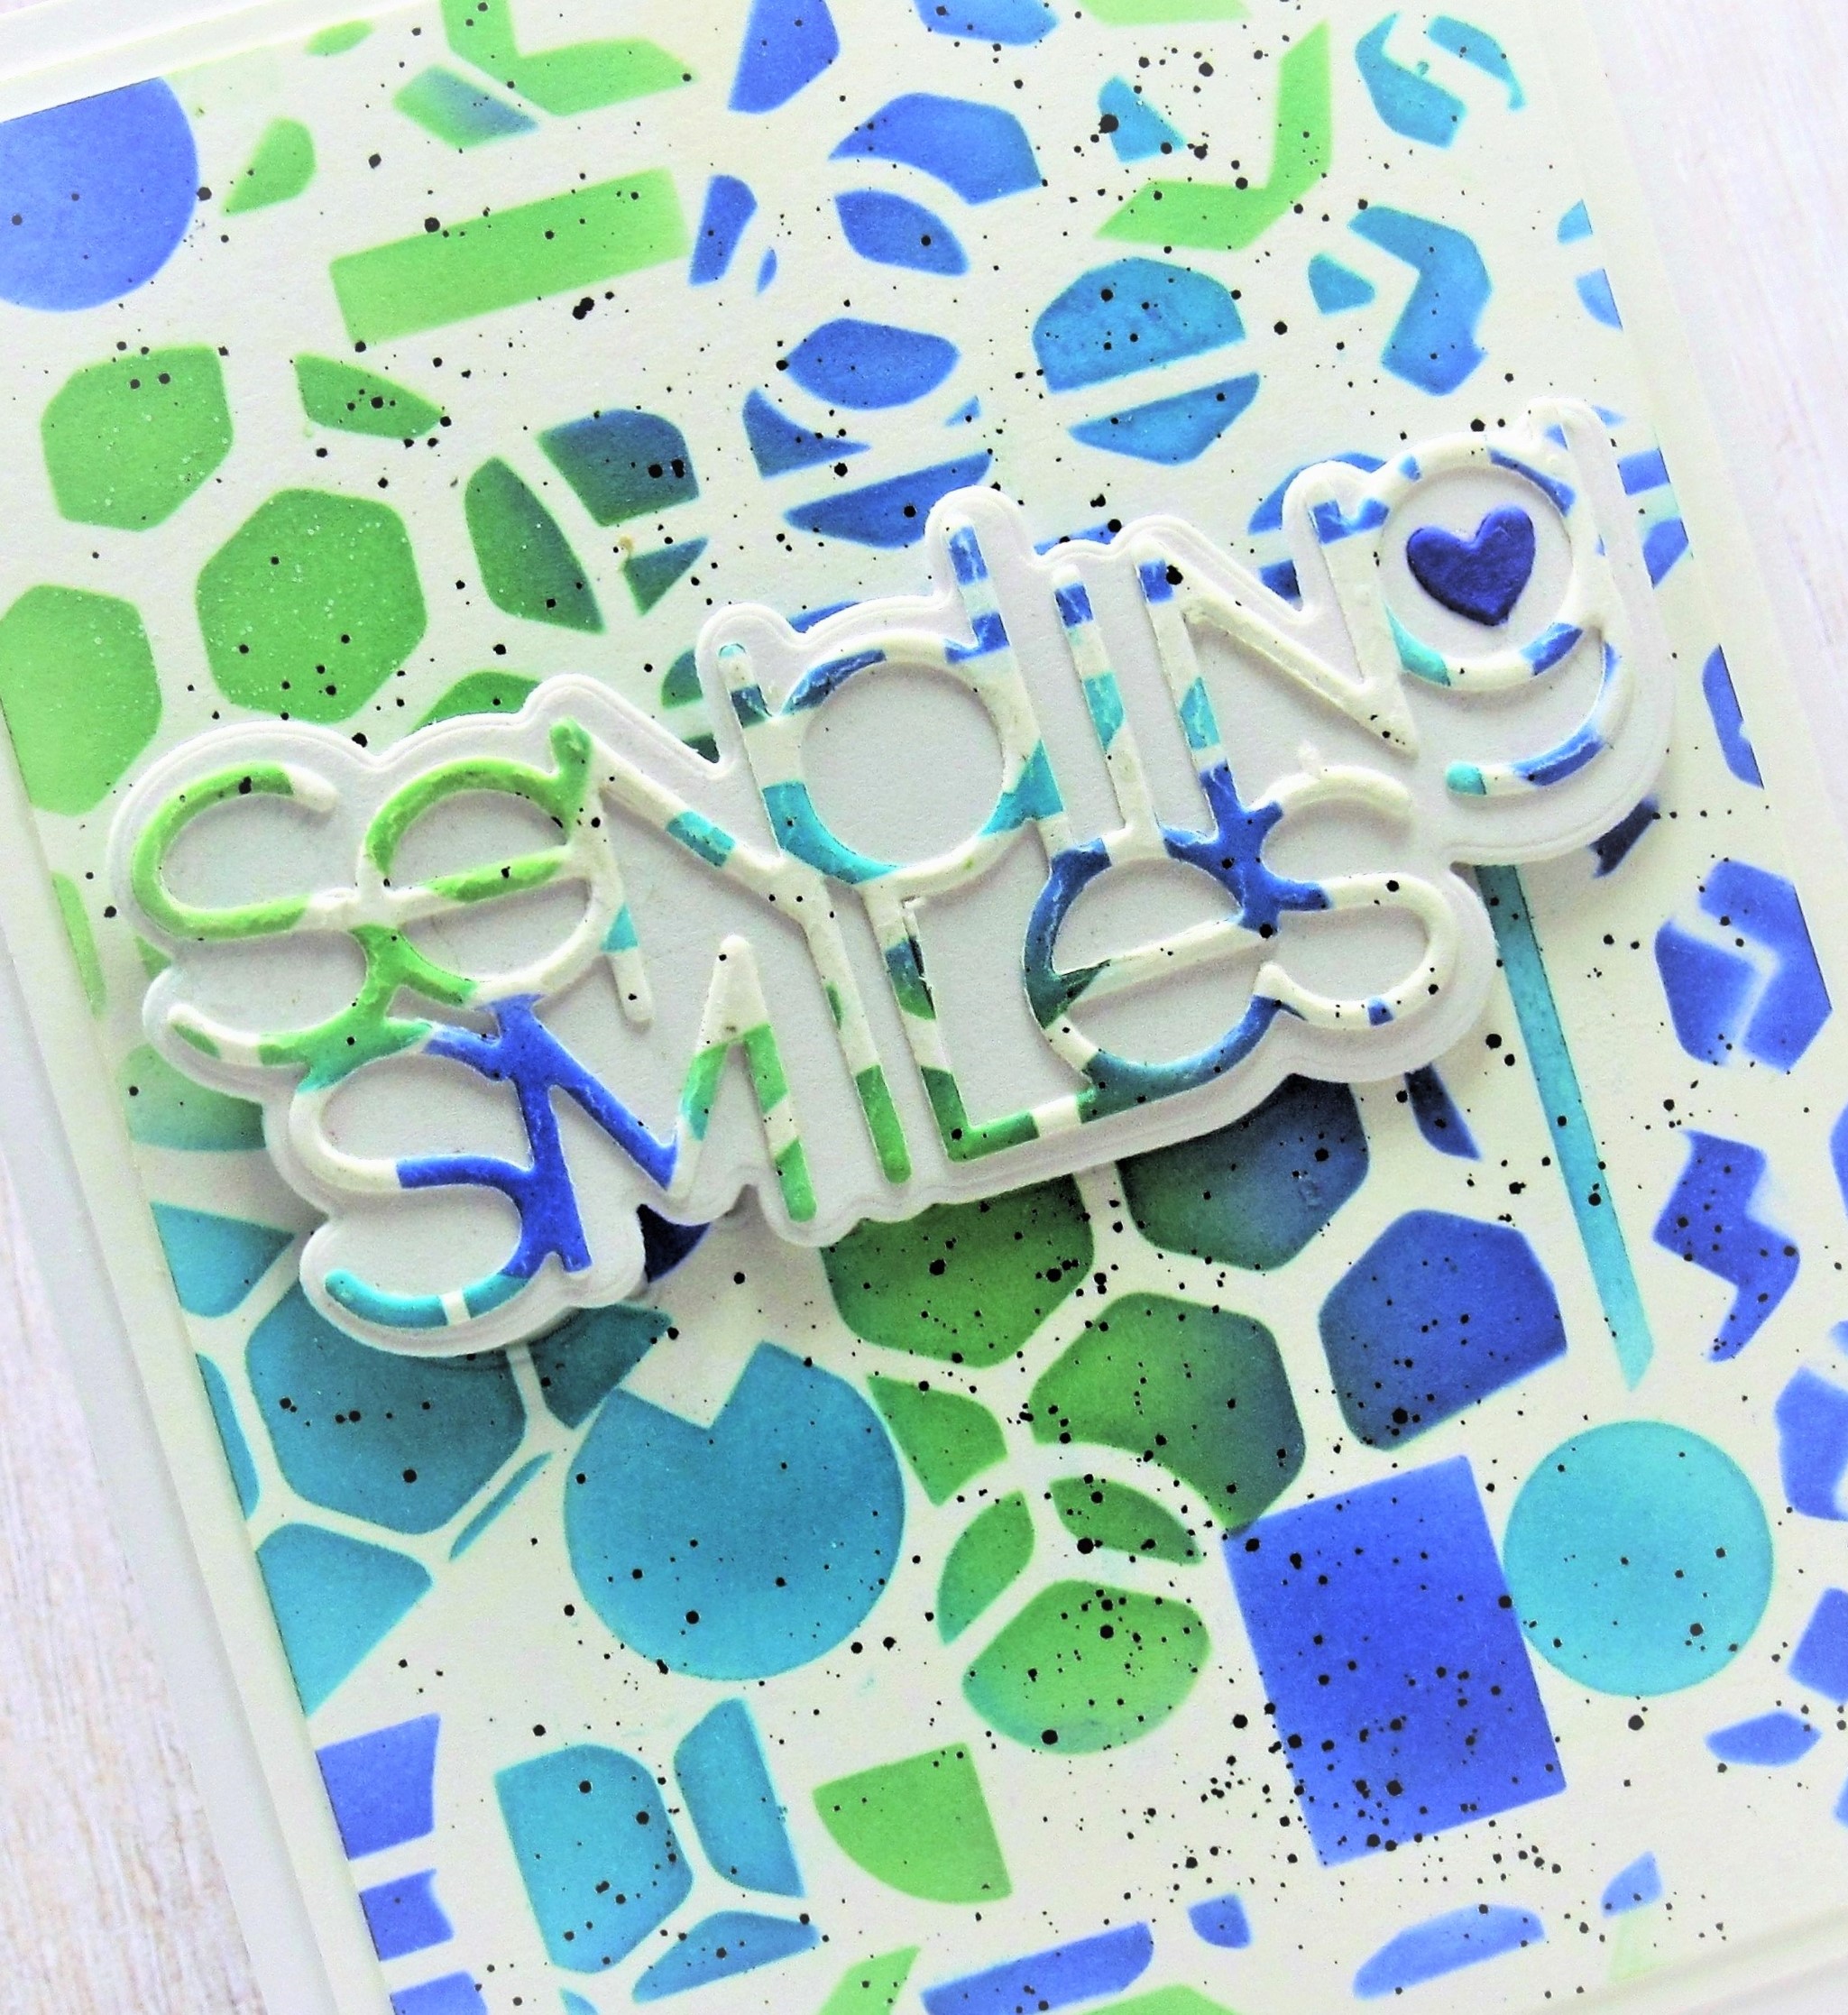
Meet today's card featuring this fun Cow Hide stencil from A Colorful Life Designs.
I wanted to try and give it a different look.

So here's what I did to create my card.
  • Like I mentioned above, I wanted to give the Cow Hide stencil a more unique look, plus I didn't have a cow stamp.  I cut a piece of white cardstock and placed it onto my Make Art Station.
  • Next, I positioned the Marvelous Masks Rectangle also from A Colorful Life Designs into the corner.  I wanted to use it for simplicity instead of having to mask.  
  • I laid the stencil over the mask and inked it up with some Picked Raspberry Distress Oxide ink.
  • I moved the rectangle mask (I did end up having to do a bit of masking using low tack tape) and repeated the process, again inking with some Mustard Seed and then some Carved Pumpkin.
  • When the card front panel was all inked, I added some details by stamping over the areas with the  same colour as I had used to ink it up.
  • I stamped the sentiment with some black ink and clear heat embossed it.
  • I carefully splattered with my black Posca pen just around the sentiment.
  • I glued it onto a piece of black cardstock, then onto an A2 card base.
  • To finish off my card, I added 3 black gems.

Here is the stencil and mask I used:
Cow Hide


Discount Code for A Colorful Life Designs
(affiliate with no extra cost to you)

Thanks so much for coming by and taking a look.

Adding my card to these challenges:
Simon Says Wed.- ANYTHING GOES
Simon Says Monday- MAKE YOUR OWN BKG

Supplies
Stamps- Grunge Tones (Visible Image); Scripted Bold Sentiments (Pinkfresh Studios)
Inks- DOX, Versafine Clair
Paper- Scribes Nook- Waterloo, Ont.
Accessories and Tools- stencils and masks (ACLD); Make Art Station (Ranger); 
TE Blending Brushes; gems (Dollar Tree), Lawn Fawn clear embossing powder

Sunday 28 August 2022

Embossing Folder Stamping with a Twist


Welcome
It's my turn to host the TLC (Technique Lovers) Challenge over at Splitcoast Stampers.
I always try my best to come up with challenges that are accessible to everyone and uses supplies we all most likely have in our stashes.
So I'm calling my challenge:

I have been trying to work on getting some Christmas cards made, so this one is another to add to the collection, all ready to mail out for the holidays.  

So here's what I did to create my card.
  • I began by looking through my supplies and found an embossing folder and a stencil that would work well together.  That really helps to make a more cohesive card front panel.
  • I opened the Texte Grunge Embossing Folder and rubbed some Cracked Pistachio Distress Oxide ink just on portions of the folder front, sprayed with water and then pressed my cardstock panel into the wet ink.  *For this technique, it is important not to cover the whole eb folder with ink as you want some white areas to be left behind*
  • I dried that, then using the Indian Blanket stencil from A Colorful Life Designs, I filled in the open areas randomly with the same above ink, merging the two patterns together. 
  • Next, I place the pine bough stamp in my Misti, inked it up with some Evergreen Bough DOX ink and stamped.  To add interest and more depth to the boughs, I used a Tombow marker to colour on just parts of the bough, sprayed with water and stamped again.
  • I repeated that process 3 more times, spacing out the greens over the card front.
  • When I was happy with the stamping, I splattered using my white Posca pen.
  • I stamped the sentiment between the boughs using my Misti again.
  • I used the end of a stylus to add the berries to the branches with some Barn Red DOX ink.  It helped brighten the branches a bit.
  • I glued it onto a piece of white cardstock, then onto an A2 card base.
  • Finally, I added 3 red gems near the sentiment.

Here is the stencil I used:

Discount Code for A Colorful Life Designs
(affiliate with no extra cost to you)

Thanks so much for coming by and taking a look.

Supplies
Stamps- Ornamental Pine (SU)
Inks- DOX; Versafine Clair, Tombow marker
Paper- heavy white- Scribes Nook- Waterloo, Ont.
Accessories and Tools- Embossing Folder (Carabelle); Indian Blanket stencil (ACLD);
TE Blending Brushes; Misti (My Sweet Petunia); white Posca Pen; red gems

Saturday 27 August 2022

Take Time


Welcome
As sad as I am to be seeing the summer coming to an end, there is something so magical about the Fall with the leaves all turning colours and the crisp, fresh air.
Today's card features a new die I just picked up called Falling Leaves.

So here's what I did to create my card.
  • I began by die cutting the leaves on some black cardstock, creating the frames around the leaves.
  • I looked through my stash of inked background and couldn't find one I wanted to use, so I decided to use some 'bleeding' tissue paper to give the colour to the leaves.
  • I took a piece of white cardstock and laid some squares of the tissue in colours that you would find in the Fall.  I sprayed with a generous amount of water and let dry completely.  
This is what it looked like after I sprayed it with the water.
So the ink from the tissue transfers onto the cardstock to colour it.

  • When the piece was totally dry, I removed all the little bits of tissue paper and die cut the leaves again with the above used die.
  • I glued the black outline part of the die onto a piece of white cardstock, then fitted the coloured tissue paper bits into place.
  • Next, I splattered with my black Posca pen and then glued it onto a 4 1/4" square card.
  • I stamped the sentiment in my Misti and then cut it out and glued it onto a piece of black cs.
  • I popped the sentiment into the corner.

Thanks so much for coming by and taking a look.

Adding my card to these challenges:
Paperminutes- DIE CUTS
Corrosive Challenge- ANYTHING GOES


Supplies
Stamp- Take Time- Impression Obsession (retired)
Inks- Versafine Clair
Paper- white (Scribes Nook- Waterloo, Ont.)
Accessories and Tools- Falling Leaves Coverplate (Photoplay); black Posca pen;
Bleeding Tissue Paper (Amazon); Misti

Tuesday 23 August 2022

Geometric Sending Smiles


Welcome
Why is the summer going by so quickly!!!??
I have had some time off and stepped away from social media, but I'm back now and ready to play.  

So meet today's card.
I used this fun Geo Framework stencil from A Colorful Life Designs to create my card.
Lots of geometric shapes.

So here's what I did to create my card.
  • I cut a piece of white cardstock and laid it onto my Make Art Station and positioned the Geo Framework stencil over that.
  • I inked it up in a random way with some Distress Oxide inks...Cracked Pistachio, Peacock Feathers and Blueprint Sketch, moving the stencil around and inking until the whole panel was covered.
  • Next, I die cut the 'Sending Smiles' sentiment from the center of the stenciled panel.
  • I cut the word shadow from some white cardstock next and glued them together.
  • I splattered using my black Posca pen, then glued it onto a piece of white cardstock, then onto an A2 size card base.
  • I popped the sentiment over the card panel.


Here is the stencil I used:

Discount Code for A Colorful Life Designs
(affiliate with no extra cost to you)

Thanks so much for coming by and taking a look.

Adding my card to these challenges:
Paper Minutes- DIE CUT
Cardz 4 Guys- STENCIL


Supplies
Stamps- none
Inks- DOX
Paper- heavy white (Scribes Nook-Waterloo, Ont.)
Accessories and Tools- Geo Framework stencil- ACLD; Sending Smiles die (SSS); 
black Posca pen; Make Art Station (Ranger)