Showing posts with label Fall. Show all posts

Saturday, 21 September 2024

Giving Thanks


Welcome
Here in Canada we will be celebrating Thanksgiving at the beginning of October, so I wanted to get a few card made to mail out.
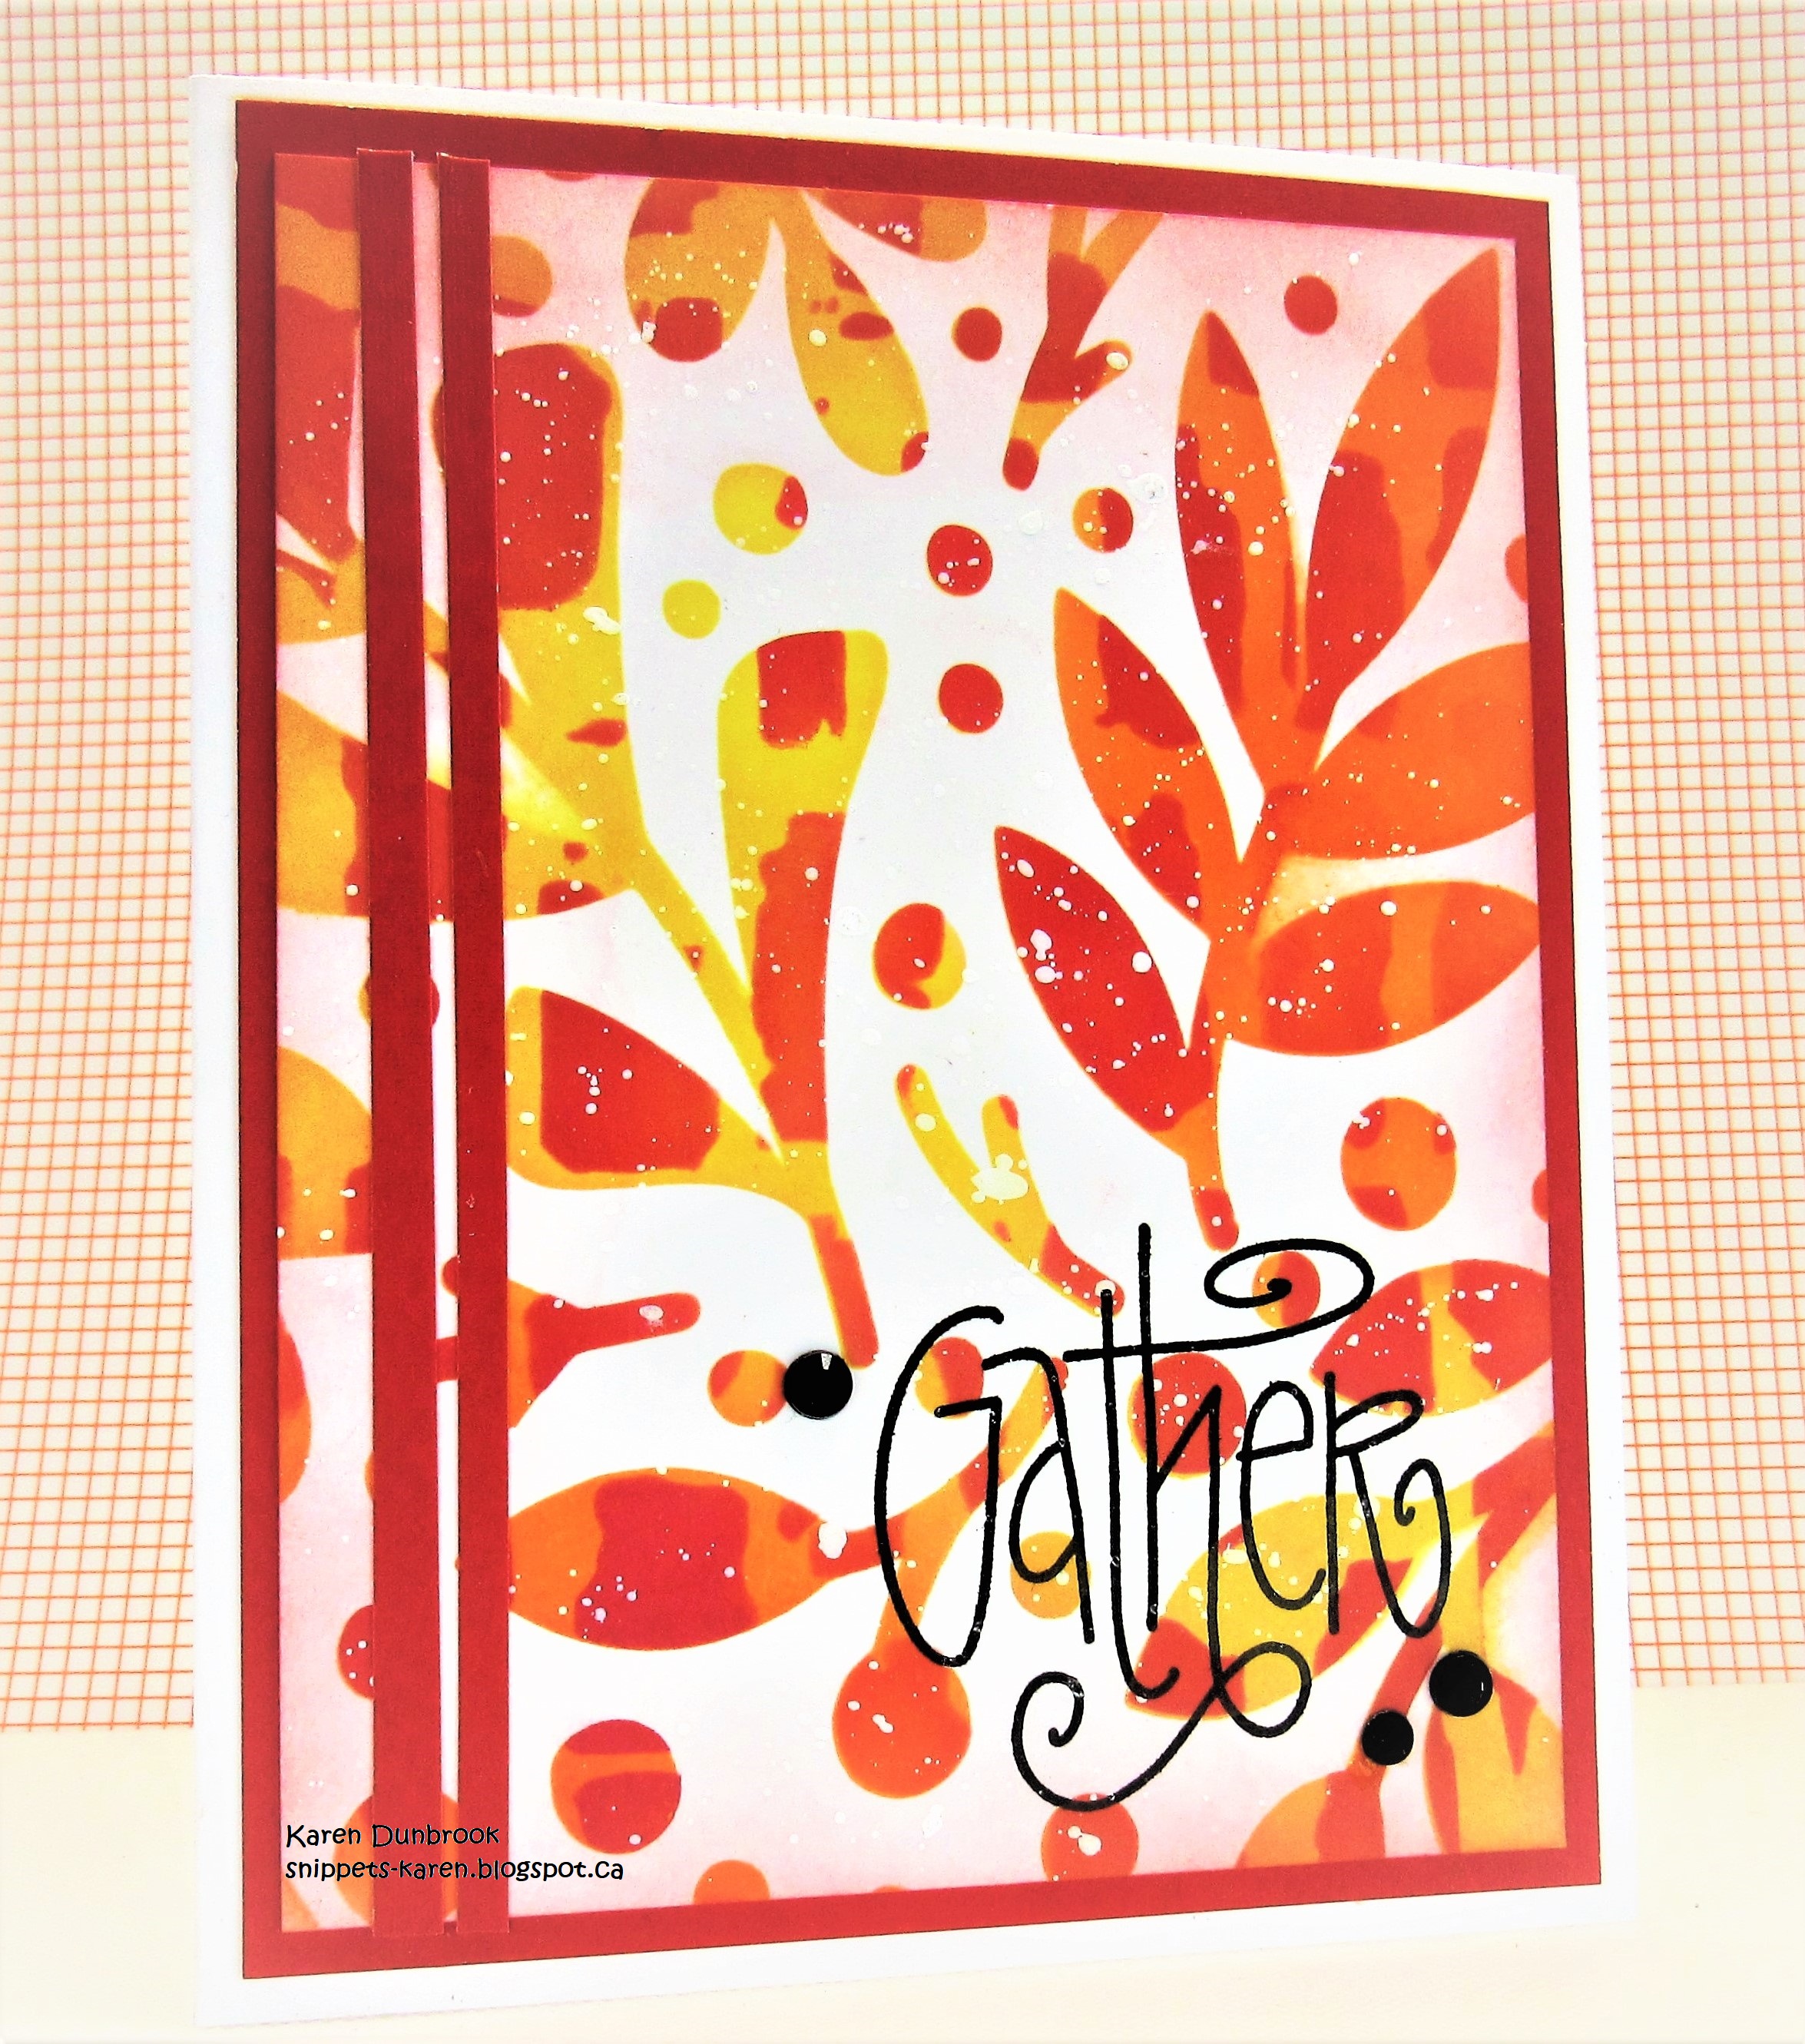
Today's card features the newly released stencil from A Colorful Life Designs called:
I paired it up with an older stencil called Stick Wreath to give the wreath a fuller look.

So, here's what I did to create my card.
  • I placed the Simple Leafy Frame stencil over a piece of white cardstock and inked it up with some Distress Oxide inks in these colours:  Rustic Wilderness; Lumberjack Plaid; Ripe Persimmon.
  • I removed that stencil and placed the Stick Wreath right over the stenciled leaves and inked with some Rusty Hinge and Vintage Photo DOX ink.
  • I used a circle die to cut out the middle area of the wreath.
  • Next, I got out a piece of dark green cardstock and embossed it with a dot embossing folder, then glued that onto an 4 1/4" square white card base.
  • I used some foam tape to pop the wreath over the embossed background.
  • I stamped the sentiment, cut it out and used some more foam tape to place it over the middle of the wreath.
  • I add a twine bow to the top to finish my card off.

Here are the stencils I used:
NEW

OLDER

Discount Code for A Colorful Life Designs
(Affiliate with no extra cost to you) 

Thanks so much for coming by and taking a look.

Adding my card to these challenges:
Alphabet Challenge- 'M' IS FOR MASCULINE
Cut it Up- COLORS OF FALL/AUTUMN
Craft Rocket Challenge- DOTS and/or STRIPES

Supplies
Stamp- Thanksgiving (Stampendous)
Ink- DOX; Versafine Clair
Paper- heavy white (Scribes Nook- Waterloo, Ont.)
Accessories and Tools- stencils (A Colorful Life Designs); Infinity Circle die (HA);
foam tape; twine; Dots Embossing folder

Friday, 20 September 2024

Halloween Fun Times

Good Morning and Welcome
I had fun creating today's card using 2 new stencils from A Colorful Life Designs called:

So, here's what I did to create my card.
  • I used some Black Soot and some Hickory Smoke Distress Oxide ink and blended over the Spooky Web stencil on some white cardstock. To help with the spooky vibe, I added some Villainous Potion DOX ink along the edges.
  • I splattered over the spider web with my black Posca pen, then set aside to dry.
  • Next, I inked up the Fast Food stencil on a piece of black cardstock with some Versamark ink and  used some white embossing powder and heat set it. I added some white splatters with my other Posca pen.
  • I glued the spider web stenciled panel onto a piece of gray cardstock, then onto some purple cardstock and finally onto an A2 sized card base.
  • I used some foam tape to pop the black embossed sentiment panel over to the one side.

Here are the stencils I used:


Thanks so much for coming by and taking a look.

Adding my card to these challenges:
Crazy is Our Fame, Stencils are Our Game- FALL FRENZIE/ANYTHING GOES
Two Old Bats- ANYTHING GOES HALLOWEEN
Simon Says Wed.- MAKE YOUR OWN BKG

Supplies
Stamps- none
Inks- Versamark; DOX
Paper- heavy white (Scribes Nook- Waterloo, Ont.)
Accessories and Tools- stencils (A Colorful Life Designs); white and black Posca pens;
small inking brushes (Amazon); foam tape; white embossing powder

Saturday, 14 September 2024

Fright Night

Welcome
I'm creating some cards for Halloween and today's card features the newly released stencil from A Colorful Life Designs that is called:
This stencil is really a fun one since it has 3 sizes of moons to use.

So, here's what I did to create my card.
  • I cut a piece of white cardstock and secured the Moon Man stencil over my paper...I used the middle sized image.  I inked that up with some Hickory Smoke and some Black Soot Distress Oxide ink.
  • I wanted the background to have lots of interest so I masked off the moon and then placed the Cloud Edger stencil (an older release) over the moon and inked with some Villainous Potion Distress Oxide ink. I kept shifting the cloud stencil down until the entire panel was all inked up.
  • I splattered with water and then set aside to dry.
  • Next, I die cut the sentiment with some black cardstock and sprayed with some Peeled Paint Distressed stain.  I cut the sentiment 3 more times and glued them all together so the sentiment would be raised.
  • I glued my card front onto a piece of black cardstock, then onto a white A2 sized card base.
  • I added the sentiment along the bottom and then added the black bats.

Here are the stencils I used:


Discount Code for A Colorful Life Designs
(Affiliate with no extra cost to you) 

Thanks so much for taking a look.

Adding my card to these challenges:
The Paper Funday- CREATE YOUR OWN BKG
Crazy is Our Fame- Stencils are Our Game- FALL FRENZY/ANYTHING GOES
Shopping Our Stash- DON'T REALLY NEED ANOTHER ONE

Supplies
Stamps- none
Inks- DOX; Distressed Spritz
Paper- heavy white (Scribes Nook- Waterloo, Ont.)
Accessories and Tools- stencil (A Colorful Life Designs); TE Blending Brushes;
Vault Gothic Portraits die (TH)

Sunday, 8 September 2024

Celebrate Fall

Good Morning
Fall is in the air with cooler mornings.  The leaves are turning colours which inspired my card.
Meet the newly released stencil from A Colorful Life Designs called

So, here's what I did to create my card.
  • I put a piece of white cardstock onto my Make Art Station and added the Blowing Leaves stencil over that.  
  • Next, I inked over the whole stencil using some Fossilized Amber, Ripe Persimmon and some Lumberjack Plaid Distress Oxide ink. I thought these colours were perfect for the colours of the changing leaves.
  • I used a rectangle die to cut right from the center of the stenciled leaves and set aside.
  • I glued my large card front panel onto a piece of rust coloured cardstock, then onto an A2 sized white card base.
  • I glued the smaller die cut panel onto the same rust cardstock and used some foam tape to position it back into place over my card front.
  • I die cut the sentiment from the rust cardstock and then cut it again 4 more times with some white. I glued them all together, offsetting a bit to help the sentiment show up better against the colourful background.  I glued that over the middle of  my card front.
  • Finally, I added 3 red gems under the sentiment to finish off my card

Here is the stencil I used:

Check out the bling too:

Discount Code for A Colorful Life Designs
(Affiliate with no extra cost to you) 

Thanks so much for coming by and taking a look.

Adding my card to these challenges:
Allsorts- AUTUMN COLORS or ANYTHING GOES
Inkspirational- MAKE YOUR MARK

Supplies
Stamps- none
Inks- DOX
Paper- heavy white (Scribes Nook- Waterloo, Ont.)
Accessories and Tools- stencil and gems (A Colorful Life Designs); TE Blending Brushes;
Infinity Rectangle dies (HA); Celebrate die (MFT)

Saturday, 7 September 2024

We Are Blessed

Welcome
Here in Canada, we celebrate Thanksgiving at the beginning of October, so I decided to use the new for September stencil called 
from A Colorful Life Designs to make a card.

So, here's what I did to create my card.
  • I cut a piece of white cardstock and then used the Postal Collage die to cut it out.
  • I placed that onto my Make Art Station and put the Blowing Leaves stencil onto the die cut and inked it up with these Distress Oxide colours:  Ripe Persimmon, Fossilized Amber, Rustic Wilderness, Lumberjack Plaid and Rusty Hinge.
  • Next, I added the above mentioned colours onto a scrap piece of white cardstock and die cut the leaves from that.
  • I glued my stenciled card front onto a piece of dark red cardstock, then onto an A2 sized card base.
  • I glued the die cut leaves to one side and then use some foam tape to pop the sentiment into the corner.

Here is the stencil I used:

Discount Code for A Colorful Life Designs
(Affiliate with no extra cost to you) 

Thanks so much for coming by and taking a look.

Adding my card to these challenges:
Just Add Ink- TEXTURE/FOLIAGE/STRING (choose 2)
My Time to Craft- ADD TEXTURE
As You Like It- TO LAYER, OR NOT and why?
(I love to layer, it adds a lot of interest)

Supplies
Stamps- Thanksgiving Blessings (Stampabilities)
Inks- Versafine Clair; Distress Oxides
Paper- heavy white (Scribes Nook- Waterloo, Ont.)
Accessories and Tools- stencil (A Colorful Life Designs); Make Art Station (Ranger);
Leaf Fragments dies (TH); Postal Collage die (Waffle Flower); 
TE Blending Brushes

Sunday, 1 September 2024

Leaves, Sunflowers and Pumpkins


Happy September!
Fall is right around the corner and the leaves are turning colours.
So meet 2 of the new stencils from A Colorful Life called:

I decided to use these 2 stencils together, so here's what I did.
  • I cut a piece of white cardstock and put the pumpkin from the Layered Sunflower Pumpkin stencil over that. I inked up the pumpkin first using some Ripe Persimmon Distress Oxide ink.  To add some shading, I added just a touch of Lumberjack Plaid DOX ink to the top of the pumpkin.
  • I cleaned the stencil off and then moved it to stencil the sunflowers with Fossilized Amber and some Mustard Seed DOX ink.
  • I moved the stencil again and then finally inked the flower centers and the leaves of the flower.
  • Next, I stenciled some of the leaves from the Blowing Leaves stencil just under and around the pumpkin.  I did have to mask it off in a few areas to add the leaves around the base of the pumpkin.
  • I splattered just the pumpkin with my white Posca pen and set it aside to dry.
  • I cut another piece of white cardstock and placed the Blowing Leaves stencil over that.  I inked them up with some Ripe Persimmon, Fossilized Amber, Lumberjack Plaid and some Rustic Wilderness DOX ink.
  • I glued the Blowing Leaves stenciled panel onto a piece of red cardstock, then onto an A2 sized card base.
  • I fussy cut out the pumpkin and sunflower portion of my cardstock out next and used some foam tape to pop it over the leaf background.

Here are the stencils I used:

Discount Code for A Colorful Life Designs
(Affiliate with no extra cost to you) 
p.s. Some good sales on now too!

Thanks so much for coming by and taking a look.

Adding my card to these challenges:
Simon Says Wed.- ANYTHING GOES
TICTACTOE- LEAVES/INK BLENDING/ MULTIPLES
Krafty Chicks- ANYTHING GOES

Supplies
Stamps- none
Inks- DOX
Paper- heavy white (Scribes Nook- Waterloo, Ont.)
Accessories and Tools- stencils (A Colorful Life Designs); TE Blending Brushes;
white Posca pen; foam tape

Friday, 6 October 2023

Happy Thanks


Welcome
Today's card features one of my favourite new releases from A Colorful Life Designs this month called 

Fall is in the air and this weekend we celebrate our Canadian Thanksgiving, so I decided to make a card for that using some warm Fall colours.

So, here's what I did to create my card.
  • I found this 'roll off' sheet in my stash and used that as my starting point.  I cut it down to work as my card front panel.  The roll off sheets are the ones I roll my Brayer off onto when I'm using inks on my Gel Plate.  
  • I placed the panel onto my Make Art Station and put the Scandinavian Flowers over that.  I inked the stencil up with some Fossilized Amber, Ripe Persimmon and some Carved Pumpkin Distress Oxide ink.
  • I removed the stencil and splattered with my white Posca pen and set aside to dry.
  • I found this negative die cut in my stash and used a piece of the roll off panel that was left when I cut it down, to back the sentiment.
  • I glued the dried panel onto some black cardstock, then onto an A2 sized white card base.
  • I used some foam tape to pop the 'THANKS' sentiment over the center of my card.

Here is the stencil I used:

Discount Code for A Colorful Life Designs
(Affiliate with no extra cost to you) 

Thanks so much for coming by and taking a look.

Adding my card to these challenges:
Little Red Wagon- Fall Colours 
Simon Says Wed.- STENCIL FUN

Supplies
Stamps- none
Inks- DOX
Paper- heavy white (Scribes Nook- Waterloo, Ont.)
Accessories and Tools- stencil (A Colorful Life Designs); TE Blending Brushes;
Make Art Station (Ranger); white Posca Pen; die (Concord and 9th)

Thursday, 28 September 2023

BOO!


Welcome!
Meet today's card using a stencil from A Colorful Life Designs called
A fun one for sure.

So, here's what I did to create my card.
  • I placed a piece of white cardstock onto my Make Art Station and placed stencil #1 (body) from the Layered Monsters and inked them up with some Villainous Potion Distress Oxide ink.
  • After they were all inked, I removed that stencil and placed stencil #2 (face features) into position and inked those up with some Black Soot DOX ink.
  • Next, using the eraser on the end of my pencil, I stamped the little black circles into the white spaces between the little monsters to add more interest.
  • I splattered with my Black Posca pen over the whole panel.
  • Using my white Posca pen, I gave all the eyes a spot of white.
  • I die cut the 'BOO' letters from the stenciled panel and gave the edges some inking with more of the Black Soot to help them stand out a bit.
  • I cut the letters again with some white cardstock, stacked and glued them all together so they would pop on my card front.
  • I glued the panel onto a piece of black, then purple cardstock, then onto an A2 sized card base.
  • Finally, I positioned and glued the letters back into place on the front of the panel for an 'eclipse style' card.

Here is the stencil I used:

Discount Code for A Colorful Life Designs
(Affiliate with no extra cost to you) 

Thanks so much for coming by and taking a look.

Adding my card to these challenges:
Simon Says Wed.- ANYTHING GOES
Make My Monday- CREATE YOUR OWN BKG
Little Red Wagon- LAYER UPON LAYER

Supplies
Stamps- none
Inks- DOX
Paper- heavy white (Scribes Nook- Waterloo, Ont.)
Accessories and Tools- stencil (A Colorful Life Designs); TE Blending Brushes;
black and white Posca pen; Alphabet letters (Scrapbook.com)

Thursday, 21 September 2023

Let's Gather Leaves


Good Morning and Welcome
The new releases for September are great at A Colorful Life Designs.  
The one I used on this card is called

So, here's what I did to create my card.
  • I cut a piece of white cardstock and placed it onto my Make Art Station.  The Layered Fall Foliage is a 2- part stencil but I just used stencil #1 for my card.
  • I inked up the stencil with some Fossilized Amber and some Ripe Persimmon.  
  • I wanted to add some different looking interest to my card, so I looked through my other stencils from older releases and got out the Stained Glass stencil.  
  • Leaving the leaf stencil in place, I put the Stained Glass right over the top and inked that up with some Lumberjack Plaid DOX ink.  It gave some really unusual interest to the leaves.
  • I removed the stencils, added a bit of the red ink along the card edges and then splattered with my white Posca pen.
  • I placed the stenciled panel into my Misti to stamp the sentiment.
  • I glued the finished piece onto some red cardstock, then onto an A2 sized white card base.
  • Finally, I cut 2 red strips of paper, glued them to the side and added 3 black gems around the sentiment.   

Here are the stencils I used:


Discount Code for A Colorful Life Designs
(Affiliate with no extra cost to you) 

Thanks so much for coming by and taking a look.

Supplies
Stamp- Gather (Impression Obsession)
Inks- Versafine Clair; DOX
Paper- heavy white (Scribes Nook- Waterloo, Ont.)
Accessories and Tools- stencils (A Colorful Life Designs); white Posca pen;
Make Art Station (Ranger); Misti (My Sweet Petunia); black gems

Monday, 18 September 2023

Spooky Halloween


Welcome
I created another Halloween card using 2 new fun stencils from A Colorful Life Designs called

So, here's what I did to create my card.
  • I took a piece of white cardstock and placed the Drippy Arch stencil over it on my Make Art Station. Using some Villainous Potion Distress Oxide ink, I inked up the whole panel.
  • This stencil has 2 parts, a stencil and a mask so I masked the bottom purple area and then went over the top area that was still white with some Weathered Wood DOX ink.
  • I shifted the stencil slightly and added just a hint of the purple along the edges to give a shadow effect.
  • Next, using some Black Soot DOX ink, I inked around all the edges just to add to the effect.
  • I splattered is all with water to lift some of the colour and set aside to dry.
  • While that dried, I stenciled one of the cute little ghost from the Drippy Ghosts set with some Weathered Wood and fussy cut it out.
  • I stamped the little spider and the sentiment and then glued it onto a piece of black cardstock, then onto an A2 sized card base.
  • I used some foam tape to pop the little ghost to the side.

Here are the stencils I used:

Interactive Drippy Ghosts 

Discount Code for A Colorful Life Designs
(Affiliate with no extra cost to you) 

Thanks so much for coming by and taking a look.

Adding my card to these challenges:
Two Old Bats Halloween- ANYTHING HALLOWEEN
Simon Says Wed.- MAKE IT CUTE
2 Sisters on the Blog- AUTUMN or THANKSGIVING

Supplies
Stamps- Halloween (Studio G), Halloween Spider (Recollections)
Inks- DOX; Versafine Clair
Paper- heavy white (Scribes Nook- Waterloo, Ont.)
Accessories and Tools- stencils (A Colorful Life Designs); Make Art Station (Ranger)

Sunday, 17 September 2023

Peeking Pumpkin


Welcome
Today's card features the new for September stencil called
from A Colorful Life Designs. A cute one for sure.
I paired it up with an older stencil release called Mid Century Shadow. They worked perfectly together.

So, here's what I did to create my card.
  • I placed a piece of white cardstock onto my Make Art Station, then placed the Mid Century Shadow stencil down and inked that up with some Carved Pumpkin and Ripe Persimmon Distress Oxide ink. 
  • Leaving that stencil in place, I inked up the Happy Pumpkin right over that with some Black Soot Distress Oxide ink.
  • I removed the pumpkin, but left the Mid Century stencil in place and I added a bit of shadowing with more of the Black Soot.
  • I stamped the sentiment, then glued the panel onto a piece of black cardstock, then onto an A2 sized card base.
  • I added 2 black gems on either side of the sentiment.

Here are the stencils I used:


Discount Code for A Colorful Life Designs
(Affiliate with no extra cost to you) 

Thanks so much for coming by and taking a look.

Adding my card to these challenges:
Simon Says WED.- MAKE IT CUTE
Colorful Options- OUTRAGEOUS ORANGE
Two Old Bats Halloween- ANYTHING HALLOWEEN

Supplies
Stamp- Happy Halloween (Studio G)
Inks- DOX; Versafine Clair
Paper- heavy white (Scribes Nook- Waterloo, Ont.)
Accessories and Tools- stencils (A Colorful Life Designs), Make Art Station (Ranger);
TE Blending Brushes

Friday, 15 September 2023

For Your Birthday


Welcome
Today's card features the new for September stencil from A Colorful Life Designs called
A great one for this time of year.

So, here's what I did to create my card.
  • I found a piece of cardstock that I had rolled ink onto with my brayer while Gel Plate printing.  I thought the yellow would work well for the background.
  • I put that inked up piece onto my Make Art Station, placed stencil #1 from the Layered Fall Foliage onto my cardstock and inked it up with some Carved Pumpkin and some Ripe Persimmon Distress Oxide ink.
  • I removed that stencil and placed stencil #2 (leaf details) into place and inked it up with some Lumberjack Plaid Distress Oxide ink.
  • I removed the stencil and then used my white Posca pen to add the dots.
  • When it was all dry, I placed it into my Misti to stamp the sentiment and clear heat embossed it.
  • To add more definition to the main panel, I drew a red line around the edge using a Tombow marker and a ruler.
  • When it was all dry, I glued it onto a piece of red cardstock, then onto an A2 sized card base.
  • Finally to finish off my card, I added 3 black gems around the sentiment.

Here is the stencil I used:

Discount Code for A Colorful Life Designs
(Affiliate with no extra cost to you) 

Thanks so much for coming by and taking a look.

Adding my card to these challenges:
Cardz 4 Galz- LEAVES
Seize the Birthday- USE FALL COLORS

Supplies
Stamp- Birthday Blessings (IO)
Inks- Versafine Clair, DOX; Tombow Marker
Paper- heavy white (Scribes Nook- Waterloo, Ont.)
Accessories and Tools- stencils (A Colorful Life Designs); Make Art Station (Ranger);
white Posca pen; Misti (My Sweet Petunia); black gems; 
clear eb powder; TE Blending Brushes