Showing posts with label Thanksgiving. Show all posts

Saturday, 21 September 2024

Giving Thanks


Welcome
Here in Canada we will be celebrating Thanksgiving at the beginning of October, so I wanted to get a few card made to mail out.
Today's card features the newly released stencil from A Colorful Life Designs called:
I paired it up with an older stencil called Stick Wreath to give the wreath a fuller look.

So, here's what I did to create my card.
  • I placed the Simple Leafy Frame stencil over a piece of white cardstock and inked it up with some Distress Oxide inks in these colours:  Rustic Wilderness; Lumberjack Plaid; Ripe Persimmon.
  • I removed that stencil and placed the Stick Wreath right over the stenciled leaves and inked with some Rusty Hinge and Vintage Photo DOX ink.
  • I used a circle die to cut out the middle area of the wreath.
  • Next, I got out a piece of dark green cardstock and embossed it with a dot embossing folder, then glued that onto an 4 1/4" square white card base.
  • I used some foam tape to pop the wreath over the embossed background.
  • I stamped the sentiment, cut it out and used some more foam tape to place it over the middle of the wreath.
  • I add a twine bow to the top to finish my card off.

Here are the stencils I used:
NEW

OLDER

Discount Code for A Colorful Life Designs
(Affiliate with no extra cost to you) 

Thanks so much for coming by and taking a look.

Adding my card to these challenges:
Alphabet Challenge- 'M' IS FOR MASCULINE
Cut it Up- COLORS OF FALL/AUTUMN
Craft Rocket Challenge- DOTS and/or STRIPES

Supplies
Stamp- Thanksgiving (Stampendous)
Ink- DOX; Versafine Clair
Paper- heavy white (Scribes Nook- Waterloo, Ont.)
Accessories and Tools- stencils (A Colorful Life Designs); Infinity Circle die (HA);
foam tape; twine; Dots Embossing folder

Saturday, 7 September 2024

We Are Blessed

Welcome
Here in Canada, we celebrate Thanksgiving at the beginning of October, so I decided to use the new for September stencil called 
from A Colorful Life Designs to make a card.

So, here's what I did to create my card.
  • I cut a piece of white cardstock and then used the Postal Collage die to cut it out.
  • I placed that onto my Make Art Station and put the Blowing Leaves stencil onto the die cut and inked it up with these Distress Oxide colours:  Ripe Persimmon, Fossilized Amber, Rustic Wilderness, Lumberjack Plaid and Rusty Hinge.
  • Next, I added the above mentioned colours onto a scrap piece of white cardstock and die cut the leaves from that.
  • I glued my stenciled card front onto a piece of dark red cardstock, then onto an A2 sized card base.
  • I glued the die cut leaves to one side and then use some foam tape to pop the sentiment into the corner.

Here is the stencil I used:

Discount Code for A Colorful Life Designs
(Affiliate with no extra cost to you) 

Thanks so much for coming by and taking a look.

Adding my card to these challenges:
Just Add Ink- TEXTURE/FOLIAGE/STRING (choose 2)
My Time to Craft- ADD TEXTURE
As You Like It- TO LAYER, OR NOT and why?
(I love to layer, it adds a lot of interest)

Supplies
Stamps- Thanksgiving Blessings (Stampabilities)
Inks- Versafine Clair; Distress Oxides
Paper- heavy white (Scribes Nook- Waterloo, Ont.)
Accessories and Tools- stencil (A Colorful Life Designs); Make Art Station (Ranger);
Leaf Fragments dies (TH); Postal Collage die (Waffle Flower); 
TE Blending Brushes

Friday, 6 October 2023

Happy Thanks


Welcome
Today's card features one of my favourite new releases from A Colorful Life Designs this month called 

Fall is in the air and this weekend we celebrate our Canadian Thanksgiving, so I decided to make a card for that using some warm Fall colours.

So, here's what I did to create my card.
  • I found this 'roll off' sheet in my stash and used that as my starting point.  I cut it down to work as my card front panel.  The roll off sheets are the ones I roll my Brayer off onto when I'm using inks on my Gel Plate.  
  • I placed the panel onto my Make Art Station and put the Scandinavian Flowers over that.  I inked the stencil up with some Fossilized Amber, Ripe Persimmon and some Carved Pumpkin Distress Oxide ink.
  • I removed the stencil and splattered with my white Posca pen and set aside to dry.
  • I found this negative die cut in my stash and used a piece of the roll off panel that was left when I cut it down, to back the sentiment.
  • I glued the dried panel onto some black cardstock, then onto an A2 sized white card base.
  • I used some foam tape to pop the 'THANKS' sentiment over the center of my card.

Here is the stencil I used:

Discount Code for A Colorful Life Designs
(Affiliate with no extra cost to you) 

Thanks so much for coming by and taking a look.

Adding my card to these challenges:
Little Red Wagon- Fall Colours 
Simon Says Wed.- STENCIL FUN

Supplies
Stamps- none
Inks- DOX
Paper- heavy white (Scribes Nook- Waterloo, Ont.)
Accessories and Tools- stencil (A Colorful Life Designs); TE Blending Brushes;
Make Art Station (Ranger); white Posca Pen; die (Concord and 9th)

Thursday, 21 September 2023

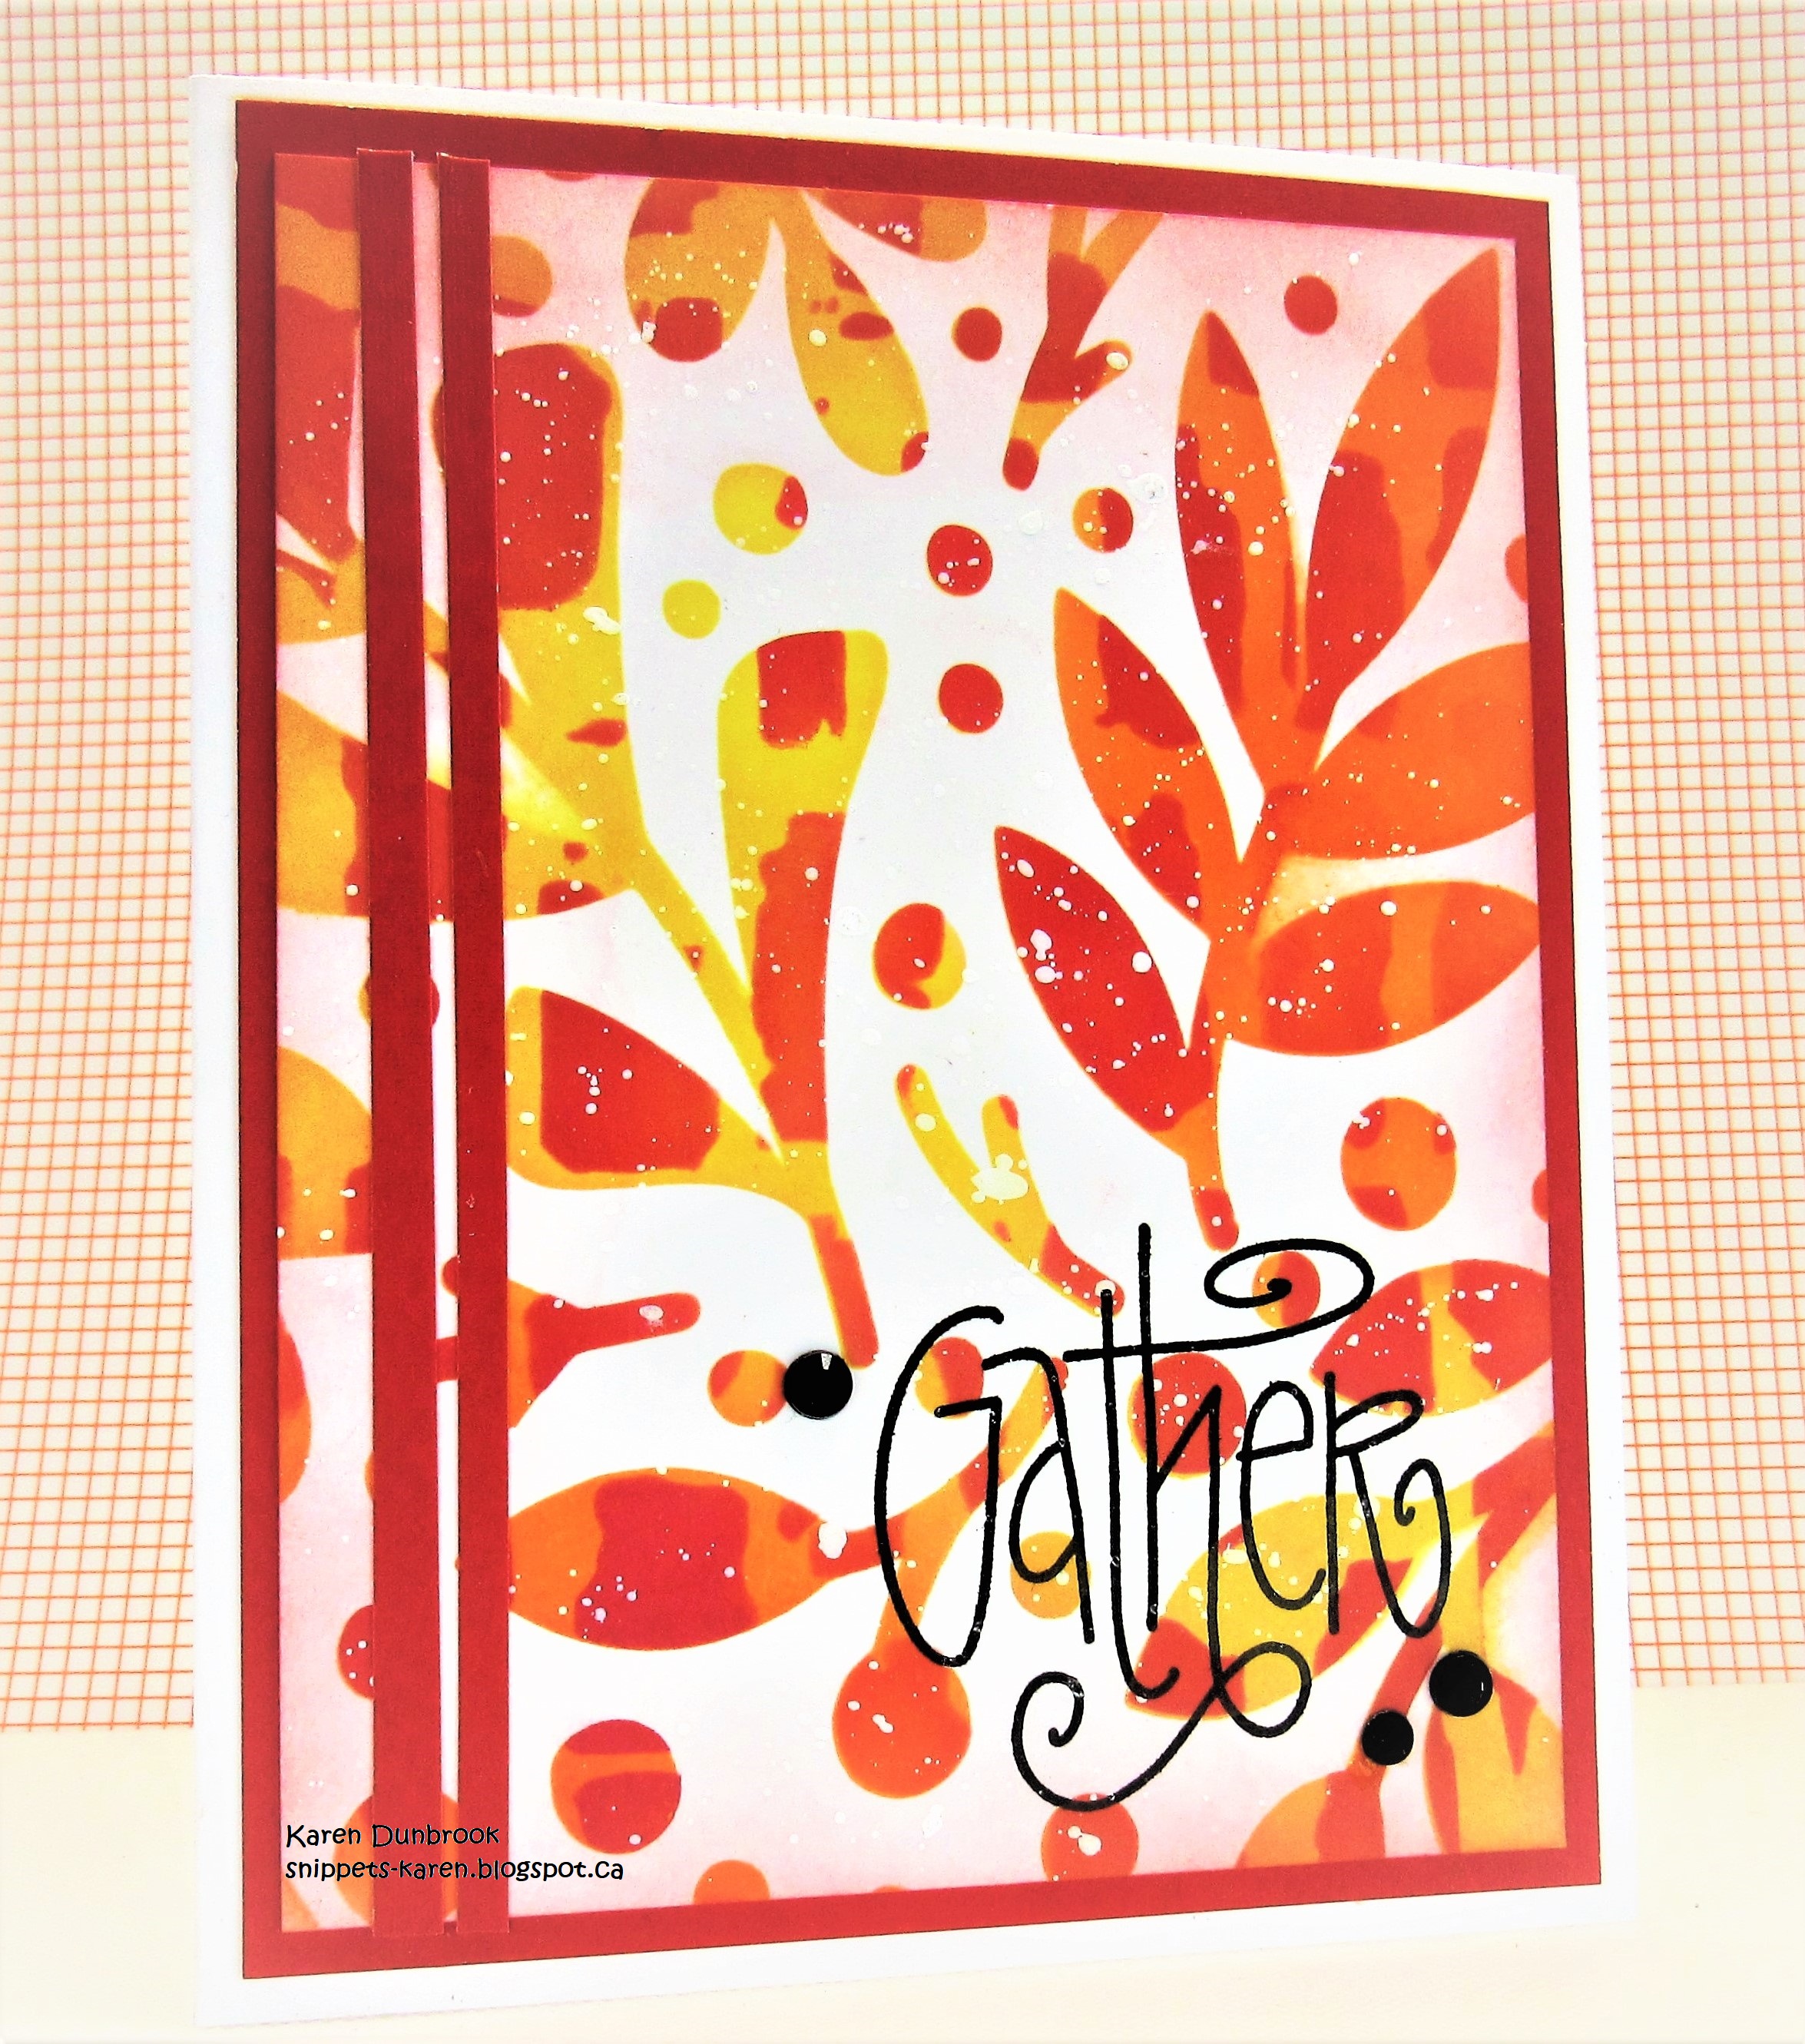
Let's Gather Leaves


Good Morning and Welcome
The new releases for September are great at A Colorful Life Designs.  
The one I used on this card is called

So, here's what I did to create my card.
  • I cut a piece of white cardstock and placed it onto my Make Art Station.  The Layered Fall Foliage is a 2- part stencil but I just used stencil #1 for my card.
  • I inked up the stencil with some Fossilized Amber and some Ripe Persimmon.  
  • I wanted to add some different looking interest to my card, so I looked through my other stencils from older releases and got out the Stained Glass stencil.  
  • Leaving the leaf stencil in place, I put the Stained Glass right over the top and inked that up with some Lumberjack Plaid DOX ink.  It gave some really unusual interest to the leaves.
  • I removed the stencils, added a bit of the red ink along the card edges and then splattered with my white Posca pen.
  • I placed the stenciled panel into my Misti to stamp the sentiment.
  • I glued the finished piece onto some red cardstock, then onto an A2 sized white card base.
  • Finally, I cut 2 red strips of paper, glued them to the side and added 3 black gems around the sentiment.   

Here are the stencils I used:


Discount Code for A Colorful Life Designs
(Affiliate with no extra cost to you) 

Thanks so much for coming by and taking a look.

Supplies
Stamp- Gather (Impression Obsession)
Inks- Versafine Clair; DOX
Paper- heavy white (Scribes Nook- Waterloo, Ont.)
Accessories and Tools- stencils (A Colorful Life Designs); white Posca pen;
Make Art Station (Ranger); Misti (My Sweet Petunia); black gems

Sunday, 2 October 2022

Give Thanks


Welcome
Our Canadian Thanksgiving is coming up next weekend, so I was feeling inspired to create some cards.
I was even more inspired after watching one of Vicki Boutin's Friday Night Lives where she did some inking using a sheet of acetate.  
* I call it acetate inking and you can find more examples of this on my blog using the search button *

So, here's what I did to create my card.
  • Like I mentioned above, I watched Vicki's live and wanted to make some Thanksgiving cards using some colours inspired by Fall.  Vicki calls her technique 'kissing' and it is very easy to do.
  • I cut a piece of white cardstock, got out a sheet of acetate and my Distress inks. The colours I used were:  Mustard Seed, Ripe Persimmon, Barn Door, Peeled Paint and Rusty Hinge.
  • I rubbed each colour, one at a time onto the sheet of acetate, sprayed it with a good amount of water and pressed and dragged it over my cardstock.  I dried each layer and I wiped off the acetate between each inking until the cardstock was covered with colour.
  • I splattered with my black Posca pen to grunge it up a bit more.
Here is what it looked like:

  • After the panel was totally dry, I die cut the leaves and the letters from the sheet.
  • I pulled out a piece of brown cardstock and embossed it using a folder from Carabelle to add interest.  I glued that onto an A2 size card base.
  • I glued the leaves in the top corner, adding some pop dots just under the tips of leaves to raise them up.
  • I glued the 'thanks' letters cut from the same inked sheet, just under the leaves.
  • To finish my card off, I tied a small piece of twine around the stems of the leaves.

Thanks so much for coming by and taking a look.

Adding my card to these challenges:
Shopping Our Stash- Leaf Me Alone
Simon Says- ANYTHING GOES


Supplies
Stamps- none
Inks- Distress 
Paper- heavy white- Scribes Nook, Waterloo, Ont.; brown
Accessories and Tools- Leaf Fragments (TH); Thanks (MFT); 
Texte Grunge eb folder (Carabelle); sheet of acetate; black Posca pen

Monday, 16 November 2020

Second Spring


Hello and Welcome
Meet today's card.  
I wanted to try my hand at creating an ombre style card using the wonderful colours of Fall.

So here's what I did to create my card. 
  • I began with a piece of heavy white cardstock.  I positioned my Marvelous Rectangle Mask over the panel, then the Orderly Leaves stencil over that as I wanted to be left with a clean, crisp white border.
  • Next, I got out some Distress Oxide inks in the Fall colours.  Using a blending brush, I started at the top blending in some yellows (Squeezed Lemonade, Fossilized Amber).  Next, orange (Carved Pumpkin), then finally reds along the bottom (Candied Apple, Barn Door).
  • When I was happy with the blending, I removed the leaf stencil but left the mask in place and splattered with my black Posca Pen.
  • I removed the mask and placed the piece into my Misti to stamp the sentiment with some Versafine Clair Noir ink, then clear heat embossed it.
  • I mounted the panel onto some red cardstock, then onto a heavy white card base.
 

Thanks so much for coming by and taking a look.

Discount Code for A Colorful Life Designs

Adding my card to these challenges:
CAS on Sunday- USE A BIG SENTIMENT
Corrosive Challenge- ANYTHING GOES

Supplies
Stamps- Second Spring (Art Gone Wild)
Inks- DOX (TH); Versafine Clair Noir
Paper- heavy white (Scribes Nook); red cs (Michaels)
Accessories and Tools- Misti; Orderly Leaves (A Colorful Life Designs);
Marvelous Rectangle Mask (ACLD); Posca Pen; Blending brush; clear eb powder; heat tool

Sunday, 15 November 2020

Fall Wishes


Good Morning.
Another Fall themed card before all the leaves in my backyard are gone.  
This is a fun technique using real leaves and some acrylic paint.  I love the results.

So here's what I did to create my card.
  • I went out into my backyard and picked out some leaves that would not be too big for my card front panel.  I have a shrub that still had these lovely leaves intact, so I picked a few to use for my card.  
  • I die-cut the panel with the Wonky Stitched die so I knew what size I was working with.
  • Using the raised veined backside of the leaf, I brayered on some acrylic paints in reds and oranges being sure to cover the whole surface.  I carefully picked up the leaf and pressed it onto my panel.
  • I repeated that process with another leaf that was a bit bigger and placed it along the side for interest.
  • I set that aside to dry which didn't take long as there was a thin coat of paint used....that's important so you don't lose the detail of the leaf.
  • While that dried, I pulled out some Distress Oxide inks that I thought would match the orange and reds.  I ended up with some Barn Door, Candied Apple and Carved Pumpkin inks.
  • I randomly stamped and filled in all the areas around the leaves using a variety of stamps from AALL and Create.  They have such wonderful stamps for creating a collage style background on cards.
  • When I was happy with all the stamping, I placed the piece into my Misti and stamped the sentiment and clear heat embossed it.  
  • I splattered with my black Posca pen, then I mounted the piece onto some red, then orange cardstock and then onto a heavy white card base.


 Thanks so much for coming by and taking a look.

Adding my card to these challenges:
Simon Says- THANKSGIVING
Inkspirational- FRAME IT
Crafty Calendar- ANYTHING GOES


Supplies
Stamps- Everyday Sentiments (YNS); Splattered Numbers #350 (AALL and Create); 
Overlapping Texture #307 (AALL and Create)
Inks- Distress Oxides (colours above); acrylic paint (Dollar Tree)
Paper- heavy white (Scribes Nook)
Accessories and Tools- brayer (Speedball); leaves from the garden; 
Wonky Stitched Die (Avery Elle); Cuttlebug; Posca pen

Monday, 12 October 2020

Autumn Splendor


Happy Thanksgiving to all my Canadian friends.
I am feeling blessed to have my immediate family with me and so glad that all my extended family and friends are doing ok during this time of the pandemic.

To celebrate this beautiful time of the Fall leaves changing and nature evolving, I wanted to create a card.
So here's what I did to create my card.

  • I began with a piece of heavy white cardstock.  I did some more bubble painting for my background.  I simply filled up an old coffee mug with water, then some Dawn dish soap.  Mixed that well and added some drops of Peeled Paint Distress re-inkers to give the colour.  (To see another bubble background I did go here)   
  • While the bubbles dried, I looked through my sentiments to find one that worked.  This is an older one for a company called Serendipity that I believe is now out of business.  I love the font and it is the perfect sentiment representing the changing seasons. I placed the stamp into my Misti and stamped it with some Versafine Clair Noir.  I clear heat embossed it to make it pop against the bkg.
  • Next, I got out my Leaf 1 and Leaf 2 stencils from A Colorful Life Designs and decided what leaves I would use around the sentiment. 
  • I positioned the leaves and used my Distress inks to stencil them randomly around the sentiment.  I used Candied Apple, Carved Pumpkin, Peeled Paint and some Aged Mahogany Distress inks for my leaves.
  • I splattered using my black Posca pen and then mounted the panel onto a piece of black cardstock and then onto a heavy white card base.


Thanks so much for coming by and taking a look.


Here are the stencils I used.
Discount Code for A Colorful Life Designs

Adding my card to these challenges:
My Time to Craft- AUTUMNAL COLOURS

Thanks so much for coming by and taking a look.
I'm so grateful for all your visits and most encouraging comments.

Supplies
Stamp- Live Each Season (Serendipity)
Inks- Distress; Versafine Clair
Paper- heavy white
Accessories and Tools- Leaf Set 1 and Leaf Set 2 (A Colorful Life Designs); Dawn Dish Soap; 
straw; sponge dabber; Posca pen; Misti (My Sweet Petunia); clear eb powder; heat tool