Showing posts with label bubble painting. Show all posts

Saturday, 9 July 2022

Being Grateful


Welcome
I have to say that this was a fun card to create using a new stencil called Megaphones from A Colorful Life Designs.
A very unique looking stencil that I wanted to play with to see what I could come up with.

So here's what I did to create my card.
  • I began by getting out my Waffle Flower Stencil Mat and the Megaphones stencil.  
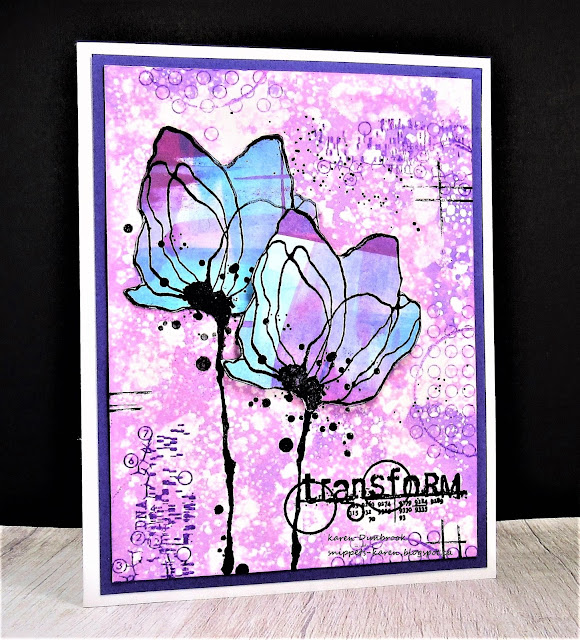
  • I found the center point of my cardstock and positioned one of the parts of the stencil going outwards from that point.  I inked that up with some Blueprint Sketch Distress Oxide ink.
  • I moved the stencil to the opposite side of the first inking and added more ink.  I continued that process until I had 4 of the blue areas inked to use as my starting point.  
  • Next, I cleaned off the stencil and moved it around to add the Peacock Feathers Distress Oxide ink in the same way I did the Blueprint Sketch. 
  • Again, I cleaned off my stencil and then filled in the leftover areas using some Cracked Pistachio ink, moving the stencil around each time.
  • When I had all the inking done, it looked like a flower to me, so I decided to fussy cut it out around the outside edge.
  • I placed it into my Misti to stamp the sentiment, then set it aside to dry.
  • Next, I went in search of a background I could use from my stash.  I found this one that I had done a bubble painting technique on......
This is what I wrote when I first did the bubble backgrounds: 
I decided to make a bunch of 'bubble' backgrounds.  I did this one using some Blueprint Sketch and some Distress re-inkers.  Simple put some water in a cup, add some dish soap then drop in some ink.  Mix well then blow some bubbles with a straw and catch them onto the paper.  So fun.  *when I bubble paint, I add one colour of re-inkers to my soap mixture, then instead of dumping that out after a few backgrounds are made, I just continue to add different colours to the same mixture to create different bkg.*


  • I glued the bubble print onto a piece of light blue cardstock, then onto a 4 1/4" square note card.
  • Finally, I pop dotted the stenciled 'flower' over the bubble bkg.


Here is the stencil I used:

Discount Code for A Colorful Life Designs
(affiliate with no extra cost to you)

Adding my card to these challenges:
Cardz 4 Galz- TRIANGLES
Corrosive Challenge- ANYTHING GOES


Thanks so much for coming by and taking a look.

Supplies
Stamps- Smile Often (IO- discontinued)
Inks- Versafine Clair, DOX
Paper- heavy white (Scribes Nook- Waterloo, Ont.)
Accessories and Tools- Stencil (ACLD); Stencil Mat (Waffle Flower); TE Blending Brushes;
Dawn soap; straw

Wednesday, 30 December 2020

Winter Wonderland


 Good Morning
One more Christmas card that I didn't get time to post.
I just had to play with this new-to-me Merry stamp and die I got by Taylored Expressions and the newest release in the Distress ink line; Rustic Wilderness.
I added it over a bubble painted background....so fun and easy to do.

So here's what I did to create my card.
  • I began with a piece of heavy white cardstock for my card front panel.  I put some Peacock Feathers Distress and Salty Ocean re-inker into a cup of water, then added some Dawn Dish Soap and mixed it up really well.  That was my bubble solution.
  • Using a straw, I blew bubbles into the mixture and then placed my paper over the bubbles to create the bubble front of my card.  I repeated that process until I was happy with the coverage.  It looked a bit flat so I added some Evergreen Bough re-inker to the same mixture and made more bubbles.  I let the panel dry completely before moving onto the next step.
  • I placed the piece into my Misti and stamped the snowflakes randomly around the outside edge using some Versamark ink.  I then white heat embossed them all.
  • I stamped the 'Merry' over the bubble background in the center of the panel with some Rustic Wilderness ink and clear heat embossed it that gave it great shine.  The 'Merry' stamp comes with a die so I positioned that over the Merry and die cut it out in my Cuttlebug.
  • Using the die again and some white cardstock, I cut it out 3 more times and glued them all together with the one I cut from the stamped panel.
  • I glued the panel onto a heavy white card base, then I fit the die cuts back into the cut away area and glued them in place.  *by die cutting all the pieces and gluing them together, it raised up the sentiment to make it more prominent on my card front*
  • To add interest, I glued some little white pearl dots onto the center of the snowflakes.


Thanks so much for coming by and taking a look.

Supplies
Stamps- Merry (Taylored Expressions); Snowflakes (Recollections)
Inks- Versamark; Distress Re-inkers (listed above)
Paper- heavy white (Scribes Nook(
Accessories and Tool- Misti (My Sweet Petunia); clear eb powder; white eb powder; 
Dawn dish soap; straw; Cuttlebug

Sunday, 18 October 2020

Little Wonder


Hello and Welcome
Today, I needed a baby card for a little girl and I thought this bubble background would work perfectly for that.  
I made this bubble background a few weeks ago and it was the perfect backdrop for this sweet little digital image from MelonHeadz.

So here is what I did to create my card.

  • I began with a piece of heavy white cardstock.  I filled up an old coffee cup with water and added some Dawn Dish soap to the water and then some Picked Raspberry Distress Reinkers and mixed well.  Using a straw, I blew bubbles with the mixture and pressed my cardstock panel over the bubbles until it was covered.  TIP: blow the bubbles past the top of the cup so you don't get the impression of the top of the cup on your panel.
  • I set the panel aside to dry completely.
  • While that dried, I printed this cute little digital bunny image from the Melonheadz site, then fussy cut it out.
  • Using my Copic markers, I coloured in the image with some pinks and purples to match the bubbles in the bkg.
  • I placed the dried bubble bkg. into my Misti and stamped the sentiment along the bottom using my Versafine Clair ink, then clear heat embossed it.
  • I pop dot mounted the bunny over the sentiment, then using a black Signo marker, I drew in the extended whiskers on the bunny.
  • To add interest, I added some Glossy Accents to the bunny's ears, nose and bow which you really can't see in the photo but it did add a lot of interest and some texture.
  • I mounted the panel onto a heavy white card base.

Here is what the panel looked like when I added the bubbles.  I like to make a few at a time.


Thanks so much for coming by and taking a look.
Have a great week.

Adding my card to these challenges:
Crafty Catz- ANYTHING GOES


Supplies
Stamps- Baby (Autumn Leaves); Digital bunny (Melonheadz)
Inks- Distress Reinkers; Versafine Clair, Copic Markers
Paper- heavy white (Scribes Nook)
Accessories and Tools- Dawn dish soap; straw; Misti (My Sweet Petunia); clear eb powder; 
heat tool; Glossy Accents (Ranger); Signo black marker


Monday, 12 October 2020

Autumn Splendor


Happy Thanksgiving to all my Canadian friends.
I am feeling blessed to have my immediate family with me and so glad that all my extended family and friends are doing ok during this time of the pandemic.

To celebrate this beautiful time of the Fall leaves changing and nature evolving, I wanted to create a card.
So here's what I did to create my card.

  • I began with a piece of heavy white cardstock.  I did some more bubble painting for my background.  I simply filled up an old coffee mug with water, then some Dawn dish soap.  Mixed that well and added some drops of Peeled Paint Distress re-inkers to give the colour.  (To see another bubble background I did go here)   
  • While the bubbles dried, I looked through my sentiments to find one that worked.  This is an older one for a company called Serendipity that I believe is now out of business.  I love the font and it is the perfect sentiment representing the changing seasons. I placed the stamp into my Misti and stamped it with some Versafine Clair Noir.  I clear heat embossed it to make it pop against the bkg.
  • Next, I got out my Leaf 1 and Leaf 2 stencils from A Colorful Life Designs and decided what leaves I would use around the sentiment. 
  • I positioned the leaves and used my Distress inks to stencil them randomly around the sentiment.  I used Candied Apple, Carved Pumpkin, Peeled Paint and some Aged Mahogany Distress inks for my leaves.
  • I splattered using my black Posca pen and then mounted the panel onto a piece of black cardstock and then onto a heavy white card base.


Thanks so much for coming by and taking a look.


Here are the stencils I used.
Discount Code for A Colorful Life Designs

Adding my card to these challenges:
My Time to Craft- AUTUMNAL COLOURS

Thanks so much for coming by and taking a look.
I'm so grateful for all your visits and most encouraging comments.

Supplies
Stamp- Live Each Season (Serendipity)
Inks- Distress; Versafine Clair
Paper- heavy white
Accessories and Tools- Leaf Set 1 and Leaf Set 2 (A Colorful Life Designs); Dawn Dish Soap; 
straw; sponge dabber; Posca pen; Misti (My Sweet Petunia); clear eb powder; heat tool

Sunday, 4 October 2020

Nature Transforms


Hello and Welcome.
Happy Card Making Day 
although it was yesterday but I'm making it into a weekend event for me.
I have had no time to craft since I've been back to work and so busy on the weekends just catching up.
I really needed some time to play which makes me happy.

So here is the card I made using a fun bubble background.
Here are the details.
  • I began with a piece of heavy white cardstock.  I filled up an old coffee mug with some water and a few drops of Dawn dish soap, added some Distress Re-inkers and blew bubbles using a straw.  When the bubbles came to the top of the cup, I pressed my paper into them.  I repeated that process until my card panel was covered.  While I was at it, I made 2 panels so I could have one on hand for another card down the road.  Here is what they looked like:


  • While the bubbles dried, I stamped the flower heads from the Visible Image called Creative Chaos onto some left over paper I had inked with more Distress Oxide inks  (I think I used Peacock Feathers, Broken China and Seedless Preserves) using some Versafine Clair ink.  I did clear heat emboss them to help make the black pop.
  • Next, I fussy cut out the flower heads and set them aside.
  • The bubble panel was dry so I stamped the flowers onto the bubble background, then I glued on of the flower heads over the stamped image and the other one was pop dotted for interest, right over the first one.
  • I stamped the sentiment and details, then splattered with my black Posca pen to add more interest.  I did some markings using an old credit card too.
  • I mounted the piece onto some purple cardstock, then onto a heavy white card base.

Thanks so very much for coming by and taking a look.
Stay safe.

Supplies
Stamps- Creative Chaos, Wings of Change (Visible Image)
Inks- Distress Re-inkers; Distress Oxide inks (TH); Versafine Clair
Paper- heavy white (Scribes Nook)
Accessories and Tools- old coffee mug; straw; Dawn Dish soap; clear eb powder; heat tool; 
black Posca pen; old credit card