Friday 31 March 2023

Fireworks


Good Morning and Happy Friday!
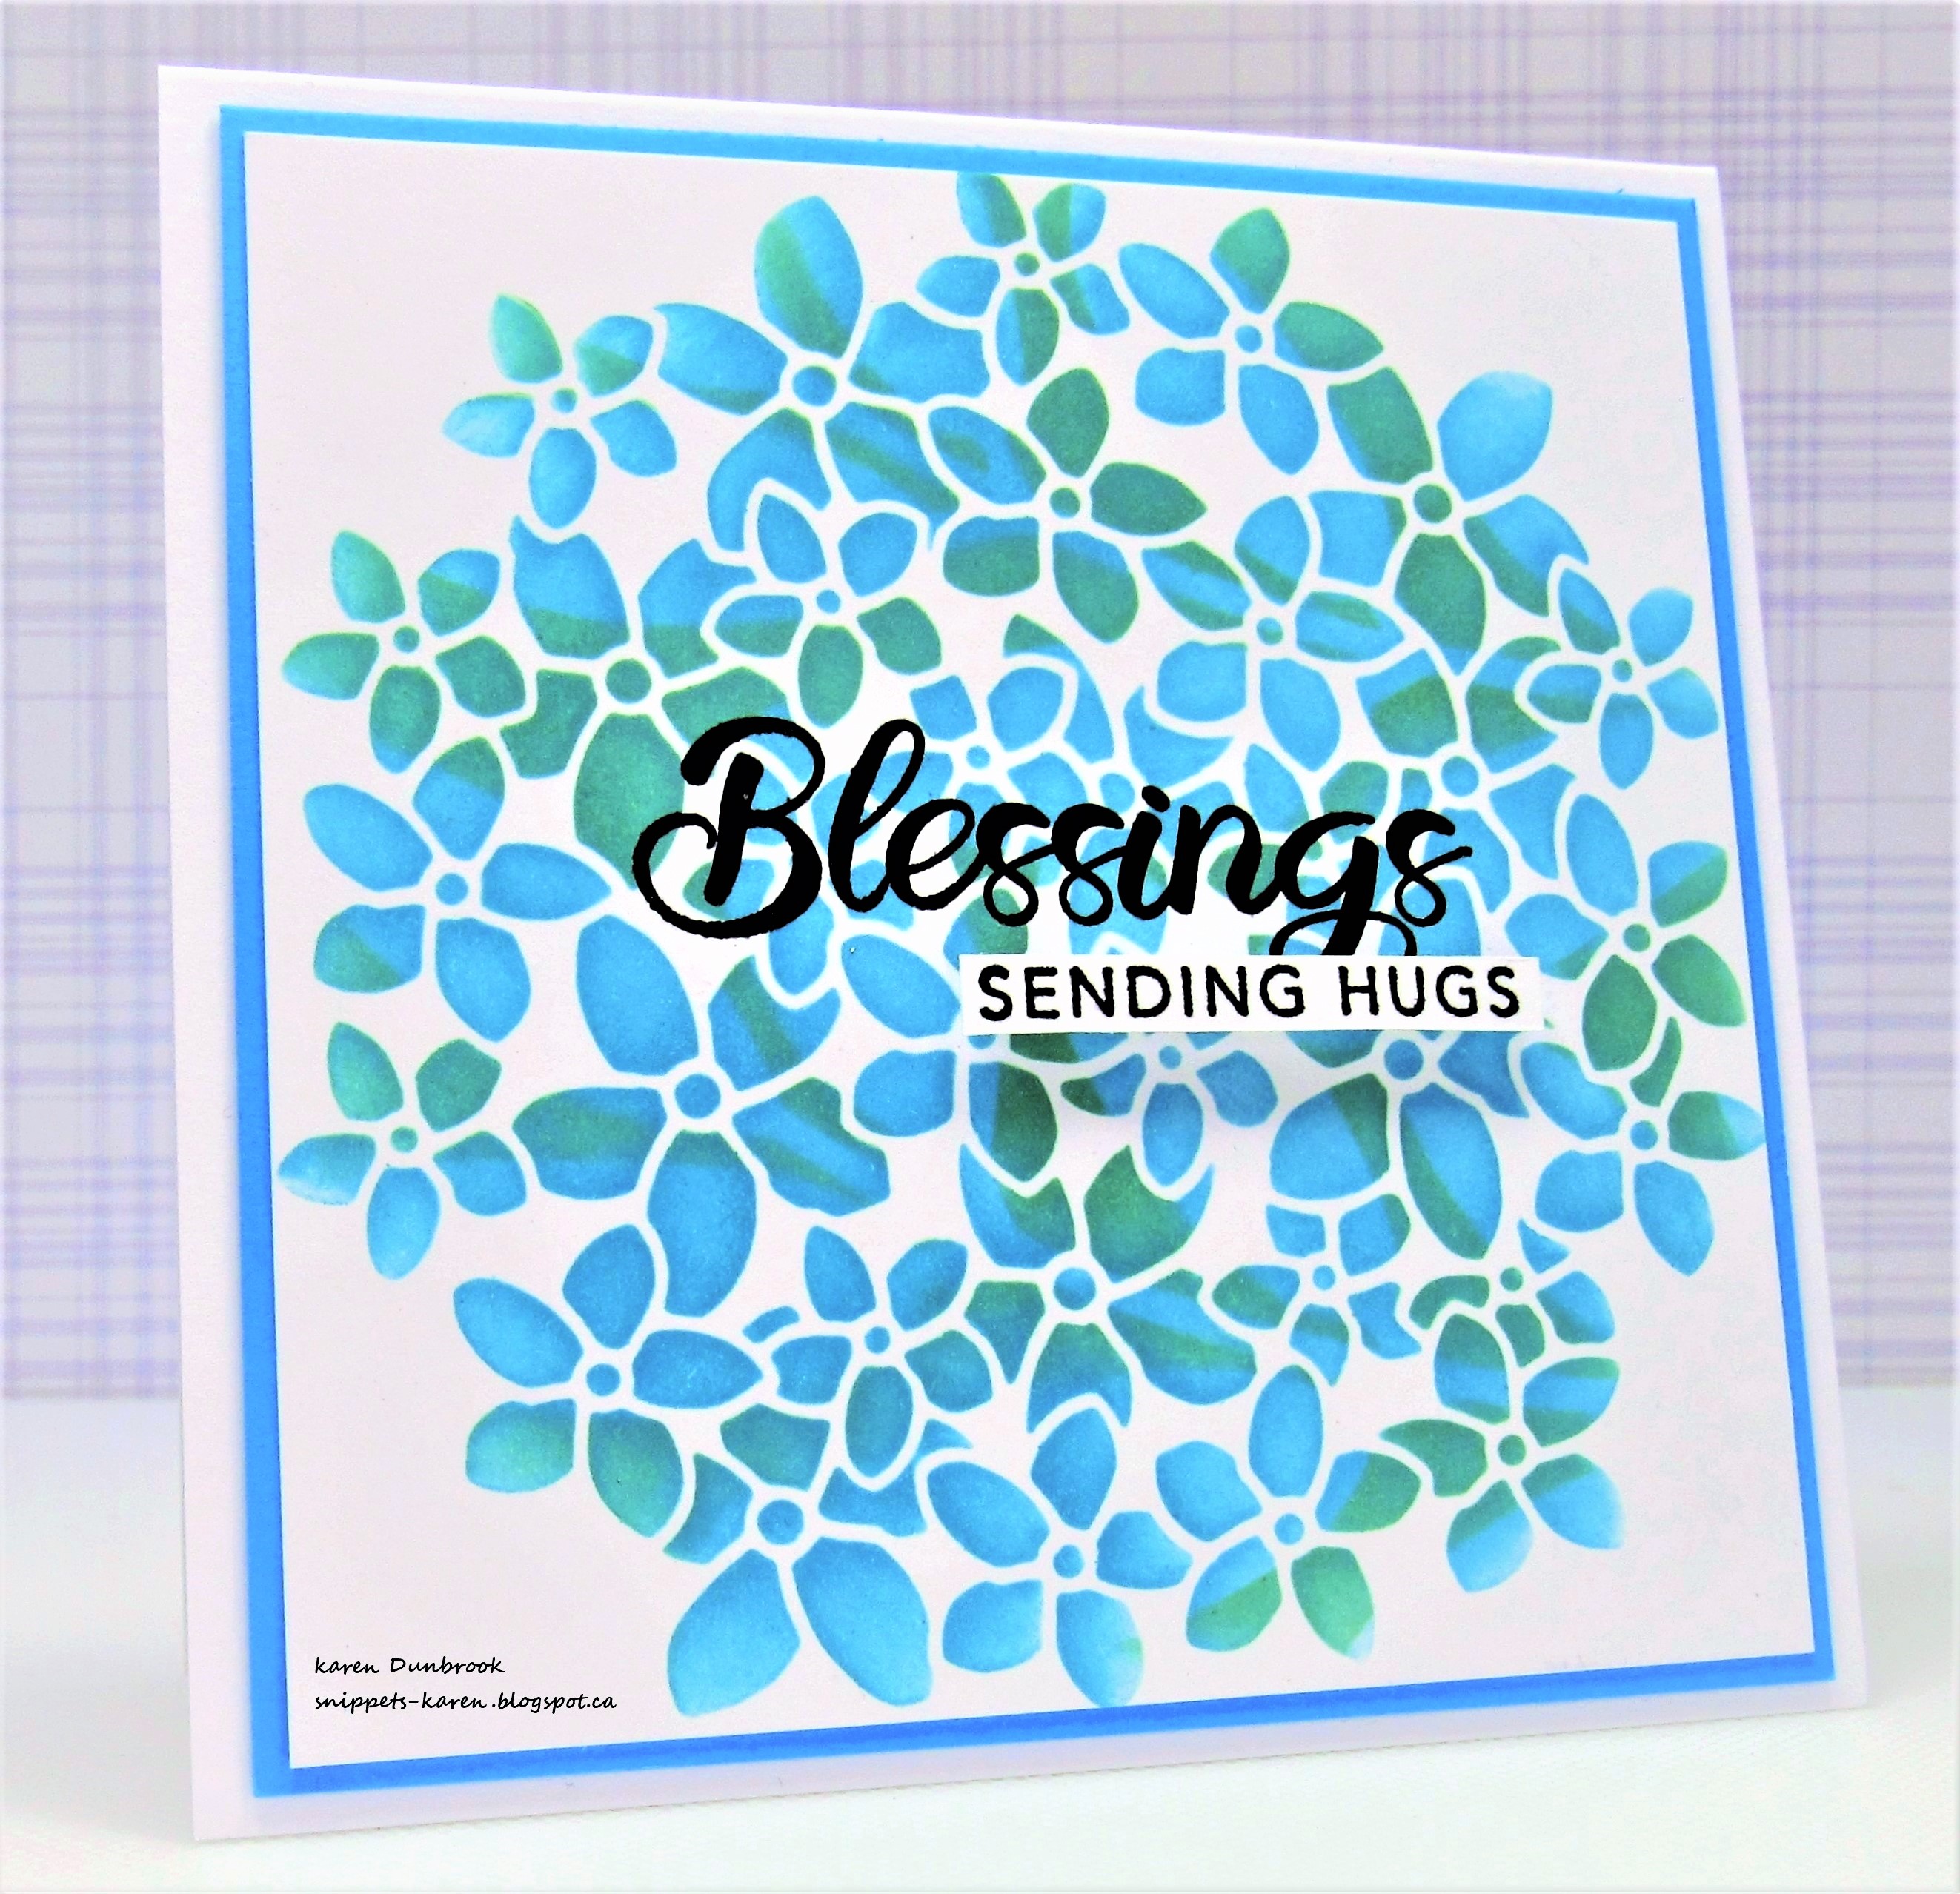
Today's card came together so quickly and I love the sense of movement it has overall....reminded me of fireworks!
I spotted my salad spinner and decided to get it out.
This card was an experiment as well, to see how the spray inks would work since I've only every done this technique using Alcohol inks before.
(to see that video, go HERE.)

So, here's what I did to create my card.
  • I got out my salad spinner (originally picked up at the Dollar Store and dedicated just to crafting) and some photo paper since I thought the ink would flow better on the shiny surface.
  • I cut the paper to fit into the bottom of the spinner, sprayed with some purple Dylusions Ink Spray, put the lid on and spun away.
  • I opened the lid and thought it needed a bit more so I added some sprays of blue Distress ink spray.
  • I set that aside to dry and stamped the sentiment with a shade of purple onto some white cardstock and die cut it out.
  • I cut the panel down to fit on the front of a 4 1/4 " square card base.
  • I pop dotted the sentiment over the background.


Thanks so much for coming by and taking a look.

Adding my card to these challenges:
Little Red Wagon- WE ARE THE CHAMPIONS
Simon Says Wed.- ANYTHING GOES

Supplies
Stamps- Big and Bold stamps and dies (SSS)
Inks- Distress Oxide, spray inks
Paper- HP photo paper
Accessories and Tools- salad spinner

Tuesday 28 March 2023

Many Blessings


Welcome
Today, I am playing with 2 new stencils from A Colorful Life Designs; Flower Ball and Trailing Vines.
There is also a great new stamp set called Happy with lots of possibilities.
So, here's what I did to create my card.
  • I placed a piece of white cardstock onto my Make Art Station and laid the Flower Ball stencil over that.
  • I inked the flowers up with some Broken China Distress Oxide ink over the whole stencil.  
  • Leaving the stencil in place, I placed the Trailing Vines stencil over the flowers and inked it up with some Cracked Pistachio DOX ink.  It added some interest to the background of the flowers.
  • I placed the inked panel into my Misti to stamp the sentiment, also a new set called Happy from A Colorful Life Designs.
  • I glued the square panel onto a piece of blue cardstock and then onto a 4 1/4" square card base.
  • I stamped the smaller sentiment and pop dotted it below the blessings.

Here are the stencils I used:


New Stamp Set:


Discount Code for A Colorful Life Designs
(Affiliate with no extra cost to you) 

Thanks so much for coming by and taking a look.

Adding my card to these challenges:
Simon Says Wed.- SPRING /EASTER
Simon Says Mon.- STENCIL IT

Supplies
Stamps- Happy (ACLD); Simple Strips (TE)
Inks- Versafine Clair, DOX
Paper- Scribes Nook- Waterloo, Ont.
Accessories and Tools-stencils (ACLD); Make Art Station (Ranger), TE Blending Brushes; 
foam tape

Saturday 25 March 2023

Monochromatic Leaves


Good Morning
Today's card features the Spring Foliage stencil, one of my favs from the new release at A Colorful Life Designs.
This card came together so quickly using my Gel Plate.

So, here's what I did to create my card.
  • I got out my Gel plate, the Spring Foliage stencil and some Peacock Feathers Distress Oxide ink.
  • I pressed the ink directly onto my Gel Plate and brayered it smooth, then placed the stencil onto the plate.  I rubbed some white cardstock over the plate to lift the print.  
  • It was a good print but I thought it needed more so, I laid the stencil back over the print and inked over it with some Uncharted Mariner Distress Oxide ink.  By moving the stencil slightly off to where it was for the first print, I was able to give it a great shadow look.
  • I placed the panel into my Misti to stamp the sentiment, then splattered the whole panel with my white Posca pen.
  • I glued the finished panel onto a piece of white cardstock, then onto a piece of matching blue cardstock.
  • I glued it onto an A2 sized card base and done.

Here is the stencil I used:

Discount Code for A Colorful Life Designs
(Affiliate with no extra cost to you) 

Thanks so much for taking a look.
Have a great weekend.

Adding my card to these challenges:
Simon Says- SPRING/EASTER
Time Out- INSPIRED BY WORDS
My Time to Craft- SPRINGTIME

Supplies
Stamp- See the Light (IO-retired)
Inks- DOX, Versafine Clair
Paper- Scribes Nook- Waterloo, Ont.
Accessories and Tools- stencil (ACLD); Gel Plate; brayer; TE Blending Brushes;
Misti (My Sweet Petunia); white Posca pen

Friday 24 March 2023

Floral Blessings


Welcome
Another new stencil to show you today called Wildflowers from A Colorful Life Designs It is just beautiful.
I used the stencil and my Gel Plate to create the panel.

So, here's what I did to create my card.
  • I got out my Gel Plate again, it's so easy to add colour to a background using Distress Oxide inks.  I pressed some Picked Raspberry, Mustard seed and some Cracked Pistachio directly onto the plate, blended using my brayer, then pressed a piece of white cardstock onto that to give the background colour.
  • The Wildflowers stencil was covered with ink from another print I made on the plate and I didn't want to waste it, so I sprayed it with a bit of water and pressed it onto the inked background to get the monoprint.
  • After the ink was dried, I stamped some script along the sides, then placed the piece into my Misti to stamp the sentiment using a great new stamp set called Happy.
  • I splattered with my white Posca pen and glued the inked panel onto a piece of pink cardstock, then onto a card base.
  • Finally, I added 3 black gems right under the sentiment.

Here is the stencil I used:

Here is the new stamp set I used:

Discount Code for A Colorful Life Designs
(Affiliate with no extra cost to you) 

Thanks so much for coming by and taking a look.

Adding my card to these challenges:
Simon Says Wed.- EASTER/SPRING
Cardz 4 Galz- SPRING FLOWERS

Supplies
Stamp- Happy (A Colorful Life Designs); Script (PB)
Inks- Distress Oxides, Versafine Clair
Paper- Scribes Nook- Waterloo, Ont.
Accessories and Tools- stencil (ACLD); white Posca pen; Gel Plate; brayer;
Misti

Thursday 23 March 2023

Easter Greetings

Welcome
Meet today's card, just in time for Easter.
I don't make a lot of Easter cards, but this new Happy Easter stencil from A Colorful Life Designs was calling to me.  I paired it up with another new stencil called Flower Ball to get a unique look and add interest.

So, here's what I did to create my card.
  • I began by placing the Happy Easter stencil onto a piece of 4 x 4" white cardstock on my Make Art Station.
  • Using some Shaded Lilac Distress Oxide ink, I rubbed over the entire stencil with my blending brush.
  • Leaving that stencil in place, I layered the Flower Ball stencil over that and rubbed over it with some Uncharted Mariner Distress Oxide ink.  It really transformed the look of the first stencil.
  • I removed both stencils and then using my Hero Arts Infinity circle dies, I die cut the ring that you can see around the sentiment.  
  • I glued the small circle onto a 4 1/4" square card base and then pop dotted the die cut circle back into place matching it up with the smaller circle.


Here is the stencil I used:


Discount Code for A Colorful Life Designs
(Affiliate with no extra cost to you) 

Thanks a lot for coming by and taking a look.

Adding my card to these challenges:
Crazy is Our Fame- Stencils are Our Game- CAS 
Simon Says Challenge- SPRING and/or EASTER
The Card Concept- SIGNS OF SPRING

Supplies
Stamps- none
Inks- DOX
Paper- Scribes Nook- Waterloo, Ont.
Accessories and Tools- stencils (ACLD); TE Blending Brushes; Make Art Station (Ranger)
Circle dies (HA); Blending Brushes (TE)

Tuesday 21 March 2023

Kaleidoscope Flower


Welcome
Today's card was a fun one to create using my Gel Plate again and this cool Kaleidoscope Flower stencil from A Colorful Life Designs.

So, here's what I did to create my card.
  • I got out my Gel Plate, brayer and some white cardstock.
  • I pressed my Villainous Potion Distress Oxide ink pad directly onto the Gel Plate and brayered it smooth.
  • Next, I placed the Kaleidoscope Flower stencil onto the plate and rubbed over it with some scrap paper to lift some of the ink off.  I removed that and the stencil and rubbed my piece of white cardstock over the plate to pull the print. (using that stencil produced the white spots you see on the panel)
  • Using the same stencil, I laid the panel onto my Make Art Station and positioned the stencil over the inked panel but slightly moved it over and down and then inked with some more of the same purple ink.
  • I placed the inked panel into my Misti and stamped the Grid over the whole thing and then splattered with my white Posca pen.
  • When the panel was dry, I die cut the sentiment from the center and the word shadow with some white cardstock.
  • I glue the panel onto an A2 card base and popped the sentiment back into place in the middle.

Here is the stencil I used:

Discount Code for A Colorful Life Designs
(Affiliate with no extra cost to you) 

Thanks so much for your visit.

Adding my card to these challenges:
Stamps and Fun=Creativity- THINKING OF YOU
A Place to Start- ANYTHING GOES

Supplies
Stamps- Grid (SSS)
Inks- DOX
Paper- Scribes Nook- Waterloo, Ont.
Accessories and Tools- stencil (ACLD); Gel Plate; brayer;
die- (Heffy Doodle); Make Art Station (Ranger); white Posca pen