Monday 31 December 2018

Merci


Hello and Welcome.
Meet today's card.

This goes out to all of you for your kindness and for all the times you pop in for a visit.  
I do truly appreciate it.

This week, I have the pleasure of hosting the TLC (Technique Lovers Challenge) over at Splitcoast Stampers.  I am tired out from all the holiday festivities and when I thought about what challenge I would present, this simple one came to mind right away.  It is so easy to create lovely backgrounds quickly and so easily.  
It is called Embossing Folder Stamping and it is a great technique for using all those embossing folders we own, in another way.  You do need to have some water based ink and a misting bottle and you are all set to go.

So onto my card details.
I began with my Embossing Folder, opened it up and inked the inside of it with some Distress Oxide inks.  I gave it a spray of water, then pressed my paper into the wet ink.
Depending on how much water you spray onto the ink, you will get different looks when you print on your paper.  I tend to use just 2 sprays to help blend the colours together.
After the piece dried, I placed it inside my Misti and stamped the 2 thistles.
To help add interest to the background, I randomly stamped a script and a zig zag stitch.  I also inked the edges and stamped the 'Merci'.  
I simply mounted that onto a piece of matching green cardstock and then onto a simple white card base.


Thanks so much for coming over and taking a look.
I hope you may give it a try.

Adding my card to these challenges:
Allsorts- THANKS A BUNCH
Love to Create- ANYTHING GOES
Simon Says Wed.- ANYTHING GOES

Supplies
Stamps- Nature Flowers (Art Journey); Merci (?); Stitch (TH); Texture (Prima)
Inks- Distress Oxides- Peeled Paint, Seedless Preserves (TH); Memento black
Paper- heavy white (Scribes Nook)
Accessories and Tools- Misti (My Sweet Petunia); EB folder (Sizzix); Mister (TH); 
inking tool (TH) 

Sunday 30 December 2018

Falling Snow


Good Morning.
We were happy to have some snow for Christmas this year.  Not a lot but just enough to make it a white Christmas.  I love the look of the snow hanging on the trees and it inspired me to make a card.

So onto my card.
I wanted my card to have a crisp, white border so I got out my Rectangle Mask from A Colorful Life and placed that over my card front.  I am loving these masks for creating this kind of card!
I placed the masked piece inside my Misti and stamped the Pine Trees with black ink.
Next, I sponged in the background using some Distress Oxide inks using a blending tool.  
To add interest to my little scene, I stenciled over the background using the Grunge Dots, then I splattered it all up with some white acrylic paint.  
I removed the mask and then scored a frame all around the scene using my ScorPal.
I kept the sentiment simple using a stamp from PB.  I mounted it onto a darker blue to bring out the blue on the stenciled snow and then onto a plain white card base.


Thanks so much for taking time to come by and see what I've been up to.

Adding my card to these challenges:
Alphabet Challenge- 'T' IS FOR TREES
Love to Create- ANYTHING GOES MIXED MEDIA
Simon Says Wed.- ANYTHING GOES


Supplies
Stamps- Pine Trees (Impression Obsession); Christmas Sentiments (PB)
Inks- Tuxedo Black Memento; Distress Oxides-Peacock Feathers, Salty Ocean, 
Blueprint Sketch (TH)
Paper- heavy white- Scribes Nook
Accessories and Tools- Misti (My Sweet Petunia); Mask and stencils (A Colorful Life);
inking tool (TH); white acrylic paint, paintbrush, ScorPal


Saturday 29 December 2018

Collaged Greetings


Welcome

I hope everyone enjoyed a wonderful Christmas.
So much preparations and it seems to be over so quickly.

Here is a holiday card I made by doing a collaged background.  I began by placing the Texture stamp into my Misti and randomly inked it up with some Tumbled Glass and Blueprint Sketch DOX and stamped.  That gave my background a nice mottled color.  
I took the Simple Mosaic stencil from A Colorful Life and filled in some areas on the background to add more interest.
I inked the edges with more Blueprint Sketch, stamped the greeting and set it aside.
I had a leftover piece of inked paper, (more DOX inks I think) and die-cut the reindeer from STAMPlorations from that.  He was mounted over the sentiment using some pop dots and I glued it all onto a simple, plain white card.


Thanks so much for coming by and taking a look.

Adding my card to these challenges:
Simon Says Wed.- ANYTHING GOES
STAMPlorations- CUTPLORATIONS

The Male Room- THE COLOR BLUE


Supplies
Stamps- Holiday Greetings (MFT); Texture (Prima)
Inks- DOX- Blueprint Sketch, Tumbled Glass
Paper- heavy white (Scribes Nook)
Accessories and Tools- Misti (My Sweet Petunia); Reindeer die (STAMPlorations);
stencil- A Colorful Life; pop dots; Cuttlebug

Monday 24 December 2018

Snowy Woods


Meet today's card.
It has a calm, wintery feel to it.  I can hear the snow crunching underfoot.

To begin, I took a piece of heavy white cardstock and placed it inside my Distressed Stripes  embossing folder and ran it through my Cuttlebug.  I turned the paper around and embossed again creating a criss-cross bkg.  Next, I painted the Snowy Grove stamp from Penny Black with some brown Brushos I diluted with some water and stamped onto my cardstock.  While that dried, I die cut the snowflake also from PB onto more heavy white cardstock.
I stamped the sentiment panel using the Christmas Sentiments, glued that over the dry embossed bkg.  To help define the area better, I embossed a line above and below it using my ScorPal.
I pop dotted the trees to one side, the snowflake added to the side and then I added some shimmery Nuvo Drops over the snowflake on the trees.


Santa arrives tonight!!
Thanks for coming by and taking a look.

Adding my card to these challenges:
Creativ Fusion- NON-TRADITIONAL CHRISTMAS
Stamps and Fun= Creativity- ANYTHING CHRISTMAS GOES


Supplies
Stamps- Snowy Grove, Christmas Sentiments (PB)
Inks- Memento Brown, Brushos
Paper- heavy white (Scibes Nook)
Accessories and Tools- Distressed Stripes (Cuttlebug); ScorPal; Snowflake die (PB);
paintbrush; Nuvo Drops; Cuttlebug

Saturday 22 December 2018

Tis the Season


Good Morning
Just a fun, simple holiday card today using a Monoprint as my starting point.

I do love the look of plaid and decided to try and make a 'rainbow' looking one.
I began by inking the back of my stencil with lots of different colours of Distress Oxide inks, sprayed with water and pressed onto my heavy white cardstock to get a monoprint.

Keeping with a simple design in mind, I placed the piece inside my Misti and stamped this fun sentiment from STAMPlorations with black Memento ink then clear heat embossed to help make it pop.
I mounted the finished stamped piece onto another piece of heavy white cardstock and pop dotted that onto a plain white card base.


As the big day gets closer and closer I wish you peace as you finish your preparations.

Adding my card to these challenges:
Little Red Wagon- ALL THINGS CHRISTMAS
Simon Says Wed.- PARTY TIME
Use Your Stuff- CHRISTMAS/HOLIDAYS
STAMPlorations- DEC CAS CHALLENGE


Supplies
Stamps- Tis the Season (STAMPlorations)
Inks- Various Distress Oxides (TH); Tuxedo Black Memento
Paper- heavy white (Scribes Nook)
Accessories and Tools- Misti (My Sweet Petunia); pop dots, Gingham stencil (SSS)

Thursday 20 December 2018

Christmas is Golden

Good Morning
Meet today's card.
Lots of shiny gold although my picture doesn't totally reflect that.  It is pretty hard to capture the shine that the gold embossing powder gives so I apologize for the poor picture.

So onto my card details.
I began by placing this great Texture stamp from Prima inside my Misti and then randomly inked it with some Versamark ink.  I sprinkled on some shiny gold embossing powder and heat set.
Next, I die-cut this snowflake from SSS with some heavy white cardstock, rubbed it with some Versamark and gold embossed it as well.  
I cut a small piece of cardstock, stamped the sentiment from Penny Black using my Misti again and some Versamark ink and gold embossed that.
To put my card together, I glued the snowflake over the gold embossed background then pop dotted the sentiment over the snowflake.
I mounted it all onto a plain white card base, keeping it clean and simple looking.


Thanks so much for coming by and taking a look.

Adding my card to these challenges:
Little Red Wagon- ALL THINGS CHRISTMAS
Use Your Stuff- CHRISTMAS/HOLIDAYS
Double D- LET IT SNOW 

Supplies
Stamps- Texture (Prima); Christmas Sentiments (Penny Black)
Ink- Versamark
Paper- heavy white (Scribes Nook)
Accessories and Tools- Misti (My Sweet Petunia); gold eb powder; heat tool; pop dots; snowflake die (SSS)


Tuesday 18 December 2018

Silver Snowflake

Hello and Welcome

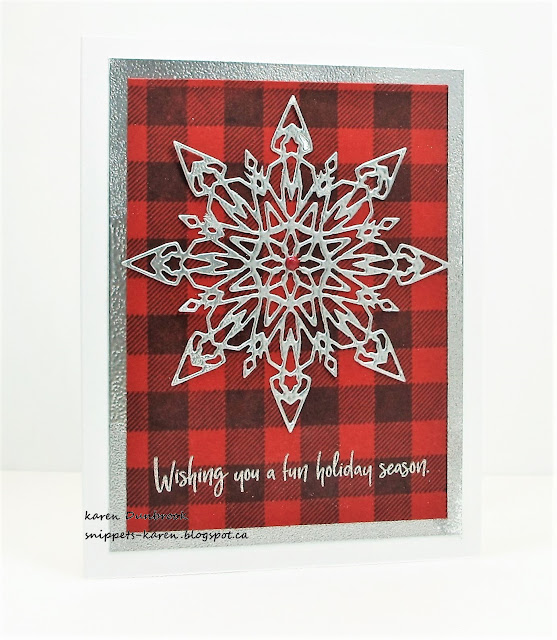
I wanted to make a simple, plaid card for my son and this is what I came up with.  
So simple using this great stamp from Concord and 9th and my Misti.

I began with a piece of red cardstock and placed it inside my Misti.  After placing the plaid stamp in the right position, I inked it up with some Tuxedo Black Memento ink and stamped.  By using my Misti, it was easy to repeat that process to get a deep, dark impression.
When the ink was all dry, I stamped the sentiment using my Misti again with some Versamark ink and silver heat embossed it along the bottom.  
Next, I die cut the snowflake from Tim Holtz with some heavy white cardstock, rubbed it with more Versamark and silver heat embossed the whole thing.  I set that aside to cool.
To continue with the silver theme, I inked the edges of a piece of white cardstock with more Versamark and silver embossed all the edges.  I glued the plaid over that then added the snowflake with a red Nuvo drop in the center.


Thanks so much for coming by and taking a look.
During this busy season, I really do appreciate it!

Adding my card to these challenges:
Simon Says Wed.- CHRISTMAS
A Bit More Time to Craft- ANYTHING GOES
Craft Stamper Magazine- ANYTHING STAMPED GOES


Supplies
Stamps- Christmas Sentiments (PB); Plaid (Concord and 9th)
Ink- Tuxedo Black Memento; Versamark
Paper- heavy white (Scribes Nook); red cs
Accessories and Tools- Misti (My Sweet Petunia); silver eb powder; heat tool; 
Flurry 1 Snowflake Die (TH); Red Nuvo Drop

Monday 17 December 2018

Merry Wishes


Hello and Welcome
I wanted to create a card with a stamped background that would be my sentiment for the card.

I began by placing a piece of white cardstock inside my Misti, inked the 'Merry Christmas' with some grey ink and repeatedly stamped it by moving it around in my Misti.  It is so easy to create this kind of background using this great tool.
Next, I stamped the reindeer that is from a set by Recollections that I recently picked up on sale at Michaels with some Versamark ink and silver heat embossed it.  I then die-cut it out.
I had some leftover pieces of Yupo paper that I had inked with some Alcohol inks, so I cut out a circle and then glued the reindeer onto that to give my card a pop of colour.
I pop-dot mounted the circle over the sentiment background and then glued that over a piece of blue cardstock to help tie in with the blue of the circle and then onto a white card base.


Thanks so much for coming by and taking a look.

Adding my card to these challenges:
Simon Says Wed.- CHRISTMAS
Cas on Friday- MAKE A CHRISTMAS CARD #2
Shopping Our Stash- TIS THE SEASON

Supplies
Stamps- Winter Wonderland (Recollections); Hand Lettered Holiday Greetings (MFT)
Inks- London Fog (Memento); Versamark
Paper- heavy white (Scribes Nook); blue cs; Yupo
Accessories and Tools- Misti (My Sweet Petunia); AI ink (Ranger); Circle die (Spellbinders); pop dots;
silver eb powder; heat tool

Sunday 16 December 2018

Noel


Good Morning

Here is a card I made the other day.  For this one, I decided to play with some dies, put them together  and see what I could come up with.
I always use a heavy white cardstock that I get from a local store and it holds up wonderfully for my projects especially when there is a lot of cutting involved.

I began by dry embossing a piece of cardstock for the background using a folder from Tim Holtz.
Next I die-cut the trees and glued them over the snowy bkg.  I added a frame over that to help pull it all together and then cut the little cardinal from some shiny red cardstock I had in my stash.
I kept it all white so the cardinal would take center stage.
I stamped the sentiment with some black Memento ink in my Misti, cut and mounted it with some pop dots.
When I was done, I had a very simple card with a clean, crisp look for the holidays.


Thanks so much for coming by and taking a look.

Adding my card to these challenges:
CASology- NORTH
Simon Says Wed.- CHRISTMAS
Little Red Wagon- NOT JUST BLACK AND WHITE

Supplies
Stamps- Christmas Sentiments (PB)
Ink- Tuxedo Black Memento
Paper- heavy white (Scribes Nook); Shiny Red (Dollarama)
Accessories and Tools- Misti (My Sweet Petunia); Stitched Frame(Memory Box);
Snowfall Speckles EB folder (TH); Branched Birch (TH); Delightful Deer (MFT); Cuttlebug


Friday 14 December 2018

Pretty Poinsettia


Hello and Welcome
I just picked up this wonderful background stamp from Stampendous and just had to play with it.
I love the collage style it has and this card came together quickly which is great for this time of year.

I began by placing the stamp inside of my Misti, inked it up with some Versamark ink and stamped onto my heavy white cardstock.  I then heat embossed it with some white powder.  
I like using the heavy white instead of watercolour paper as I find the ink sits on the surface and pools a bit better rather then blending in.
Next, I took some red Brushos and sprinkled it just over the flowers then sprayed with water to activate the colour crystals.  Like I have mentioned before, less is more when working with Brushos as they are highly concentrated.  I let that dry a bit then sprinkled on some purple Brushos over the other areas and sprayed with water again.  I let it dry a bit then using a wet paintbrush, I applied some more red to the flowers to help make them pop.
When is was all fully dry, I mounted it onto a plain white card base.


Thanks so much for coming by and taking a look.

Simon Says Wed.- CHRISTMAS
Craft Stamper Magazine- ANYTHING STAMPED GOES


Supplies
Stamp- Poinsettia Collage (Stampendous)
Inks- Versamark; Brushos
Paper- heavy white (Scribes Nook)
Accessories and Tools- Misti (My Sweet Petunia); white eb powder; heat tool; paintbrush

Monday 10 December 2018

Country Christmas


Good Morning
Today, the challenge over at Splitcoast Stampers is to make a card that would be easy to mass produce.
Now while assembly line stamping isn't my thing, this card fits the bill.

I began with this lovely snowy stamp from Serendipity Stamps.  It is larger then I wanted for my card front so I used a mask from A Colorful Life over my white cardstock.  I added some torn tape along the edges to give a bit of an irregular edge which is just something I prefer.  
These masks have come in so super handy and work fantastic.  It has also helped me use less Post It tape on my projects.
Here is what it looked like after I had masked it.


Next, I rubbed some Distress Oxide ink directly onto my non-stick craft mat, sprayed with water and pulled my stamp through the wet ink.  I then stamped over the mask which left a wonderful impression.  Before I lifted the mask, I sponged some more ink along the edges, then removed the mask and it was ready to use on the next card front to stamp again.
When the piece was dry, I scored a border along the edges and stamped the Penny Black sentiment using my Misti.  The Misti is another invaluable tool when mass producing.
I simply mounted it all onto a white card base.


Thanks so much for coming by and taking a look.

Adding my card to these challenges:
CASology- NORTH
The Male Room- CELEBRATE
SSS- CHRISTMAS CARD DAY

Supplies
Stamps- Wheel in Snow (Serendipity Stamps); Christmas Sentiments (PB)
Inks- Tuxedo Black Memento; Distress Oxides- Peacock Feathers, Salty Ocean, Faded Jeans (TH)
Paper- heavy white (Scribes Nook)
Accessories and Tools- Marvelous Masks Rectangles (A Colorful Life); Misti (My Sweet Petunia);
non-stick craft mat (TH); ScorPal; Mister (TH)

Saturday 8 December 2018

Snowy Branch


Happy Saturday.

Still creating a few more holiday cards.
This one is super simple and shows off the beautiful colours achieved using Brushos.
For those of you that are not familiar with using Brushos, they are highly pigmented small particles of colour that are activated by adding water.  

So, I began by stamping this branch with Versamark ink and white heat embossed it to create a resist.
I'm sorry I don't know who makes this stamp as the name has worn off my block.  I have had it for years and I still love the simplicity it adds to a design.
Next, I took some Brushos and sparely sprinkled some over the embossed branch, sprayed with water and watched the magic appear.  I helped the colour reach all areas with a wet paint brush.

When the piece was totally dry, I placed it inside my Misti and stamped the sentiment from Penny Black.  I kept it simply by mounting it over a plain white card base.


Thanks so much for coming by and taking a look.

Adding my card to these challenges:
Simon Says Mon.- 'B' IS FOR?
(branch)
CAS on Friday- MAKE A CHRISTMAS CARD
The Male Room- CELEBRATE
Craft Stamper Magazine- ANYTHING GOES


Supplies
Stamps- Branch-??; Christmas Sentiment (PB)
Inks- Tuxedo Black Memento; Versamark
Paper- heavy white (Scribes Nook)
Accessories and Tools- Misti (My Sweet Petunia); Brushos (leaf green); white eb powder; heat tool; paintbrush

Tuesday 4 December 2018

Large Poinsettia- The Flower Challenge

Good Morning.
Time for a new theme at 


I think it is fun to go back and re-discover some older, much loved stamps.  This poinsettia stamp is for sure one of my favourites to use for creating holiday cards.

So onto my card.
I chose to make this wonderful Penny Black Poinsettia the star of my card.
I have had this stamp for a long time and I always love the look of a red poinsettia.
I stamped the flower with some Memento Black then used some Distress Oxide inks to watercolour the image.  I just rubbed my ink pad directly onto my non-stick craft mat, sprayed with some water and picked up the ink with a wet paintbrush.  I fussy cut it out and to give it a big pop of shine, I rubbed the whole flower with my Versamark pad and clear heat embossed.  It gave the flower lots more stability and also gave it a wonderful texture.

The background was created by rubbing some Candied Apple, Festive Berries and Barn Door Distress Oxide inks over a piece of white cardstock using a blending brush.  When I was happy with the colour blends, I took the Circles Makes Circles Stencil from A Colorful Life and some water and lifted the ink in places to add interest. I repeated that process using the Mini Grid stencil as well giving the background more depth and interest.
When that was dry, I splattered with some white acrylic paint then glued the flower over the top.
I stamped the sentiment and pop dotted it over the flower as not to cover up the interest the background gave.


Thanks so much for coming by and taking a look.

Supplies
Inks- Distress Oxide (TH); Tuxedo Black Memento
Paper- heavy white (Scribes Nook)
Accessories and Tools- Stencils- A Colorful Life; Misti (My Sweet Petunia); pop dots;
white acrylic paint; clear EB powder; heat tool; sponging tool (TH)

Monday 3 December 2018

Brushos Christmas

Hello and Welcome
This is a simple card that came together easily with the help of my Brushos and some white embossing powder.
For those of you still needing to make a few last minute cards, this sure fits the bill.

I began with a piece of heavy white cardstock.  I like to use it as I find the inks sit on the surface instead of soaking in.  You could totally use some watercolour paper as well with great results too.
I placed the Poinsettia Sketch stamp into my Misti, inked it up with some Versamark then sprinkled on some white embossing powder and heat set.  The white embossing powder works as the perfect resist for the inks.
Next, I sprinkle some Brushos lightly over my card panel....less is more as these are so highly pigmented, then sprayed with some water.  Using a wet paintbrush, I moved some of the wet ink around, highlighting some areas more then others.
When that was dry, I stamped the sentiment, added a few drops of Nuvo  and mounted it all onto a plain white card base.


Thanks so much for coming by and taking a look.

Adding my card to these challenges:
Simon Says Wed.- ANYTHING GOES
CAS Mix Up- EMBOSS RESIST
(emboss resist, Brushos, watercolouring)


Supplies
Stamps- Poinsettia Sketch (Impression Obsession); Seasons Greeting (Recollections)
Inks- Versamark; Tuxedo Black Memento
Paper- heavy white (Scribes Nook)
Accessories and Tools- Misti (My Sweet Petunia); Brushos; Mister (TH); paint brush; 
white Embossing Powder; heat tool; Nuvo Drops

Sunday 2 December 2018

Snowflake Thanks- CAS Watercolour Challenge


Hello and Welcome.
Time for another challenge at the 

This month our theme is 
THANK-YOU


This is a good time to create some Thank-You cards to send out after the holidays.
Be sure and stop by our blog to see the wonderful cards created by our talented DT and our special guest
I had the great pleasure of meeting Michele IRL last April at Scrapfest in Kitchener.  She is super talented, friendly and has the warmest, welcoming smile.  

So this is how I created my card.
I began my card by making my own stamping pad.  I have been playing around with this fun and easy technique and love the results it gives.  I rubbed 3 different Distress Oxide inks onto my non-stick craft mat, sprayed with water and ran my snowflake stamp through the wet ink and stamped it onto the middle of my card front.  I love the watery, snowy look I was left with.
When that was dry, I placed the piece inside my Misti and stamped the thanks.
Next, to help give the snowflake more presence, I scored a border all around the edges of it using my ScorPal.  
I mounted it onto a white card base, keeping it very simple and clean.
The finishing touch was to add the gem/pearl to the center of the snowflake.


Thanks so much for coming by and taking a look.
I hope you will come and play along with us.

Adding my card to these challenges:
Simon Says- ANYTHING GOES
AAA Cards- MOSTLY WHITE
Crimbo Crackers- ANYTHING CHRISTMAS GOES

Supplies
Stamps- Snowflakes (HA); Thanks (SSS)
Inks- Distress Oxides- Iced Spruce, Faded Jeans, Peacock Feathers (TH)
Paper- heavy white (Scribes Nook)
Accessories and Tools- ScorPal; blue gem; Misti (My Sweet Petunia); non-stick 
craft mat (TH); Mister (TH)