Showing posts with label Brushos. Show all posts

Sunday, 11 February 2024

Beautiful Day

Welcome
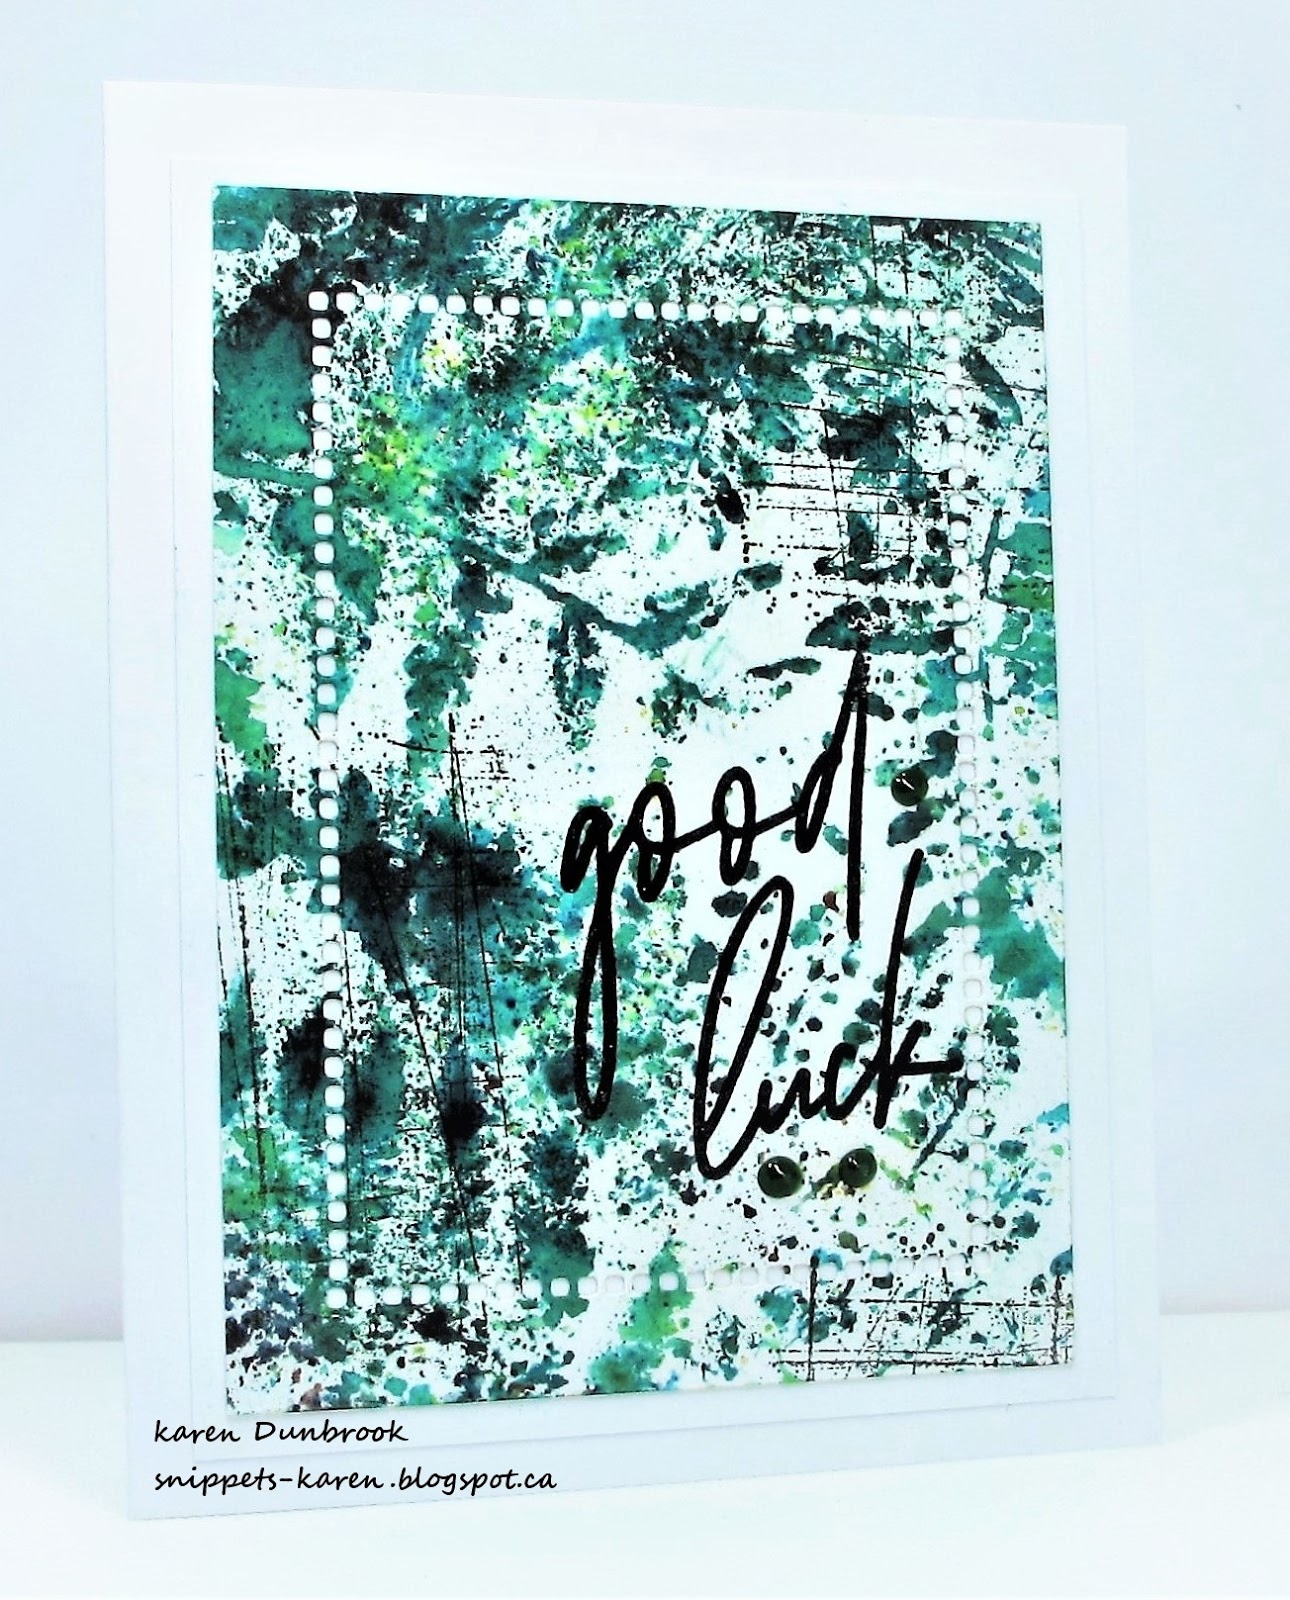
Today, I'm using the new for February stencil from A Colorful Life Designs called 
I haven't played with my Brushos for ages so I got them out too.

So, here's what I did to create my card.
  • I cut a piece of white cardstock and placed it onto my Make Art Station.
  • I placed the Tall Flowers stencil over that and sprayed with some water...not too much as I didn't want it to soak under the stencil.
  • I sprinkled some blue and green Brushos over the whole panel and watched it come to life.  
  • I removed the stencil right away and let the piece dry.  If some areas of the stencil do not show up, use a paint brush with just a touch of water to pull out the colour.
  • When the panel was totally dry, I rubbed over it with a paper towel to brush off any loose Brushos.
  • I placed the piece into my Misti and stamped the sentiment with some Versafine Clair Noir and clear embossed it to help it pop over the colourful background.
  • I glued the finished card front to a piece of blue cardstock, then onto an A2 sized card base.
  • Finally, to finish my card off, I added 3 black gems around the sentiment.

Here is the stencil I used:

Discount Code for A Colorful Life Designs
(Affiliate with no extra cost to you) 

Thanks so much for coming by and taking a look.

Adding my card to these challenges:
Simon Says Mon.- FUN WITH STENCILS
The Crafty Addicts- ANYTHING GOES
Word Power- SENTIMENT IS THE FOCUS

Supplies
Stamps- Live in the Moment (CTMH)
Inks- Versafine Clair; Brushos
Paper- heavy white (Scribes Nook- Waterloo, Ont.)
Accessories and Tools- stencil (A Colorful Life Designs); Make Art Station (Ranger); 
black gems; clear eb powder

Saturday, 3 December 2022

Snowy Greetings


Welcome
I picked up this fun Snowflake Cluster stencil from Simon Says and wanted to get a chance to play with it.

So, here's what I did to create my card.
  • I began by placing a piece of white cardstock onto my Make Art Station and then positioned the Snowflake stencil over that.
  • Next, I sprayed my panel with some water, then sprinkled on some Brushos.  (Brushos are highly concentrated crystals of colour that are activated by water.) 
  • I used a baby wipe to dab over the stencil to help spread the colour of the Brushos, covering the panel, then removed the stencil and let the piece dry.
  • I die cut the sentiment next.  The script with some white and the outline with a dark purple to match the card front and glued them together.
  • When the snowflakes were dry, I splattered with my white Posca pen to add a more snowy effect.
  • I glued it onto a piece of pale purple cardstock, then onto an A2 card base.
  • I popped the sentiment over the background and added 3 silver gems.

Thanks so much for coming by and taking a look.

Adding my card to these challenges:
Simon Says Wed.- ANYTHING GOES
Beyond the Blue- WINTER HOLIDAY
Allsorts- IT'S BEGINNING TO LOOK A LOT LIKE CHRISTMAS

Supplies
Stamps- none
Inks- Brushos
Paper- heavy white (Scribes Nook)
Accessories and Tools- Snowflake Clusters (SSS); Snowy Greetings die (SSS); 
Brushos; baby wipes; silver gems; white Posca pen; Make Art Station (Ranger)

Sunday, 6 February 2022

Something Different


Welcome
I'm calling this post 'Something Different' because it's just that for me.
Trying out a new fold for my card base....so easy but gives a different look.

So here's what I did to create my card.
  • I decided to challenge myself to create a different style of card.  In the end, it was so super easy that I will be doing it again.  I began by making a standard card base that was 5 1/2 x 4 1/4" when folded.  
  • Next, I scored and folded the front side panel in half. It creates a 'Z' fold card.
  • I found this piece of painted cardstock that I had done on my Gel Plate and thought it would look nice as the base colour.
  • I cut it and adhered it to the outside folded part of the panel and also to the inside of the card base.
  • After I had the blue gel print glued to my card base, I cut a piece of white cardstock and placed the Paper Swirls stamp into my Misti.  I sprayed the stamp with lots of water, then pressed it onto my cardstock.  
  • I sprinkled on some Brushos and let dry completely.  I love the look as the colour bursts to life with the Brushos.  For those of you that are wondering what Brushos are, they are little crystals filled with lots of pigment, that are activated by spraying with water.
  • When it was all dry, I brushed away the excess Brushos, leaving behind this lovely stamping.
  • I placed it into my Misti again and stamped the sentiment.
  • I glued the inked piece onto some lavender cardstock and then glued it just to the front fold of the card base. (finished size was 3 x 4 1/4")
  • I added 3 black gems to finish it all off.


A really simple fold to do and still room to write on the inside of the card.


Thanks so much for coming by and taking a look.

Adding my card to these challenges:
Simon Says Wed.- WITH LOVE
Creative Creases- ANYTHING GOES WITH A FUN FOLD
Krafty Chicks- STAMP ACT

Supplies
Stamps- Paper Swirls (Frog's Whiskers); Scripted Bold Sentiments (Pinkfresh Studio)
Inks- Versafine Clair; Brushos
Paper- white (Scribes Nook- Waterloo, Ont.)
Accessories and Tools- ScorPal; Misti (My Sweet Petunia); black gems; gel plate print

Tuesday, 19 January 2021

Remember


Hello and Welcome
Meet today's card.  I need to make some sympathy cards to have on hand; always a tough one to create in the moment.

So here's what I did to create my card.
  • I began with a piece of heavy white cardstock.  I sprinkled some green Brushos onto the bottom corner of my panel, then sprayed with a bit of water to activate the colour crystals.  Using a straw, I blew the inks in an upward motion.  I repeated that process using some blues next.  * For those of you that are not familiar with Brushos, they are highly pigments granules of colour that are activated with water.  You can sprinkle them onto your paper or use them diluted to watercolour*
  • When I was happy with all the inking, I let the panel dry completely.
  • Next, I laid the Flower Head stencil from A Colorful Life Designs over my inked panel with some Peacock Feathers Distress Oxide ink.  I just love the look it gave.
  • I placed the panel into my Misti to stamp the new to me sentiment from Impression Obsession with some Versafine Clair and clear heat embossed it.
  • Using my black Posca pen, I splattered the corner of my flower right over what would be the flower center.  I added some dots to that as well using my white Posca pen.
  • I added it to a piece of navy cardstock, then onto a heavy white card base.


Thanks so very much for coming by and taking a look.


Discount Code for A Colorful Life Designs

Supplies
Stamps- Happy Memory (Impression Obsession)
Inks- DOX, Brushos, Versafine Clair
Paper- heavy white (Scribes Nook)
Accessories and Tools- Flower Head stencil (ACLD); straw; Posca pens; clear eb powder;
heat tool (Ranger)

Monday, 4 May 2020

Monochrome- The Flower Challenge


Good Morning and Welcome!
Time for another fun theme at 


So this month we would like to see a 'Monochrome' look on your cards.This means either 'black and white' or varying tones of one colour. We are allowing a white card base & touches of white also, so you could have a white card base with say shades of purple stamped flowers or dies on as an example.
This month we welcome 
Guest Designer this month is  Nonni from  Nonnishandmadecards

So onto my card details.
I have had time to play around with my Gelli Plate and I decided to try it out using my Brushos.
I  sprinkled on 2 shades of blue Brushos that are highly pigmented, onto my Gelli Plate, sprayed with a bit of water to activate the crystals, then put my paper panel over that to pull the print.  I did use my brayer to help move a bit of the colour around before pulling the print.  I was left with a lovely bkg. ready to stamp onto.
I stamped the scripts in the background using Broken China Distress Oxide inks to add interest. They are from the new Tim Holtz set called Faded Type that I am obsessed with!
I die cut the stitched frame and placed the piece under the frame.  I die cut the Hollyhocks and glued them onto the inked piece.  I stamped the sentiment and pop dotted it over the bkg.


Thanks so much for coming by and taking a look.
I hope you will check out the gallery to see all the wonderful creations there.

Supplies
Stamps- Everyday Sentiments (YNS); Faded Text (TH)
Inks- Versafine Clair; DOX; Brushos
Paper- heavy white (Scribes Nook)
Accessories and Tools- Gel Plate; pop dots; Stitched Frame (Memory Box)
Hollyhocks die (TH); brayer


Saturday, 18 April 2020

Lead the Way


Hello and Welcome
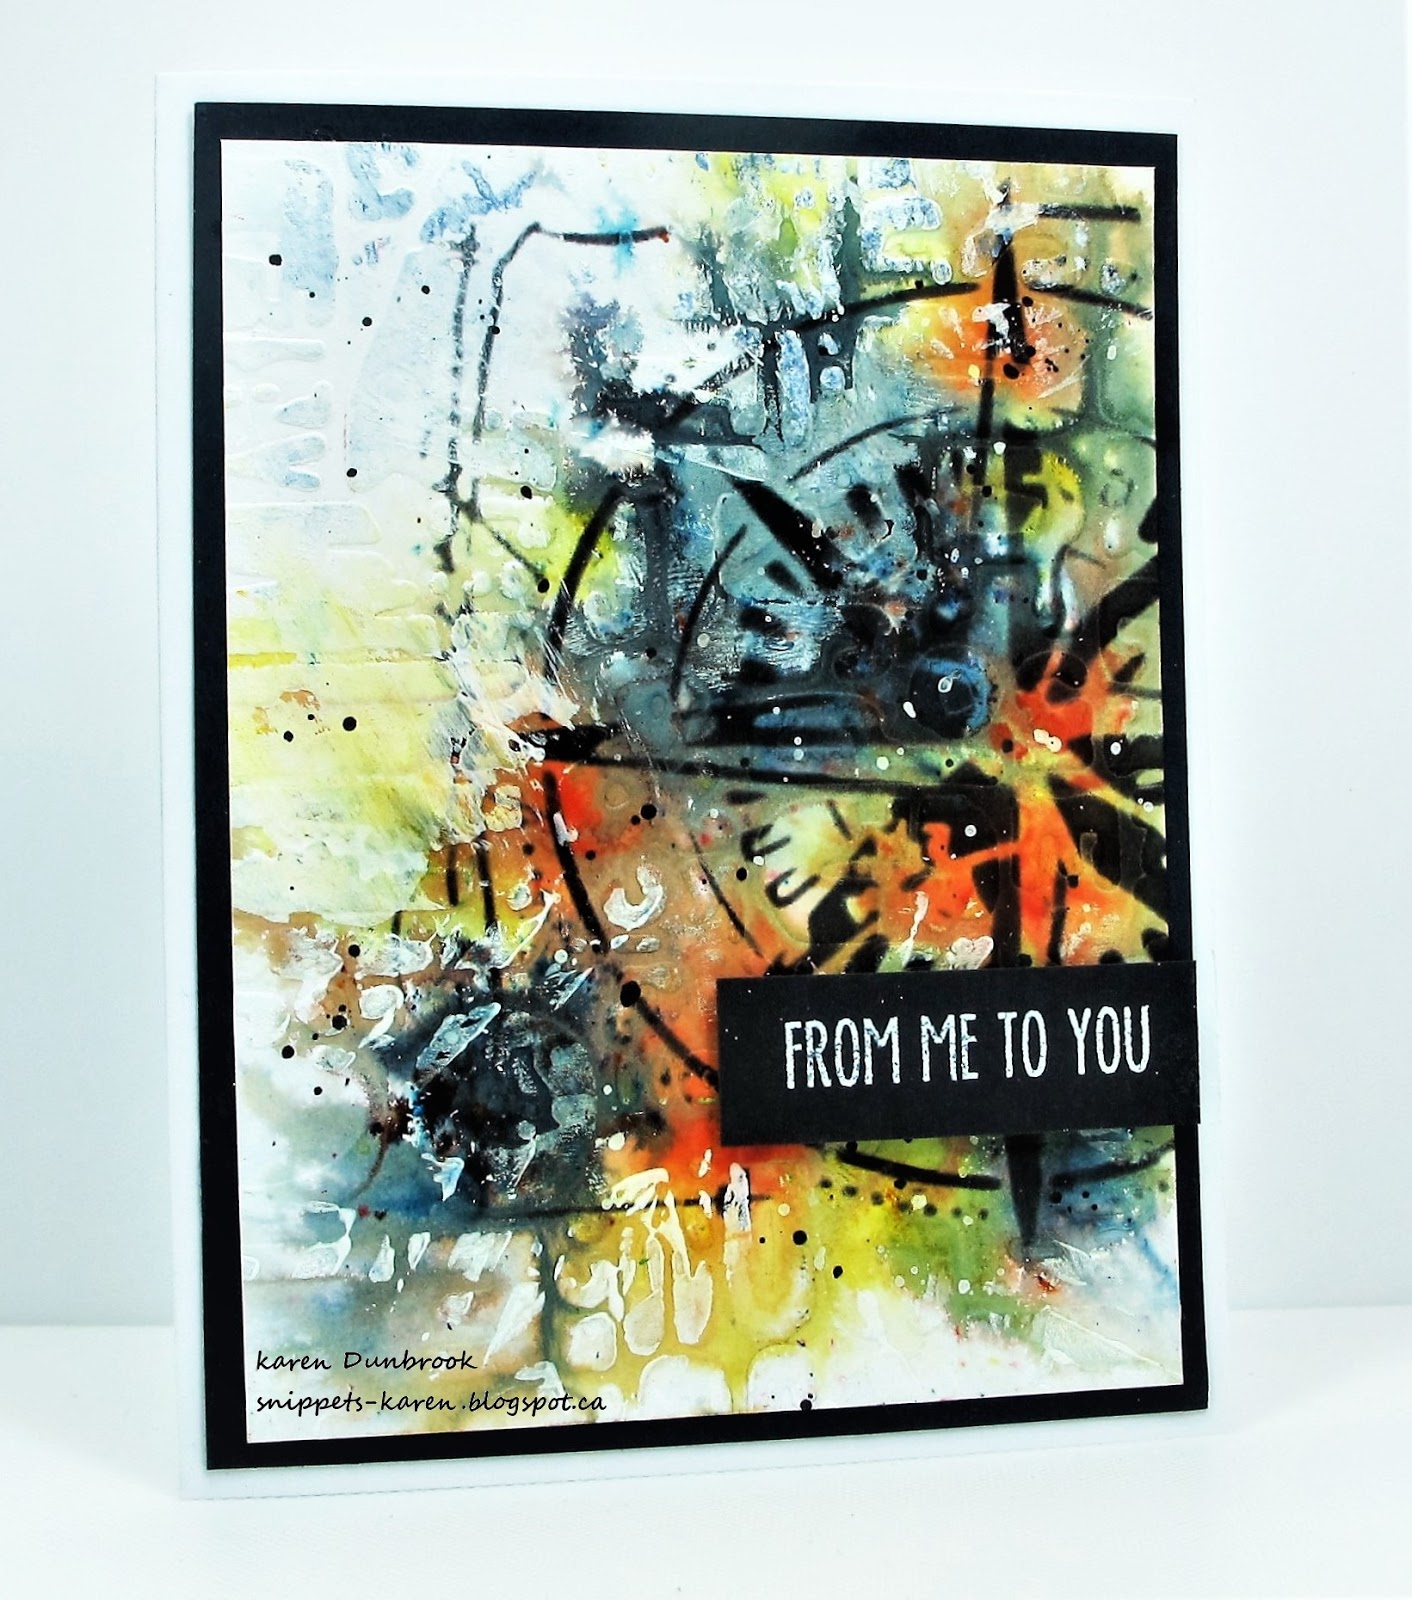
Today I'm trying my hand at some Mixed Media with this card.  Just playing around is fun.

So here's how my card came to be.
I began with a piece of heavy white cardstock.  I embossed it with my Cuttlebug using a folder from Carabelle Studio.  I think it's called Graffiti but I can't find it at the moment.
* helpful tip:  Lightly spray your paper before placing it inside your embossing folder to get a better impression*
Next, I sprinkled some Brushos onto my embossed card panel, sprayed with just a bit of water and let the colours bloom.  I used some black, lemon and some orange Brushos.  The black is the most amazing as when it is activated with water, you see shades of gray, blue and green.  I dried that with my heat tool. 
When it was all dry, I use the Compass stencil from AAll and Create with some Ranger Archival ink to stencil over to the side of the panel.  Some of the areas looked a bit dark, so I added touches of white acrylic paint using my brayer to lighten them up a bit.  I splattered with some black acrylic paint, then I stamped the sentiment onto a piece of black cardstock, white heat embossed it and pop dotted it over my background.
I glued it over a piece of black cardstock, then onto a white card base.


Thanks so much for coming by and taking a look.

Supplies
Stamps- Everyday Sentiments (YNS)
Inks- Ranger Archival, Brushos, Versamark
Paper- heavy white (Scribes Nook)
Accessories and Tools- EB folder (Carabelle Studios); Compass stencil (AAll Creates);
brayer; pop dots; white eb powder; black and white acrylic paint

Sunday, 5 April 2020

Flowering


Good Morning

I hope you are doing well.
Creating has been my saving grace during this time off and isolation.
It gives me some peace in a crazy world.
I hope it does that for you too....takes your mind off of what is happening, even for a few moments.
I heard a quote yesterday that makes such sense....

"The best way to cheer yourself up is to try to cheer somebody else up."
(Mark Twain)

....so I have been creating and sending out cards that will hopefully brighten someone's day and let them know that I am thinking about them.

Anyways, onto my card design.
I began with a piece of heavy white cardstock.  I stamped the Large Floral from Magenta onto my card panel with some Versamark ink, then heat embossed it with some white powder.  
Using some orange, yellow and red Brushos, I watercoloured in the flowers.  So Spring like with those happy colours.  I so enjoy working with the Brushos as they give such intense colour to any project.
When that was dry, I die cut the stitched edge to add interest, added the die cut sentiment and a few orange sequins.  


Thanks so much for coming by and taking a look.
Stay safe...blessings.

Adding my card to these challenges:
Simon Says Wed.- HAPPY BIRTHDAY
Craft Stamper Magazine- TAKE IT/MAKE IT Anything Goes
The Flower Challenge- SPRING/AUTUMN

Supplies
Stamp- Large Floral (Magenta)
Inks- Brushos, Versamark
Paper- heavy white (Scribes Nook)
Accessories and Tools- Misti (My Sweet Petunia); paintbrush; Celebrate die (MFT);
orange sequins; white eb powder; heat tool

Monday, 2 March 2020

Luck of the Irish- CAS Watercolour Challenge


Welcome
Well we are into the month of March and it's time for another fun theme at the 

This month we are celebrating The Luck of the Irish!


Everyone's Irish on St. Paddy's Day right?!  So this month lets show some green, it could be shamrocks, meadows, leprechauns (or gnomes!), or use some color with a rainbow or something gold. It doesn't have to say anything about St. Paddy's Day but be inspired by it.
This month we also welcome our Guest Designer:  Hannelie (Desert Diva)

So onto my card details.
I began with a piece of heavy white cardstock and positioned my Fern Garden stamp into my Misti. I got out my Green Brushos, sprinkled some into my palette then diluted it with a bit of water.  Using a wet brush, I painted the stamp with the green and pressed onto my paper.  I did spray the stamp with some water after the first impression was stamped to use all the little bits of colour still left on the stamp.  It also helps give the overall impression a more watercoloured look.
When all was dry, I die cut the middle area of my card with the hemstitch die to add interest, then stamped the sentiment.  I did add some faint grid stamping in the corners for interest as well.
I simply mounted it onto a heavy white card base.


Thanks so much for coming by and taking a look.


Supplies
Stamps- Fern Garden (Stampendous); Scripted Bold Sentiments (Pinkfresh Studio)
Scratch Bkg (SU-so sorry, but I don't know the name of this stamp)
Inks- Versafine, Brushos
Paper- heavy white (Scribes Nook)
Accessories and Tools- Misti (My Sweet Petunia); Hemstitch Die (Spellbinders); 
Cuttlebug; paintbrush

Sunday, 19 January 2020

Snow Storm


Good Morning.
Meet today's card inspired by the snowstorm we are in the middle of.  It's been such a weird winter here, not much snow up to this point but lots of rain.

So onto my card details.
I just had to pick up this wonderful stamp from the Colorado Stamp Comp. after seeing it on social media.  Love the look and how big it is.  I had such fun playing around with it.
I began with a piece of heavy white cardstock and placed it into my Misti.  I positioned the stamp,  painted it with some diluted Brushos and a wet paintbrush, then pressed onto my white cardstock.  I repeated that process until all areas of the snowflake had been inked with colour.
I just love the bold colour the Brushos give.
I had some diluted Brushos left on my palette, so I took a wet paintbrush and splattered the bkg.  No sense in letting good ink go to waste right?  Besides, I love the look of the splatters.

When it was all dry, it looked a little plain, so I die-cut it, then pop dot mounted it back over my card front then onto a heavy white card base.  I added a blue jewel to the center of my snowflake as the finishing touch.


Thanks so much for coming by and taking a look.

Adding my card to these challenges:
CAS on Friday- WINTER
Craft Stamper Magazine- ANYTHING GOES

Supplies
Stamp- Warm Wishes Snowflake (Colorado Stamp Company)
Inks- Brushos
Paper- heavy white (Scribes Nook)
Accessories and Tools- paintbrush, Hemstitch die (Spellbinders); blue jewel; pop dots


Wednesday, 15 January 2020

From Me to You- CAS Watercolour Challenge


Welcome
So glad you popped in for a visit.

This is my reminder card for the 

You still have some time to come and play along too!


This month we are creating using Cool colours.  
Here is a sampling of them:

We also want to welcome our Guest Designer this month:


Here are my card details.
I just picked up this lovely bkg. stamp called Winter Floral Mix from SSS and wanted to play with it.
So, I took a piece of heavy white cardstock and placed it into my Misti.  I inked up the stamp with some Versamark ink, stamped and white heat embossed.
Next, I took some Brushos and a wet paintbrush and watercoloured in the image.  The stamp is technically meant to be a Christmas image but I love that these 'cool' colours make it look less like that.  I mounted the panel onto some white.
To add some interest, I dry embossed another piece of cardstock and added some scored lines as well.
I pop dotted my stamped panel over that and added the sentiment.


Thanks so much for coming by and taking a look.

Adding my card to these challenges:
Use Your Stuff- ANYTHING GOES

Supplies
Stamps- Winter Floral Mix (SSS); Everyday Sentiments (YNS)
Inks- Versamark; Brushos
Paper- heavy white (Scribes Nook); black cs (Michaels)
Accessories and Tools- Misti (My Sweet Petunia); white eb powder; heat tool;
pop dots; Embossing folder; Cuttlebug; paintbrush