Wednesday 28 June 2023

Tropical Flowers


Welcome
Meet today's card.
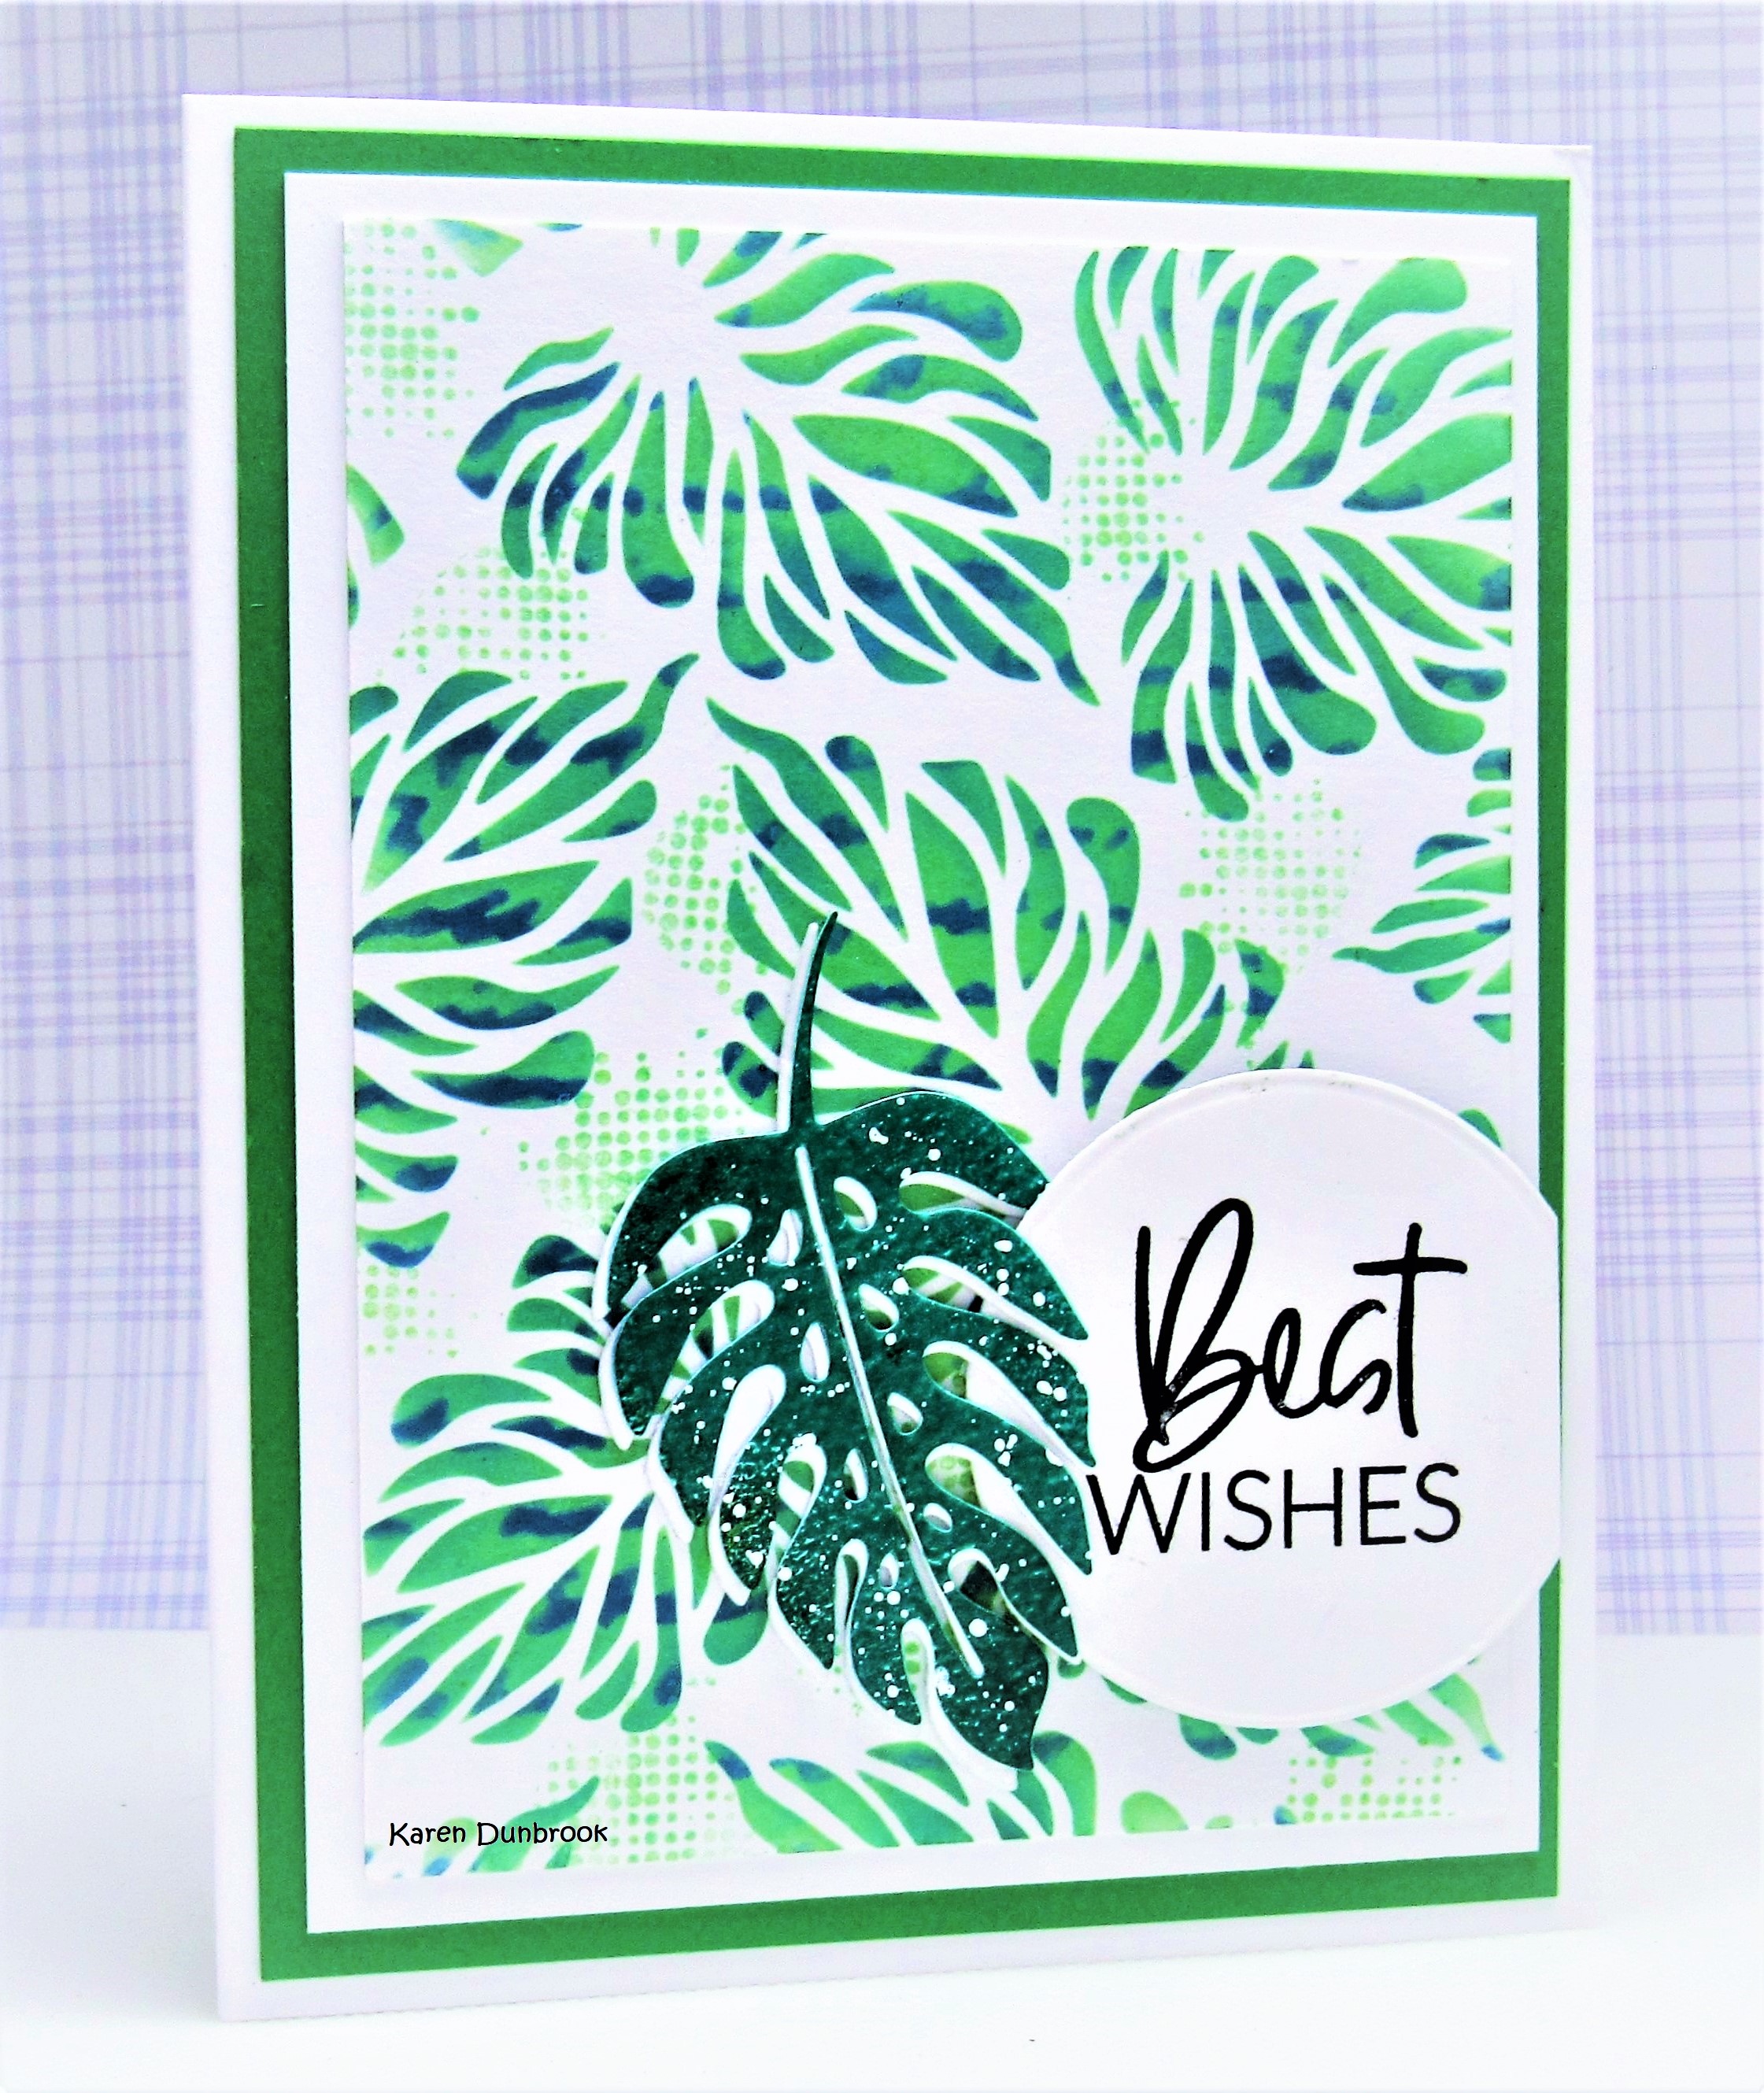
A bright and playful one with these bright, happy colours.
I'm using 2 new stencils released for June from A Colorful Life Designs called 

So, here's what I did to create my card.
  • I placed a piece of white cardstock onto my Make Art Station and laid the Tropical Flowers stencil over my paper.  I inked it up with some Ripe Persimmon Distress Oxide ink.
  • To add more interest and detail to the flowers, I left the stencil in place and put the Monstera Leaves stencil over it and inked with some Picked Raspberry DOX ink.
  • I removed both stencils and using the eraser on the end of a pencil, I placed dots around the flowers to fill in some of the white areas using the same colours mentioned above.
  • Next, I die cut the word shadow die right from the center of the card front.  I die cut the sentiment from a piece of pink cardstock and glued it over the shadow.
  • I glued the stenciled panel onto a piece of orange cardstock, then onto a white A2 card base.
  • I used some foam tape to add the sentiment back into place over the cut away area.  

Here are the stencils I used:


Discount Code for A Colorful Life Designs
(Affiliate with no extra cost to you) 

Thanks a lot for coming by.

Adding my card to these challenges:
Try it On Tuesday- SUMMER BLOOMS
Bastel-traum- PLANTS/FLOWERS
Crafting Happiness- ANYTHING GOES

Supplies
Stamps- none
Inks- DOX
Paper- heavy white (Scribes Nook- Waterloo, Ont.)
Accessories and Tools- Stencils (A Colorful Life Designs); TE Blending Brushes;
Make Art Station; pencil; die (SSS)

Tuesday 27 June 2023

Mr. Bubble


Good Morning.
Just a fun card celebrating summer's arrival.
I used a new for June stencil called Mr. Bubble and a new stamp set called Chasing the Sun from A Colorful Life Designs.

So, here's what I did to create my card.
  • I placed a piece of white cardstock onto my Make Art Station and positioned the Mr. Bubble stencil over that. I inked it up with some Salty Ocean Distress Oxide ink.
  • Leaving the stencil in place, I inked the largest bubble with some Uncharted Mariner DOX to bring the highlight to where I wanted to put the little fish.  Without inking my blending brush again, I added some ink in other areas too for some shadowing.
  • Again, leaving the stencil in place, I stamped over it with a splatter stamp using more of the Uncharted Mariner ink. It really added to the look of the bubbles.
  • I splattered with my white Posca pen and set aside to dry.
  • I stamped the fish, die cut it out and coloured it with my Copic markers.  I covered the goggles the fish is wearing with some Nuvo Crystal Glaze to make them look glassy.
  • I placed the stenciled panel into my Misti and stamped the sentiment from the new Chasing the Sun set in the darker area of my card panel.
  • I glued the stenciled panel onto an A2 card panel then used some foam tape to pop up the fish over the sentiment.


Here is the stencil and stamp set I used:


Discount Code for A Colorful Life Designs
(Affiliate with no extra cost to you) 

Thanks for coming by and taking a look.

Adding my card to these challenges:
Make My Monday- ON THE WATER
Simon Says Wed.- VACATION

Supplies
Stamps- Chasing the Sun (ACLD); Mini Snorkel Fun Fishy (Your Next Stamp)
Inks- Versafine Clair; DOX
Paper- heavy white (Scribes Nook- Waterloo, Ont.)
Accessories and Tools- stencil (ACLD); fish die; white Posca pen; 
Misti (My Sweet Petunia); Nuvo Crystal Glaze 

Saturday 24 June 2023

Beach Days


Hello and Welcome
Today's card is featuring the new for June stencil called Wave Cloud which I inked up over the 3 Rectangle Shadow stencil from A Colorful Life Designs.
There is also a new stamp set called Chasing the Sun that is perfect for summer.

So, here's what I did to create my card.
  • I cut a piece of white cardstock and placed it onto my Make Art Station.  I placed the 3 Rectangle Shadow stencil over the cardstock and then the Wave Cloud on top of that and inked it up with some Salty Ocean Distress Oxide ink.
  • I removed the Wave Cloud stencil, but left the 3 Rectangles in place and inked around the edges with some Blueprint Sketch DOX ink.
  • I took the stenciled panel and placed it into my Misti to stamp the beach chairs and the sentiment.
  • I glued the panel onto a piece of blue cardstock, then onto an A2 sized card base.

Here are the stencils and stamp set I used:


Discount Code for A Colorful Life Designs
(Affiliate with no extra cost to you) 

Thanks so much for coming by and taking a look.

Adding my card to these challenges:
Simon Says Wed.- VACATION
Crafty Calendar- SUMMERTIME
Corrosive Challenge- ANYTHING GOES

Supplies
Stamps- Chasing the Sun (ACLD); Beach (Local King Rubber)
Inks- DOX, Versafine Clair
Paper- heavy white (Scribes Nook- Waterloo, Ont.)
Accessories and Tools- Stencils (ACLD); TE Blending Brushes; Make Art Station (Ranger);
Misti (My Sweet Petunia)

Friday 23 June 2023

Dancing in the Rain


Welcome.
Got a fun filled card for you today featuring the new for June stencil called What a Splash from 
A Colorful Life Designs.
I paired it up with a previous release called to Ink Blot create this fun card.

So, here's what I did to create my card.
  • I placed a piece of white cardstock onto my Make Art Station and positioned the What a Splash stencil over that.  I inked it up with some Salty Ocean and a hint of Uncharted Mariner Distress Oxide ink.
  • I removed the stencil and replaced it with the Ink Blot stencil and inked that up with some Peacock Feathers DOX ink.  Those colours worked so well together.
  • I splattered with my white Posca pen to help add more of the look of rain falling.
  • When it was dry, I placed it into my Misti and stamped the silhouette and sentiment.
  • I glued the finished panel onto a piece of blue cardstock and then onto an A2 sized card base.
  • Lastly, I added 3 black gems around the sentiment.

Here are the stencils I used:


Discount Code for A Colorful Life Designs
(Affiliate with no extra cost to you) 

Thanks so much for coming by and taking a look.

Adding my card to these challenges:
Fab 'n' Funky- USE A SENTIMENT
Crafting Happiness- ANYTHING GOES
The Crafty Addicts= ANYTHING GOES

Supplies
Stamps- Rain Sentiments and Rain Dance (Technique Junkies)
Inks- DOX, Versafine Clair
Paper- heavy white (Scribes Nook- Waterloo, Ont.)
Accessories and Tools- stencils (ACLD); Make Art Station (Ranger);
white Posca pen; Misti

Monday 19 June 2023

The Best of Wishes


Welcome
Today, I am playing with 2 new stencils from A Colorful Life Designs called Monstera Leaves and Script stencils.

So, here's what I did to create my card.
  • I laid a piece of white cardstock onto my Make Art Station and positioned the Monstera Leaves stencil over that.  
  • I inked up the leaves with some Cracked Pistachio Distress Oxide ink and then added some Lucky Clover DOX ink to give them a bit more dimension.
  • Leaving that stencil in place, I positioned the Script stencil over that and inked it up with some Uncharted Mariner DOX ink.  It gave the leaves a lot more interest.
  • I inked up a dots stamp with some more Cracked Pistachio ink and randomly stamped that in the open areas between the leaves.
  • I die cut the leaf twice, once from white and then from a piece of leftover inked green that I splattered with my white Posca pen.  I glued them together and set aside to dry.
  • I stamped the sentiment in my Misti and die cut it out.
  • I glued the stenciled panel onto a piece of green cardstock, then onto an A2 sized card base.
  • I popped the sentiment over to the side at the bottom and then popped the leaf over that using some foam tape.

Here are the stencils I used:


Discount Code for A Colorful Life Designs
(Affiliate with no extra cost to you) 

Thanks so much for coming by and taking a look.

Adding my card to these challenges:
Simon Says Wed.- LOTS OF LAYERS
Shopping Our Stash- LET'S HEAR IT FOR THE BOYS
Simon Says Mon.- MAKE IT MASCULINE

Supplies
Stamp- Everyday Circle Tags (Avery Elle); Dots Grunge Tones (Visible Image)
Inks- DOX, Versafine Clair
Paper- heavy white (Scribes Nook- Waterloo, Ont.)
Accessories and Tools- stencils (A Colorful Life Designs); Make Art Station (Ranger); 
Tropical Leaf (Dee's Distinctly), white Posca pen; Infinity Circle die

Saturday 17 June 2023

Party in the Garden


Good Morning.
Today, I am showing a sunny, happy feeling card featuring the new for June stencil called Party Lei and the Script stencils from A Colorful Life Designs.
So easy to create a card for any occasion using it.

So, here's what I did to create my card.
  • I placed a piece of white cardstock onto my Make Art Station and then placed the Party Lei stencil over that.
  • I inked the whole thing up with some Ripe Persimmon Distress Oxide ink.
  • Next, I laid the Script stencil over the top, leaving the Party Lei in place and inked it up with some Candied Apple DOX ink to added interest and pattern to the flowers.
  • I stamped the sentiment with the same ink and die cut it out.
  • I decided to cut the finished panel on the diagonal to add interest and just for something different.
  • I used foam tape to pop up the panel onto a piece of white cardstock, then glued that onto a piece of red and then onto a white A2 sized card base.
  • I popped the sentiment onto the front and then added some red gems to the flower centers.

Here are the stencils I used:

(on sale right now too!)

Discount Code for A Colorful Life Designs
(Affiliate with no extra cost to you) 

Thanks so much for coming by and taking a look.

Adding my card to these challenges:
Simon Says Wed.- LOTS OF LAYERS

Supplies
Stamp- Big and Bold Sentiment (SSS)
Inks- DOX
Paper- heavy white (Scribes Nook- Waterloo, Ont.)
Accessories and Tools- stencils (A Colorful Life Designs); TE Blending Brushes; Make Art Station (Ranger); red gems (Dollar Store)

Thursday 15 June 2023

Double Ginger Flowers

Welcome.
Today's card features this beautiful new stencil from A Colorful Life Designs called Double Ginger Flowers.  
So easy to create different looks with the flowers on this stencil.

So, here's what I did to create my card.
  • I began by cutting a piece of white cardstock that was 3 3/4" square. 
  • I found the center point of my panel and then placed the cardstock onto my Make Art Station.
  • I masked around 1/4 of the panel as I wanted to stencil 4 x's.
  • I turned the stencil around so the outside point of the Double Ginger Flower stencil was touching the inside middle of my panel and inked it up with some Broken China Distress Oxide ink.  
  • To add shading to my flower, I inked with some Uncharted Mariner DOX ink right into the center area.
  • I repeated the above process 3 more times.
  • I splattered with my white Posca pen.
  • While that dried, I stamped the sentiment from Simon Says with some Uncharted Mariner and die cut it out.
  • I glued the stenciled panel onto a piece of white cardstock, then onto a 4 1/4" square note card.
  • Lastly, I added 3 silver gems around the sentiment.

Here is the stencil I used:

Discount Code for A Colorful Life Designs
(Affiliate with no extra cost to you) 

Thanks so much for coming by and taking a look.

Adding my card to these challenges:
Crazy is Our Fame- Stencils are Our Game- STENCIL/ optional- LAYERED STENCILS

Supplies
Stamp- Big and Bold Sentiments (SSS)
Inks- DOX
Paper- heavy white (Scribes Nook- Waterloo, Ont.)
Accessories and Tools- stencil (ACLD); Make Art Station (Ranger); 
TE Blending Brushes; white Posca pen; silver gems; low tack tape

Sunday 11 June 2023

Faux Paper Weaving


Welcome
Today's card is all about using leftover strips that I keep in my stash.  
Most were done on my Gel Plate or were roll off sheets while I was printing.

So, here's what I did to create my card.
  • I began by looking through all my scrap paper strips and picked out some that I thought would work well together.
  • I glued the strips onto a piece of white cardstock being sure all were firmly secured and touching each other.
  • After the glue was dry, I cut the panel into strips so that each strip included all the different scraps paper. 
  • Using another piece of white cardstock, I glued the strips down, offsetting them each time to give the panel the look of some 'faux paper weaving'.
  • I glued the finished panel onto a piece of white cardstock, then onto a piece of red and then finally, onto an A2 sized card panel.
  • I die cut the sentiment from some white cardstock and the word shadow from some of the red and glued them together.
  • I glued that over the faux weaving and added 3 red gems.

Thanks so much for coming by and taking a look.

Adding my card to these challenges:
Allsorts- BIRTHDAY or ANYTHING GOES
We Love 2 Create- ANYTHING MIXED MEDIA GOES
Just Us Girls- USE THE WORD HELLO

Supplies
Stamps- none
Inks- DOX and Acrylic paints on my Gel Plate
Paper- heavy white (Scribes Nook- Waterloo, Ont.)
Accessories and Tools- scraps of paper; Hello sentiment (SSS); red gems (Dollar Store)

Saturday 10 June 2023

Special Congrats


Welcome
Today's card was a fun one using this new stencil called Tropical Flowers from A Colorful Life Designs.
I paired it up with the Tic Tac Toe mask to give the look of the flowers on a trellis.

So, here's what I did to create my card.
  • I placed a piece of white cardstock onto my Make Art Station, then placed the Tropical Flowers stencil over that.  I inked it up with some Villainous Potion Distress Oxide ink.
  • To add more interest and depth to the look of the flowers, I rubbed some Uncharted Mariner DOX just into the center of the flowers.
  • I remove that stencil and positioned the Tic Tac Toe mask over the flowers and inked that up with some Shaded Lilac DOX ink.  
  • I splattered with my white Posca pen and set aside to dry.
  • I stamped the sentiment with some more Villainous DOX ink (although it looks black) and die cut it out.
  • I glued the finished panel onto a piece of white cardstock, then onto an A2 sized card base.
  • I used some foam tape to pop up the sentiment and added 3 silver gems around that. 


Here are the stencils I used:


Discount Code for A Colorful Life Designs
(Affiliate with no extra cost to you) 

Thanks so much for coming by and taking a look.

Adding my card to these challenges:
Tic Tac Toe Challenge- I chose: INK BLENDING/ FREE/ FLORAL

Supplies
Stamp- Big and Bold Sentiments (SSS)
Inks- DOX
Paper- heavy white- Scribes Nook, Waterloo, Ont.
Accessories and Tools- stencils (ACLD); Make Art Station (Ranger); white Posca pen;
silver gems (Dollar Store)

Monday 5 June 2023

Forever Chasing the Sun


Welcome
Today's card was a fun one, using the new stencil called Waterspout from A Colorful Life Designs and the sentiment from the new Chasing the Sun clear stamp set.
I used it as part of my 'collage' style card.

So, here's what I did to create my card.
  • I laid a piece of white cardstock onto my Make Art Station and then I tore a piece of scrap paper to use as my masks for the top and bottom of my cardstock.
  • I positioned the Waterspout stencil along the middle of the masked area and inked that with some Blueprint Sketch Distress Oxide ink.
  • I turned the stencil upside down and inked the stencil again along the top edge with some Salty Ocean DOX ink.  I think the stencil gave a nice sense of movement to my background.
  • Using some Broken China DOX ink, I inked up the background so the torn edge would become more visible.
  • I did some stamping over the stenciled background to help provide more interest.
  • Next, I removed the masking paper and placed the stenciled panel into my Misti and stamped the image of the biker and stamped the sentiment from the Chasing The Sun stamp set.
  • I glued the finished panel onto a piece of navy cardstock, then onto an A2 sized card base.

Here is the stencil and stamp set I used:


Discount Code for A Colorful Life Designs
(Affiliate with no extra cost to you) 

Thanks so much for coming by and taking a look.

Adding my card to these challenges:
Simon Says Wed.- ANYTHING GOES
2 Sisters on the Blog- MEN'S CARD AND HOBBY
Pearly Sparkles- MAKE IT MASCULINE


Supplies
Stamps- Chasing the Sun (ACLD); Friendship Script (HA); Graffiti Grunge (Kaiser Craft);
Bike Boy (Flonz)
Inks- DOX, Versafine Clair
Paper- heavy white (Scribes Nook, Waterloo, Ont.)
Accessories and Tools- stencil (ACLD); Make Art Station (Ranger); Misti;
scrap paper; TE inking Brushes

Saturday 3 June 2023

Lush Flowers- Stencil Layering


Good Morning
Today's card features 2 new fun stencils for June called Lush Flowers and Wave Cloud from A Colorful Life Designs.
I did some stencil layering to come up with this fun card.

So, here's what I did to create my card.
  • I began with a piece of white cardstock and placed it onto my Make Art Station.  
  • I positioned the Lush Flowers stencil over that and inked it up with some Broken China and some Salty Ocean Distress Oxide ink.
  • Leaving that stencil in place, I positioned the Wave Cloud stencil over the flowers and inked again, this time with some Blueprint Sketch DOX ink.  It added such a fun design to the background.
  • Next, I stamped the sentiment in some Salty Ocean DOX ink and die cut it out.
  • I glued the stenciled card front to a piece of light blue cardstock, then onto an A2 sized card base.
  • I used some foam tape to pop the sentiment over the background.
 

Here are the stencils I used:


Discount Code for A Colorful Life Designs
(Affiliate with no extra cost to you) 

Thanks so much for coming by and taking a look.

Adding my card to these challenges:
Simon Says Wed.- ANYTHING GOES
Crafting Happiness- ANYTHING GOES
Use Your Stuff- ANYTHING GOES

Supplies
Stamp- Big and Bold Sentiments (SSS)
Inks- DOX
Paper- Scribes Nook- Waterloo, Ont.
Accessories and Tools- Stencils (ACLD); Make Art Station (Ranger); 
TE Blending Brushes

Thursday 1 June 2023

Monstera Leaves


Welcome!
I can't believe it's June 1st.  Time flies when you're having fun, I guess.
With a new month comes a whole new release of stencils from A Colorful Life Designs.
The stencil I used today is called Coral Reef.  I used it to add depth and details to my leaves.

So, here's what I did to create my card.
  • I began with a piece of white cardstock.  I inked up the inside of the Monstera Leaves 3D embossing folder from Altenew with some Cracked Pistachio Distress Oxide ink and ran it through my machine.
  • I took that embossed panel and laid it onto my Make Art Station and positioned the Coral Reef stencil over that.  I inked it up with some Lucky Clover Distress Oxide ink that is a bit darker, which picked up the details on the leaves.
  • I die cut the Thanks sentiment from some black cardstock.  This die comes with a shadow so I cut that out of some vellum and glued them together.  By gluing it onto the vellum, it made it easy to add it over the raised, embossed background.
  • I glue the finished panel onto a piece of green cardstock, then onto an A2 sized card base.
  • I glued the sentiment over the center of the card.

Here is the stencil I used:

Discount Code for A Colorful Life Designs
(Affiliate with no extra cost to you) 

Thanks so much for coming by and taking a look.

Adding my card to these challenges:
Simon Says Wed.- ANYTHING GOES
The Paper Funday- EMBOSS IT

Supplies
Stamps- none
Inks- Distress Oxides
Paper- heavy white (Scribes Nook, Waterloo, Ont.); black cardstock
Accessories and Tools- stencil (ACLD); vellum; Embossing folder (Altenew); 
TE Blending Brushes; Markered Messages die (Concord and 9th)