Monday 28 March 2022

A Simple Palette


Welcome
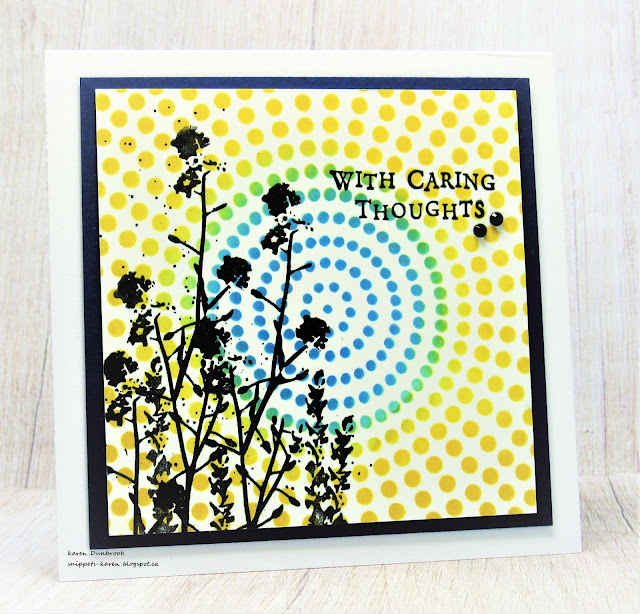
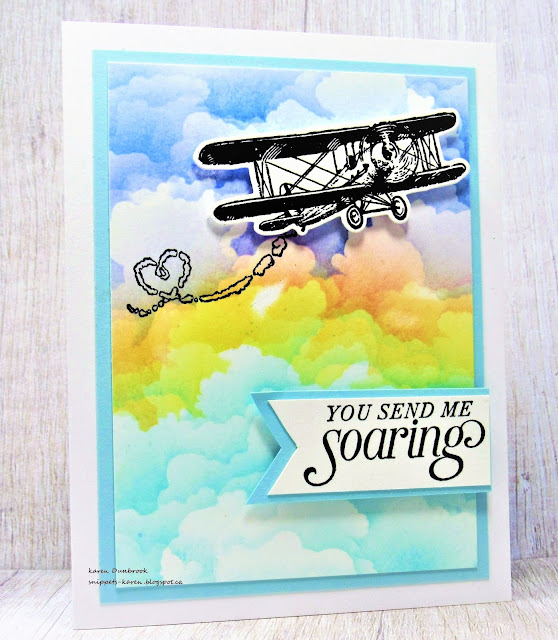
A simple card today although it looks more complicated then it actually is.
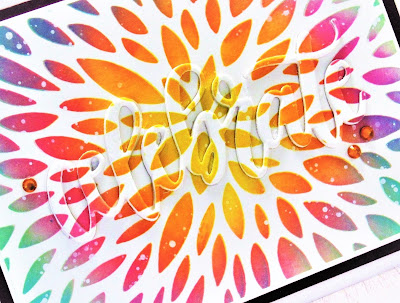
Altenew for the win with this great layering stencil called Dahlia Stencil A and B.

So here's what I did to create my card.
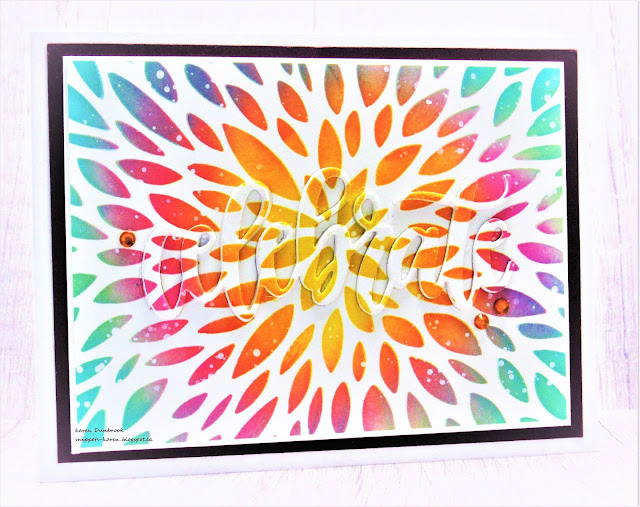
  • I began by cutting a white cardstock panel and got out some Weathered Wood Distress Oxide ink.  I positioned Stencil A over my cardstock on my Stencil Mat and inked it up. 
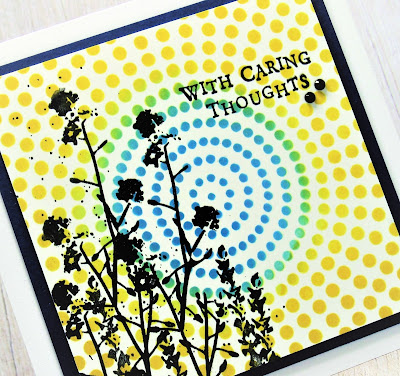
  • When I was happy with the coverage of ink, I removed Stencil A and positioned Stencil B into place.  Stencil B adds a lot of the flower details.  I inked that up with some Black Soot Distress Oxide ink.
  • I removed that stencil and splattered with my white Posca pen.
  • After the stenciled panel was dry, I die cut the sentiment outline along the bottom, then cut the sentiment from some white cardstock.
  • I glued the stenciled panel onto a piece of white cardstock, then onto a white card base.
  • I glued the die cut sentiment onto the outline die cut and pop dotted it back into place over the front panel.

Thanks so much for coming by and taking a look.

Adding my card to these challenges:
Allsorts- IN THE GARDEN
Corrosive- ANYTHING GOES
Addicted to Stamps and More- DIE CUTS AND/OR STENCILS


Supplies
Stamps- none
Inks- DOX
Paper- heavy white (Scribes Nook- Waterloo, Ont.)
Accessories and Tools- Dahalia stencils A &B (Altenew); TE Blending Brushes; 
white Posca pen; With Sympathy die (SSS); Waffle Flower Stencil Mat; foam dots

Thursday 24 March 2022

Ideas and Words


Welcome
Meet today's card.
This one is a leftover piece of a white cardstock that I had inked up.
To see what I did with the other half, go HERE.

So here's what I did to create my card.
  • Like I mentioned above, this card front panel is part of a larger one that I cut down.  This leftover piece was just the right size to make a mini slimline card measuring  6" x 3".
  • This started as white cardstock that I inked up with some Mustard Seed, Dried Marigold and Picked Raspberry Distress Oxide ink.  You need a good amount of ink for this technique to work the best.
  • Next, I sprayed the Dot Circle stencil from ACLD heavily with water, then placed it onto the inked background.  I sprayed on some extra water over the top and dabbed with a paper towel to lift a bit.  Leaving the stencil in place, I set it aside to dry. Distress Oxide inks work so well for this technique as they react to water.  
This is what the inked piece looked like when dry.

  • So I took the leftover piece and splattered it with my white Posca pen and let dry.
  • I placed the dry piece into my Misti and stamped the sentiment along one side and the cattails along the other.
  • I kept it simple and just glued it onto a white card base.


Here is the stencil I used:

Discount Code for A Colorful Life Designs
(affiliate with not extra cost to you)

Adding my card to these challenges:
Addicted to Stamps and More- DIE CUTS and/or STENCILS
The Sisterhood of CraftersSentiments (make the sentiment the focus of your project)
Try it on Tuesday- SAY IT WITH FLOWERS


Supplies
Stamps- Words and Idea (IO); Dans la Nature (Carabelle)
Inks- Distress Oxide, Versafine Clair
Paper- heavy white (Scribes Nook- Waterloo, Ont.)
Accessories and Tools- Dot Circle stencil (ACLD); TE Blending Brushes;
water Mister (TH); Misti (My Sweet Petunia); Posca pen

Wednesday 23 March 2022

Caring Thoughts for Ukraine


Welcome
Everyday, we continue to hear about the horrible plight the Ukrainian people face.
I decide to use the colours of their flag to make another card in support for this senseless war.


So here's what I did to create my card.
  • I began by cutting a front panel 3 3/4" square from some white cardstock.  I took out the Dot Circle stencil from ACLD and positioned it over my paper then inked up the middle area with some Salty Ocean Distress Ink. 
  • When the center was inked, I inked up the rest of the stencil with some Mustard Seed DOX ink.  I should have cleaned off the stencil before adding the yellow because I did get a bit of green where the 2 colours blended together.
  • I removed the stencil and placed the panel into my Misti to stamp the flowers and the sentiment.
  • Using my black Posca pen, I added some splatters just over the flowers.
  • I glued the finished panel onto a piece of black cardstock, then onto a white card base that measured 4 1/4" square.
  • I added 2 black gems just under the sentiment.

Here is the stencil I used:

Discount Code for A Colorful Life Designs
(affiliate with no extra cost to you)

Thanks so much for coming by and taking a look.

Adding my card to these challenges:
Try it on Tuesday- SAY IT WITH FLOWERS
Unicorn Challenge- DOTS and/or STRIPES
STAMPlorations- NEVER ENDING


Supplies
Stamps- Caring Thoughts (Hero Arts); Beautiful You (STAMPlorations)
Inks- Distress Oxides, Versafine Clair
Paper- heavy white- (Scribes Nook- Waterloo, Ont.)
Accessories and Tools- Circle Dot stencil (ACLD); Misti (My Sweet Petunia); 
TE Blending Brushes; black Posca pen; black gems

Monday 21 March 2022

Paper Weaving


Welcome
Meet today's card.
Another one for the series of cards I am doing and calling 
USE YOUR SCRAPS

So here's what I did to create my simple card.
  • I decided on making a slimline card.  This is a fun size to create, a bit smaller then a regular sized slimline.  A standard Slimline card is size is 8 1/2 x 3 1/2 whereas a Mini Slimline is 6" x 3". To see how I made another mini slimline and an envelope to fit it, see THIS POST.
  • I began by cutting a piece of cardstock for my front panel which was a bit smaller then the finished card base.  I got out all my paper scraps and started to weave them together across my card front panel. 
  • When I was happy with the look, I glued the pieces down to secure them.
  • Next, I die cut the sentiment from some matching pink cardstock and then some heavy white.  I glued them together, offsetting them a bit so the white would peek out from behind the pink.
  • I glued the woven panel onto a piece of pink cardstock that matched the die cut sentiment, then glued that onto my card base.
  • I glued the sentiment over the background and finally I added 3 silver gems to add interest and finish off my card.


Thanks so much for coming by and taking a look.

Adding my card to these challenges:
Simon Says Wed.- FAVOURITE THING
(being able to use my paper scraps in new ways is one of my fav. things)
Simon Says Mon.- BRIGHT AND CHEERFUL


Supplies
Stamps- none
Inks- various DOX inks, acrylic paints
Paper- heavy white (Scribes Nook- Waterloo, Ont.)
Accessories and Tools- Peace die (Simon Says); paper scraps; silver gems (Dollar Store)

Sunday 20 March 2022

Soaring


Hello and Welcome Spring!!
I wanted to create a masculine card for my hubby and this is what I came up with.
I just love this Cloud Edger Stencil from ACLD.

So here's what I did to create my card.
  • I began by cutting a white cardstock panel that was 3 3/4 x 5" and got out my Cloud Edger stencil and some Distress Oxide inks.
  • Beginning at the top, I positioned the stencil and rubbed on some Salty Ocean DOX ink, moved the stencil down a bit and added more of that ink.  
  • Next I moved the stencil down a bit and added just a hint of Blueprint Sketch ink.  
  • I continued working my way down the white cardstock using some Carved Pumpkin, Mustard Seed, a hint of Cracked Pistachio and then finally a good dose of Peacock Feathers DOX ink along the bottom.
  • While my cloud background dried, I stamped the airplane with some black Versafine Clair ink and die cut it out.
  • I stamped the sentiment from the same set, cut it out and glued it onto a piece of light blue cardstock.
  • I positioned the airplane and stamped the heart trail with some black ink.
  • I glued the cloud background onto another piece of blue cardstock, then onto a white cardstock base.
  • I pop dotted the plane in the sky and then pop dotted the sentiment in the bottom corner.


Here is the stencil I used:

Discount Code for A Colorful Life Designs
(affiliate with no extra cost to you)


Thanks so much for coming by and taking a look.

Adding my card to these challenges:
Bastel-traum- SPRING


Supplies
Stamps- Sky is the Limit (SU)
Ink- Versamark, DOX ink
Paper- heavy white (Scribes Nook- Waterloo, Ont.)
Accessories and Tools- Airplane die (SU): Cloud Edger stencil (ACLD); 
TE Blending Brushes

Saturday 19 March 2022

Give Me a Rainbow


Good Morning and Welcome.
Spring is in the air and I think of flowers, colour and rainbows.
I wanted to play with this beautiful newly released stencil from A Colorful Life Designs called Mum Mat.
The size is perfect for creating slimline cards too.
I chose to fill my card with a rainbow of colours.

So here's what I did to create my card.
  • I began by getting out my Stencil Mat and placed a piece of white cardstock onto the mat.  
  • I positioned the Mum Mat stencil over my cardstock and starting at the center of the stencil blending outwards with some Mustard Seed. 
  • I continued inking the stencil by moving from the center outwards, creating sort of a rainbow effect with these colours: Carved Pumpkin, Candied Apple, Wilted Violet and Peacock Feathers Distress Oxide ink.
  • When the inking was all done, I splattered the panel using my white Posca pen.
  • I let the ink dry completely, then die cut the 'celebrate' from the inked panel to create an embedded eclipse sentiment.  Be sure to save all the little pieces when doing this technique!!
  • I die cut the sentiment 3 more times onto some white cardstock and glued them all together.
  • I glued the die cut from the panel on the top of the stack and set aside to dry.
  • I glued the stenciled panel onto a piece of dark cardstock, then onto a white card base.
  • I glued the sentiment back in place into the stenciled area, then fitted in all the extra little die cut pieces to complete it.
  • I added 3 orange gems to give it a bit of bling.

Here is the stencil I used:

Discount Code for A Colorful Life Designs
(affiliate with no extra cost to you)

Thanks so much for coming by and taking a look.

Adding my card to these challenges:
Simon Says Wed.- FAVORITE THINGS
(fav die and stenciling)

Supplies
Stamps- none
Inks- Distress Oxides
Paper- heavy white (Scribes Nook- Waterloo, Ont.)
Accessories and Tools- Mum Mat stencil (ACLD); TE Blending Brushes; 
Celebrate die (MFT); Posca pen; Stencil Mat (Waffle Flower)

Tuesday 15 March 2022

Many Leaves


Hello and Welcome
Today's card turned out nothing like I pictured it in my head. 
I found this stamped background in my stash.  I had used a snowflake stamp and multiple colours of Distress Oxide inks to stamp with.
I saw this newly released stencil call Mum Mat from ACLD and thought I would give it a go.

So here's what I did to create my card.
  • I cut a piece of white cardstock for my front card panel (finished card is 5 1/2 x 4 1/4) and placed the Snowflakes stamp onto an acrylic block.  (this stamp is basically lots of dots) I inked up the Snowflake stamp with some Distress Oxide ink, stamped, cleaned the stamp off, reinked and stamped again.  I continued that process until the card front panel was covered with colour.
  • Next, I laid the Mum Mat stencil over my card base, positioning it so the center of the flower was in the top left hand corner, having the petals cascading down the card front.
  • I inked the center of the flower with some Crackling Campfire Distress Oxide ink, moved down the stencil and used some Carved Pumpkin and finally some Mustard Seed DOX ink.
  • After removing the stencil and looking at my card front, it needed something more, so I laid the stencil back into place and traced around the leaves with a fine tip black marker.  
  • After tracing them, they reminded me of leaves, so I added the leaf details to the stenciled areas.  Great way to transform the look of your stencil!
  • I stamped the sentiment with some Versamark ink and white heat embossed it.
  • I glued the finished panel onto a piece of white, then dark orange cardstock, then onto a white card base.
  • I pop dot mounted the sentiment over that.

Here is the stencil I used:

Discount Code for A Colorful Life Designs
(affiliate with no extra cost to you)

Thanks so much for coming by and taking a look.

Supplies
Stamps- Everyday Greetings (YNS); Snowflakes (Nellie's Choice)
Inks- DOX, Versamark
Paper- white cardstock (Scribes Nook- Waterloo, Ont.)
Accessories and Tools- Mum Mat stencil (ACLD); TE Blending Brushes; 
Hero Arts white eb powder; heat tool; Signa fine line black marker; Foam tape

Sunday 13 March 2022

Embrace Your Life


Good Morning
Meet today's card.
It started as a white cardstock circle I cut out for something? and found in my stash.
From there, an idea and a card was born.

So here's what I did to create my card.
  • Like I mentioned above, I found this white die cut circle in my stash and then when I searched a bit, I found the negative I had cut it from.
  • So, my original plan was to use this wonderful Paint Strokes stencil from ACLD, to stencil the circle for my card.  I laid the circle into the cut away square just to hold it there, but it became part of the card design as I loved the look.
  • I randomly placed the Paint Strokes stencil around the outside of the circle and inked it up with a rainbow of colours using a blending brush and my Distress Oxide inks.  The colours I used were: Mustard Seed, Carved Pumpkin, Prize Ribbon, Peacock Feathers, Picked Raspberry, Wilted Violet.
  • While that dried, I die cut the sentiment 3 times from some black cardstock and glued them together.
  • I cut a white card base 4 1/4" square and used some foam tape to pop the negative die cut square onto the base.  I matched up the circle to the inside and glued it down right onto the base.
  • I glued the die cut sentiment over the cut away circle area.

Here is the stencil I used:

Discount Code for A Colorful Life Designs

(affiliate with no extra cost to you)

Thanks so much for coming by and taking a look.

Adding my card to these challenges:
Allsorts- SPRING IS IN THE AIR (rainbows)


Supplies
Stamps- none
Inks- DOX listed above
Paper- black cs, heavy white (Scribes Nook- Waterloo, Ont.)
Accessories and Tools- Paint Stroke stencil (ACLD); Infinity Circle die (HA);
TE Blending Brushes; Live, Love, Laugh die (Frantic Stamper)

Saturday 12 March 2022

Sweet Little One


Welcome
I'm playing with the new stencil called Bunny Fields from ACLD....doesn't it just scream SPRING!
As soon as I saw it, I thought of new life, Easter and Spring.
I thought it would make a great baby card.

So here's what I did to create my card.
  • I got out my Stencil Mat from Waffle Flower, some white cardstock and some spring feeling inks.
  • I positioned the Bunny Fields stencil over my cardstock and masked around the areas of the rabbit using some low tack tape, then inked it up with some Peacock Feathers Distress Oxide ink.
  • I removed the tape and masked around the flowers, then inked them up with some Picked Raspberry DOX ink.
  • Lastly, I masked for the leaves and inked them with Cracked Pistachio DOX ink.
  • I rubbed over the rabbit with my anti- static bag, stamped the sentiment across the rabbit in my Misti and clear heat embossed it.
  • I cut a card base that was 5 x 5" from some heavy white cardstock.
  • The card looked flat to me so I decided to cut it into panels to add more interest.  
  • I glue the top and bottom panel directly to the card base, then pop dotted the bunny in the center piece in the middle. 


Here is the stencil I used:

Discount Code for A Colorful Life Designs
(affiliate with no extra cost to you)

Thanks so much for coming by and taking a look.

Adding my card to these challenges:
Simon Says Wed.- BIT O GREEN
Crafting Happiness- ANYTHING GOES


Supplies
Stamps- Sweet Little One (IO)
Inks- DOX, Versafine Clair
Paper- heavy white (Scribes Nook- Waterloo, Ont.)
Accessories and Tools- Bunny Fields Stencil (ACLD); TE Blending Brushes; 
tape for masking, Waffle Flower Stencil Mat