Showing posts with label A Colorful Life Design. Show all posts

Saturday, 19 March 2022

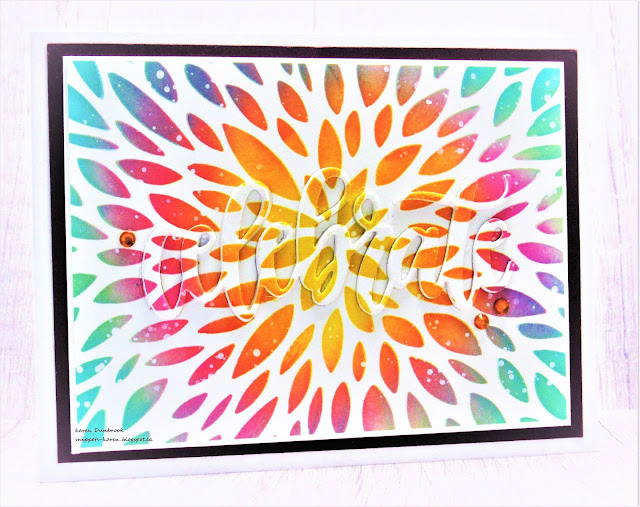
Give Me a Rainbow


Good Morning and Welcome.
Spring is in the air and I think of flowers, colour and rainbows.
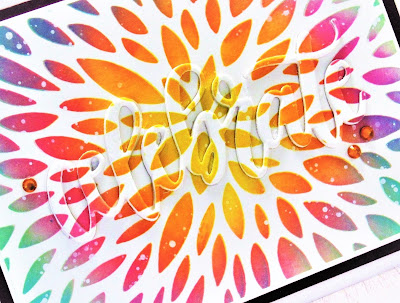
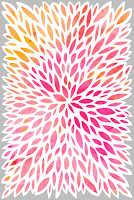
I wanted to play with this beautiful newly released stencil from A Colorful Life Designs called Mum Mat.
The size is perfect for creating slimline cards too.
I chose to fill my card with a rainbow of colours.

So here's what I did to create my card.
  • I began by getting out my Stencil Mat and placed a piece of white cardstock onto the mat.  
  • I positioned the Mum Mat stencil over my cardstock and starting at the center of the stencil blending outwards with some Mustard Seed. 
  • I continued inking the stencil by moving from the center outwards, creating sort of a rainbow effect with these colours: Carved Pumpkin, Candied Apple, Wilted Violet and Peacock Feathers Distress Oxide ink.
  • When the inking was all done, I splattered the panel using my white Posca pen.
  • I let the ink dry completely, then die cut the 'celebrate' from the inked panel to create an embedded eclipse sentiment.  Be sure to save all the little pieces when doing this technique!!
  • I die cut the sentiment 3 more times onto some white cardstock and glued them all together.
  • I glued the die cut from the panel on the top of the stack and set aside to dry.
  • I glued the stenciled panel onto a piece of dark cardstock, then onto a white card base.
  • I glued the sentiment back in place into the stenciled area, then fitted in all the extra little die cut pieces to complete it.
  • I added 3 orange gems to give it a bit of bling.
Here is the stencil I used:
Discount Code for A Colorful Life Designs
(affiliate with no extra cost to you)

Thanks so much for coming by and taking a look.

Adding my card to these challenges:
Simon Says Wed.- FAVORITE THINGS
(fav die and stenciling)

Supplies
Stamps- none
Inks- Distress Oxides
Paper- heavy white (Scribes Nook- Waterloo, Ont.)
Accessories and Tools- Mum Mat stencil (ACLD); TE Blending Brushes; 
Celebrate die (MFT); Posca pen; Stencil Mat (Waffle Flower)

Saturday, 25 September 2021

Woodlands


Hello
I hope all is well with you in your part of the world.  
I am presently working on some more holiday cards and this is one I did using a background I made with a stencil from A Colorful Life Designs.
Sometimes when I don't know what the heck I want to make, I pull out some supplies and make backgrounds.  For me, that's the easy part....making them into cards takes way more thought!
It's nice to have some at the ready when I actually need to make some cards.

So here's what I did to create my card.
  • I began with a background I had made using my Gel Plate, some Distress Oxide ink and this great stencil called Dot Circle from A Colorful Life Designs.  
  • I pressed my Blueprint Sketch Distress Oxide pad right onto the middle of my Gel Plate, then some Peacock Feathers DOX on the right and then some Dusty Concord on the left hand side. Again as I have mentioned before, leave a bit of space between the colours so you don't contaminate the other pads. Using my brayer, I blended all the colours together on my plate.
  • I laid the Dot Circle stencil onto my plate and pressed gently with the end of a paint brush to make sure that the stencil had good adhesion.  
  • Next, I removed the stencil carefully, rubbed my white cardstock over the plate and lifted the print. Love the look.
  • I splattered with lots of white using my Posca pen.
  • I just picked up this Stag stamp by Inkadinkadoo.  I inked it up with some Versafine Clair and stamped it over my background.  
  • I stamped the sentiment from Stampin Up and glued it onto a piece of matching cardstock, then onto a white card base.


Here is the stencil I used:

                                                       Discount Code for A Colorful Life Designs
(affiliate with not extra cost to you)

Thanks so much for coming by and taking a look.

Adding my card to these challenges:
Daring Cardmakers- A WALK ON THE WILD SIDE
Allsorts- ANYTHING GOES WITH THE OPTION OF NATURE

Supplies
Stamps- Christmas Reindeer (Inkadinkadoo); Happy Holidays (SU)
Inks- Distress Oxides; Versafine Clair
Paper- heavy white (Scribes Nook- Waterloo, Ont.)
Accessories and Tools- Gel Plate; Dot Circle stencil (ACLD); white Posca pen; 
Speedball brayer

Saturday, 18 September 2021

Harlequin Sphere


Happy Saturday
Meet today's card.
A really fun one using a new stencil from A Colorful Life Designs called Harlequin Sphere.  
Lots of possibilities with this stencil.

So here's what I did to create my card.
  • First, I cut a piece of white cardstock and positioned the Harlequin Sphere stencil over my paper.
  • All the inks used on my card are Distress Oxide inks.  
  • Beginning in the center of the stencil, I rubbed on some Spiced Marmalade using a small blending brush. I rubbed in a circular motion all around the center.  Moving outwards, I inked with some Carved Pumpkin, Crackling Campfire then some Barn Door and finally some Dusty Concord.
  • When I was happy with the inking, I shifted the stencil and repeated that process again using the same colours.  I love how the Oxides blend together to create new colours.
  • I removed the stencil and splattered using a black Posca pen and set aside to dry.
  • When the panel was all dry, I die cut using this die from Simon Says.  I cut the outline portion from the panel, then the letters from a piece of white and glued them together.
  • I glued the inked panel onto a white card base, then pop dot mounted the sentiment back into place, matching up the design.


Here is the stencil I used:
Harlequin Sphere

Discount Code for A Colorful Life Designs

Thanks so much for coming by and taking a look.
Hope you have a wonderful weekend.

Adding my card to these challenges:
Daring Cardmakers- GOING ROUND IN CIRCLES
Love to Craft- ANYTHING GOES


Supplies
Stamps- none
Inks- Distress Oxides (all colours mentioned above)
Paper- heavy white (Scribes Nook- Waterloo, Ont)
Accessories and Tools- Harlequin Sphere stencil (ACLD); Posca pen; die (SSS);
Brush Ink Applicators (i Crafter)

Monday, 13 September 2021

Comfort and Peace


Hello and Welcome
Meet today's card.
Another sympathy card made for a friend who has requested to have a few on hand.

So here's what I did to create my card.
  • I began with a piece of white cardstock.  Using some Wilted Violet and some Dusty Concord, I rolled my brayer directly onto the ink pad and rolled the colours onto my white cardstock until I was happy with the coverage.  
  • Using the Simple Mosaic stencil, I added some detail using the same inks mentioned above.  The subtle stenciling adds a lot of interest and depth.
  • Next, I placed the inked panel into my Misti and stamped the thistles and sentiment.
  • I splattered using my black and white Posca pens.
  • I rubbed my Versamark ink pad along the edges of the card front, then white heat embossed, again, just to add more interest.
  • I foam taped it onto a piece of purple cardstock, then onto a white card base.


Here is the stencil I used:


Discount Code for A Colorful Life Designs
(affiliate)

Thanks so much for coming by and taking a look.


Supplies
Stamps- Nature Flowers (Art Journey); Sympathy Sentiments (Penny Black)
Inks- Distress Oxides; Versafine Clair, Versamark
Paper- heavy white (Scribes Nook- Waterloo, Ont.)
Accessories and Tools- Posca paint pens; Misti (My Sweet Petunia); 
Simple Mosaic Stencil (ACLD); Speedball Brayer