Showing posts with label woods. Show all posts

Thursday, 11 December 2025

Greetings for the Season

Good Morning
Today's card features an older stencil from A Colorful Life Designs called:
Such a unique and interesting stencil to play with.
So, here's what I did to create my card.

To begin, here are the measurements for my card.
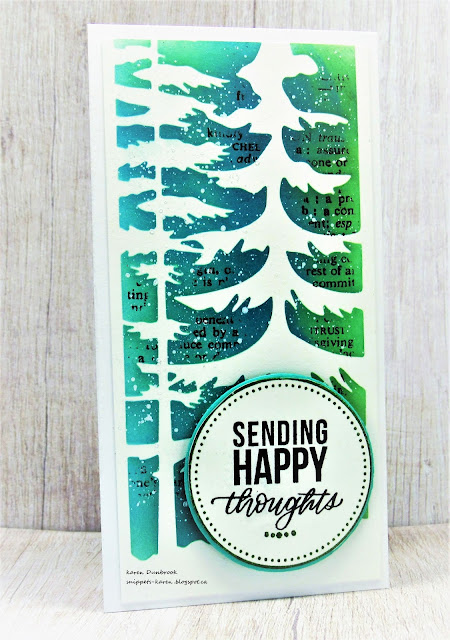
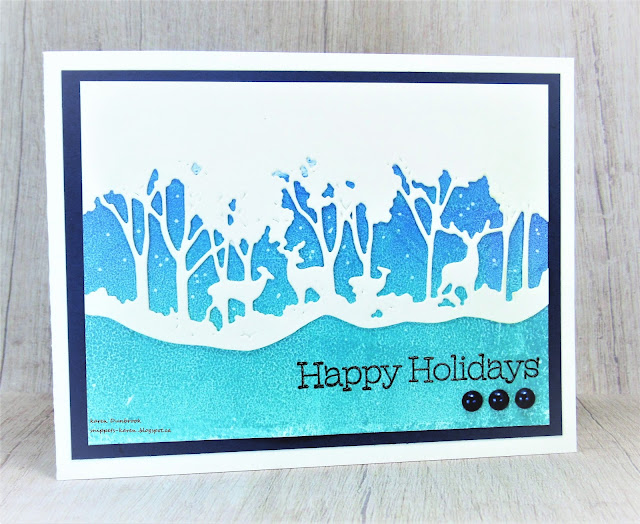
I decided to make a Side Fold card using the stencil so I began by prepping my card base.  Here is how I did that:
- Base: cut a piece of cardstock 9 3/4" x 4 1/4"
- Score the base at 4 1/4"\

- Stamped Panel Front measures 3 3/4"  
- Side Panel measures 1 1/2" x 3 3/4"

** MY STENCILED PANELS ARE A BIT SMALLER AS I ADDED A BORDER AROUND**

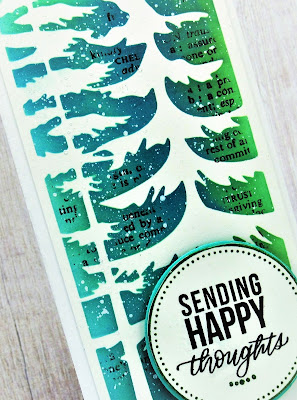
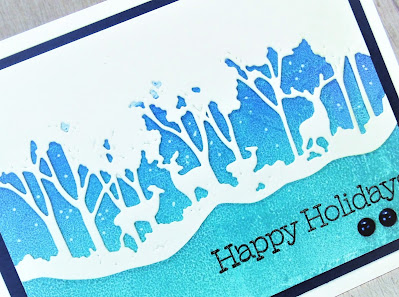
  • I placed the Tribal Fabric stencil over a piece of white cardstock and inked it up with some Salvaged Patina and some Cracked Pistachio Distress Oxide ink.
  • I cleaned the stencil off and then masked just the center area with the lines on it and inked again with more of the Cracked Pistachio DOX ink, creating a grid effect for the trees.
  • I placed the stenciled panel into my Misti to stamp the tree line and then splattered with my white Posca pen.
  • I cut the panel into the sizes mentioned above and glued them onto a white card base.
  • I stamped the sentiment and then glued it onto a green die cut circle.

Here is the stencil I used:


Thanks a lot for taking a look.

Adding my card to these challenges:
Make My Monday- CHRISTMAS TREE

Supplies
Stamps- Christmas Tags (Avery Elle); 3 Pine Trees (Nellie's Choice)
Inks- DOX; Versafine Clair
Paper- Solar White
Accessories and Tools- stencil (A Colorful Life Designs); Infinity Circle die (HA);
white Posca pen; Misti (My Sweet Petunia)

Sunday, 7 December 2025

Holiday Time

Hello
I hope your holiday planning is going well, it's such a busy time of year.
Today, I am revisiting this wonderful stencil from A Colorful Life Designs called:

So, here's what I did to create this simple card.
  • I placed the Triangle Fade stencil over a piece of white cardstock and inked it up with some Salty Ocean and some Speckled Egg Distress Oxide ink.
  • I used the design of the pattern and cut along the edges to give the zig zag edges.
  • I took the stenciled panel and placed it into my Misti to stamp the trees over the background and then splattered with my white Posca pen.
  • Next I took another piece of white cardstock and stamped the sentiment along the bottom edge.
  • I added some foam tape to the stenciled and stamped trees piece and added it along the middle section of my card front over the sentiment.
  • I glued the panel onto a piece of blue cardstock and then onto a white A2 sized card base.
  • To finish my card off, I added 2 black gems beside the sentiment.

Here is the stencil I used:


Thanks a lot for taking a look.

Adding my card to these challenges:
Crafty Calendar- WINTER/CHRISTMAS
Girlz Creative- ANYTHING CHRISTMAS
Creative Knockouts- WINTER WONDERLAND

Supplies
Stamps- Merry Sentiments (SBC); Pine Trees (Nellie's Choice); Trees (IO)
Inks- DOX; Versafine Clair
Paper- Solar White (Prism)
Accessories and Tools- stencil (A Colorful Life Designs); TE Blending Brushes;
Misti (My Sweet Petunia); white Posca pen

Friday, 28 November 2025

Sending Peace


Hello and Welcome
Today's card features 2 newly released stencil from A Colorful Life Designs called:

Here's what I did to create my card.
  • I placed the Snowflake Deer stencil over a piece of white cardstock and inked with some Blueprint Sketch and some Shaded Lilac Distress Oxide ink.
  • Leaving that stencil in place, I put the Little Snowflake stencil over the deer and inked it again with some Chipped Sapphire DOX ink.
  • I removed the stencils and then using my white Posca pen, I splattered and dotted the snowflakes to give them more interest.
  • I glued my stenciled card front onto a piece of purple cardstock, then onto an A2 sized white card base.
  • I found this pre-printed sentiment, so I added it with some foam tape along the card front.
  • To finish my card off, I added some clear gems to the snowflakes at the bottom.

Here are the stencils I used:


Thanks a lot for taking a look.

Adding my card to these challenges:
Little Red Wagon- PEARLS & SEQUINS &GEMS
Simon Says Wed.- ANYTHING GOES
Simon Says Mon.- MATCHING SET (deer)
Just Us Girls- ANYTHING GOES

Supplies
Stamps- none
Inks- DOX
Paper- Solar White (Prima)
Accessories and Tools- stencils (A Colorful Life Designs); TE Blending Brushes;
white Posca pen, pre-printed sentiment (TE)

Saturday, 22 November 2025

Love, Joy, Peace

Welcome
Today I'm showing you a wonderful new stencil from A Colorful Life Designs called;

So, here's what I did to create my card.
  • I placed the Snowflake Deer stencil over a piece of white cardstock and inked with some Wild Honey and some Vintage Photo Distress Oxide ink just around the deer.  I added some Tumbled Glass DOX around the outside edges.
  • I removed the stencil, splattered with my white Posca pen and set aside to dry.
  • Next, I die cut the trees with some white cardstock and looked through my foiled sentiments to find one that worked.
  • I glued the tree die cut over the deer, centering them into the open area.
  • I glued my card front onto a piece of pale blue cardstock and then onto a white A2 sized card base.
  • Lastly, I glued the pre-printed sentiment over the deer to finish off my card.

Here is the stencil I used:


So glad you came for a visit, thanks!

Adding my card to these challenges:
Simply Clean and Simple- HOLIDAYS/WINTER
Just Add Ink- STENCILS-DIES OR BOTH

Supplies
Stamps- none
Inks- DOX
Paper- Solar White (Prism)
Accessories and Tools- stencil (A Colorful Life Designs); TE Blending Brushes;
Enchanting Forest Winter Trees die (Amazon); Foiled Sentiment (Pinkfresh);
white Posca pen

Sunday, 12 October 2025

Message of Sympathy


Welcome
Sympathy cards are not always easy ones to make, so I like to have some on hand.
This newly released set of stencils from A Colorful Life Designs is great for creating simple ink blended card front background.  There are many different sizes in these sets too.
So, meet the newly released:
Here's what I did to create my card.
  • I placed one of the Marvelous Masks Arches stencils over a piece of white cardstock.
  • Beginning at the top of the arch, I inked with some Shaded Lilac, Peacock Feathers and some Uncharted Mariner Distress Oxide inks.
  • I lifted the stencil off and added a mask along the bottom edge so my stamping would be contained along the bottom of the inking.
  • I placed it into my Misti to stamp out the trees and the sentiment.
  • I glued the panel onto a piece of navy cardstock, then onto a white A2 sized card base.
  • I added 3 silver gems under the sentiment to finish the card off.

Here are the stencils I used:


Thanks so much for coming by and taking a look.

Adding my card to these challenges:
Ellibelle's Corner- I SPY...SOMETHING CLEAN AND SIMPLE
Cardz 4 Guyz- FALL/AUTUMN
CRAFT- GRANDPARENTS/ANYTHING GOES

Supplies
Stamps- 3 Pine Trees (Nellie's Choice);  Inside Out Sympathy (Catherine Pooler)
Inks- Versafine Clair; DOX
Paper- Solar White (Prism)
Accessories and Tools- stencil (A Colorful Life Designs); TE Blending Brushes; 
silver gems; Misti (My Sweet Petunia)

Sunday, 28 January 2024

Stenciled Die Cuts


Good Morning
Today's card is a simple one as I wanted to play with a new die that I just got along with the newly released stencil from A Colorful Life Designs called

So, here's what I did to create my card.
  • I cut a piece of white cardstock and placed it onto my Make Art Station.
  • I laid the Not Quite Stripes stencil over that and inked it up with some Cracked Pistachio Distress Oxide ink.
  • I lifted the stencil off, cleaned it and turned it around and put it back over my first stenciling.  I inked again with some Rustic Wilderness DOX ink.
  • I took the stenciled panel and used the Eclectic Tree Outlines die to cut it out.  Be sure and keep all the little pieces when you die cut.  It helps to put some low tack tape across the back of your cardstock before die cutting it out to help hold all the little pieces in place.
  • I glued the panel onto a piece of white cardstock, then glued the little die cut pieces back into place over the panel.
  • I glued the panel onto a piece of green cardstock, then onto an A2 sized card base.
  • I use some foam tape to add the sentiment.

Here is the stencil I used:

Discount Code for A Colorful Life Designs
(Affiliate with no extra cost to you) 

Thanks so much for coming by and taking a look.

Adding my card to these challenges:
Just Us Girls- ANYTHING GOES STENCIL WEEK
Cut it Up- THIS MAKES ME HAPPY

Supplies
Stamps- TE Sentiment Strips
Ink- Versafine Clair; DOX
Paper- heavy white (Scribes Nook- Waterloo, Ont.)
Accessories and Tools- stencil (A Colorful Life Designs); Make Art Station (Ranger);
TE Blending Brushes; Eclectic Tree Outlines die (SSS)

Thursday, 7 September 2023

With Much Sympathy


Welcome
Sympathy cards are never easy to make, so that's why I like to always have some on hand.
I like to keep mine very simple and not overdone.

So, here's what I did to create my card.
  • I cut a piece of white cardstock and placed it into my Misti to stamp the tree line.
  • I clear heat embossed the trees as I wanted to add some water and inking and didn't want the ink to smear.
  • Next, I rubbed some Lucky Clover, Rustic Wilderness and some Tumbled Glass Distress Oxide ink onto a piece of acetate. 
  • Using a damp sponge, I dabbed into the ink and then dabbed over and around the embossed trees.  It gave a lovely mottled look to the background.
  • When I was happy with the sponging, I splattered with a black Posca pen to add interest.
  • While that all dried, I stamped the sentiment onto a piece of white cardstock and rubbed some Tumbled Glass DOX ink along the edges.
  • I glued the tree panel onto a piece of blue cardstock, then onto an A2 sized card base.
  • I added the sentiment with some foam tape to pop it up.

Thanks so much for coming by and taking a look.

Adding my card to these challenges:
Simon Says Wed.- STAMP IT
Little Red Wagon- SQUARE or RECTANGLE
Simon Says Mon.- STAMP IT

Supplies
Stamps- Tree Line (Impression Obsession); More Sentiments (Avery Elle)
Inks- DOX; Versafine Clair
Paper- heavy white (Scribes Nook- Waterloo, Ont.)
Accessories and Tools- Misti (My Sweet Petunia); sponge; piece of acetate; 
black Posca pen

Sunday, 13 November 2022

Winter Scene


Welcome
Meet today's card inspired by the snow falling outside.
I'm not a big fan of the snow, but it does look pretty on the trees.

So, here's what I did to create my card.
  • I began with a piece of white cardstock and positioned the Watercolor Wash Free form mask over my paper on my Make Art Station.
  • Next, I tore some paper strips from some scraps that I wanted to use to create the look of snowbanks in the scene.  
  • I began at the top of the masked area and sponged on some Boken China Distress Oxide ink.  I then sponged some Peacock Feathers just under that, leaving the bottom area un-inked.  I darkened the sky a bit at the top with some Uncharted Mariner DOX ink as well.
  • Ok...now for the torn paper strips.  I laid one on and inked above it with some Cracked Pistachio. I removed that and used another one that I had torn to ink again, moving it down and leaving some white space to look like the snowbanks.
  • I removed the torn paper but left the mask in place and stamped the trees using my Misti.
  • I splattered with my white Posca pen and removed the mask.
  • I stamped the sentiment in the top corner.
  • I glued the finished panel onto a piece of white cardstock, then onto an A2 card base.
  • Finally, I added 2 black gems on either side of the sentiment.

Thanks so much for coming by and taking a look.

Adding my card to these challenges:
We Love Stamping- CHRISTMAS
Stamping Sensations- CHRISTMAS CELEBRATIONS

Supplies
Stamps- 3 Pine Trees (Nellie's Choice); Trees (IO); Merry Sentiments (Scrapbook.com)
Inks- Versafine; DOX
Paper- white (Scribes Nook- Waterloo, Ont.)
Accessories and Tools- mask (MFT); Misti (My Sweet Petunia); scrap paper; 
Posca pen; TE Blending Brushes; black gems

Monday, 21 February 2022

Grazing in the Woods


Welcome
Today's card is a simple one.
I got this lovely die from one of my boys for Christmas and wanted to use it.
I pulled out this inked piece of cardstock found sitting in my stash, one that I had rolled ink off my brayer while Gel Plate printing.

So here's what I did to create my card.
  • After I found this inked piece of cardstock, I placed the die into the center of sheet and die cut the deer in the woods and set it aside.  (the ink I brayered onto  the paper was Blueprint Sketch, Cracked Pistachio and some Rustic Wilderness DOX ink)
  • To give the scene a shadow effect, I die cut a piece of white cardstock and glued it to the back of the inked die cut piece, off setting it a bit.
  • Using my white Posca pen, I added splatters to look like snow and give more interest to the scene.
  • I added some foam tape to the back of the piece and added it to a white card base.  (my finished card is 4 1/4 x 5 1/2")


Thanks so much for coming by and taking a look

Adding my card to these challenges:
Critter Crazy- FEATURE AN ANIMAL
Little Red Wagon- MASCULINE


Supplies
Stamps- none
Inks- Distress Oxide 
Paper- white (Scribes Nook- Waterloo, Ont.)
Accessories and Tools- die (Amazon); white Posca pen; foam tape; brayer

Saturday, 12 February 2022

Northern Lights


Hello and Welcome
It's the weekend and I have time to play...yeah!
So, meet today's card.
This is so super simple to create using some of that bleeding tissue paper I got from Amazon.  
Here is another card I made using it...such fun results.

So here's what I did to create my card.
  • I began by cutting a piece of white cardstock that would fit my card front.
  • I set my cardstock onto a tray (so I could move it out of the way after wetting it) and tore lots of pieces of the bleeding tissue paper.  I covered the whole piece of cardstock with the tissue, then sprayed with a good amount of water.  It helps to push all the corners and edges down to make sure they are wet and are making good contact with the paper.
  • After the piece was completely dry, I removed all the bits of tissue and checked to see if any areas were left without the colour transferred.  If so, just repeat the process above.
  • I took the dried panel and placed it into my Misti and stamped the Winter Woodland trees creating the scene.  I did clear heat emboss the trees to help make them stand out.
  • I debated about adding a sentiment, but finally decided to just leave it as is so I could use it for a number of occasions.

Thanks so much for coming by and taking a look.

 Simon Says Wed.- EMBOSS IT


Supplies
Stamp- Winter Woodland (Penny Black)
Inks- Versafine Clair
Paper- heavy white (Scribes Nook- Waterloo, Ont.)
Accessories and Tools- Bleeding Tissue Paper (Amazon); Misti (My Sweet Petunia); 
water mister (Ranger); clear eb powder; heat tool

Wednesday, 26 January 2022

There Are No Words


Hello and Welcome
Adding another card to the stash after I found this blue piece of cardstock that I had rolled my brayer off onto while Gel Plate printing. I thought it would make a lovely background for this tree stamp by Inkadinkadoo that I scored at the Second Hand store for .50 cents.

So here's what I did to create my card.
  • Like I mentioned above, I found this piece of cardstock that I had used to remove paint from my brayer while Gel Plate printing.  I always keep those sheet even if they look super ugly at the time.  I inked up this tree stamp with some Versafine Clair and stamped onto the blue.  I clear heat embossed the trees to help make them pop.
  • I splattered using my white Posca pen and set aside to dry.
  • I cut a white card panel for my card front.  I inked up the stamp again with black Versafine Clair and stamped the trees onto one side, then inked and stamped again on the other side.  I wanted the look of a continuous tree line all across the front of my card.
  • I placed the white panel into my Misti and stamped the sentiment.
  • I glued the white panel onto a piece of black cardstock, then onto a white card base.
  • I pop dot mounted the blue stamped trees over the white background, matching up at the level of the ground.


Thanks so much for coming by and taking a look.

Adding my card to these challenges:
Simon Says Wed.- ANYTHING GOES
Double D- WHITE AND BLUE

Supplies
Stamps- Trees (Inkadinkadoo); Sympathy Sentiments (Penny Black)
Inks- Versafine Clair
Paper- Scribes Nook- Waterloo, Ontario
Accessories and Tools- Misti (My Sweet Petunia); white Posca pen; scrap paper;
Hero Arts clear eb powder; foam tape

Monday, 17 January 2022

Sending Some Happy


Good Morning
Hope you had a good weekend.  I appreciated having some time to create.
I pulled out this great stencil from ACLD called Pine Tree Right.  There are a series of tree stencils similar to this one and all create such great backgrounds.  They especially work well for creating slimline cards.
My card today is a Mini Slimline...a bit smaller then the regular size.  
A standard Slimline card is size is 8 1/2 x 3 1/2 whereas a Mini Slimline is 6" x 3".
To see how I made another mini slimline and an envelope to fit it, see this card:

So here's what I did to create my card.
  • I placed a piece of white cardstock onto my Waffle Flower Stencil Mat and positioned the Pine Trees stencil over that.  I began to ink it up with some Lucky Clover Distress Oxide inks just along the right side of the stencil and towards the middle.
  • Next, I filled in the rest of the areas with some Rustic Wilderness DOX ink.  
  • To add more interest and shading to the trees, I rubbed on some Broken China DOX ink just along the left hand sides of the trees.
  • Leaving the stencil in place, I stamped over it with the Friends background script stamp to add interest.  
  • I splattered the whole panel with my white Posca pen.
  • While that dried, I stamped the sentiment from the Hexagon Crafty Hugs set with some Versafine Clair ink and then stamped the circle from an Avery Elle set with more of the Rustic Wilderness ink around the sentiment.
  • I die cut it with a circle and glued it onto a piece of blue/green cardstock to match the background.
  • I glued the stenciled trees onto a white slimline base (6" x 3") and pop dotted the sentiment at the bottom.


Here is the stencil I used:


Discount Code for A Colorful Life Designs
(affiliate with no extra cost to you)


Thanks so much for coming by and taking a look.

Adding my card to these challenges:
Simon Says Wed.- FUN WITH STENCILS
Stamping Sensations- ANYTHING GOES WITH OPTION OF A DIE
Alphabet Challenge- 'U' IS FOR UNEQUAL (BIG AND SMALL)


Supplies
Stamps- Crafty Hugs (SSS); Merry Circle Tags (Avery Elle); Friends Bkg (HA)
Inks- Distress Oxides (mentioned above); Versafine Clair
Paper- Scribes Nook; Waterloo, Ont.
Accessories and Tools- Stencil Mat (Waffle Flower); TE Blending Brushes; 
Misti (My Sweet Petunia); Posca pen; Infinity Circle Dies (HA)

Monday, 13 December 2021

Walk in the Woods


Welcome
Meet today's card.
A simple one that took no time at all to make.

So here's what I did to create my card.
  • I wanted to create a simple blue sky background so I pulled out my Gel Plate and brayer.  I pressed some Peacock Feathers Distress ink along one side of the plate and then some Salty Ocean along the other side and blended them together using my brayer.  
  • I pressed a piece of heavy white cardstock over the plate and rubbed to lift the print.  It is honestly one of the easiest ways to blend a background.
  • I set that aside to dry then die cut the forest scene from white cardstock.  I love this die....a special gift from a special friend.  To add more interest, I cut along the bottom edge of the die cut before gluing it over the blue background.
  • I stamped the sentiment from and old SU set in the bottom corner.
  • I glued the panel onto a piece of dark blue cardstock, then onto a heavy white card base.
  • I added a few white splatters and then 3 navy dots under the sentiment.

Thanks so much for coming by and taking a look.

Adding my card to these challenges:
Simon Says Wed.- COLD AS ICE
Die Cut Divas- WINTER/ CHRISTMAS
Love to Craft- ANYTHING GOES

Supplies
Stamps- SU (??)
Inks- Distress Oxides, Versafine Clair
Paper- heavy white (Scribes Nook- Waterloo, Ont.)
Accessories and Tools- die (gift from a friend); Speedball brayer; Gel Plate; Posca pen;
gem dots (Dollar Store)

Saturday, 30 October 2021

Forest Souls


Hello and welcome!
A simple card for today using this wonderful die my friend Loll Thompson gifted me.
I was thrilled to say the least!!

So here's what I did to create my card.
  • I began by cutting a white cardstock panel for the front of my card and then I centered the die and cut it out with my die cutting machine.  
  • I set that aside and went looking through my stash for an inked piece.  I keep the 'fails' and all my Gel Plate roll off sheets for times just like this.  The piece I found was just a random one that I had put some Brushos onto over a stencil but added too much water and it all bled.  It wasn't good for much except this or I would have cut it up and used it for something else.
  • Before layering the 2 pieces, I placed the white die cut panel into my Misti and stamped the sentiment from Technique Tues. with some Versafine Clair.
  • I glued the 2 panels onto some blue cardstock, then onto a white card base.

Thanks so much for coming by and taking a look.

Supplies
Stamps- Christmas Cheer (TT)
Inks- Brushos; Versafine Clair
Paper- heavy white (Scribes Nook- Waterloo, Ont.)
Accessories and Tools- Forest die (??); Misti (My Sweet Petunia); Spellbinder Platinum die 
cutting machine

Saturday, 25 September 2021

Woodlands


Hello
I hope all is well with you in your part of the world.  
I am presently working on some more holiday cards and this is one I did using a background I made with a stencil from A Colorful Life Designs.
Sometimes when I don't know what the heck I want to make, I pull out some supplies and make backgrounds.  For me, that's the easy part....making them into cards takes way more thought!
It's nice to have some at the ready when I actually need to make some cards.

So here's what I did to create my card.
  • I began with a background I had made using my Gel Plate, some Distress Oxide ink and this great stencil called Dot Circle from A Colorful Life Designs.  
  • I pressed my Blueprint Sketch Distress Oxide pad right onto the middle of my Gel Plate, then some Peacock Feathers DOX on the right and then some Dusty Concord on the left hand side. Again as I have mentioned before, leave a bit of space between the colours so you don't contaminate the other pads. Using my brayer, I blended all the colours together on my plate.
  • I laid the Dot Circle stencil onto my plate and pressed gently with the end of a paint brush to make sure that the stencil had good adhesion.  
  • Next, I removed the stencil carefully, rubbed my white cardstock over the plate and lifted the print. Love the look.
  • I splattered with lots of white using my Posca pen.
  • I just picked up this Stag stamp by Inkadinkadoo.  I inked it up with some Versafine Clair and stamped it over my background.  
  • I stamped the sentiment from Stampin Up and glued it onto a piece of matching cardstock, then onto a white card base.


Here is the stencil I used:

                                                       Discount Code for A Colorful Life Designs
(affiliate with not extra cost to you)

Thanks so much for coming by and taking a look.

Adding my card to these challenges:
Daring Cardmakers- A WALK ON THE WILD SIDE
Allsorts- ANYTHING GOES WITH THE OPTION OF NATURE

Supplies
Stamps- Christmas Reindeer (Inkadinkadoo); Happy Holidays (SU)
Inks- Distress Oxides; Versafine Clair
Paper- heavy white (Scribes Nook- Waterloo, Ont.)
Accessories and Tools- Gel Plate; Dot Circle stencil (ACLD); white Posca pen; 
Speedball brayer