Showing posts with label rainbow. Show all posts

Sunday, 17 August 2025

Simple Note


Hello and Welcome
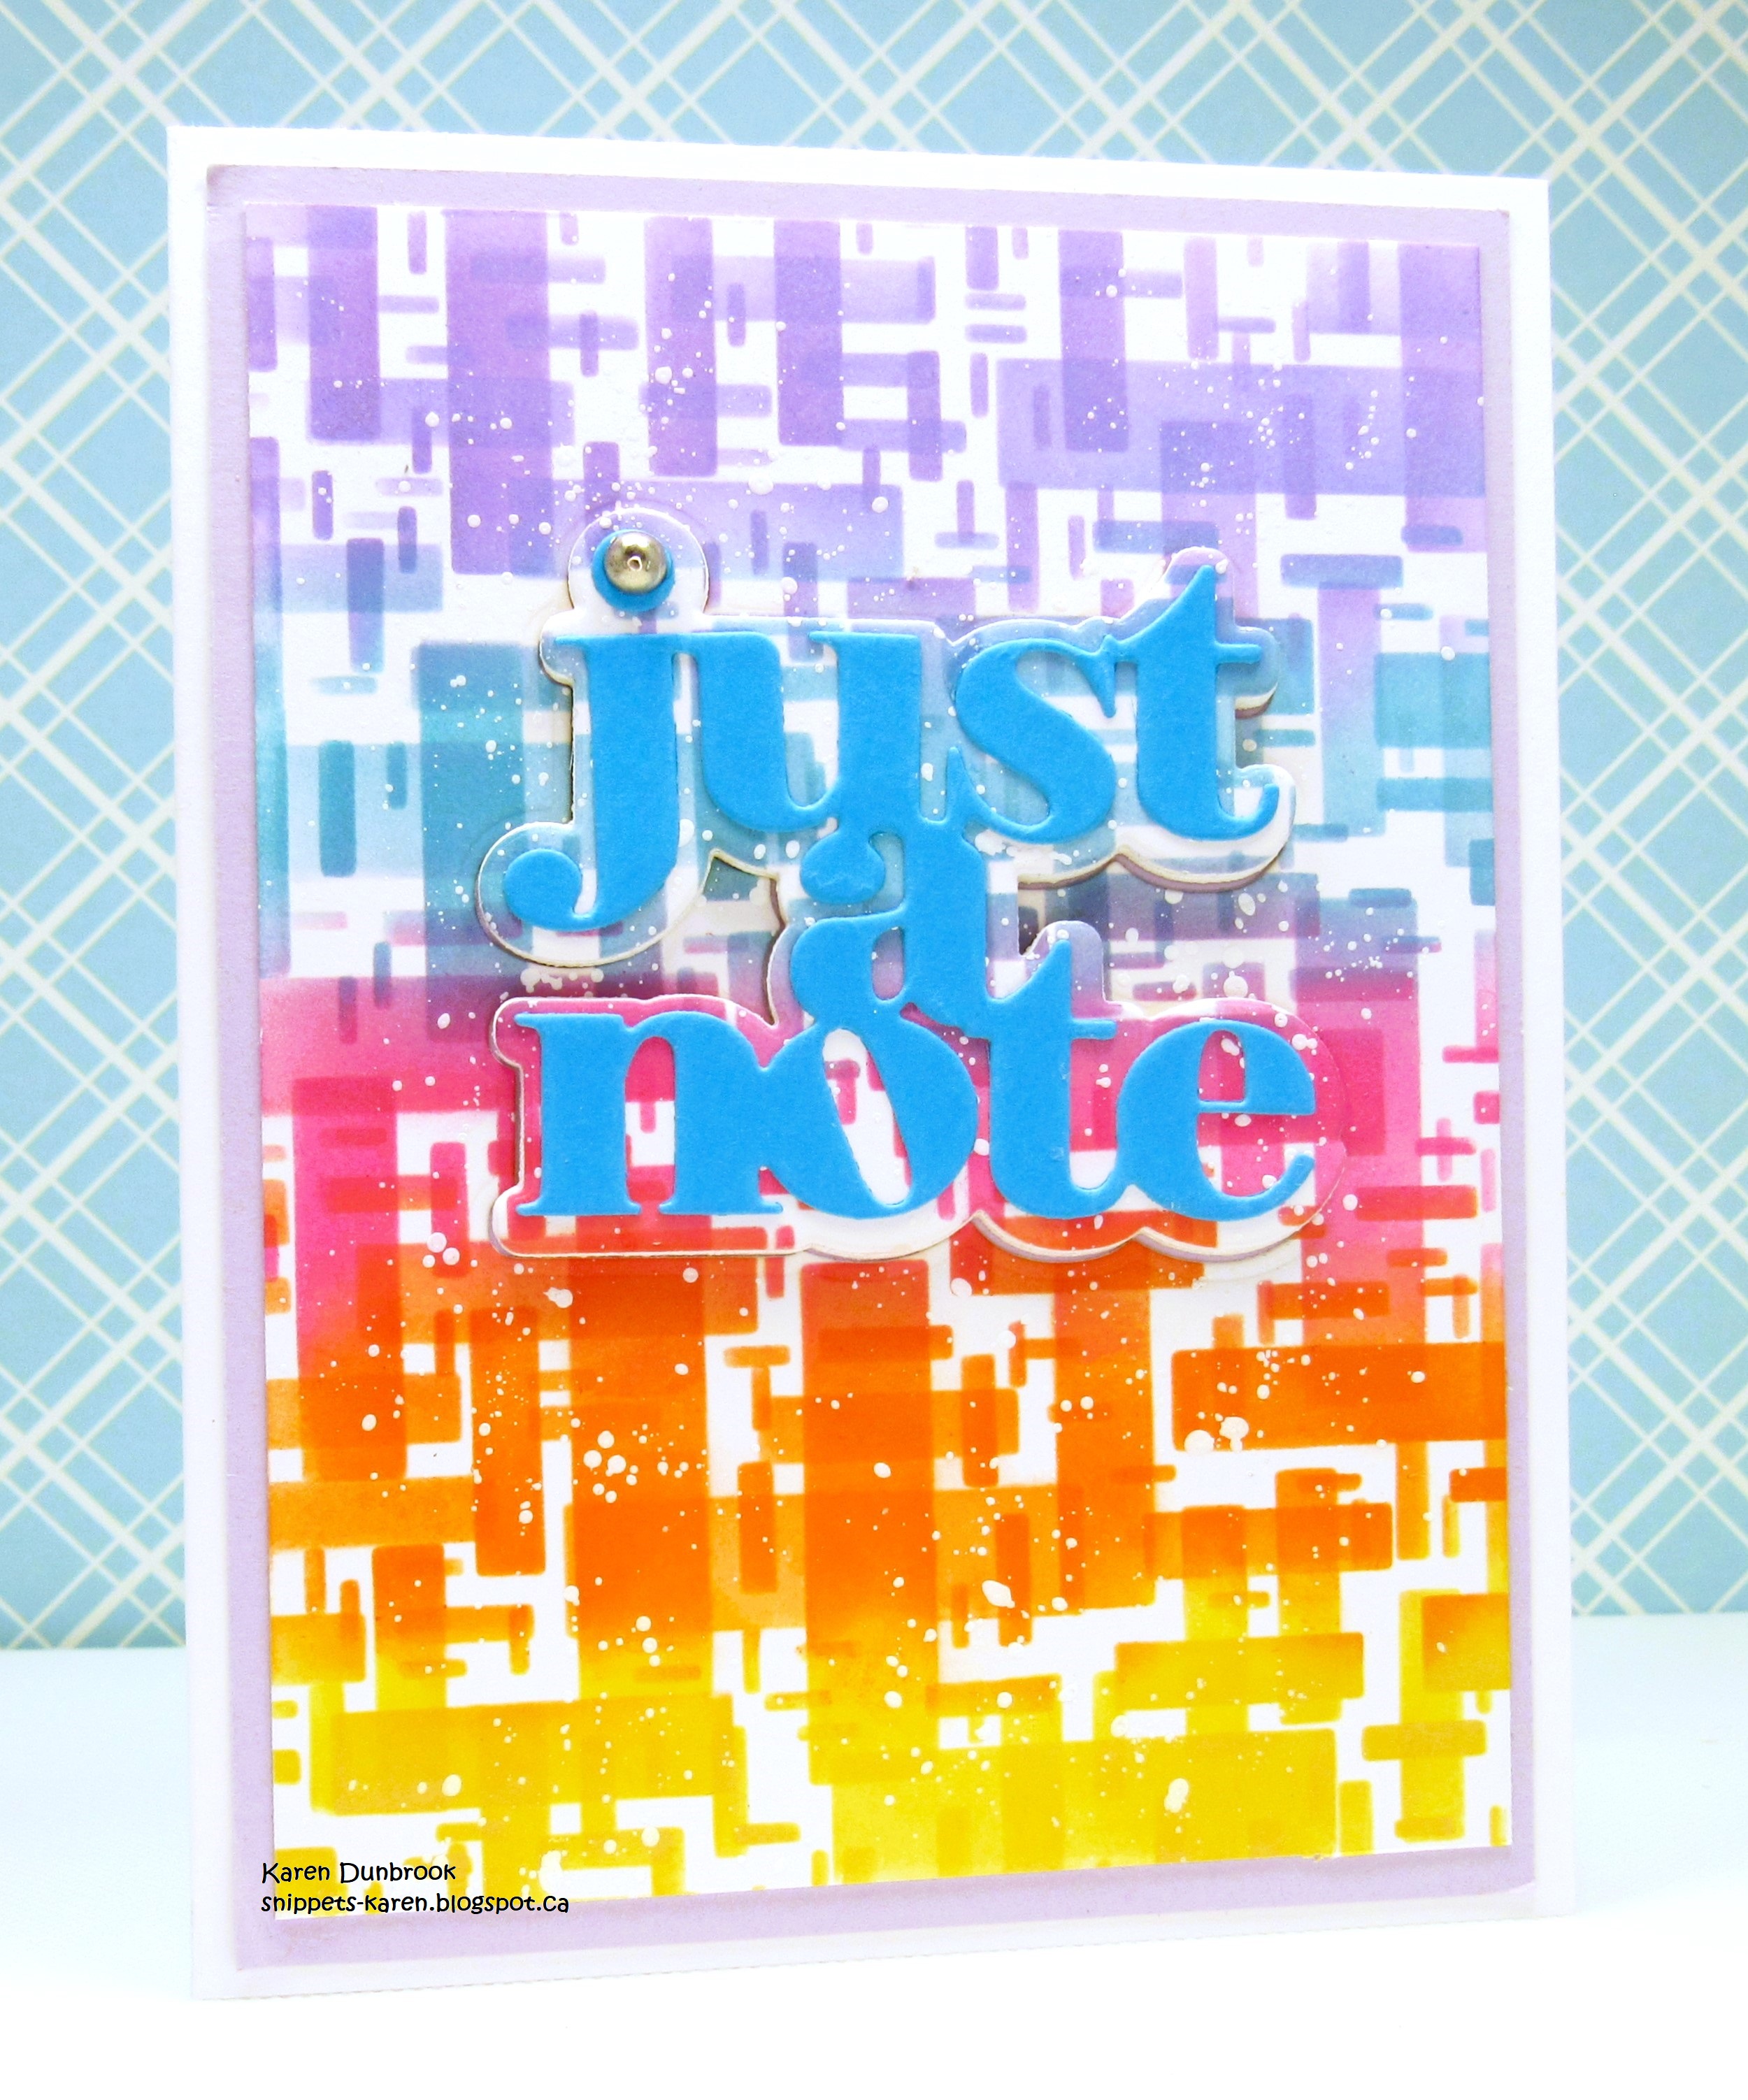
Meet the newly released stencil from A Colorful Life Designs called:

I decided to make a more masculine black and white card, so here's what I did.
  • For my this card, I began by getting out my Gel Plate.  I pressed my Black Soot Distress Oxide ink pad directly onto the plate and I used my brayer to spread the ink evenly.
  • I place the Mid Century Double Rainbow stencil over that, then rubbed a piece of white cardstock over the stencil to create the print.
  • I repeated the steps mentioned above, but this time I turned the stencil sideways and printed right over the first one to create this pattern.  I splattered with my white Posca pen and set aside to dry. 
  • I die cut a circle from the middle of the dried panel and cut another circle from a piece of black cardstock and glued them together.
  • I die cut the sentiment from some black cardstock and the word shadow from a piece of white and glued those together.
  • I glued my card front panel onto a piece of white cardstock, then onto a piece of black and then onto an A2 sized card base.
  • I used some foam tape to pop the large circle back into place, matching up the pattern and then glued the sentiment over that.

Here is the stencil I used:


Thanks a lot for taking a look.

Adding my card to these challenges:
Cut It Up- ADD A SENTIMENT
Word Power- ANYTHING GOES
The Sisterhood of Crafters- CARD OF ENCOURAGEMENT

Supplies
Stamps- none
Inks- DOX
Paper- Solar white, black cardstock
Accessories and Tools- stencil (A Colorful Life Designs); Gel Plate; Speedball Brayer;
white Posca pen; Infinity Circle die (HA); Just Saying die (Concord and 9th)

Saturday, 9 August 2025

Big Wishes

Good Morning
Here's a fun one for you.  
A new month means a whole new lineup of innovative stencils filled with so many different designs.
So meet one of the newest one from A Colorful Life Designs called:

So, here's what I did to create my card.
  • I placed a piece of white cardstock onto my Make Art Station and put the Mid Century Banners stencil along the left hand side of the paper.  Starting at the top, I inked with some Peacock Feathers, Wilted Violet, Picked Raspberry and finally some Ripe Persimmon Distress Oxide inks.
  • I lifted the stencil off, cleaned it and then placed it back down onto the right side of the paper.  I inked again using the same colours as mentioned above.
  • To help enhance the look of this colourful background, I used the eraser on the end of a pencil to add all the dots.  It really added to the fun look.
  • Next, I took the panel and used a circle die to cut out the middle part.
  • I took the sentiment die and cut it using some purple cardstock and I cut the word shadow with some white and glued them together.
  • I glued my card front onto a piece of pink cardstock, then onto a white A2 sized card base.
  • I used some foam tape to put the circle back into place, matching up the pattern and then glued the sentiment over that to finish my card off.   

Here is the stencil I used:


Thanks a lot for coming by and taking a look.

Adding my card to these challenges;
Simon Says Wed.- QUITE QUIRKY
Simon Says Monday- HAPPY BIRTHDAY
Cut It Up- USE A SENTIMENT

Supplies
Stamps- none
Inks- DOX
Paper- Solar White
Accessories and Tools- stencil (A Colorful Life Designs); TE Blending Brushes;
Wish Big die (SSS); pencil eraser; Infinity Circle die (HA); Make Art Station (Ranger)

Saturday, 2 August 2025

Let's Go Retro


Welcome
I can't believe it's August already but I am excited about all the new releases at A Colorful Life Designs.
 If you love mid century designs, you are going to love the new releases.
Meet 2 of the new releases called:

Here's what I did to create my card.
  • I placed the Mid Century Single Rainbow stencil over a piece of white cardstock and starting at the left hand side I inked with my Distress Oxide inks in these colours: Dusty Concord, Salty Ocean, Picked Raspberry, Ripe Persimmon and Mustard Seed.
  • Leaving that stencil in place, I put the Mid Century Circles and Squares stencil right over it and inked again with some Villainous Potion DOX ink, creating a fun layered look to the background.
  • Next, I die cut the sentiment from black cardstock 5 times and glued them all together to make a stacked sentiment.  I die cut the word shadow right from the middle of my stenciled card front and glued those together.
  • I glued my stenciled card front panel onto a piece of white cardstock, then onto a piece of black and then onto a white A2 sized card base.
  • I glued the sentiment back into place on the card front, matching up the pattern.

Here are the stencils I used:


Thanks so much for taking a look.

Adding my card to these challenges:
Little Red Wagon- MASCULINE
Simon Says Wed.- ANYTHING GOES

Supplies
Stamps- none
Inks- Distress Oxides
Paper- Solar White
Accessories and Tools- stencils (A Colorful Life Designs); TE inking Brushes;
Good Vibes die (SSS)

Saturday, 5 July 2025

Let's Get Creative

Good Morning
How fun is this! 
I used the newly released stencil from A Colorful Life Designs called 

I enjoyed creating this one and here's what I did.
  • I decided to go with a 'rainbow' theme and began by placing the Nautilus Swirl stencil over the outside edge of my white cardstock. I inked with some Fossilized Amber, Ripe Persimmon, Picked Raspberry, Wilted Violet and some Salty Ocean Distress Oxide ink.
  • I lifted the stencil, moved it to the side and repeated the process with the same colours.
  • I splattered the panel with my black Posca pen and set it aside to dry.
  • When it was dry, I stamped the sentiment and clear heat embossed it to help make it pop against the colourful background.  
  • I glued the panel onto a piece of white cardstock, then onto a piece of purple the finally onto a A2 sized card base.
  • I added some black gems around the sentiment to finish off my card.

Here is the stencil I used:

Thanks for taking a look.

Adding my card to these challenges:
Little Red Wagon- TO GO BOLDLY
Allsorts- FOR A CHILD or ANYTHING GOES
Cardz 4 Galz- WELCOME TO SUMMER

Supplies
Stamps- Just Be Happy (Visible Image)
Inks- DOX; Versafine Clair
Paper- Solar White
Accessories and Tools- stencil (A Colorful Life Designs); TE Blending Brushes;
Make Art Station (Ranger); black Posca pen, clear EB powder; black gems 

Monday, 23 June 2025

Sending You Happy Rainbows


Welcome
Quick and simple card today using one of the new for June stencils from A Colorful Life Designs called:

Here is what I did.
  • I placed the Gears stencil down first and then I put a piece of the Rainbow Scratch paper over that and secured well.
  • Using the side of a popsicle stick, I rubbed back and forth over the paper to reveal the pattern of the stencil.  It is so fun!
  • I set that aside for a moment and took another small piece of the Scratch paper and rubbed over the whole piece to use for my large Hello sentiment.
  • I glued the stenciled card front panel onto a piece of black, then yellow and then onto a white A2 sized card base.
  • I added a piece of black cardstock along the bottom edge and then glued the Hello over that.

Here is the stencil I used:

Thanks a lot for coming by and taking a look.

Adding my card to these challenges:
Crafter's Cafe- ANYTHING GOES/optional MASCULINE
Simon Says Wed.- WE'RE GOING AROUND IN CIRCLES
Inspiration Station- INSPIRATION PHOTO

Supplies
Stamps- none
Inks- none
Paper- Rainbow Scratch paper (Dollarama)
Accessories and Tools- stencil (A Colorful Life Designs); Hello die (Amazon);
popsicle stick for scratching

Sunday, 15 June 2025

To My Friend

 
Welcome
Meet today's card I made by doing some stencil layering using 2 new stencils from A Colorful Life Designs called:
***Rainbow Roads is our Mid-month release and is on sale***

So, here's what I did to create my card.
  • I placed the Open Coils stencil over a piece of white cardstock and inked it up with some Picked Raspberry and some Tattered Rose Distress Oxide ink.
  • Leaving that stencil in place, I layered the Rainbow Roads stencil right over it and inked again using some Prize Ribbon DOX ink. It created a fun designs behind the coils by layering them.
  • Next, using the Colour Wheel Love die, I cut the large circle from the stenciled panel and then from a piece of navy cardstock as well.  
  • I glued the stenciled panel onto a piece of pale pink, (sorry, it looks orange in the picture) and then onto a white A2 sized card base.
  • I took the piece of navy cardstock that I die cut and positioned it back into the cut area of the front panel.  I took the die cut from the stenciled part and glued it on top, off setting it a bit so I would become more visible.
  • I used some foam tape to pop the sentiment over the die cut middle.

Here are the stencils I used:

Was: $6.99
Now: $4.00


Thanks a lot for taking a look.

Adding my card to these challenges:
Cut it Up- MASCULINE
Crazy Catz- ANYTHING GOES
AAA Birthday- NO STAMPING

Supplies
Stamps- none
Inks- DOX
Paper- Solar White
Accessories and Tools- stencils (A Colorful Life Designs); TE Blending Brushes;
Friend die (Amazon); Colour Wheel die (Paper Rose)

Monday, 28 April 2025

Rainbow Hello

Good Morning
How about another rainbow inspired card.  Super easy to do using the Rainbow Scratch paper I picked up at the Dollar Store.  
So meet the newly released stencil from A Colorful Life Designs called:

So, here's what I did to create my card.
  • As I mentioned above, I began with a piece of Rainbow Scratch paper and placed the Ordered Lines stencil under the paper and secured it well.
  • Using the side of a popsicle stick, I rubbed over the entire paper to transfer the pattern.
  • I took another piece of the scratch paper and placed the Broken Lines stencil under that and rubbed over it to transfer the pattern.  I used that piece to die cut the sentiment.
  • I glued the stenciled card front panel onto a piece of black cardstock, then a piece of blue and then onto a white A2 sized card base.
  • I used some foam tape to add the sentiment across the front of my card.

Here are the stencils I used:


My Discount Code for Your Entire Order from A Colorful Life Designs:
Thanks so much for coming by and taking a look.
VERY APPRECIATED!!

Adding my card to these challenges:
Simon Says Monday- WHATEVER THE WEATHER (rainbow)
Just Us Girls- STENCIL WEEK
Krafty Chicks- MASCULINE

Supplies
Stamps- none
Paper- Rainbow Scratch paper; black, blue and white cs
Inks- none
Accessories and Tools- stencils (A Colorful Life Designs); popsicle stick;
Hello die (Amazon)

Sunday, 13 April 2025

Make it a Good Day


Welcome
Today, I'm playing with a newly released stencil from A Colorful Life Designs called
This stencil is so unique and fun.  

So, here's what I did to create my card.
  • I placed the Op Art Bench stencil over a piece of white cardstock and secured it well.
  • Starting at the top of my stencil, I inked with some Mustard Seed Distress Oxide ink. Moving down the stencil, I inked next with some Ripe Persimmon and then finally some Picked Raspberry DOX along the bottom.
  • I removed the stencil and splattered with my white Posca pen and set aside to dry.
  • I went into my scrap box where I found the inky piece to die cut the flowers.  
  • As I looked, I also found another piece that I had inked using the A Lot of Angles, also from A Colorful Life Designs.  I die cut the sentiment from that piece. This sentiment did NOT come with a shadow, so I traced around the die onto black cardstock, fussy cut it out and glued those together.
  • I glued the stenciled panel onto a piece of orange cardstock, then a piece of pink and then onto a white A2 sized card base.
  • I added the flowers along the side and used some foam tape to pop up the sentiment.

Here are the stencils I used:


My Discount Code for Your Entire Order from A Colorful Life Designs:

Thanks so much for the visit.

Adding my card to these challenges:
Allsorts- STENCIL/MASKS/ ANYTHING GOES
Crafty Calendar- FEMININE
As You Like It- FLORAL or CUTE
(floral as I'm a gardener)

Supplies
Stamps- none
Paper- heavy white, orange and pink cs
Inks- DOX
Accessories and Tools- stencils (A Colorful Life Designs); TE Blending Brushes;
white Posca pen; The Good Life die (Uniquely Creative); foam tape;
Flowers (Amazon)

Saturday, 5 April 2025

Vibrant YAY!


Welcome
I have to say that I really had some fun with the new April releases from A Colorful Life Designs.
For today's card, I used 2 of the new stencils called:

So, here's what I did to create this simple card.
  • Last time I was at the Dollar Store, I picked up some Black Rainbow Scratch Paper.  It looks totally black until a pattern or drawing is scratched into it. That was my starting point.
  • I placed the newly released Middle Square stencil down first and then put the Scratch paper over that.
  • Using the side of a popsicle stick, I rubbed over the whole stencil to transfer the pattern. Super easy and done in a jiffy.
  • I wanted the sentiment to match the panel so I took a small piece of the Scratch paper and place the Broken Lines stencil under that and rubbed over it to once again, transfer the pattern.  I used that to die cut the 'YAY'.
  • I glue my card front panel onto a piece of black cardstock and then onto an A2 sized card base.
  • I used some foam tape to pop the sentiment over the card front.

Here are the stencils I used:


My Discount Code for Your Entire Order from A Colorful Life Designs:
Thanks so much for taking a look.

Adding my card to these challenges:
Simon Says Wed.- HAPPY BIRTHDAY
Seize the Birthday- MILESTONE BIRTHDAY
Cardz 4 Galz- STRIPES

Supplies
Stamps-none
Inks- none
Paper- Black Scratch Paper; heavy white
Accessories and Tools- stencils- (A Colorful Life Designs); popsicle stick; 
YAY die (Whimsy Stamps)

Saturday, 30 November 2024

Let's Celebrate

Welcome
Today's card features a stencil from A Colorful Life Designs that I showed a few weeks ago called 
I decided to try and use it in a totally unique and different way.

So, here's what I did to create my card.
  • I took the Pop the Cork stencil and placed it over a piece of heavy white cardstock on the diagonal, eliminating the bottle portion of the stencil and inked it up with these Distress Oxide colours:  Fossilized Amber, Salty Ocean, Picked Raspberry, Cracked Pistachio and some Dusty Concord.
  • I lifted the stencil off, clean it and then repositioned it just to the top corner.  I masked off the area I had already stenciled before inking again with more of the above mentioned colours.  I repeated that process in the bottom corner as well until my card front was covered with ink.
  • Using a fine line marker, I drew a border around the outside edge and added some lines along the stenciled areas.
  • I die cut the sentiment from some black cardstock and the sentiment shadow right from the middle of my card base and glued those two together.
  • I glued my card front onto a piece of blue cardstock, then onto a piece of purple and then onto a white A2 sized card base.
  • I added the sentiment back into place using some foam tape and placed 3 black gems around it.

Here is the stencil I used:

My Discount Code for A Colorful Life Designs:
KarenFan10

Thanks so much for coming by and taking a look.

Adding my card to these challenges:
Simon Says Wed.- ANYTHING GOES
Just Us Girls- STENCIL

Supplies
Stamps- none
Inks- Distress Oxides
Paper- Scribes Nook- Waterloo, Ont.
Accessories and Tools- stencil (A Colorful Life Designs); TE Blending Brushes;
black gems, Fine line marker, die- TE

Thursday, 8 August 2024

Big and Little Lines

Hello and Welcome
Today's card is featuring a new stencil for August from A Colorful Life Designs called

So, here's what I did to create my card.
  • I placed a piece of white cardstock onto my Make Art Station and positioned the Big and Little Lines stencil over that.  
  • Next, I inked starting at the top and moving my way down with these Distress Oxide colours:  Shaded Lilac; Peacock Feathers; Picked Raspberry; Ripe Persimmon and some Fossilized Amber.
  • I lifted the stencil off, wiped it and then flipped it onto it's side.  I inked again using the same colours as mentioned above.
  • After I removed the stencil, I splattered with my white Posca pen and set aside to dry.
  • While the panel dried, I die cut the sentiment letters from some blue cardstock, then die cut the shadow from the center of my card front panel.  I glued the letters onto the shadow.
  • I glued my stenciled card front onto a piece of pale purple cardstock, then onto an A2 sized white card base.
  • I used some foam tape to pop the sentiment back into place over the card front and added a silver gem to dot the 'i'.

Here is the stencil I used:

Discount Code for A Colorful Life Designs
(Affiliate with no extra cost to you) 

Thanks so very much for coming by and taking a look.

Adding my card to these challenges:
Love to Craft- ANYTHING GOES
Crafts Galore Encore- ANYTHING GOES
(rainbow colours)

Supplies
Stamps- none
Inks- DOX
Paper- heavy white (Scribes Nook- Waterloo, Ont.)
Accessories and Tools- stencil (A Colorful Life Designs); Make Art Station (Ranger);
Small Blending Brushes (Amazon); silver gem; Just a Note (Concord and 9th)

Friday, 12 July 2024

Bright and Happy Birthday

Welcome

For today's card, I went with a bit of a 'rainbow' theme with the colours I added over this new stencil from A Colorful Life Designs called:

So, here's what I did to create my card.
  • I placed a piece of white cardstock onto my Make Art Station and put the Mid Century Jacks and Balls stencil over that.  
  • Starting at the top corner and moving my way down, these are the colours I used to blend together:  Fossilized Amber, Ripe Persimmon, Picked Raspberry and some Peacock Feathers.
  • After I had inked the whole panel, I decided to add a Stitched border to give more interest to my card.
  • I die cut the sentiment with some white cardstock 4 times and glued 3 of them together.  I inked the 4th one with the same colours I had used on the background mentioned above and glued that onto the top of the stack.
  • I glued the card front onto a piece of navy cardstock, then added the sentiment across the front.

Here is the stencil I used:

Discount Code for A Colorful Life Designs
(Affiliate with no extra cost to you) 

Thanks so much for coming by and taking a look.

Adding my card to these challenges:
Little Red Wagon- SOMETHING YOU LOVE
(I love using these colours together)
Word Power- WORDS AS YOUR FOCUS

Supplies
Stamps- none
Inks- Distress Oxides (Ranger)
Paper- heavy white (Scribes Nook- Waterloo, Ont.)
Accessories and Tools- stencil (A Colorful Life Designs); Make Art Station (Ranger);
Diagonal Stitch Rectangle Stacklets (TE); TE Blending Brushes;
Happy Birthday die (Lawn Fawn)