Tuesday 30 March 2021

Plaid Thinking of You


Welcome
Meet today's card.
I'm always excited to get time to play especially with some new stencils.
This one is a great one called Tic Tac Toe from ACLD.
The great thing about this stencil is that it has no edge so is perfect for also creating slimline cards.

So here's what I did to create my card.
  • I decided to make a print on my Gel Plate so I got that out and some of my Distress Oxide inks and my brayer.  The Oxides work so well for this simple technique.  I took some Blueprint Sketch and brayered that onto my plate.  I laid the stencil down and then rubbed over my cardstock to pick up the print.  (you can see some of that ink in the background)
  • Without wiping the plate off, I brayered on some Broken China DOX ink onto the plate and using the same inked panel, I pulled another print right on top of the first one.  It gave a fun shadow like effect to my cardstock.
  • I took the inked panel and dried it completely.  I then placed it into my Cuttlebug and die cut the 'Thinking of You' sentiment.  I set all of that aside and die cut the sentiment again 4 times more from some white cardstock.  I glued the sentiments together and set them aside to dry.
  • I placed the inked background into my Misti, and stamped the Wildflowers Rest and Refresh from Simon Says with some Versafine Clair ink along the bottom.  I clear heat embossed the flowers to help them stand out more against the inked bkg.
  • I glued the panel onto a piece of white cardstock, then fit the layered sentiment back into the cut away area of the background for an Embedded Sentiment.  (I love using this technique as it doesn't cover up the background)
  • I glue it onto a heavy white card base.
 

Thanks so much for coming by and taking a look.


Discount Code for A Colorful Life Designs


Supplies
Stamps- Wildflowers (SSS)
Inks- DOX, Versafine Clair Noir
Paper- heavy white (Scribes Nook- Waterloo, Ont.)
Accessories and Tools- Tic Tac Toe stencil (A Colorful Life Designs); Wow clear eb powder;
heat tool; Misti (My Sweet Petunia); Gel Plate; Brayer (Speedball), Thinking of You die (Echo Park)

Sunday 28 March 2021

Wee One- Sanded Embossed Background


Hello and Welcome

It's my turn to host the TLC Challenge (Technique Lovers) over at Splitcoast Stampers.
I like to try and think of some challenges that would be accessible to everyone and this is the one I came up with.  
I've been going through my background pieces that have been inked or painted that I haven't used for cards or that I just went 'yuck' after I was done.  You know those scenarios don't you?
Well instead of throwing them away, I put them in a bin and keep them for die cutting or for who knows what.  That is how this card started off.....and I watched a video by Jennifer McGuire a few weeks ago too so that helped.  

So here's what I did to create my card.
  • I went through my bin of discarded backgrounds and found this one that was blue and green.  Since I wanted to make a generic baby card, I figured this one might work.  It was a blue and green paint roll off from one of my Gel Plate printing sessions.  (For those unfamiliar with a Gel Plate, you roll paint or ink onto it with a brayer.  Many times, while rolling smooth with a brayer, there is too much paint, so to remove some of it I roll it onto scrap paper.  I keep those scraps for future whatever.)
  • I placed the painted piece into my Cozy Knit embossing folder and ran it through my Cuttlebug to emboss.  I removed the piece and then used a piece of sandpaper to remove the ink from all the high points of the embossing.  It totally transformed the look of the background.  (I wish I would have taken a picture of the before and after....especially since I hated the before!)  I set that aside.
  • Next, I die cut the scalloped circle using a Spellbinder die and placed that into my Misti.  I stamped the Baby Bunny from Impression Obsession with some Versafine Clair Noir ink.  I clear heat embossed it as I wanted to watercolour the bunny and the embossing helps contain the wet ink. 
  • Using some Peacock Feathers and some Cracked Pistachio Distress Oxide inks, I watercoloured in the bunny.  I just press the ink pad directly onto my Tim Holtz Glass mat, spray with water to dilute and use a paint brush to add colour.
  • Next, I stamped the sentiment from the Little One Animals from Photoplay onto some white and fussy cut it out.
  • I glued the sanded background onto a piece of white cardstock, then onto a heavy white card base.
  • I pop dotted the scalloped bunny circle over the background, the glued the sentiment banner over the circle.
 

Thanks so much for coming by and taking a look.
I hope you get a chance to try it out.

Adding my card to these challenges:
Simon Says Wed.- SPRING/EASTER MOOD BOARD
The Crafting Challenge- PASTEL COLOURS


Supplies
Stamps- Baby Bunny (IO); Little One Animals (Photoplay)
Inks- Versafine Clair Noir; Distress Oxides
Paper- heavy white (Scribes Nook-Waterloo, Ont.)
Accessories and Tools- Cozy Knit eb folder (Fun Stampers Journey); Cuttlebug, sandpaper;
acrylic paint (Dollar Tree); pop dots; Scalloped circle die- Spellbinders; paintbrush; TH glass mat;
Misti (My Sweet Petunia), clear eb powder (Wow)

Monday 22 March 2021

Rockin' Birthday


Welcome
Meet today's card.
A really fun and easy one to create.  These two stamp sets work so great together.

So here's what I did to create my card.
  • I began with a piece of white cardstock cut for my front panel.  I positioned the Dot Circle Stencil from A Colorful Life Designs over my panel, then I used my blending brush with some Peacock Feathers and some Salty Ocean Distress Oxide inks to stencil.  I applied the ink with varying pressure to help give it a feeling of motion as if the record was spinning.  
  • I took another piece of cardstock and stamped the record and the turntable arm from the Vinyl Greetings set in my Misti.  I clear heat embossed it to give it a shiny look like an album would have.  I stamped the 'Happy Birthday to You' from that same set onto the center of the record with some red ink.
  • I fussy cut out the record and the arm and set that aside.
  • I placed the stenciled piece into my Misti and stamped the sentiment from the For the Record set along the bottom. 
  • I pop dotted the record onto the center of my card, then added the turntable arm.
  • I glued it all onto a piece of blue cardstock, then onto a heavy white card base.


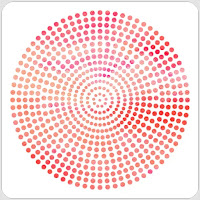
Here is the Dot Circle stencil I used.

Discount Code for A Colorful Life Designs

Adding my card to these challenges:
Stamping Sensations- MONOCHROMATIC

Thanks so very much for coming by and taking a look.


Supplies
Stamps- Vinyl Greetings (Create a Smile);  For the Record (Honey Bee)
Inks- Versafine Clair Noir, Distress Oxides
Paper- heavy white (Scribes Nook, Waterloo Ontario)
Accessories and Tools- Dot Circle Stencil (ACLD); clear eb powder; heat tool; TE blending brushes,
pop dots; 

Sunday 21 March 2021

Embedded Happy Birthday


Hello and Welcome
I'm happy to be back with a fun card using this great stamp from Technique Junkies.
It's an older one but I love that it's so easy to make a card using it.  Take a background, stamp the city image and then add a sentiment.

So here's what I did to create my card.
  • I used a piece of Strathmore Bristol watercolour paper for my front panel, then got out my Distress inks (Peacock Feathers, Salty Ocean, Blueprint Sketch, Seedless Preserves and Wilted Violet).  I rubbed the ink pads directly onto my Tim Holtz Glass mat and diluted them with water.
  • Using a large paintbrush, I added water all over the panel.  Then I picked up some Peacock Feathers ink and started added the inks onto the wet panel.  Since these inks are water soluble, they can be easily diluted for watercolouring.
  • I continued with each of the colours mentioned above until the panel was washed with inks.  I set that aside to dry completely.
  • When totally dry, I placed the inked panel into my Misti and stamped the Watercolor NY image with some Versafine Clair Noir and clear heat embossed it.
  • I die cut the Happy Birthday from the panel using a die from Penny Black and set that aside.  
  • I die cut the Birthday again 3 more times and glued them all together.  
  • I glued the inked panel onto a card base and fitted the 'Happy Birthday' back into the cut away on the image for an embedded sentiment.  It's kind of hidden but doesn't take away from the overall look of the image.
  • I added a few white splatters with my Posca pen until it died...ugh.

Thanks so much for coming by and taking a look.

Adding my card to these challenges:
Craft Rocket- USE DIE/SPRING
Cards for Galz- SPRING RAIN
As You Like It- FAV WAY TO CUT YOUR IMAGE AND WHY
(by embedding you can still see the full image)

Supplies 
Stamp- Watercolor NY (Technique Junkies)
Inks- Distress (Tim Holtz); Versafine Clair
Paper- Strathmore Bristol; heavy white (Scribes Nook, Waterloo Ont.)
Accessories and Tools- Misti (My Sweet Petunia), Wow clear eb powder; heat tool; paintbrush,
Happy Birthday die (PB); Cuttlebug, Posca pen

Monday 15 March 2021

Welcome Spring


Welcome
I had some time on the weekend to play.
I am so looking forward to Spring....blue skies and all coming to life.
I picked out some greens and blues to make this Springtime card.

So here's what I did to create my card.
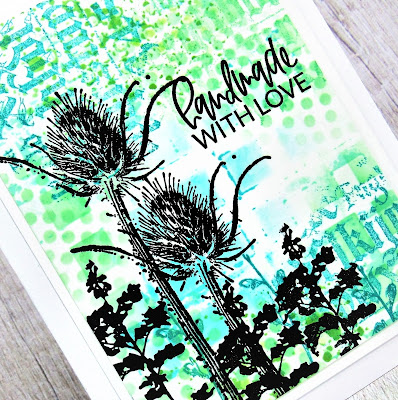
  • I began with a heavy cardstock panel for the front of my card.  I got out some Peacock Feathers,  Cracked Pistachio and some Broken China Distress Oxide inks, then I got out my Dot Circle stencil from A Colorful Life Designs.  I inked over that with some green just in the corners of my card front.
  • Next, using the Tic Tack Toe stencil, I rubbed on some green and then some blue mentioned above, in random areas.
  • To add more interest to the collage style background, I stamped some script from the Faded Text set by Tim Holtz using the same inks to match the background. 
  • I placed the piece into my Misti then stamped the thistles and plants with some Versafine Clair ink.  
  • I stamped some of the foliage again along the bottom with some more Peacock Feathers ink to help better ground the images.
  • I stamped the sentiment from Avery Elle in my Misti, then glued it all together onto a heavy white card base.


Thanks so much for coming by and taking a look.

Here are the stencils I used:


Discount Code for A Colorful Life Designs

Adding my card to these challenges:
Simon Says Wed.- A BIT OF GREEN
Crazy 4 Challenges- 2 STENCILS OR MORE
Daring Cardmakers- PLANT A FLOWER


Supplies
Stamps- Faded Type (TH), Nature Flowers (Art Journey); Foliage (Old Island Stamp Comp.)  
Everyday Circle Tags(Avery Elle)
Inks- Distress Oxides (listed above); Versafine Clair Noir
Paper- heavy white (Scribes Nook Waterloo, Ontario)
Accessories and Tools- Misti (My Sweet Petunia); Stencils- Dot Circle, Tic Tac Toe (ACLD), 
Blending Brushes (TE)