Showing posts with label city. Show all posts

Sunday, 21 March 2021

Embedded Happy Birthday


Hello and Welcome
I'm happy to be back with a fun card using this great stamp from Technique Junkies.
It's an older one but I love that it's so easy to make a card using it.  Take a background, stamp the city image and then add a sentiment.

So here's what I did to create my card.
  • I used a piece of Strathmore Bristol watercolour paper for my front panel, then got out my Distress inks (Peacock Feathers, Salty Ocean, Blueprint Sketch, Seedless Preserves and Wilted Violet).  I rubbed the ink pads directly onto my Tim Holtz Glass mat and diluted them with water.
  • Using a large paintbrush, I added water all over the panel.  Then I picked up some Peacock Feathers ink and started added the inks onto the wet panel.  Since these inks are water soluble, they can be easily diluted for watercolouring.
  • I continued with each of the colours mentioned above until the panel was washed with inks.  I set that aside to dry completely.
  • When totally dry, I placed the inked panel into my Misti and stamped the Watercolor NY image with some Versafine Clair Noir and clear heat embossed it.
  • I die cut the Happy Birthday from the panel using a die from Penny Black and set that aside.  
  • I die cut the Birthday again 3 more times and glued them all together.  
  • I glued the inked panel onto a card base and fitted the 'Happy Birthday' back into the cut away on the image for an embedded sentiment.  It's kind of hidden but doesn't take away from the overall look of the image.
  • I added a few white splatters with my Posca pen until it died...ugh.

Thanks so much for coming by and taking a look.

Adding my card to these challenges:
Craft Rocket- USE DIE/SPRING
Cards for Galz- SPRING RAIN
As You Like It- FAV WAY TO CUT YOUR IMAGE AND WHY
(by embedding you can still see the full image)

Supplies 
Stamp- Watercolor NY (Technique Junkies)
Inks- Distress (Tim Holtz); Versafine Clair
Paper- Strathmore Bristol; heavy white (Scribes Nook, Waterloo Ont.)
Accessories and Tools- Misti (My Sweet Petunia), Wow clear eb powder; heat tool; paintbrush,
Happy Birthday die (PB); Cuttlebug, Posca pen

Wednesday, 16 September 2020

Blue Skies


Welcome
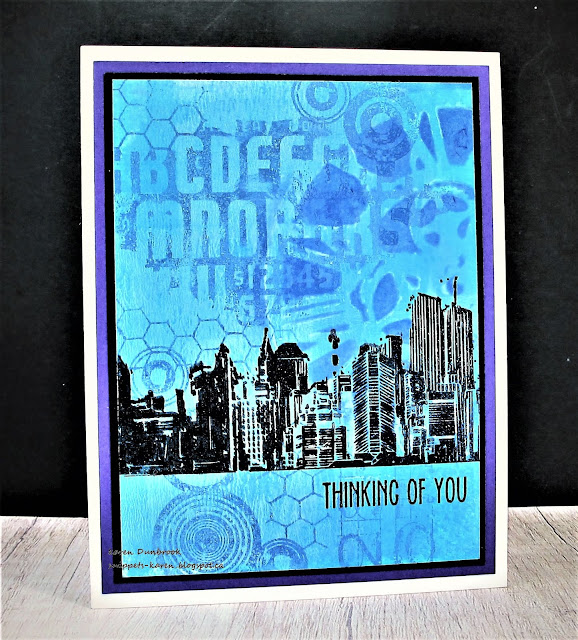
Here is a card I made putting together different stamps and a stencil but staying in the same colour palette.  I do love making collage cards and there is something about the interest and look they have.
I find by staying with the same or similar colours, the look is more cohesive.

So here's what I did to create my card.
  • I began by inking up a piece of heavy white cardstock with some Peacock Feathers and Broken China Distress Oxide inks using an inking tool.
  • Next, I laid down the Clockworks stencil from Tim Holtz and rubbed some Blueprint Sketch over that to one side.  
  • I then inked up some of the words from the Faded Text stamp set and stamped randomly over the background.  I added additional stamping with his other set called Bitty Grunge filling in some of the open areas.
  • I inked up the Cityscape stamp with some black Versafine Clair, stamped then clear heat embossed it.  I stamped the sentiment the same way.
  • I added some white detail to the buildings using my Posca pen.
  • I mounted the piece onto some coloured cardstock, then onto a heavy white card base.

Thanks so much for coming by and taking a look.


Supplies
Stamps- Faded Text; Cityscapes; Bitty Grunge (Tim Holtz); Everyday Sentiments (YNS)
Inks- Distress Oxides; Versafine Clair
Paper- heavy white (Scribes Nook); coloured cardstock (Michaels)
Accessories and Tools- Clockwork stencil (TH); inking tool (TH); white Posca pen

Tuesday, 21 August 2018

Rainy Day in the City

Hello and Welcome.
It's a super rainy day here today so I thought I would post my Rainy Day card.  We sure need the rain after this dry, hot summer we have had.  It also gave me a chance to play with this fun stamp from Technique Junkies, one of my favs.

Using a piece of heavy white cardstock, I placed the stamp inside my Misti, inked with some Blueprint Sketch Distress Oxide ink and stamped onto my paper.  I moved my paper slightly inside my Misti, inked my stamp with some Faded Jeans DOX and stamped again.  I repeated that process with some Hickory Smoke and I was left with a blurred image like you would have on a rainy day.
I then took a wet paintbrush and blended the colours together, then using some more ink, I did a watercolour wash on the sky.  I splattered on some diluted ink to give the effect of rain then stamped the sentiment along the bottom.
The rain is making me 'smile' today.


Thanks so much for coming by and taking a look.

Adding my card to these challenges:
Craftaholics R Us- ANYTHING GOES
House that Stamps Built- INSPIRATION PALETTE
Moo-Mania- SUMMERTIME

Supplies
Stamps- New York (Technique Junkies)= Smile (Daisy Bucket)
Inks- Tuxedo Black Memento= DOX: Blueprint Sketch, Faded Jeans, Hickory Smoke (TH)
Paper- heavy white (Scribes Nook Waterloo Ont)
Accessories and Tools- Misti- paintbrush

Saturday, 17 June 2017

Reflections on a Rainy Day

Happy Saturday!
Time to have some fun.

Meet today's card.  
Just playing around with some Distress inks and a great scene stamp.
 Recently, I saw the challenge at Technique Junkies that showed how to do a 'drip' technique on your card.  I really wanted to give it a try using this great stamp from them.  So here's what I did.

I wanted to give the scene a reflective look, like it was a rainy day.
I placed the stamp inside my Misti, inked with Tuxedo black ink and stamped.  Leaving the stamp inside my Misti, I shifted the paper slightly and then inked the stamp with Salty Ocean Distress ink and stamped again.  I shifted the paper one last time and did a final inking with London Fog Memento.  The whole image looked blurred but wait....

At this point, I changed the technique a bit but did keep it a 'drip' technique as I didn't have a dropper on hand and not enough re-inkers to use.
So, I took a very wet paintbrush and dripped water down from the top of my card front.  I pressed Distress ink onto my non-stick craft mat and picked up some ink with my wet paintbrush and touched the water lines to give the appearance of rainfall.  The colour stays right where you have added the water.
I continued that process until I was happy with my colour drips then splattered to add to the rainy effect.
Now here's the final step.....again, get a very wet paintbrush and go over your stamped image to blend out the stamping lines and add to the reflective quality of your stamping.  The blurriness will remain but it will look more artsy and lend to the rainy feel.  Added a few splatters to look like raindrops.


Have a great weekend and thanks so very much for coming by and taking a look!


Adding my card to these challenges:
 Technique Junkies- DRIP TECHNIQUE 
Craft Stampers Magazine- TAKE A STAMP/ANYTHING GOES 
The Male Room- OFF THE EDGE 
(I dripped off the edge)


Supplies
Stamp- Watercolor NY (Technique Junkies)
Ink- London Fog, Tuxedo Bl Memento; Blueprint Sketch, Shaded Lilac, Peacock Feathers
Stormy Sky Distress (TH)
Paper- heavy white cs (local store)
Accessories and Tools- MISTI, paintbrush