Showing posts with label Spring. Show all posts

Thursday, 20 March 2025

The Best Wishes for You


Good Morning
For today's card, I decided to do some stencil layering using 2 of the newly released stencils from A Colorful Life Designs called:

So, here's what I did to create my card.
  • I placed the Flowing Curl stencil over a piece of white cardstock.  Starting at the top and working my way down, I inked with some Fossilized Amber, Ripe Persimmon and some Picked Raspberry Distress Oxide ink.
  • Leaving the stencil in place, I put the Zig Zag Squares over the top of it and inked again with the same colours as mentioned above.
  • I removed both stencils and placed the panel into my Misti to stamp the flowers.
  • Next, I splattered with my black Posca pen and set aside to dry.
  • I stamped the sentiment and die cut it with a circle die.
  • I glued my card front onto a piece of white cardstock, then onto a piece of pink and then onto a white A2 sized card base.
  • I added the sentiment up in the corner with some foam tape to pop it up.

Here are the stencils I used:


My Discount Code for Your Entire Order from A Colorful Life Designs:

Adding my card to these challenges:
Simon Says Wed.- FUN WITH STENCILS
Try it on Tues.- THINK SPRING
2 Sisters on the Blog- SPRING/ EASTER

Supplies
Stamps- Everyday Circle Tags (Avery Elle); Insightful Meadow (Unity)
Inks- DOX, Versafine Clair
Paper- heavy white
Accessories and Tools- stencil (A Colorful Life Designs); Blending Brushes (Amazon); 
Misti (My Sweet Petunia); black Posca Pen; foam tape; Hero Arts Infinity Circle dies

Monday, 20 January 2025

Spring Buds


Welcome

Going monochromatic today with this new stencil from A Colorful Life Designs called:
I don't know about you and where you live, but I'm so ready for Spring to be here!

So, here's what I did to create my card.

  • I placed the Spring Buds over a piece of white cardstock onto my Make Art Station and inked up the flowers with some Salvaged Patina Distress Oxide ink.
  • Next, I used some Salty Ocean DOX ink to add a darker shade of blue to the flower centers.
  • I turned the stencil upside down and inked again using the same colours, creating these fun little flowers. 
  • I die cut the sentiment with some navy cardstock and then die cut the shadow for the sentiment right from the middle of the stenciled panel.  I glued those 2 together.
  • I glued my card front onto a piece of navy cardstock, then onto an A2 white card base.
  • I used some foam tape to pop the sentiment back into place over the card front.
  • Finally, I added 3 navy blue gems under the sentiment to finish my card off.

Here is the stencil I used:


My Discount Code for A Colorful Life Designs:

Thanks so much for coming by and taking a look.

Adding my card to these challenges:
Simon Says Wed.- CLEAN AND SIMPLE
Craft Rocket- SOMETHING NEW
Cardz 4 Galz- STENCIL

Supplies
Stamps- none
Inks- DOX
Paper- heavy white (Scribes Nook- Waterloo, Ont.)
Accessories and Tools- stencil (A Colorful Life Designs); TE Blending Brushes;
Make Art Station (Ranger); Sending Smiles die (SSS); navy gems

Sunday, 21 April 2024

Hello Spring

Welcome
Today's card features 2 new stencil releases this month from A Colorful Life Designs called
I combined them with some fun colours and patterns.

So, here's what I did to create my card.
  • I began by placing a piece of white cardstock onto my Make Art Station and then put the Intersections stencil over just the top half of my cardstock panel.  
  • Next, I inked it up with a few different Distress Oxide inks.  These are the colours I used:  Fossilized Amber, Ripe Persimmon and Picked Raspberry.
  • I lifted the stencil off and repositioned it across the bottom part of my cardstock and inked again with the same colours as mentioned above.
  • I took another piece of white cardstock and inked a portion of the Rotating Rings stencil.  Again, I used the same colours as mentioned above.  I used a circle die and cut that out.
  • I die cut the sentiment from some more white cardstock 3 times and inked the top one to match the background.
  • I glued the stenciled card front onto a piece of pink and then onto an A2 card base.
  • I used some foam tape to add the circle over the middle of my card front and glued the sentiment onto that.

Here are the stencils I used:


Discount Code for A Colorful Life Designs
(Affiliate with no extra cost to you) 

Thanks so much for the visit!

Adding my card to these challenges:
Simon Says Wed.- STENCIL IT
Simon Says Mon.- MAKE YOUR OWN BKG

Supplies
Stamps- NONE
Inks- DOX
Paper- heavy white (Scribes Nook- Waterloo, Ont.)
Accessories and Tools- stencils (A Colorful Life Designs); blending Brushes;
Make Art Station (Ranger); Circle die (Hero Arts); Hello Spring die (Amazon)

Sunday, 31 March 2024

Happy Easter

Happy Easter!

I hope your day is filled with many blessings.
I created a fun card using some new and older supplies.

So, here's what I did to create my card.
  • I placed a piece of white cardstock into my Misti and stamped the new to me bunny face with Versafine Clair black ink.
  • I die cut around the bunny head with the arched die, being sure to leave enough space at the bottom to stamp the Happy Easter greeting.
  • Next, I used some watercolour pencils to add the pink to the ears and nose and fill in some areas.
  • To add detail to the background, I used the Simple Mosaic stencil and some Broken China Distress Oxide ink to help ground the bunny.  
  • I used the ink left on my blending brush to ink the edges of the arch as well.
  • I dry embossed a piece of pale blue cardstock and sanded it slightly to give it a bit of a distressed look.
  • I glued the embossed cardstock onto an A2 sized card base and then used some foam tape to pop the bunny arch over that.  

Here is the stencil I used:

Discount Code for A Colorful Life Designs
(Affiliate with no extra cost to you) 

Thanks so much for coming by and taking a look.

Adding my card to these challenges:
Simon Says Wed.- ANYTHING GOES
Little Red Wagon- ANIMAL ANTICS
Daring Cardmakers- EASTER THEME
Just Us Girls- ANYTHING GOES STENCIL WEEK

Supplies
Stamps- Happy Easter (Craftsmart); Hipster Bunny (TH)
Inks- Versafine Clair; DOX, watercolour pencils
Paper- heavy white (Scribes Nook- Waterloo, Ont.)
Accessories and Tools- stencil (A Colorful Life Designs); TE Blending Brushes;
Arches die (Photoplay); EB folder (Darice)

Saturday, 30 March 2024

Easter Bunny

Welcome
As we celebrate Easter and Spring, it's time to meet the new for March stencil from A Colorful Life Designs called 
I used the bunny along with the Marvelous Masks Hexagons in the background.

So, here's what I did to create my card.
  • I placed a piece of white cardstock onto my Make Art station and then put the Bunny Profile stencil along one side and inked it up with some Rusty Hinge and some Aged Mahogany Distress Oxide ink.
  • This stencil comes with a mask so I placed that over my stenciled bunny and secured in place.  
  • I put the smallest Marvelous Mask Hexagon over the bunny mask and inked it up with some Cracked Pistachio ink.
  • I added the next sized Hexagon and inked that with some Peacock Feathers DOX ink.  I repeated that all using the next largest sized Hexagon and inked with some Uncharted Mariner DOX ink.
  • I removed the Hexagon Masks, but left the Bunny Mask in place so I could splatter with my white Posca pen.
  • I stamped the sentiment along the bottom, then glued the panel onto a piece of blue cardstock, then onto an A2 sized card base.
  • Lastly, I added 2 black gems beside the sentiment.

Here is the stencil and masks I used:


Discount Code for A Colorful Life Designs
(Affiliate with no extra cost to you) 

Thanks so much for coming by and taking a look.

Adding my card to these challenges:
Simon Says Wed.- ANYTHING GOES
Shopping Our Stash- SPRING HAS SPRUNG
Just Us Girls- ANYTHING GOES STENCIL WEEK
Little Red Wagon- ANIMAL ANTICS

Supplies
Stamps- Hippity Hoppity (Craft Smart)
Inks- Versafine Clair, DOX
Paper- heavy white (Scribes Nook- Waterloo, Ont.)
Accessories and Tools- stencils (A Colorful Life Designs); TE Blending Brushes;
Make Art Station (Ranger); white Posca pen; black gems

Saturday, 13 May 2023

Split Circle


Good Morning
Meet the May newly released Split Circle stencil from A Colorful Life Designs.
Lots of different ways to use this one.

So here's what I did to create my card.
  • I cut a piece of white cardstock and positioned the Split Circle stencil over that on my Make Art Station, tilting the whole stencil to one side.  I inked up over the stencil with some Shaded Lilac Distress Oxide ink.
  • Next, leaving the stencil in place, I positioned the Spring Foliage stencil over that and inked with some Villainous Potion DOX ink.  Layering the 2 stencils gave such a fun looking background.
  • I splattered with my white Posca pen and let dry.
  • When the panel was dry, I placed it into my Misti to stamp the sentiment from Hero Arts.
  • I glued the piece onto some white cardstock, then purple, then onto an A2 sized card base.
  • I added 3 black gems around the sentiment.

Here are the stencils I used:


Discount Code for A Colorful Life Designs
(Affiliate with no extra cost to you) 

Thanks so much for coming by and taking a look.

Adding my card to these challenges:
Simon Says Stamp- STENCIL IT
My Time to Craft- MONOCHROMATIC
Addicted to Stamps and More- DIE CUTS and/or STENCIL

Supplies
Stamp- Huge Hugs (HA)
Inks- Versafine Clair; DOX
Paper- Scribes Nook- Waterloo, Ont.
Accessories and Tools- stencils (ACLD); white Posca pen; Blending Brushes (TE)
Make Art Station (Ranger); Misti (My Sweet Petunia)

Saturday, 25 March 2023

Monochromatic Leaves


Good Morning
Today's card features the Spring Foliage stencil, one of my favs from the new release at A Colorful Life Designs.
This card came together so quickly using my Gel Plate.

So, here's what I did to create my card.
  • I got out my Gel plate, the Spring Foliage stencil and some Peacock Feathers Distress Oxide ink.
  • I pressed the ink directly onto my Gel Plate and brayered it smooth, then placed the stencil onto the plate.  I rubbed some white cardstock over the plate to lift the print.  
  • It was a good print but I thought it needed more so, I laid the stencil back over the print and inked over it with some Uncharted Mariner Distress Oxide ink.  By moving the stencil slightly off to where it was for the first print, I was able to give it a great shadow look.
  • I placed the panel into my Misti to stamp the sentiment, then splattered the whole panel with my white Posca pen.
  • I glued the finished panel onto a piece of white cardstock, then onto a piece of matching blue cardstock.
  • I glued it onto an A2 sized card base and done.

Here is the stencil I used:

Discount Code for A Colorful Life Designs
(Affiliate with no extra cost to you) 

Thanks so much for taking a look.
Have a great weekend.

Adding my card to these challenges:
Simon Says- SPRING/EASTER
Time Out- INSPIRED BY WORDS
My Time to Craft- SPRINGTIME

Supplies
Stamp- See the Light (IO-retired)
Inks- DOX, Versafine Clair
Paper- Scribes Nook- Waterloo, Ont.
Accessories and Tools- stencil (ACLD); Gel Plate; brayer; TE Blending Brushes;
Misti (My Sweet Petunia); white Posca pen

Thursday, 23 March 2023

Easter Greetings

Welcome
Meet today's card, just in time for Easter.
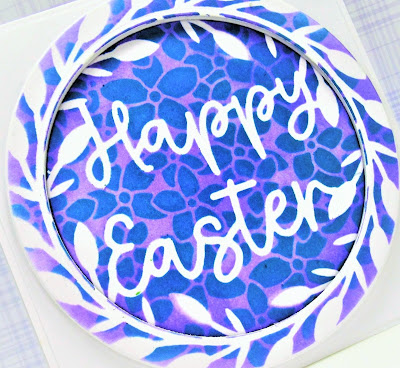
I don't make a lot of Easter cards, but this new Happy Easter stencil from A Colorful Life Designs was calling to me.  I paired it up with another new stencil called Flower Ball to get a unique look and add interest.

So, here's what I did to create my card.
  • I began by placing the Happy Easter stencil onto a piece of 4 x 4" white cardstock on my Make Art Station.
  • Using some Shaded Lilac Distress Oxide ink, I rubbed over the entire stencil with my blending brush.
  • Leaving that stencil in place, I layered the Flower Ball stencil over that and rubbed over it with some Uncharted Mariner Distress Oxide ink.  It really transformed the look of the first stencil.
  • I removed both stencils and then using my Hero Arts Infinity circle dies, I die cut the ring that you can see around the sentiment.  
  • I glued the small circle onto a 4 1/4" square card base and then pop dotted the die cut circle back into place matching it up with the smaller circle.


Here is the stencil I used:


Discount Code for A Colorful Life Designs
(Affiliate with no extra cost to you) 

Thanks a lot for coming by and taking a look.

Adding my card to these challenges:
Crazy is Our Fame- Stencils are Our Game- CAS 
Simon Says Challenge- SPRING and/or EASTER
The Card Concept- SIGNS OF SPRING

Supplies
Stamps- none
Inks- DOX
Paper- Scribes Nook- Waterloo, Ont.
Accessories and Tools- stencils (ACLD); TE Blending Brushes; Make Art Station (Ranger)
Circle dies (HA); Blending Brushes (TE)

Saturday, 18 March 2023

Friendship


Welcome
Today's card was a fun one.  
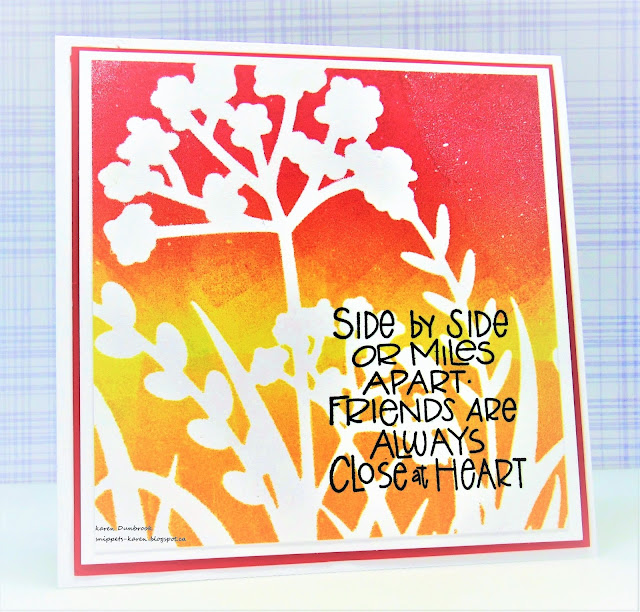
I thought of all we can look forward to seeing Spring's arrival and this newly released stencil from A Colorful Life Designs called Wildflowers inspired me.

So, here's what I did to create my card.
  • I cut a piece of white cardstock and got out my Gel Plate.
  • I pressed my Mustard Seed Distress Oxide pad directly onto the middle of my Gel Plate.  Along the bottom I pressed some Carved Pumpkin DOX ink and along the top some Lumberjack Plaid DOX ink. Using my brayer, I blending the colours together.  
  • Next, I placed the Wildflowers stencil onto the plate and rubbed over it with my cardstock to take the print.
  • When the panel was dry, I placed it into my Misti to stamp the sentiment and clear heat embossed it.
  • I glued the finished piece onto a piece of white, then a piece of red cardstock, then onto an 5 x 5" card base.

Here is the stencil I used:

Discount Code for A Colorful Life Designs
(Affiliate with no extra cost to you) 

Thanks so much for coming by and taking a look.

Adding my card to these challenges:
Craft Rocket- FOR THE GIRLS


Supplies
Stamp- Side by Side (IO- retired)
Inks- Versafine Clair; Distress Oxides
Paper- Scribes Nook- Waterloo, Ont.
Accessories and Tools- stencils (A Colorful Life Designs); Make Art Station (Ranger); 
Misti; Gel Plate; Speedball Brayer; clear eb powder; heat tool