Showing posts with label Unity. Show all posts

Thursday, 20 March 2025

The Best Wishes for You


Good Morning
For today's card, I decided to do some stencil layering using 2 of the newly released stencils from A Colorful Life Designs called:

So, here's what I did to create my card.
  • I placed the Flowing Curl stencil over a piece of white cardstock.  Starting at the top and working my way down, I inked with some Fossilized Amber, Ripe Persimmon and some Picked Raspberry Distress Oxide ink.
  • Leaving the stencil in place, I put the Zig Zag Squares over the top of it and inked again with the same colours as mentioned above.
  • I removed both stencils and placed the panel into my Misti to stamp the flowers.
  • Next, I splattered with my black Posca pen and set aside to dry.
  • I stamped the sentiment and die cut it with a circle die.
  • I glued my card front onto a piece of white cardstock, then onto a piece of pink and then onto a white A2 sized card base.
  • I added the sentiment up in the corner with some foam tape to pop it up.

Here are the stencils I used:


My Discount Code for Your Entire Order from A Colorful Life Designs:

Adding my card to these challenges:
Simon Says Wed.- FUN WITH STENCILS
Try it on Tues.- THINK SPRING
2 Sisters on the Blog- SPRING/ EASTER

Supplies
Stamps- Everyday Circle Tags (Avery Elle); Insightful Meadow (Unity)
Inks- DOX, Versafine Clair
Paper- heavy white
Accessories and Tools- stencil (A Colorful Life Designs); Blending Brushes (Amazon); 
Misti (My Sweet Petunia); black Posca Pen; foam tape; Hero Arts Infinity Circle dies

Monday, 17 June 2024

Happy Father's Day to My Guy


Welcome
Today, I am having fun creating a card for Father's Day for my husband.  I am using the newly released stencil from A Colorful Life Designs called:

So, here's what I did to create my card.
  • I placed the Swirling Droplets stencil over a piece of white cardstock and randomly inked it up with some Cracked Pistachio, Peacock Feathers and some Salty Ocean Distress Oxide ink.
  • I removed the stencil and then rubbed some of the Peacock Feathers DOX ink along the edges of the card front panel.
  • Next, I used my black Posca pen and splattered the whole panel.
  • While that dried, I stamped and clear heat embossed the beer cans and fussy cut them out.
  • To add colour to the cans, I pressed the Cracked Pistachio and the Peacock Feathers ink pads onto a piece of acetate, sprayed with water and dragged the stamped cans through the wet ink.
  • I stamped the sentiment from the same set onto a little piece of inky cardstock and then set aside to dry.
  • I glued the card front panel onto a piece of pale green cardstock, then onto an A2 sized card base.
  • I used some foam tape to add the cans over the center of my card front and then added the sentiment under it using some more of the foam tape.
  • To finish my card off, I added 2 black gems on either side of the sentiment.

Here is the stencil I used:

Discount Code for A Colorful Life Designs
(Affiliate with no extra cost to you) 

Thanks so much for coming by and taking a look.

Adding my card to these challenges:
Sweet Stampin'- FATHER'S DAY/ SPECIAL MAN
Allsorts- MASCULINE
Papercraft Challenges- FOR THE BOYS

Supplies
Stamps- Cheers Bruh (Unity)
Inks- DOX, Versafine Clair
Paper- heavy white (Scribes Nook, Waterloo, Ont.)
Accessories and Tools- stencil (A Colorful Life Designs); TE Blending Brushes;
black Posca pen; acetate sheet; black gems

Monday, 13 May 2024

Two Card Designs, One Stencil

Good Morning.
I've got 2 cards to show you today.
They both use the same stencil and same colours, but the background design looks totally different.

So, meet the newly released stencil from A Colorful Life Designs called 

So, here's what I did to create my cards.
  • I placed the Chunky Chevrons stencil over a piece of white cardstock and inked it up with some Picked Raspberry and some Ripe Persimmon Distress Oxide ink.
  • I wiped the stencil off, flipped it upside down and inked again with the same colours in the same areas.  It made a fun, patterned background.
  • I placed the stenciled panel into my Misti and stamped the flowers and the sentiment.
  • I splattered over the flowers with my black Posca pen.
  • I glued the finished piece onto some white cardstock, then orange and then onto an A2 sized card base.


So now onto CARD #2

  • I cut another piece of white cardstock and placed the Chunky Chevrons stencil onto the paper and inked with some Picked Raspberry and some Ripe Persimmon Distress Oxide ink.
  • I lifted the stencil off but to get a different look then the card above, I flipped the stencil upside down and then tried to match up the chevrons instead of off setting them and inked with the same colours again.
  • I placed the panel into my Misti and stamped the flowers to one side and added the sentiment to the side.  
  • I used my black Posca pen to splatter just around the flowers.
  • I glued the dried piece onto some pink cardstock and then onto an A2 sized card base.

Here is the stencil I used for both cards:

Discount Code for A Colorful Life Designs
(Affiliate with no extra cost to you) 

Thanks so much for coming by and taking a look.

Little Red Wagon- CREATE YOUR OWN BACKGROUND
Crafts Galore Encore- ANYTHING GOES
Sparkles- APRIL SHOWERS BRING MAY FLOWERS
Dragonfly Dreams- USE A STENCIL

Supplies
Stamps- CARD #1- Star Burst (Lavinia), Just Be Happy (Visible Image)
CARD #2- Noteworthy (STAMPlorations); Insightful Meadow (Unity)
Inks- Verafine Clair, DOX
Paper-heavy white (Scribes Nook- Waterloo, Ont.)
Accessories and Tools- stencil (A Colorful Life Designs); Misti (My Sweet Petunia); 
black Posca pen

Thursday, 10 March 2022

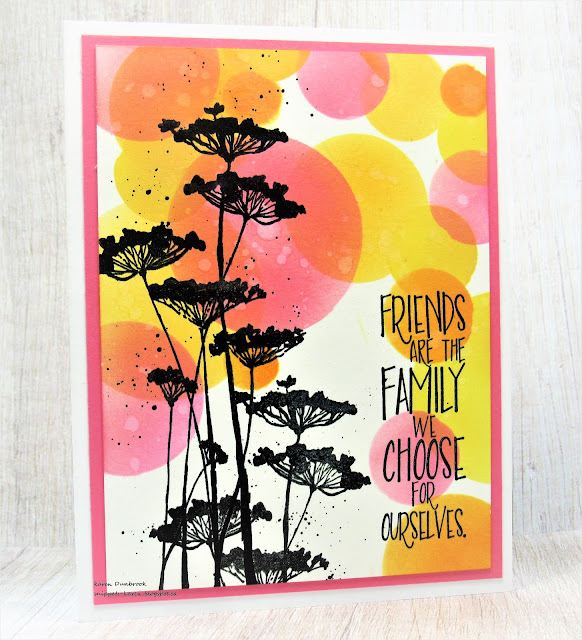
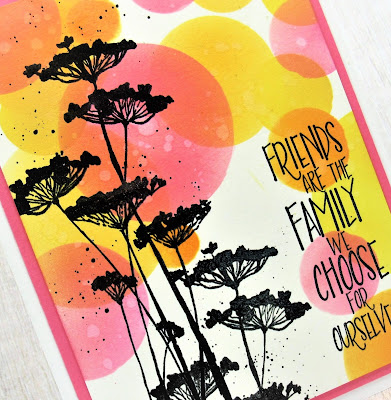
Simple Bokeh


Good Morning
Today's card features a very simple technique called Bokeh.
Basically it is circles of light and dark...gives a fun look to the background.

So here's what I did to create my card.
  • I cut a white cardstock panel for my card front and got out my sheet of acetate that I had used to die cut different sized circles to use for this technique.  
  • I began inking up the circles in different areas using Distress Oxide inks, varying the depth of colours to create the look of bokeh.  I used some Picked Raspberry, Carved Pumpkin and Mustard Seed DOX ink.
  • When I was done with that inking, I splattered the panel with water to lift some of the ink in places and give more interest.
  • I placed the dry panel into my Misti and stamped the flowers and the sentiment with black Verafine ink.
  • Using my black Posca pen, I splattered just over the area of the flowers.
  • I glued the finished panel onto a piece of pink cardstock, then onto a white card base.

Thanks so much for coming by and taking a look.

Adding my card to these challenges:
Crafty Gals Corner- ADD A FLOWER
Unicorn Challenge- DOT and/or STRIPES


Supplies
Stamps- Insightful Meadow (Unity); Friends are Family (Impression Obsession)
Inks- DOX; Versafine Clair
Paper- heavy white (Scribes Nook- Waterloo, Ont.)
Accessories and Tools- Infinity Circle die (Hero Arts); Misti (My Sweet Petunia); 
Posca pen; TE Blending Brushes

Sunday, 20 February 2022

Birthday Hugs


Welcome
Time for a bright, happy clean and simple card.
So easy to create using this fun Mid Century Shadow stencil from A Colorful Life Designs.

So here's what a did to create my card.
  • I began by cutting a piece of white cardstock and positioned it onto my Stencil Mat with the 4 Mid Century Shadow stencil over it.  (This stencil comes with the cut away masks, so it's easy to ink with different colours as you can pop the mask into areas you don't want to ink up)
  • I started at the top and inked up the first panel with some Mustard Seeds Distress Oxide ink, then masked and moved down to ink up the next area with some Picked Raspberry DOX ink.  I continued that process down the panel, inking, masking using some Cracked Pistachio then finally some Peacock Feathers DOX ink.  
  • I removed all the mask and splattered with my white Posca pen.
  • I placed the inked panel into my Misti and stamped the flowers to one side, leaving room to stamp the sentiment in the bottom corner.
  • I glued it onto a piece of blue cardstock, then onto a white card base.
 

Here is the stencil I used:

Discount Code for A Colorful Life Designs
(affiliate with no extra cost to you)

Thanks so much for coming by and taking a look.

Adding my card to these challenges:
CAS on Friday- SPRING FLOWERS
Less is More- BIRTHDAY
We Love Stamping- STAMPING optional STENCIL

Supplies
Stamps- Insightful Meadow (Unity); Birthday Hug (Penny Black)
Inks- Versafine Clair, DOX
Paper- white (Scribes Nook- Waterloo, Ont.)
Accessories and Tools- stencil (ACLD); Taylored Expressions Blending Brushes;
white Posca pen; Misti (My Sweet Petunia); Stencil Mat (Waffle Flower)

Saturday, 6 March 2021

Blooming


Good Morning and welcome to the weekend....time to get crafting.
This is a simple card to make using an embossing folder for the background.  
It's great when we can extend the uses for the tools we already have in our stash and I know that so many of us have embossing folders.

So here's what I did to create my card.
  • I began with a white panel.  I rubbed some Peacock Feather and some Salty Ocean Distress inks over my opened embossing folder, sprayed with water, then pressed onto my panel.  **you will get different looks depending on what side of your embossing folder you ink onto**
  • When the panel was totally dry, I placed it into my Misti and stamped the flowers from Unity over to the side with some black Versafine Clair ink.  This set has some of the best flowers in it.  I bought it years ago but it is still one of my go to sets for flowers.
  • I stamped the sentiment from Impression Obsession down the other side with the same black ink but clear embossed it so the words would pop against the blue background.
  • I splattered some black over the flowers with my Posca pen, then mounted the piece onto some blue cardstock, then onto a heavy white card base.


 Thanks so much for coming by for a visit and have a great weekend!

Adding my card to these challenges:
Simon Says Wed.- BEAUTIFUL BLOSSOMS


Supplies
Stamps- Insightful Meadow (Unity); Words and Idea (Impression Obsession)
Inks- Versafine Clair; Distress inks
Paper- heavy white (Scribes Nook, Waterloo, Canada)
Accessories and Tools- Misti (My Sweet Petunia); Honeycomb eb folder (Sizzix); 
clear embossing powder

Tuesday, 14 April 2020

Sending Hugs

Good Morning
Having extra time on my hands has awarded me some time to watch the amazing and inspiring videos posted on FB and YouTube.  I am so grateful for the time and effort so many have put into these videos to help us keep creating and to try some new things.
This pandemic is so nasty but I am elated every day with the ingenuity and talents that are coming to the forefront.  The way the businesses are retooling machines to produce masks, PPE's etc., all needed to protect our frontline workers!  Neighbours helping neighbours by picking up groceries, leaving chalked messages on the sidewalks or by the artwork hanging in their front windows reminding everyone that we are all in this together.
It is truly uplifting in these times of need.

This is a simple card I created after watching Tim Holtz use his Marker Spritzer tool.  I have one and haven't used it in ages so decided to get it out and have a play with it.
Here's what it looks like:

You place a marker in the holder on the side and puff out air to spread the ink over your paper.

I wanted a nice white border on my card front, so I place the Rectangle Mask from A Colorful Life Designs over my paper.  Next, I laid the Diagonal Weave stencil over the mask and using some blue Crayola markers in the Spritzer, I sprayed the background.  When I was happy with the inking, I left the stencil in place and gave it one little spritz of water to help the colours blend.

I removed the stencil but left the mask in place then stamped the flowers to one side.  I removed the mask and stamped the sentiment from the Good Wishes sentiments by Penny Black.
Using my ScorPal, I scored a border all around the inked area.  I mounted it onto some blue cardstock, then onto a heavy white card base.

Thanks so much for coming by and taking a look.
Sending you out a big hug!

Discount Code for A Colorful Life Designs
*Just use the code KarenFan10 to get a discount on stencils and masks.*


Supplies
Stamps- Good Wishes (Penny Black); Insightful Garden (Unity)
Inks- Crayola Markers, Versafine 
Paper- heavy white (Scribes Nook)
Accessories and Tools- Diagonal Weave stencil (ACLD); Marvelous Rectangle Mask (ACLD);
Marker Spritzer tool (TH); ScorPal