Showing posts with label Visible Image. Show all posts

Saturday, 5 July 2025

Let's Get Creative

Good Morning
How fun is this! 
I used the newly released stencil from A Colorful Life Designs called 

I enjoyed creating this one and here's what I did.
  • I decided to go with a 'rainbow' theme and began by placing the Nautilus Swirl stencil over the outside edge of my white cardstock. I inked with some Fossilized Amber, Ripe Persimmon, Picked Raspberry, Wilted Violet and some Salty Ocean Distress Oxide ink.
  • I lifted the stencil, moved it to the side and repeated the process with the same colours.
  • I splattered the panel with my black Posca pen and set it aside to dry.
  • When it was dry, I stamped the sentiment and clear heat embossed it to help make it pop against the colourful background.  
  • I glued the panel onto a piece of white cardstock, then onto a piece of purple the finally onto a A2 sized card base.
  • I added some black gems around the sentiment to finish off my card.

Here is the stencil I used:

Thanks for taking a look.

Adding my card to these challenges:
Little Red Wagon- TO GO BOLDLY
Allsorts- FOR A CHILD or ANYTHING GOES
Cardz 4 Galz- WELCOME TO SUMMER

Supplies
Stamps- Just Be Happy (Visible Image)
Inks- DOX; Versafine Clair
Paper- Solar White
Accessories and Tools- stencil (A Colorful Life Designs); TE Blending Brushes;
Make Art Station (Ranger); black Posca pen, clear EB powder; black gems 

Friday, 13 December 2024

Falling Snow


Welcome
I can't believe how close we are to the big day!
I had fun creating this card...doing some stencil layering again.
I used 2 stencils from A Colorful Life Designs called:

So, here's what I did to create my card.
  • I cut a piece of white cardstock for my card front, then embossed it using a Dot Embossing Folder. Using some Tumbled Glass Distress Oxide ink, I gently rubbed over the embossing to make it show up.
  • Next, I placed the Falling Snow stencil over my embossed background and inked with some Peacock Feathers DOX ink.
  • I lifted that stencil off and replaced it with the Glittering Heavens stencil and inked again with more Peacock Feathers DOX ink.
  • I placed my stenciled card front into my Misti and stamped the large snowflake with some Uncharted Mariner DOX ink right up into the corner.
  • While that dried, I stamped the sentiment and then die cut it out.
  • I glued the stenciled panel onto a piece of white cardstock, then a piece of navy and then onto an A2 sized card base.
  • I used some foam tape to pop the sentiment up near the bottom and finally, added a silver gem to the middle of the snowflake.

Here are the stencils I used:


My Discount Code for A Colorful Life Designs:
KarenFan10

Thanks so much for coming by and taking a look.

Adding my card to these challenges:
Simon Says Monday- USE DIES FOR DIECEMBER
CRAFT- CHRISTMAS, THE LAST STRETCH
(the snow is here now so ready for Christmas)

Supplies
Stamps- Let it Snow (Visible Image); Holiday Sentiments (Photoplay)
Inks- DOX
Paper- Scribes Nook- Waterloo, Ont.
Accessories and Tools- stencils (A Colorful Life Designs); TE Blending Brushes;
Dot EB Folder (Sizzix); silver gem; Misti (My Sweet Petunia); 
foam tape

Wednesday, 2 October 2024

Snowy Christmas Greetings

Welcome
How can it be October already??
Well, a new month means a whole new lineup of great stencils from A Colorful Life Designs.
There are so many great ones this month too, including lots of the 'Grinch' so stay tuned for that!!
So meet the stencil I used today called:

So, here's what I did to create my card.
  • I began by creating the background first.  I got out my Gel Plate and pressed my Salty Ocean Distress Oxide ink pad directly onto my plate.  After I brayered it smooth, I pressed the Simple Christmas Trees stencil onto the plate and rubbed my cardstock over it to get the impression.
  • After I let the background dry, I placed it into my Misti and stamped the large snowflake over the middle of the panel with some Uncharted Mariner DOX ink.
  • I splattered the whole panel with my white Posca pen and set aside to dry.
  • Next, I die cut the shadow from the Snowy Greetings die right from the middle of my card front panel and glued the sentiment die that I cut with white cardstock onto it.
  • I glue the finished panel onto a piece of navy cardstock, then onto an A2 sized white card base.
  • I used some foam tape to pop the sentiment back into place, matching up the pattern.
  • Finally, I added some silver gems around the sentiment to add some sparkle.

Here is the stencil I used:

Discount Code for A Colorful Life Designs
(Affiliate with no extra cost to you) 

Thanks so much for coming by and taking a look.

Adding my card to these challenges:
Simon Says Wed.- ANYTHING GOES
Simon Says Mon.- CHRISTMAS/WINTER
Make My Monday- CREATE YOUR OWN BKG

Supplies
Stamps- Let it Snow (Visible Image)
Inks- DOX
Paper- heavy white (Scribes Nook- Waterloo, Ont.)
Accessories and Tools- stencil (A Colorful Life Designs); Gel Plate; Speedball Brayer;
Snowy Greetings die (SSS); white Posca pen; Misti (My Sweet Petunia); silver gems

Saturday, 6 July 2024

Congrats to You!


Welcome
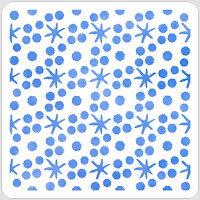
Today, I'm playing with another new fun released stencil from A Colorful Life Designs called:

So, here's what I did to create my card.
  • I placed a piece of white cardstock onto my Make Art Station, then I placed the Mid Century Pyramids stencil over that and inked with these Distress Oxide ink colours:  Salty Ocean, Ripe Persimmon and Lumberjack Plaid.
  • I lifted the stencil, cleaned it off and then added a few more of the circles to some of the open areas.
  • Using my white Posca pen, I added white dots to some of the circles and set aside to dry.
  • Next, I looked through my stash to find some cardstock scraps that were the same colours as the background and then I punched out circles from that.  I also punched out some black circles as well.
  • I glued some of the circles onto a small piece of white cardstock, then cut some of the circles to create the fun design.
  • I placed the stenciled card front into my Misti to stamp the sentiment and then glued it onto a piece of black cardstock and then onto an A2 sized card base.
  • I used some foam tape to pop up the square with the punched out circles on it.

Here is the stencil I used:

Discount Code for A Colorful Life Designs
(Affiliate with no extra cost to you) 

Thanks so much for coming by and taking a look.

Adding my card to these challenges:
Simon Says Mon.- ADD SOME RED/WHITE and/ OR BLUE

Supplies
Stamps- No Words (Visible Image)
Inks- DOX
Paper- heavy white (Scribes Nook- Waterloo, Ont.)
Accessories and Tools- stencil (A Colorful Life Designs); Make Art Station (Ranger);
white Posca pen; Misti (My Sweet Petunia); circle paper punch; foam tape

Friday, 14 June 2024

Fintastic Birthday Wishes to You!


Good Morning and Welcome
Meet one of the new stencils for June from A Colorful Life Designs called:
These fish look as though they are swimming around in a circle, but there is a perfect open space to add any kind of sentiment.

So, here's what I did to create my card.
  • I placed a piece of white cardstock onto my Make Art Station and then added the Fishy Frame stencil over that.
  • I inked with my Distress Oxides with these colours, varying them as I went along:  Cracked Pistachio, Peacock Feathers, Blueprint Sketch and some Uncharted Mariner.
  • I removed the stencil and diluted some Peacock Feathers DOX ink with water and used that to splatter over the fish.
  • When the panel was dry, I placed it into my Misti and stamped the sentiment into the open area.
  • I glued the panel onto a piece of mottled blue cardstock and then onto an A2 sized white card base.
  • Final step was to add 3 black gems right under the sentiment.

Here is the stencil I used:

Discount Code for A Colorful Life Designs
(Affiliate with no extra cost to you) 

Thanks so much for coming by and taking a look.

Adding my card to these challenges:
Simon Says Wed.- BRIGHT AND COLORFUL
Crafts Galore Encore- ANYTHING GOES
The Four Seasons- ANYTHING SUMMER GOES

Supplies
Stamps- Lost for Words (Visible Image)
Inks- Versafine Clair; DOX
Paper- heavy white (Scribes Nook- Waterloo, Ont.)
Accessories and Tools- stencil (A Colorful Life Designs); Make Art Station (Ranger);
TE Blending Brushes; black gems

Monday, 13 May 2024

Two Card Designs, One Stencil

Good Morning.
I've got 2 cards to show you today.
They both use the same stencil and same colours, but the background design looks totally different.

So, meet the newly released stencil from A Colorful Life Designs called 

So, here's what I did to create my cards.
  • I placed the Chunky Chevrons stencil over a piece of white cardstock and inked it up with some Picked Raspberry and some Ripe Persimmon Distress Oxide ink.
  • I wiped the stencil off, flipped it upside down and inked again with the same colours in the same areas.  It made a fun, patterned background.
  • I placed the stenciled panel into my Misti and stamped the flowers and the sentiment.
  • I splattered over the flowers with my black Posca pen.
  • I glued the finished piece onto some white cardstock, then orange and then onto an A2 sized card base.


So now onto CARD #2

  • I cut another piece of white cardstock and placed the Chunky Chevrons stencil onto the paper and inked with some Picked Raspberry and some Ripe Persimmon Distress Oxide ink.
  • I lifted the stencil off but to get a different look then the card above, I flipped the stencil upside down and then tried to match up the chevrons instead of off setting them and inked with the same colours again.
  • I placed the panel into my Misti and stamped the flowers to one side and added the sentiment to the side.  
  • I used my black Posca pen to splatter just around the flowers.
  • I glued the dried piece onto some pink cardstock and then onto an A2 sized card base.

Here is the stencil I used for both cards:

Discount Code for A Colorful Life Designs
(Affiliate with no extra cost to you) 

Thanks so much for coming by and taking a look.

Little Red Wagon- CREATE YOUR OWN BACKGROUND
Crafts Galore Encore- ANYTHING GOES
Sparkles- APRIL SHOWERS BRING MAY FLOWERS
Dragonfly Dreams- USE A STENCIL

Supplies
Stamps- CARD #1- Star Burst (Lavinia), Just Be Happy (Visible Image)
CARD #2- Noteworthy (STAMPlorations); Insightful Meadow (Unity)
Inks- Verafine Clair, DOX
Paper-heavy white (Scribes Nook- Waterloo, Ont.)
Accessories and Tools- stencil (A Colorful Life Designs); Misti (My Sweet Petunia); 
black Posca pen

Sunday, 20 August 2023

Let's Create


Hello and Welcome
Today's card features another wonderful geometric shaped stencil from A Colorful Life Designs called 

So, here's what I did to create my card.
  • I began by looking through my stash of inky backgrounds and found this one.  It was one that I had rolled my brayer off onto while I was Gel Plate printing.  It had some orange in the center and pink along the edges.  That was my starting point.
  • I took the panel and placed it onto my Make Art Station and positioned the Mid Century Angles stencil over that.
  • Next, I inked up the middle area with some Ripe Persimmon Distress Oxide ink and then used some Picked Raspberry DOX ink along the edges.
  • I removed the stencil and splattered with my white Posca pen.
  • To add a bit more interest to the design, I stamped a star into some of the open areas of the stenciled background.
  • When the ink was all dry, I placed the panel into my Misti to stamp the sentiment into the middle and clear heat embossed it.
  • I glued it onto a piece of pink cardstock, then onto an A2 sized card base.
  • Lastly, I added 3 black gems around the sentiment.

Here is the stencil I used:

Thanks so much for coming by and taking a look.

Adding my card to these challenges:
Simon Says Mon.- USE YOUR FAV TECHNIQUE (stenciling)
Shopping Our Stash- HOT, HOT, HOT (I used hot colours)

Supplies
Stamps- Just Be Happy (Visible Image); Feelin Fizzy (stars- Catherine Pooler)
Inks- DOX; Versafine Clair
Paper- heavy white (Scribes Nook)
Accessories and Tools- stencil (A Colorful Life Designs); Speedball brayer; white Posca pen,
Make Art Station (Ranger); Misti; TE Blending Brushes; clear eb powder; black gems

Friday, 18 August 2023

Floral Wishes


Hello and Welcome
Today's card features the new for August stencil from A Colorful Life Designs called 

So, here's what I did to create my card.
  • I cut a piece of white cardstock and placed it onto my Make Art Station.  I positioned the Halftone stencil over that and inked it up with some Lumberjack Plaid Distress Oxide ink.
  • I rotated the stencil from the top to the bottom and inked again.
  • I removed the stencil and inked around the edges with some more DOX ink.
  • I stamped the flower onto a scrap piece of white cardstock, stenciled it with the same stencil as above, then inked it with some Ripe Persimmon and Lumberjack Plaid DOX ink.
  • I splattered the flower head with my white Posca pen and when dry, I fussy cut it out.
  • In the meantime, I placed the stenciled panel into my Misti and stamped the whole flower to one side and the sentiment beside the flower.
  • I glued the panel onto a piece of red cardstock, then onto an A2 sized card base.
  • Finally, I used some foam tape to pop the flower head into place.


Here is the stencil I used:

Discount Code for A Colorful Life Designs
(Affiliate with no extra cost to you) 

Thanks so much for coming by and taking a look.

Adding my card to these challenges:
Simon Says Wed.- CLEAN AND SIMPLE
Crafting Happiness- ANYTHING GOES

Supplies
Stamp- Creative Chaos (Visible Image); Smile, Sparkle, Shine (Sizzix)
Inks- Versafine Clair, DOX
Paper- heavy white (Scribes Nook, Waterloo, Ont.)
Accessories and Tools- stencil (A Colorful Life Designs); white Posca pen,
Make Art Station (Ranger); Misti (My Sweet Petunia); foam tape

Saturday, 20 May 2023

Just Imagine- Use Your Stencil as a Stamp


Welcome
Today's card features the newly released Star Stretch stencil from A Colorful Life Designs.
I tried a new technique for this card and was pleased with the results as it gave a muted background.

So, here's what I did to create my card.
  • I got out a piece of white cardstock and my Star Stretch stencil.  I also got out a solid background stamp from Hero Arts called Paint Swatches.  You have to use a solid stamp for this technique.
  • Next, I inked up the solid stamp with some Uncharted Mariner Distress Oxide ink and pressed the stamp onto the Star Stretch stencil to pick up the pattern and stamped that onto my white cardstock.
  • I repeated that process until the whole panel was covered.
  • I placed the stenciled panel into my Misti and stamped the flowers to one side and the sentiment near the top.  I did heat emboss them to help make them pop.
  • I glued the finished panel onto a piece of black cardstock, then onto blue and then onto an A2 sized card base.
  • I added 3 black gems around the sentiment.

Here is the stencil I used:
Star Stretch

Discount Code for A Colorful Life Designs
(Affiliate with no extra cost to you) 

Thanks so much for coming by and taking a look.

Adding my card to these challenges:
Stamping Sensations- STENCIL AND STAMPING
Cardz 4 Galz- BACKGROUNDS
Bastel-traum- PLANTS/FLOWERS

Supplies
Stamps- Just Be Happy (Visible Image); Clover Silhouette (Magenta); Paint Swatches (HA)
Inks- Versafine Clair; DOX
Paper- Scribes Nook- Waterloo, Ont.
Accessories and Tools- stencil- ACLD; Make Art station (Ranger); Misti (My Sweet Petunia);
clear EB powder

Monday, 1 May 2023

Life's Journey


Welcome
Happy May!!!
It's a new month so that means it's time for some new stencil releases.
This Star Stretch stencil from A Colorful Life Designs made some pretty interesting patterns when I used it as a monoprint.

So, here's what I did to create my card.
  • I began by rubbing the entire back of the Star Stretch stencil with some Uncharted Mariner Distress Oxide ink, sprayed with a generous amount of water and pressed onto a piece of white cardstock.
  • I let the stencil sit on the paper for a bit, rubbing over it and giving the ink a chance to soak into the cardstock. I removed the stencil and let the piece dry.
  • While that dried, I placed another piece of white cardstock into my Misti, stamped the sentiment and fussy cut it out.
  • I placed the stenciled piece into my Misti and stamped the flowers with black ink.
  • I glued the panel onto a piece of matching blue cardstock, then onto an A2 sized card base.
  • Lastly, I pop dotted the sentiment over near the corner.

Here is the stencil I used:

Discount Code for A Colorful Life Designs
(Affiliate with no extra cost to you) 

Thanks so much for coming by and taking a look.

Adding my card to these challenges:
Simon Says Wed.- ANYTHING GOES

Supplies
Stamp- Just Be Happy (Visible Image); Valley Berries (Memory Box)
Inks- Versafine Clair; DOX
Paper- Scribes Nook- Waterloo, Ont.
Accessories and Tools- Misti (My Sweet Petunia); foam tape

Sunday, 22 January 2023

Snowflake


Welcome
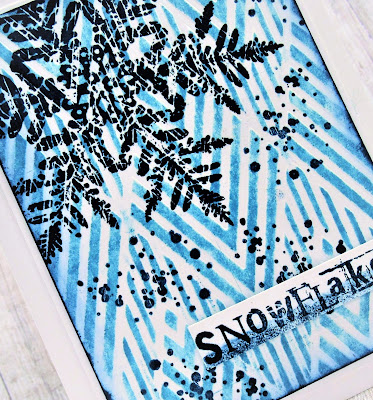
Today's card was a fun one to create using the new Three Diamonds stencil with an added twist.
Have you ever used a stencil to emboss your background?  That's what I did for the background.

So, here's what I did to create my card.
  • I decided to emboss the background using the Three Diamonds stencil.  To do that in your machine, you may have to experiment.  For my machine (Spellbinders Platinum)..... this is the sandwich I used:  Main Plate; Rubber Mat; cardstock; stencil; scrap paper; and top plate.
  • After my cardstock was embossed, I used my brayer to apply the colour by gently rolling over the raised embossing with some Broken China Distress Oxide ink. (I wish I could have captured the embossing look with the picture)
  • Next, using a blending brush, I rubbed some Uncharted Mariner DOX ink along the edges to give the panel a bit more definition.
  • I placed the embossed and inked piece into my Misti and stamped the snowflake into the top corner.  I love the distressed look of the snowflake.
  • I stamped the random dots that are included in the same set as the snowflake, around the snowflake.
  • Now for the sentiment....I looked through my scraps and found this one that I had cut off of the jeans pocket card I had made for my son.  I stamped the sentiment onto that using my Misti.
  • I glued the finished panel onto a piece of white cardstock, then onto an A2 sized card base.
  • I pop dotted the sentiment into the bottom corner.

Here is the stencil I used:

Discount Code for A Colorful Life Designs
(Affiliate with no extra cost to you) 

Thanks so much for coming by and taking a look.

Adding my card to these challenges:
Allsorts- STRIPES AND SPOTS
We Love Stamping- FAVOURITE COLOURS

Supplies
Stamps- Let it Snow (Visible Image)
Inks- Versafine Clair; DOX
Paper- Scribes Nook- Waterloo, Ont.
Accessories and Tools- stencil (ACLD); brayer; Misti