Showing posts with label celebrate. Show all posts

Sunday, 3 August 2025

Garden Celebration


Good Morning
I love the look of this newly released stencil from A Colorful Life Designs called 

So here's what I did to create my simple card.
  • I cut a piece of white cardstock, placed the Bauhaus Circle Mask stencil over that and inked it up with some Wilted Violet Distress Oxide ink.
  • When the ink was dry, I rubbed over the panel with an anti-static bag (to help prevent the embossing powder from sticking everywhere) and then placed it into my Misti.
  • I stamped the flowers along the bottom edge with some Versafine Clair ink and used some clear embossing powder to help the flowers pop against the background.
  • I repeated that process with the sentiment as well.
  • I glued the panel onto a piece of purple cardstock and then onto an A2 sized white card base.

Here is the stencil I used:


Thanks a lot for coming by and taking a look.

Adding my card to these challenges:
Simon Says Wed.- ANYTHING GOES
Krafty Chicks- ANYTHING GOES

Supplies
Stamps- Celebrate (IO, out of business); Garden (ISC- out of business)
Inks- Distress Oxide; Versafine Clair
Paper- Solar White
Accessories and Tools- stencil- (A Colorful Life Designs); TE Blending Brushes;
Clear EB powder (Lawn Fawn); Misti (My Sweet Petunia)

Sunday, 8 September 2024

Celebrate Fall

Good Morning
Fall is in the air with cooler mornings.  The leaves are turning colours which inspired my card.
Meet the newly released stencil from A Colorful Life Designs called

So, here's what I did to create my card.
  • I put a piece of white cardstock onto my Make Art Station and added the Blowing Leaves stencil over that.  
  • Next, I inked over the whole stencil using some Fossilized Amber, Ripe Persimmon and some Lumberjack Plaid Distress Oxide ink. I thought these colours were perfect for the colours of the changing leaves.
  • I used a rectangle die to cut right from the center of the stenciled leaves and set aside.
  • I glued my large card front panel onto a piece of rust coloured cardstock, then onto an A2 sized white card base.
  • I glued the smaller die cut panel onto the same rust cardstock and used some foam tape to position it back into place over my card front.
  • I die cut the sentiment from the rust cardstock and then cut it again 4 more times with some white. I glued them all together, offsetting a bit to help the sentiment show up better against the colourful background.  I glued that over the middle of  my card front.
  • Finally, I added 3 red gems under the sentiment to finish off my card

Here is the stencil I used:

Check out the bling too:

Discount Code for A Colorful Life Designs
(Affiliate with no extra cost to you) 

Thanks so much for coming by and taking a look.

Adding my card to these challenges:
Allsorts- AUTUMN COLORS or ANYTHING GOES
Inkspirational- MAKE YOUR MARK

Supplies
Stamps- none
Inks- DOX
Paper- heavy white (Scribes Nook- Waterloo, Ont.)
Accessories and Tools- stencil and gems (A Colorful Life Designs); TE Blending Brushes;
Infinity Rectangle dies (HA); Celebrate die (MFT)

Friday, 17 November 2023

So Happy!


Welcome
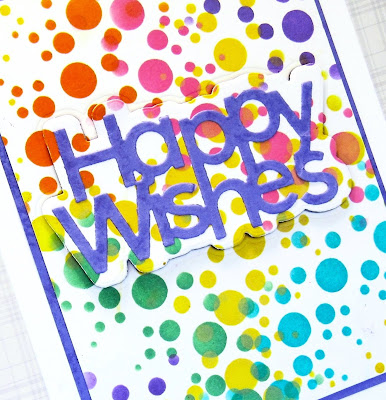
Today's card is featuring the new release from A Colorful Life Designs called
I used the stencil in a different way to get the fun and festive look.

So, here's what I did to create this fun card.
  • I placed a piece of white cardstock onto my Make Art Station and instead of centering the Star Ring stencil over my card panel, I just put a corner of the it on.  
  • I started inking with the lightest colour, wiped off the stencil and moved onto the other colours. I continually moved the stencil into different areas of my card front until it was all inked up. Here are the colours I used:  Fossilized Amber, Ripe Persimmon, Picked Raspberry, Cracked Pistachio, Peacock Feathers and Shaded Lilac Distress Oxide inks.
  • Next, I die cut the sentiment from a piece of purple cardstock and then I die cut the shadow for the sentiment right from the stenciled card front.  I glued those 2 together and set aside to dry.
  • I glued the stenciled panel onto another piece of purple cardstock and then onto an A2 card base.
  • I used some foam tape to pop the sentiment back into place over the front.

Here is the stencil I used:

Discount Code for A Colorful Life Designs
(Affiliate with no extra cost to you) 

MARK YOUR CALENDAR....

Thanks so much for coming by and taking a look.

Adding my card to these challenges:
Crafty Gals Corner- DOT/STRIPES
The Crafty Addicts- ANYTHING GOES
Crazy is Our Fame-Stencils are Our Game- NOVEMBER FUN option: LEAVES

Supplies
Stamps- none
Inks- DOX
Paper- heavy white (Scribes Nook- Waterloo, Ont.)
Accessories and Tools- stencil (A Colorful Life Designs); Make Art Station (Ranger); 
Happy Wishes sentiment die (SSS)

Tuesday, 30 May 2023

Celebrate BIG!


Welcome
Today's card features a new for May stencil from A Colorful Life Designs called Meteorites.
Just a fun little stencil to play with that I used to create a border.

So, here's what I did to create my card.
  • I cut a piece of white cardstock for my front panel.  I laid that onto my Make Art Station and positioned the Meteorites stencil over the first edge.  It is a smaller size stencil so easy to move around without having to mask.  I inked that up with some Mustard Seed Distress Oxide ink.
  • I moved the stencil around to another side of my card front panel and inked with more of the Mustard Seed until all the edges were inked.
  • I cleaned my stencil off and repeated that whole process again using some Ripe Persimmon Distress Oxide ink.
  • Lastly, I went all around the edges with some Picked Raspberry DOX ink to finish it off.
  • I die cut the white frame, placed it into my Misti and stamped the sentiment onto the center area.  It was the perfect fit.
  • I glued the stenciled panel onto a piece of orange cardstock, then onto an A2 sized card panel.
  • I used some foam tape to pop the sentiment right into the center of the panel.

Here is the stencil I used:

Discount Code for A Colorful Life Designs
(Affiliate with no extra cost to you) 

Thanks so much for coming by and taking a look.

Supplies
Stamp- Celebrate (IO- retired)
Inks- DOX, Versafine Clair
Paper- heavy white- Scribes Nook- Waterloo, Ont.
Accessories and Tools- stencil (ACLD); Make Art Station (Ranger); 
Braided Oval Frame die (Pinkfresh)

Wednesday, 24 May 2023

Celebrate in a Big Way

Good Morning.
Today's card features some stencil layering using 2 new stencils for May from A Colorful Life Designs called 
Layering your stencils can give you a whole different look.

So, here's what I did to create my card.
  • I cut a piece of white cardstock and placed it onto my Make Art Station.  I put the Contrails stencil over my paper and inked it up with some Cracked Pistachio Distress Oxide ink.
  • Leaving that stencil in place, I positioned the Star Stretch stencil over that and inked it up with some Evergreen Bough DOX ink. By leaving the first stencil in place and inking over, it allowed the white areas of the first stencil to still show through.
  • I removed both stencils and splattered the whole panel with my white Posca pen.
  • Next, I placed the inked panel into my Abstract Rounds embossing folder and ran it through my machine to emboss it.
  • I took the Evergreen Bough ink pad and keeping it flat, I dragged it across the panel, depositing ink just over the raised areas created by the embossing folder.
  • I die cut the sentiment from the center of the panel and set aside.  I wanted a shadow and this die does not come with a shadow, so I made my own.  I traced around the outside edge of the die onto some white cardstock and fussy cut it out, then glued the sentiment onto it.
  • I glued the stenciled panel onto a piece of dark green cardstock, then onto an A2 sized card base.
  • I used some foam tape to pop the sentiment into place over the background and finally, added some green gems around the sentiment.

Here are the stencils I used:


Discount Code for A Colorful Life Designs
(Affiliate with no extra cost to you) 

Thanks a lot for coming by and taking a look.

Adding my card to these challenges:
Simon Says Wed.- ADD A SENTIMENT
Paper Minutes- EMBOSSING
The Paper Funday- EMBOSS IT

Supplies
Stamps- none
Inks- DOX
Paper- Scribes Nook- Waterloo, Ont.
Accessories and Tools- stencils (ACLD); Make Art Station (Ranger); TE Blending Brushes;
white Posca pen; Abstract Rounds EB folder (Sizzix); Celebrate die (MFT)

Thursday, 9 March 2023

Celebrate Dotted Wreath


Welcome
Today's card is a simple CAS using the Dotted Wreath stencil from A Colorful Life Designs.
Just a fun stencil to play around with.

So, here's what I did to create my card.
  • I cut a piece of white cardstock and then laid it onto my Make Art Station.
  • I positioned the Dotted Wreath stencil to one side and inked it up with some Mustard Seed Distress Oxide ink.
  • I wiped the stencil off and moved it over a bit and inked with some Carved Pumpkin DOX ink.  I repeated that process again and inked with some Lumberjack Plaid DOX ink.
  • I removed the stencil and placed the panel into my Misti to stamp the sentiment in the middle.
  • To add more interest, I inked along the edges of the panel with some more of the Lumberjack Plaid.
  • Next, I glued the inked panel onto a piece of white cardstock, then onto a piece of orange then finally onto an A2 card base.
  • I added 3 black gems around the sentiment.

Here is the stencil I used:

Discount Code for A Colorful Life Designs
(Affiliate with no extra cost to you) 

Thanks so much for coming by and taking a look.

Adding my card to these challenges:
Unicorn Challenge- DOTS/STRIPES
Corrosive Challenge- ANYTHING GOES
AAA Birthday Game #47- STRIPES/ DOTS

Supplies
Stamp- Celebrate (IO)
Inks- DOX, Versafine Clair
Paper- Scribes Nook- Waterloo, Ont.
Accessories and Tools- stencil (ACLD); TE Blending Brushes; Misti;
Make Art Station (Ranger)

Friday, 29 July 2022

Trash to Treasure


Good Morning
A bit of a different card today as I am playing along with some of the challenges at Splitcoast Stampers.
The challenge was to recycle...I knew I had saved this tissue box for a reason!  
Loved the vibrant colours.

So here's what I did to create my card.
  • Like I mentioned above, my starting point was this beautiful tissue box I had saved.  I took it out, cut it down for my card front panel.
  • I die cut the 'celebrate' right into the middle of the panel.
  • I die cut the sentiment 4 more times with some white cardstock (in hindsight, I should have cut them in black but oh well) stacked them and glued them all together.
  • I glue the panel onto a piece of matching yellow cardstock, then onto some black and then onto an A2 white card base.
  • I glued the sentiment back into place and added 3 black gems.

Thanks so much for coming by and taking a look.

Adding my card to these challenges:
Simon Says Wed.- ANYTHING GOES
Addicted to CAS- ANY OCCASION
Cardz 4 Guys- RECYCLE

Supplies
Stamps- none
Inks- none
Paper- Scribes Nook (Waterloo, Ont.)
Accessories and Tools- die (MFT); black gems

Tuesday, 21 June 2022

Celebrate Good Times!


Hello and Welcome
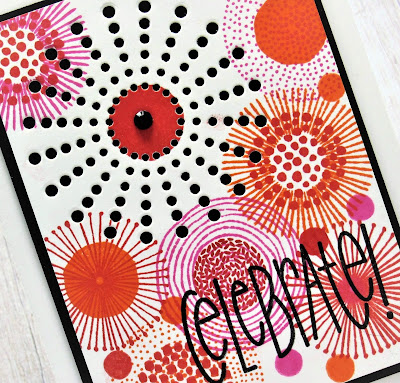
For this card, I pulled out a fun set from Simon Says called Amazing. 
 It is filled with lots of fun elements.
  
So here's what I did to create my card.
  • I cut a piece of white cardstock and got out some Picked Raspberry and some Festive Berries Distress ink.  
  • I placed various images into my Misti and just started to stamp away, varying the colours a bit until the card base was covered.
  • When I was happy with the coverage of stamping, I stamped the sentiment along the bottom in black to make it pop.
  • Looking at the stamped panel, I felt it need something so I used this sunburst die (no longer available) to add some interest.  
  • I glued the stamped panel onto a piece of black cardstock, then onto a heavy white card base.
  • I added a black gem to the center of the sunburst.


Thanks so much for coming by and taking a look.

Adding my card to these challenges:
Simon Says Wed.- ADD A SENTIMENT
Crafting Happiness- ANYTHING GOES

Supplies
Stamps- Amazing (SSS); Celebrate (Impression Obsession)
Inks- DOX, Versafine Clair
Paper- heavy white (Scribes Nook- Waterloo, Ont.)
Accessories and Tools- Misti (My Sweet Petunia); Sunburst die (IO- discontinued);
black gem

Sunday, 29 May 2022

Stacked Die Cuts or Faux Embossing

Hello and Welcome

It's my turn to host the TLC Challenge over at Splitcoast Stampers.
Every week there is a new and fun technique to try.  
I chose a simple one that everyone could play along with as most would likely have all the needed supplies to do the challenge.
So I'm calling my challenge:

So here's what I did to create my card.
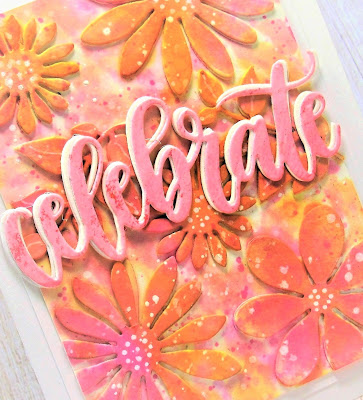
  • I began by looking through my dies and found these flowers and leaves.  Chose some fairly simple dies for this project.
  • Next, I die cut each flower three times, stacked and glued them together.
  • I repeated that process until I had 5 stacked flowers for my card front.  I did the same with the leaves.
  • I positioned the flowers and the leaves on my card base that was 3 3/4 x 5" and when I was happy with the spacing, I glued them all down into place. NOTE: some of the flowers hung over my card front panel and had to be trimmed a bit.
  • To add some colour to the panel, I pressed some Carved Pumpkin, Mustard Seed and some Picked Raspberry Distress Oxide ink onto a piece of acetate and sprayed with water to dilute it.  I press the panel directly into the wet ink to add the colour.  There were still a lot of white areas, so I added some more of the leftover ink using a wet paintbrush.
  • While the panel dried, I die cut the 'Celebrate' sentiment 3 times, glued them together and added colour in the same way as I did on the panel.  It was a bit lost when I held it over the panel, so I glued a white die cut offset behind it to make it be more visible.
  • When all was dry, I splattered the panel with my white Posca pen and added dots to the flower centers.
  • I glued the panel onto a heavy white card base, then glued the sentiment over that.


Thanks so much for coming by and taking a look.

Adding my card to these challenges:
Simon Says Wed.- ANYTHING GOES
Little Red Wagon- SENTIMENT AS MAIN FOCUS
Alphabet Challenge- 'D' FOR DIE CUTS


Supplies
Stamps- none
Inks- DOX
Paper- heavy white (Scribes Nook- Waterloo, Ont.)
Accessories and Tools- die cuts (unknown, gifted to me); die cutting machine,
white Posca pen; Nuvo glue; Celebrate die (MFT) 

Friday, 8 April 2022

Confetti Time


Good Morning and Happy Friday!!
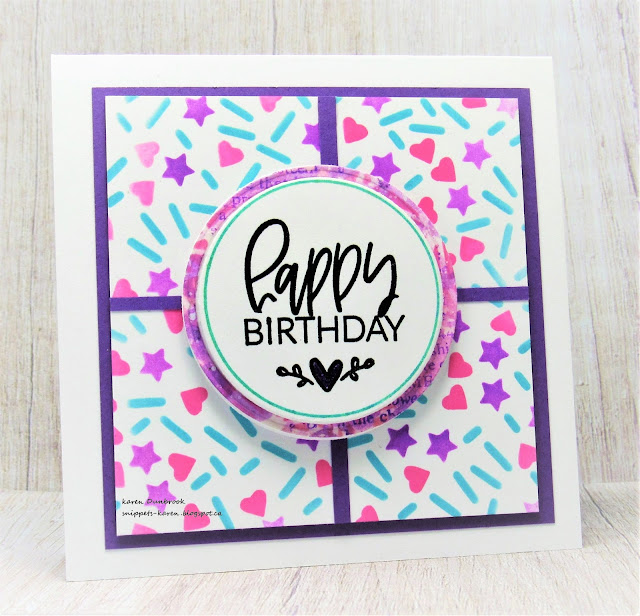
Today's card is a simple one using a fun layering stencil set from ACLD called Layered Party.
This 3 stencil set is super fun to play with to create a festive feeling card.  You could use the stencils separately or layer them all together.....lots of possibilities.  

So here's what I did to create my card.
  • I cut a square that was 3 3/4" square and placed it onto my Stencil Mat.  I placed Stencil #1 over my paper (the pieces of confetti) and inked it up with some Peacock Feathers Distress Oxide ink.
  • Next, I removed that stencil and replaced it with Stencil #2 (the hearts) and inked them up with some Picked Raspberry DOX ink then repeated that process with the last Stencil #3 (the stars) and inked them up with some Wilted Violet.
  • I set that aside to dry and die cut a circle for my sentiment. I stamped the sentiment using my Misti with some black Versafine Clair.
  • I found this scrap circle in my stash and it matched all the colours on my card, so I used that as a backer for my sentiment.
  • I glued the stenciled square onto a piece of purple cardstock.  When I cut down the purple, I had these strips leftover, so I decided to add them as cross pieces over the stenciling to add more interest.
  • I glued the panel onto a white card base that measured 4 1/4 square.
  • I pop dotted the sentiment into the center of my card.


Here is the stencil set I used:

Discount Code for A Colorful Life Designs
(affiliate with not extra cost to you)

Thanks so much for coming by and taking a look.
Have a wonderful weekend!

Adding my card to these challenges:
Simon Says Wed.- HAPPY BIRTHDAY
CAS on Friday- STENCIL
Aud Sentiments- BIRTHDAY


Supplies
Stamps- Everyday Circle Tags (Avery Elle)
Inks- Distress Oxides; Versafine Clair
Paper- heavy white (Scribes Nook- Waterloo, Ont.)
Accessories and Tools- Layered Party stencils (ACLD); Stencil Mat (Waffle Flower);
TE Blending Brushes; Infinity Circle Dies (HA); foam tape;
Misti (My Sweet Petunia)