Showing posts with label STAMPlorations. Show all posts

Tuesday, 2 April 2024

Swirl Around


Good Morning
It's an exciting day at A Colorful Life Designs as the newest release is up.
I used this lovely new stencil to create my card called 
I paired it with an older stencil called Simple Mosaic for a fun rainbow type card.

So, here's what I did to create my card.
  • I placed a piece of white cardstock onto my Make Art Station and put the Swirl Around stencil over that.  I inked from top to bottom with these Distress Oxide colours:  Fossilized Amber, Ripe Persimmon, Picked Raspberry and Peacock Feathers.
  • Leaving that stencil in place, I put the Simple Mosaic stencil right over the top and inked again using the same colours in the same areas.  It added such great interest to the design.
  • I removed both stencils and used the ink left on my blending brushes to add some colour around the outer edges of stenciling.
  • Next, I placed the card front into my Misti, rubbed it with my anti-static bag before stamping the sentiment.  I clear heat embossed it to help it pop.
  • I covered the sentiment and splattered the panel with my white Posca pen.
  • I glued the stenciled panel onto a piece of white cardstock, then onto a piece of red and then finally, onto an A2 sized card base.  I also added 3 black gems around the sentiment.

Here are the stencils I used:


Discount Code for A Colorful Life Designs
(Affiliate with no extra cost to you) 

Thanks so much for coming by and taking a look.

Adding my card to these challenges:
Simon Says Wed.- ANYTHING GOES
Simon Says Monday- WHATEVER THE WEATHER
(rainbow)
Crafts Galore- ANYTHING GOES

Supplies
Stamps- Life is Art (STAMPlorations)
Inks- DOX, Versafine Clair
Paper- heavy white (Scribes Nook- Waterloo, Ont.)
Accessories and Tools- stencils (A Colorful Life Designs); Make Art Station (Ranger);
TE Blending Brushes; white Posca pen; black gems

Thursday, 15 December 2022

All Wrapped Up


Welcome
Today's card features a new stencil from A Colorful Life Designs called Christmas Cover.

So, here's what I did to create my card.
  • I masked the top part of my card panel, laid just the snowflake part of the stencil over the top part of my card front and inked it up with some Broken China Distress Oxide ink.  I shaded a bit with some Prize Ribbon DOX next.
  • When I was finished inking the top, I moved the masks and then moved the stencil down to the bottom area and inked again, this time including the bow.
  • I removed the stencil and stenciled just the bow again onto another piece of cardstock.  I did that because I wanted to fussy cut it out so I could pop it over the flat panel.
  • I did some inking in the background with some Peacock Feathers Distress Oxide ink to help fill in the white space, then splattered with my white Posca pen.
  • Next, using my Scor-bug, I scored some lines along the edges of the inking and into the white area.
  • I die cut the sentiment, then inked it up as well with the same colours as mentioned above and splattered.
  • I glued the panel onto and A2 sized card base and popped the sentiment up near the top of the panel.
  • I fussy cut out the bow I had inked up on a separate piece of cardstock and popped that over the stenciled background.  It worked so great and added a lot more interest then just leaving it flat.


Here is the stencil I used:


Discount Code for A Colorful Life Designs
(Affiliate with no extra cost to you) 

Thanks so much for coming by and taking a look.

Adding my card to these challenges:
Simon Says Wed.- ICE COLD
Crafty Gals Corner- TIS THE SEASON


Supplies
Stamps- none
Inks- DOX
Paper- Scribes Nook- Waterloo, Ont.
Accessories and Tools- stencil (ACLD); TE Blending Brushes; white Posca pen;
Scor-Bug; Be Jolly die (STAMPlorations)

Wednesday, 23 March 2022

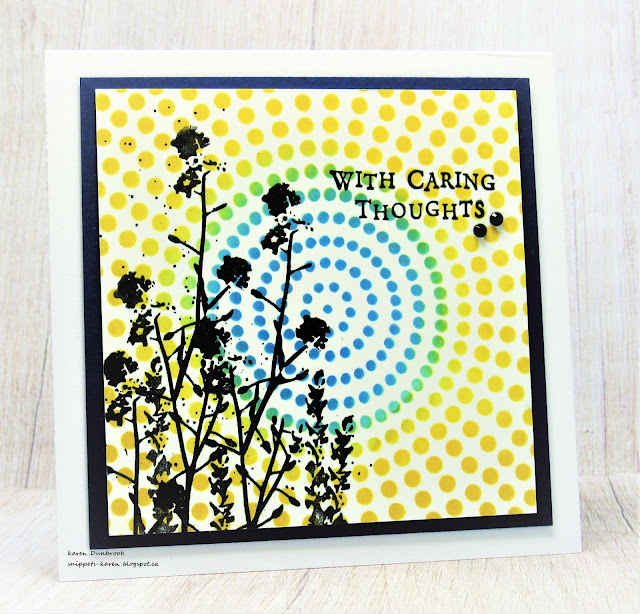
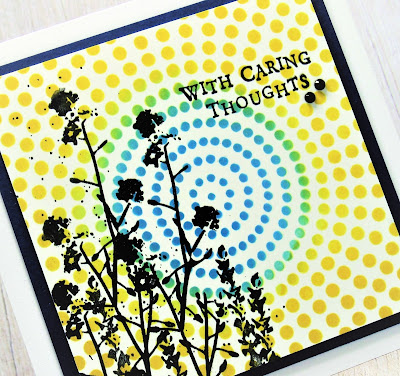
Caring Thoughts for Ukraine


Welcome
Everyday, we continue to hear about the horrible plight the Ukrainian people face.
I decide to use the colours of their flag to make another card in support for this senseless war.


So here's what I did to create my card.
  • I began by cutting a front panel 3 3/4" square from some white cardstock.  I took out the Dot Circle stencil from ACLD and positioned it over my paper then inked up the middle area with some Salty Ocean Distress Ink. 
  • When the center was inked, I inked up the rest of the stencil with some Mustard Seed DOX ink.  I should have cleaned off the stencil before adding the yellow because I did get a bit of green where the 2 colours blended together.
  • I removed the stencil and placed the panel into my Misti to stamp the flowers and the sentiment.
  • Using my black Posca pen, I added some splatters just over the flowers.
  • I glued the finished panel onto a piece of black cardstock, then onto a white card base that measured 4 1/4" square.
  • I added 2 black gems just under the sentiment.

Here is the stencil I used:

Discount Code for A Colorful Life Designs
(affiliate with no extra cost to you)

Thanks so much for coming by and taking a look.

Adding my card to these challenges:
Try it on Tuesday- SAY IT WITH FLOWERS
Unicorn Challenge- DOTS and/or STRIPES
STAMPlorations- NEVER ENDING


Supplies
Stamps- Caring Thoughts (Hero Arts); Beautiful You (STAMPlorations)
Inks- Distress Oxides, Versafine Clair
Paper- heavy white- (Scribes Nook- Waterloo, Ont.)
Accessories and Tools- Circle Dot stencil (ACLD); Misti (My Sweet Petunia); 
TE Blending Brushes; black Posca pen; black gems

Saturday, 22 May 2021

Rainbow Celebrate


Welcome
Meet today's card.
Just a fun one I created using lots of rainbow colours of Distress Oxide inks and one stamp from Stamplorations with a repeated pattern.

So here's what I did to create my card.
  • I cut my card panel from a piece of heavy white cardstock.  I looked through my Distress Oxide inks and settled on these colours in order.... Picked Raspberry, Barn Door, Fossilized Amber, Cracked Pistachio, Peacock Feathers and finally some Blueprint Sketch.
  • Next, I positioned my card panel into my Misti with one of the stamps from the Mixed Media set from Stamplorations, inked it up with some Picked Raspberry and stamped it to the far left.  The great thing about using the Misti stamping tool is that it has a grid to help guide your stamping.
  • I continued to repeat stamping the pattern by moving my panel in my Misti and using the above mentioned colours.
  • When I was happy with the stamping, I splattered using a wet paint brush with all the colours by diluting them on my TH Glass Mat.  I also used my Posca black pen for a bit more drama.
  • When the panel was totally dry, I placed the 'celebrate' die carefully over the stamped area and secured it with a piece of low tack tape.  I ran it through my Spellbinder Platinum to die cut it out.  Be sure to keep all the pieces intact...I use a little tray to contain it all...you will need all those little cut away pieces!
  • I stamped the small sentiment under the die-cut area with some black Versafine Clair in my Misti.
  • I die-cut the sentiment 3 more times from some white cardstock and then glued all the 4 pieces together.  
  • I glued the panel onto a piece of black cardstock, then fit the 'celebrate' back into the cut away area.  I fit and glued all the small pieces back into place to create an embedded or otherwise called an eclipse sentiment.  
  • I glued it all to a white card base, then added 3 black gems to pull it all together.


Thanks so much for coming by and taking a look.

Adding my card to these challenges:
STAMPlorations- NEVERENDING CHALLENGE

Simon Says Wed.- USE DIES or PUNCHES
Addicted to Stamps and More- DIES AND/or STENCILS


Supplies
Stamps- Mixed Media (STAMPlorations); Tiny Words (SSS)
Inks- DOX (all mentioned above); Versafine Clair
Paper- heavy white (Scribes Nook- Waterloo, Ontario)
Accessories and Tools- Misti (My Sweet Petunia); black gems; Posca Pen; paintbrush;
Celebrate die (MFT); Spellbinder Platinum die cutting machine; Nuvo glue

Sunday, 14 February 2021

Friends


Good Morning
I hope all is well in your part of the world.
Happy Valentine's Day....great day to show our family and friend how much we love them.
Where I live, we are still in lockdown and I am missing my friends so much!
I still had my Vicki Boutin Art Crayons out from the other day, so I decided to use them again to create this background.  I love how this turned out.

So here's what I did to create my card.
  • I began with a card panel cut from some heavy white cardstock.  I rubbed some of the yellow Art Crayon onto a piece of acetate, sprayed with a generous amount of water and blended with a paint brush.  When it was all mixed and diluted, I pressed onto my card front and dried.
  • I used some greens and blues to add the additional colours.  **Vicki's crayons come in 3 different sets; Neutrals (brown, grey), Warm (reds, orange, yellow) and Cool (blues, greens).  The great thing about these crayons is that you can mix them to create your own custom colours.**
  • I added some more Art Crayon to my acetate sheet, diluted that and used it as a stamp pad to add the background letters using the Faded Text stamp.
  • I dried the panel completely, then placed it into my Misti and stamped the flowers from STAMPlorations with some Versafine Clair ink.
  • I stamped the sentiment from Impression Obsession to the one side.
  • Using my black Posca pen, I splattered with black, then mounted onto a piece of coordinating cardstock and then onto a heavy white card base.


Thanks so much for coming by and taking a look.

Supplies
Stamps- Beautiful You (STAMPlorations); Friends (IO)
Inks- Vicki Boutin Art Crayons; Versafine Clair Noir
Paper- heavy white (Scribes Nook, Waterloo, Ontario)
Accessories and Tools- Misti (My Sweet Petunia); sheet of acetate; Posca pen


Monday, 7 December 2020

Christmas Reindeer


Good Morning and Welcome
Meet today's card.
I am so trying to use up some of my backgrounds and pieces that I have used to brayer off when using my Geli Plate.  
For those of you that are not familiar with using the Geli Plate, you add paint but then have to brayer it smooth.  Often that involves removing some paint onto a piece of paper.  I keep those to use as bkgs.
That's how this card started; as a piece that I brayered off blue acrylic paints.

So here's what I did to create my card.
  • I took this piece of acrylic painted cardstock and ran it through my Cuttlebug with the Cut and Stitch circle die from Penny Black.
  • I used the leftover piece to die cut the reindeer from STAMPlorations and set it aside.
  • I cut a piece of white cardstock and dry embossed it using a Distressed Stripes folder to give some interest.  I glued that onto my card front panel, then glued the blue die-cut piece over that.
  • I added some pop dots to the back of the reindeer and mounted that into the center of the circle.
  • I stamped the sentiment from Taylored Expressions and also pop dotted that under the deer. (the strip die is a part of that set)
  • I added black gems all around the circle to add more interest and a bit of colour.
  • Lastly, I mounted it onto a heavy white card base.

Thanks for looking.

Adding my card to these challenges:
Simon Says Wed.- FUN WITH DIES

Supplies
Stamps- Christmas Sentiments (Taylored Expressions)
Inks- Versafine Clair
Paper- heavy white (Scribes Nook0
Accessories and Tools- acrylic paint; brayer; Cut and Stitch Circle (PB); Cuttlebug;
Distressed Stripes EB Folder (Provo); pop dots; black gems

Monday, 7 September 2020

Beautiful Together


Good Morning
Meet today's card.
A pretty simple one using a Splash Watercolour Technique background.

So here's what I did to create my card.
  • I began with a piece of heavy white cardstock.  I rubbed some Salty Ocean, Wilted Violet, Peacock Feathers and Twisted Citron Distress Oxide ink onto my non-stick craft mat.  
  • I sprayed the inks with water, then slapped my paper into the wet ink.  You get more of a mottled looking background then if you would press the paper directly into the wet ink.
  • When dry, I cut the panel down to 3 1/2 x 4 3/4" and I placed the panel into my Misti.  I stamped the flowers from the Stamplorations set called Beautiful You.
  • I had a little piece of inked cardstock left, so I stamped the sentiment from the same set onto it with some Versafine Clair and clear heat embossed it.  I mounted it onto a small piece of white cardstock.
  • I glued the panel onto some purple cardstock, then onto a heavy white card base.
  • I pop dotted the sentiment over the background, then added 3 black gem


Adding my card to these challenges:
Simon Says Wed.- STAMP IT
Sweet Stampin- ANYTHING BUT A BIRTHDAY CARD
Corrosive Challenge- ANYTHING GOES
STAMPlorations- NEVER ENDING ANYTHING GOES


Thanks so much for coming by and taking a look.


Supplies
Stamps- Beautiful You (STAMPlorations)
Inks- DOX, Versafine Clair
Paper- heavy white (Scribes Nook)
Accessories and Tools- Misti (My Sweet Petunia); black gems; pop dots; non-stick craft mat;
water mister (TH); clear eb powder

Tuesday, 21 April 2020

Blowing Bubbles


Hello and Welcome!
And now for some more fun......blowing more bubbles!
A few weeks ago, I hosted the Technique Lovers Challenge over at Splitcoast Stampers.  We did some bubble blowing you can see here:

I began by placing my Oval Acrylic Mask from A Colorful Life Designs onto my paper.  I used some Post-It Tape to hold it in place.  I filled a shallow dish with some water, soap and some Carved Pumpkin Distress re-inker and started blowing bubbles.  As soon as they come over the top, I pressed my paper over them to make the bubbles break and colour my paper. I found that the re-inkers are more concentrated so gave much deeper colour to the bubbles.  I repeated that process until I was happy with the coverage.
I left the mask in place and stamped the flowers and the sentiment from STAMPloration when it was all dry.  I mounted it onto some orange cardstock then onto a heavy white card base.  


Thanks so much for coming by and taking a look.

Discount Code for A Colorful Life Designs
*Just use the code KarenFan10 to get a discount on stencils and masks.*


Supplies
Stamps- Beautiful You (STAMPlorations)
Inks- Versafine Clair; Distress re-inker
Paper- heavy white (Scribes Nook)
Accessories and Tools- Dawn Dish soap; straw; Marvelous Oval Masks (ACLD)