Showing posts with label jolly. Show all posts

Thursday, 21 December 2023

Sending Holly and Jolly


Welcome
Todays card is a fun one using a stencil from A Colorful Life Designs called

So, here's what I did to create my card.
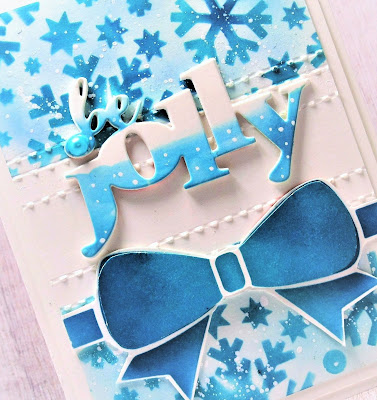
  • I placed a piece of white cardstock onto my Make Art Station and positioned the Flurries stencil over that.
  • I began in the middle of the panel and inked it up with some Peacock Feathers Distress Oxide ink.  I inked on either side of the middle next with some Salty Ocean DOX ink and then some Villainous Potion along the top and the bottom edges.
  • Using the eraser on the end of a pencil, I added some dots into the open areas using the same colours mentioned above.
  • When the panel was dry, I added white dots to the snowflake and then splattered using my white Posca pen.
  • I die cut the sentiment shadow from the center of the card front and then cut the letters from some matching inked cardstock.  I glued the sentiment onto the shadow die cut.
  • I glued the panel onto a piece of purple cardstock, then onto an A2 sized card base.
  • Finally, I added the sentiment with some foam tape, matching up the inked pattern.

Here is the stencil I used:

Discount Code for A Colorful Life Designs
(Affiliate with no extra cost to you) 

Thanks so much for coming by and taking a look.

Adding my card to these challenges:
Little Red Wagon- UNDER PRESSURE
Simon Says Monday- LET IT SNOW

Supplies
Stamps- none
Inks- Distress Oxide
Paper- heavy white (Scribes Nook- Waterloo, Ont.)
Accessories and Tools- stencil (A Colorful Life Designs); TE Blending Brushes;
Make Art Station (Ranger); Holly Jolly die (Catherine Pooler); foam tape;
white Posca pen

Friday, 13 October 2023

Candy Stripes


Welcome
Meet today's card.
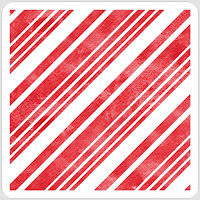
A simple one using the newly released Candy Stripes stencil from A Colorful Life Designs.

So, here's what I did to create my card.
  • I cut a piece of white cardstock and placed it onto my Make Art Station.  
  • I positioned the Candy Stripes stencil over my cardstock and inked it up with some Barn Door Distress Oxide ink.
  • I lifted the stencil off and repositioned it going in the other direction so the stripes would intersect each other.  I inked that with some Lumberjack Plaid DOX ink.
  • I removed the stencil and splattered with my white Posca pen.
  • When it was all dry, I die cut the circle directly from one side of the stenciled background.  I cut a white circle from another piece of cardstock and glued the 2 together.
  • I placed the die cut circle into my Misti to stamp the sentiment and I clear heat embossed it to help it pop.
  • I glued the stiped panel onto a piece of red cardstock and then onto a white A2 sized card base.
  • I used some foam tape to pop the circle back into place, matching up the stripes.
  • Lastly, I added 3 black gems just under the sentiment.

Here is the stencil I used:

Discount Code for A Colorful Life Designs
(Affiliate with no extra cost to you) 

Thanks so much for coming by and taking a look.

Adding my card to these challenges:
Simon Says Wed.- CHRISTMAS
Krafty Chicks- CHRISTMAS

Supplies
Stamps- Holly Jolly (Technique Tues.)
Inks- Versafine Clair; DOX
Paper- heavy white (Scribes Nook- Waterloo, Ont.)
Accessories and Tools- stencil (A Colorful Life Designs); Make Art Station (Ranger);
TE Blending Brushes; clear eb powder; Hero Arts Infinity Circle die; black gems 

Thursday, 31 August 2023

Holly Jolly


Good Morning
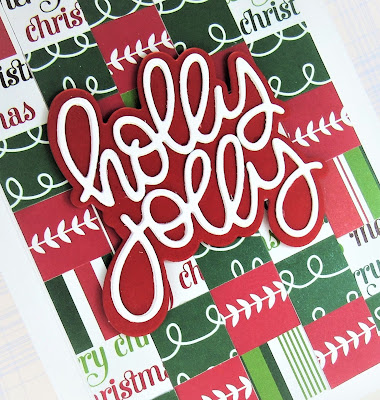
I'm working on getting some Christmas cards done and this one uses a technique called Bargello.
It is such a great way to use some of the paper strips we all have saved in our stash.
I went with some Christmas papers I had on hand.

So, here's what I did to create my card.
  • To do this technique, first, you cut scraps of paper into strips.  I cut my strips into 1/2".
  • Next, I glued the strips from top to bottom onto another piece of cardstock, placing them right beside one another.
  • After the glue was dry, I cut another piece of cardstock to use as the base for my finished strips.  I cut the strips panel into more strips again and glued them onto the cardstock, OFFSETTING them to create the look.  If that doesn't make sense go watch this video:  Bargello technique - YouTube
  • I added the finished panel to an A2 sized card base.
  • I die cut the sentiment from white cardstock, then glued that onto a red shadow base.  I used some foam tape to pop it over the finished background.

Thanks so much for coming by and taking a look.

Adding my card to these challenges:
Simon Says WED.- ANYTHING GOES
Little Red Wagon- SMALL or BIG (big sentiment)

Supplies
Stamps- none
Inks- none
Paper- heavy white (Scribes Nook- Waterloo, Ont.); various scraps of Christmas paper
Accessories and Tools- die (Catherine Pooler)

Thursday, 15 December 2022

All Wrapped Up


Welcome
Today's card features a new stencil from A Colorful Life Designs called Christmas Cover.

So, here's what I did to create my card.
  • I masked the top part of my card panel, laid just the snowflake part of the stencil over the top part of my card front and inked it up with some Broken China Distress Oxide ink.  I shaded a bit with some Prize Ribbon DOX next.
  • When I was finished inking the top, I moved the masks and then moved the stencil down to the bottom area and inked again, this time including the bow.
  • I removed the stencil and stenciled just the bow again onto another piece of cardstock.  I did that because I wanted to fussy cut it out so I could pop it over the flat panel.
  • I did some inking in the background with some Peacock Feathers Distress Oxide ink to help fill in the white space, then splattered with my white Posca pen.
  • Next, using my Scor-bug, I scored some lines along the edges of the inking and into the white area.
  • I die cut the sentiment, then inked it up as well with the same colours as mentioned above and splattered.
  • I glued the panel onto and A2 sized card base and popped the sentiment up near the top of the panel.
  • I fussy cut out the bow I had inked up on a separate piece of cardstock and popped that over the stenciled background.  It worked so great and added a lot more interest then just leaving it flat.


Here is the stencil I used:


Discount Code for A Colorful Life Designs
(Affiliate with no extra cost to you) 

Thanks so much for coming by and taking a look.

Adding my card to these challenges:
Simon Says Wed.- ICE COLD
Crafty Gals Corner- TIS THE SEASON


Supplies
Stamps- none
Inks- DOX
Paper- Scribes Nook- Waterloo, Ont.
Accessories and Tools- stencil (ACLD); TE Blending Brushes; white Posca pen;
Scor-Bug; Be Jolly die (STAMPlorations)

Thursday, 2 December 2021

Have a Holly Jolly


Hello
So glad you could drop in.
I want to apologize.
I owe so many of you a visit...my life is a crazy one working with my 5 little daycare kiddos and preparing for Christmas.  There just are not enough hours in the day!!
Anyways, I found some paper strips in my stash, so decided to make them into a card.

So here's what I did to create my card.
  • Like I mentioned above, I found some paper strips in the box where I keep all my Christmas papers.  I seldom use papers from that box, but these vintage style ones inspired me to make another card using the Disappearing Nine Patch Background. Super simple with fun results. (you can click on the link to see the tutorial) Here is the first card I made using this technique.
  • I cut the paper strips to the right size following the tutorial and glued them onto a piece of cardstock that was 3" x 3".
  • After cutting them down into strips and gluing them again, I pop dot mounted the panel over some more of the papers scraps from the same paper collection.
  • I glued that onto a white card base. (my finished card is 4 1/4 x 4 1/4 so it will still fit into a standard size envelope)
  • I found this sentiment sticker in the box that I have had for ages, so I glued it over the patch background.

Thanks again so much for taking the time out of your day to come and visit.

Supplies
Stamps- none
Inks- none
Paper- heavy white (Scribes Nook- Waterloo, Ont.); dp (unknown)
Accessories and Tools- sentiment sticker (Dollar Store); foam tape