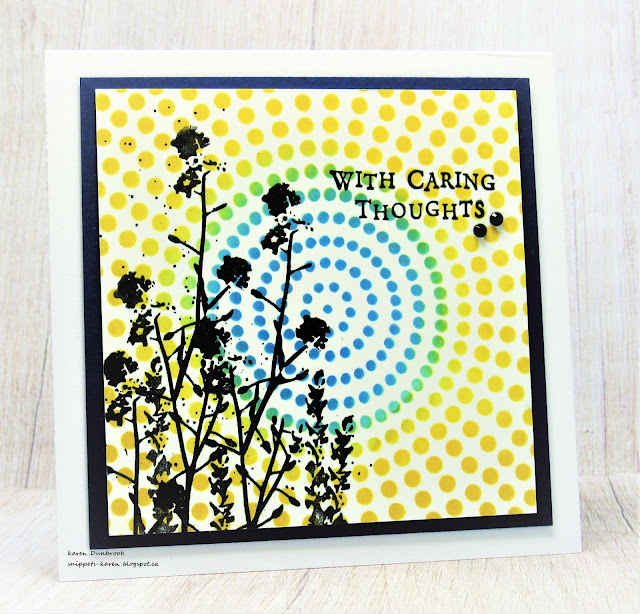
Showing posts with label dot circle. Show all posts

Thursday, 24 March 2022

Ideas and Words


Welcome
Meet today's card.
This one is a leftover piece of a white cardstock that I had inked up.
To see what I did with the other half, go HERE.

So here's what I did to create my card.
  • Like I mentioned above, this card front panel is part of a larger one that I cut down.  This leftover piece was just the right size to make a mini slimline card measuring  6" x 3".
  • This started as white cardstock that I inked up with some Mustard Seed, Dried Marigold and Picked Raspberry Distress Oxide ink.  You need a good amount of ink for this technique to work the best.
  • Next, I sprayed the Dot Circle stencil from ACLD heavily with water, then placed it onto the inked background.  I sprayed on some extra water over the top and dabbed with a paper towel to lift a bit.  Leaving the stencil in place, I set it aside to dry. Distress Oxide inks work so well for this technique as they react to water.  
This is what the inked piece looked like when dry.

  • So I took the leftover piece and splattered it with my white Posca pen and let dry.
  • I placed the dry piece into my Misti and stamped the sentiment along one side and the cattails along the other.
  • I kept it simple and just glued it onto a white card base.


Here is the stencil I used:

Discount Code for A Colorful Life Designs
(affiliate with not extra cost to you)

Adding my card to these challenges:
Addicted to Stamps and More- DIE CUTS and/or STENCILS
The Sisterhood of CraftersSentiments (make the sentiment the focus of your project)
Try it on Tuesday- SAY IT WITH FLOWERS


Supplies
Stamps- Words and Idea (IO); Dans la Nature (Carabelle)
Inks- Distress Oxide, Versafine Clair
Paper- heavy white (Scribes Nook- Waterloo, Ont.)
Accessories and Tools- Dot Circle stencil (ACLD); TE Blending Brushes;
water Mister (TH); Misti (My Sweet Petunia); Posca pen

Wednesday, 23 March 2022

Caring Thoughts for Ukraine


Welcome
Everyday, we continue to hear about the horrible plight the Ukrainian people face.
I decide to use the colours of their flag to make another card in support for this senseless war.


So here's what I did to create my card.
  • I began by cutting a front panel 3 3/4" square from some white cardstock.  I took out the Dot Circle stencil from ACLD and positioned it over my paper then inked up the middle area with some Salty Ocean Distress Ink. 
  • When the center was inked, I inked up the rest of the stencil with some Mustard Seed DOX ink.  I should have cleaned off the stencil before adding the yellow because I did get a bit of green where the 2 colours blended together.
  • I removed the stencil and placed the panel into my Misti to stamp the flowers and the sentiment.
  • Using my black Posca pen, I added some splatters just over the flowers.
  • I glued the finished panel onto a piece of black cardstock, then onto a white card base that measured 4 1/4" square.
  • I added 2 black gems just under the sentiment.

Here is the stencil I used:

Discount Code for A Colorful Life Designs
(affiliate with no extra cost to you)

Thanks so much for coming by and taking a look.

Adding my card to these challenges:
Try it on Tuesday- SAY IT WITH FLOWERS
Unicorn Challenge- DOTS and/or STRIPES
STAMPlorations- NEVER ENDING


Supplies
Stamps- Caring Thoughts (Hero Arts); Beautiful You (STAMPlorations)
Inks- Distress Oxides, Versafine Clair
Paper- heavy white- (Scribes Nook- Waterloo, Ont.)
Accessories and Tools- Circle Dot stencil (ACLD); Misti (My Sweet Petunia); 
TE Blending Brushes; black Posca pen; black gems

Monday, 14 February 2022

My Valentine


Good Morning and Happy Valentine's/ Friendship Day.
Time to make another Valentine theme card.
This one was easy as I pulled out a previously inked background, so I just had to add the heart and sentiment.  
I think it works great for a guy.

So here's what I did to create my card.
  • Like I mentioned above, I found this previously inked background in my stash.  I created it using Distress inks and this Dot Circle stencil from A Colorful Life Designs.
  • So onto my Gel Plate I pressed some Blueprint Sketch and Peacock Feathers Distress Ink.  I blended them together using my brayer, then laid on the stencil.  I used the handle end of a paint brush to press the stencil firmly in place, making good contact.
  • I carefully lifted the stencil off, removing some of the ink and rubbed a piece of cardstock over the plate to lift the print.
  • While that dried, I got out the All Over Hearts stencil and inked up a heart with some more blue ink.  I fussy cut it out and set it aside.
  • I stamped the sentiment along the bottom edge of the print.
  • I glued the print onto a piece of white cardstock, then onto a white card base.
  • I pop dotted the little fussy cut heart in the middle of the card front.


Here are the stencils I used:


Discount Code for A Colorful Life Designs
(affiliate with no extra cost to you)

Thanks so much for coming by and taking a look.
I do truly appreciate your friendship.


Adding my card to these challenges:
Little Red Wagon- BE MY LOVE VALENTINE
Use Your Stuff- HEARTS/LOVE
My Time to Craft- ALL YOU NEED IS LOVE


Supplies
Stamp- Happy Valentines Day (Studio G)
Inks- Versafine Clair, Distress Oxide
Paper- white (Scribes Nook- Waterloo, Ont.)
Accessories and Tools- Gel Plate; Speedball brayer; Dot Circle Stencil; 
All Over Hearts stencil (ACLD)

Sunday, 11 July 2021

Under the Lights


Hello and Welcome
Meet today's card.
An easy one to create using my Gelli Plate.
So many people seem to be intimidated by a gel plate, but honestly it couldn't be easier for creating fast and fun backgrounds.
I will walk you through it below.

So here's what I did to create my card.
  • I cut my card front panel from a piece of heavy white cardstock.  I got out my Gelli Arts Plate, a brayer and some Distress Oxide inks....Blueprint Sketch, Broken China and Wilted Violet.
  • I took the ink pads and pressed them directly onto my Gelli Plate, leaving a bit of space between the colours as not to contaminate my ink pads with the other colours.  
  • Using a brayer, I rolled over the Gel plate to blend the colours. *be sure to have an extra piece of paper handy to roll off the excess ink from your brayer.  These often make wonderful backgrounds as well or can be used to die cut *
  • Next, I place the Dot Circle Stencil from ACLD over my Gel plate and using my tweezers, I gently pushed the stencil onto the plate being sure to make good contact with the plate.
  • I lifted off the stencil removing some of the ink from my plate, set it aside and rubbed my cardstock panel over my plate.  Voila, I had my background.
  • I dried the ink completely....{DOX inks take a bit longer to dry so use a heat tool or just set aside for a bit.}  When dry, I placed the piece into my Misti and stamped the silhouette image from Impression Obsession and then the sentiment from Visible Image using some Versafine Clair ink.
  • I mounted the inked panel onto a heavy white card base.


Thanks so much for coming by and taking a look.


Here is the stencil I used:
Dot Circle

                                                        Discount Code for A Colorful Life Designs

Adding my card to these challenges:
Allsorts- MASCULINE
Love To Scrap- ANYTHING GOES


Supplies
Stamps- Rock Silhouette (IO); Just Be Happy (VI)
Inks- Distress Oxides (colours listed above); Versafine Clair
Paper- heavy white (Scribes Nook- Waterloo, Ontario)
Accessories and Tools- Dot Circle (ACLD); Misti (My Sweet Petunia); Brayer (Speedball);
Gelli Arts Plate