Showing posts with label mixed media. Show all posts

Saturday, 31 May 2025

That's Awesome!


Welcome
Here's one last card for May using the newly released stencil from A Colorful Life Designs called:
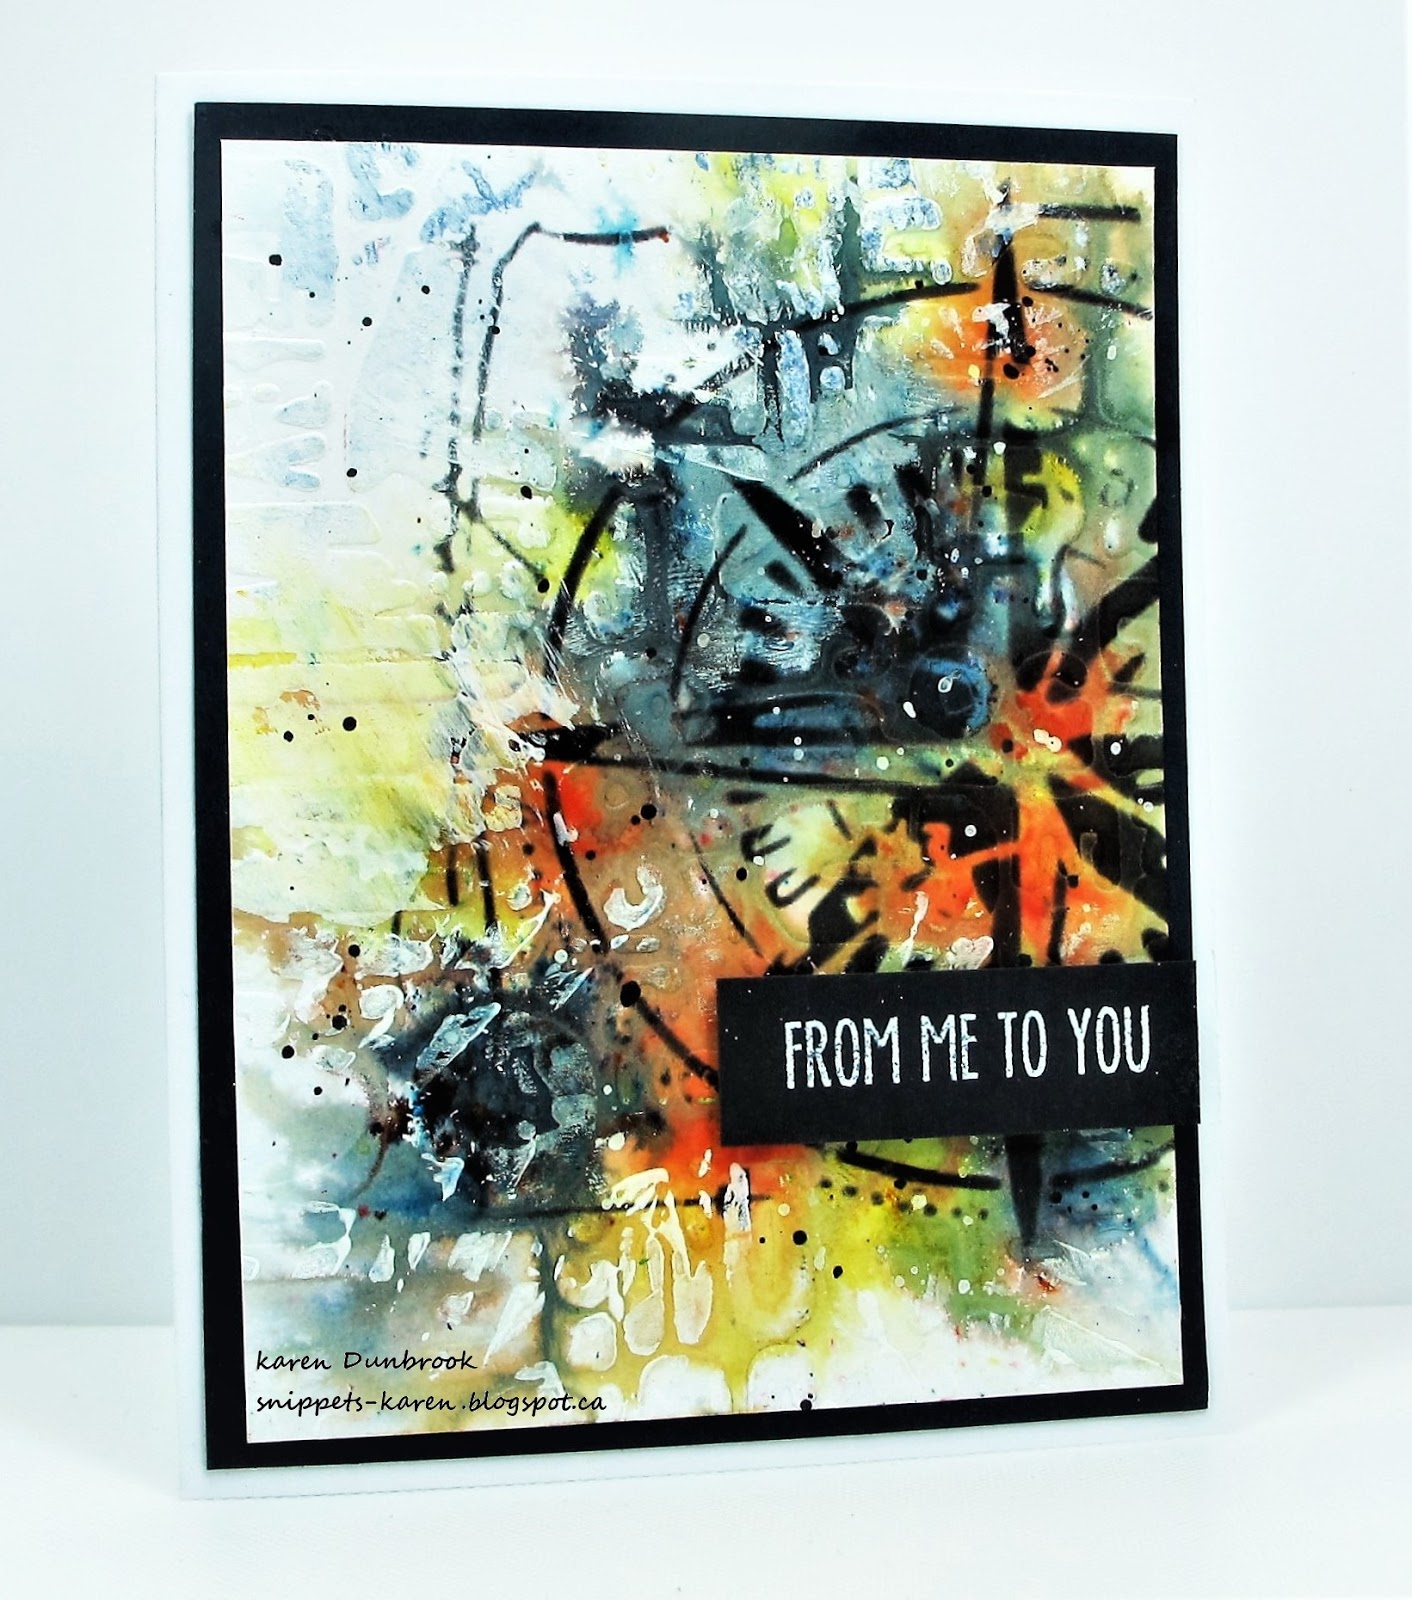
A mixed media card, something I haven't done in awhile. 
Lots of stamping on this one over the stenciling.

So, here's what I did to create my card.
  • I took a piece of white cardstock and dragged some Acrylic Gel over the paper randomly, using an old gift card.  I set that aside to dry, it does take awhile.
  • When the Gel was dry, I inked over the whole panel with some Peacock Feather Distress Oxide ink.  You can see through the inking the areas where I applied the Gel, giving the card a unique look.
  • Next, I place the Square Swirl stencil over my card panel and inked with some Prize Ribbon DOX ink near the top of the panel.  I repeated that process, inking again along the bottom.
  • I added the stamping over the background to add more interest.
  • I die cut the sentiment from some white cardstock and then the sentiment shadow right from the middle of the card base and glued those together.
  • I glue the finished card front panel onto a piece of white cardstock, then a piece of blue and then onto a white A2 sized card base.
  • I used some foam tape to pop the sentiment back into place, matching it to the background.

Here is the stencil I used:


Many thanks for coming to visit today.

Adding my card to these challenges:
Simon Says Wed.- ANYTHING GOES
Sweet Stampin'- BOYS< BOYS< BOYS
Cut It Up- ANYTHING GOES

Supplies
Stamps- Faded Type (TH); Texture 
Inks- DOX; Versafine Clair
Paper- Solar White
Accessories and Tools- stencil (A Colorful Life Designs); Vicki Boutin Acrylic Gel Medium;
TE Blending Brushes; Awesome die (Neat and Tangled); foam tape

Friday, 9 July 2021

Livin' Life


Welcome
Meet today's card.
Super simple one using Vicki Boutin's Art Crayons, inspired again by one of her Friday Night Lives.

Before I add the details of my card, I want to send out a
BIG THANKS
to all of you that have decided to follow me.  I am so grateful!!


So here's what I did to create my card.
  • I cut my card front from a piece of heavy white cardstock.  Using the Vicki Boutin Warm set of Art Crayons and a piece of acetate, I began adding my circles.  I rubbed the pink Art Crayon first directly onto the acetate in a circular shape, used a wet paint brush to dilute it and then pressed it onto my cardstock.
  • I repeated that process over a few times with the pink at the top and bottom, then used some orange and then yellow to create the circles. 
  • I dried the panel, then rubbed some of the pink Art Crayon onto my non-stick craft mat, diluted it with water and used that for stamping the script in the background of the circles.
  • I used the leftover ink to add some splatters then added more black ones with my Posca pen.
  • While that all dried, I die-cut the sentiment from Frantic Stamper 3 times...2 from white cardstock and one black one for the top.  I glued those all together and set aside.
  • Looking at my panel, I realized it needed something more, so I doodled in the lines to define the circle shape.
  • I glued the inky panel onto a piece of pink cardstock, then onto a white card base.
  • Finally, I glued the sentiment over the circles and added the little heart.


Thanks so very much for coming by and taking a look.

Adding my card to these challenges:
Simon Says Wed.- HELLO SUNSHINE
CAS on Friday- SUNSHINE


Supplies
Stamps- Script (Penny Black)
Inks- Vicki Boutin Art Crayons
Paper- heavy white- Scribes Nook Waterloo
Accessories and Tools- paintbrush, acetate sheet, die- Frantic Stamper, Spellbinder Platinum, 
black Posca pen, Nuvo glue, Signa fine line marker

Saturday, 26 June 2021

Colour Wheel


Welcome to the weekend.
So appreciate that you dropped in to see what I am up to today.

I just picked up this fun die from Paper Rose called Color Wheel Love.
I was inspired by the card I made a few weeks ago after watching one of Vicki Boutin's lives.

So here's what I did to create my card.
  • I began by creating some inky backgrounds using Vicki Boutin's Art Crayons and a piece of acetate.  I simply scribbled the crayons onto the acetate, used a wet paintbrush to blend it out, then pressed onto my white cardstock.  I did add some stenciling and splatters as well to each piece. When I was finished, I had 3 inked pieces.
  • Next, using a piece of black cardstock, I die cut the Color Wheel and set that aside.  
  • I then die-cut my inked pieces using the same die with each inky panel I had created.
  • I glued the black outline onto a piece of white cardstock as a base, then fussy cut around it.  I then glued in all the different colours, fitting them all back into place varying the colours.  
  • I set that aside to dry and cut a 4 x 4 inch piece of white cardstock and got out my Gel Plate.
  • Using a brayer and my Distress Oxide inks, I inked up my Gel Plate and then took a print. 
  • I placed the square panel into my Misti and stamped the 'Just Be Happy' sentiment from the Just Be Happy set by Visible Image, repeating it across the panel.
  • I die-cut the Celebrate 3 times from white cardstock and glued those together.  Using my foam finger dabber, I added some Picked Raspberry over the die applying more at the base and fading out as I reached the top.
  • I glued the Gel Plate print onto a white card base, then pop dotted the Color Wheel over that.  
  • Lastly, I glued the 'Celebrate' over that.


Thanks so much for coming by and taking a look.

Supplies
Stamps- Just Be Happy (Visible Image)
Ink- Vicki Boutin Art Crayons (warm and cool sets); Distress Oxides (Picked Raspberry, Peeled Paint,
Cracked Pistachio, Kitsch Flamingo, Peacock Feathers, Salvaged Patina)
Paper- heavy white (Scribes Nook: Waterloo Ontario)
Accessories and Tools- Color Wheel die (Paper Rose); acetate sheet; Celebrate die (MFT); 
Posca black pen; various stencils (ACLD); Misti (My Sweet Petunia)

Tuesday, 4 May 2021

Multicoloured Celebrate


Hello and Welcome
Here is a fun card I made after watching one of Vicki Boutin's Friday Night Lives.
A whole lot of fun packed into one card that's for sure.
I will do my best to explain how I created this as it started with these 4 background pieces I made.


So here's what I did to create my card.
  • I began by die-cutting a circle from my cardstock to use as a mask.  For the inking on each one, I rubbed some of Vicki Boutin's Art Crayons onto a sheet of acetate, sprayed with water and pressed over the circle mask.  **Vicki's crayons come in 3 different packs; I just used the Warm and Cool packs of her crayons**  I added more colour using Distress Crayons with a blending tool in similar colours to the crayons.  I added stenciling, stamping and some lifting with water on each circle.
  • In Vicki's live, after she had inked up her pieces, she cut out the circles and then cut them into pie shaped pieces.  So after I decided I wanted to use the blue one pictured above as my base, I glued the cut up pie shaped pieces over that leaving some of the blue showing through.  
  • When I was happy with the way they all were placed over the blue circle, I glued them into place then added some 'faux' stitched lines to the pieces.
  • After I let the pieces dry, I die-cut out the circle around the outer edge and then cut it again with a smaller circle die creating 2 pieces.  
  • Using some white cardstock, I die-cut 2 circles, each a bit bigger then my inked circles.  I glued them all together and set aside.
  • Next, I cut out the main panel of my card with white cardstock and using my ScorPal, I scored some straight lines and some perforated ones with my ScorBug.
  • I glued the biggest circle onto the card front panel, then pop dotted the smaller one back into place matching the bigger one.
  • I die-cut the Celebrate and inked it up with some Distress Oxide inks.
  • I glued it onto a 4 1//4 x 4 1/4 card base.


 Thanks so much for coming by and taking a look.
If you want any more specific info, please email me and I will do my best to help you.

Adding my card to these challenges:
Simon Says Wed.- ANYTHING GOES
We Love to Create- ANYTHING MIXED MEDIA

Supplies
Stamps- various ones from my stash
Inks- Vicki Boutin's Art Crayons, Distress inks
Paper- heavy white (Scribes Nook)
Accessories and Tools- Infinity Circle dies (HA); Celebrate die (MFT); black line marker,
pop dots; ScorPal, Scorbug, various stencils (ACLD), piece of acetate, TE blender brushes

Saturday, 24 April 2021

Made with Love


Good Morning and Welcome to the Weekend!!
Always happy when I get some time to play.

I made this card after watching a Friday night live with Vicki Boutin.  She does them every week and they are so inspiring.  You can find her on FB or on YouTube.  

So here's what I did to create my card.
  • I began by cutting a 4 x 4 inch piece of white cardstock.  I use a heavy weight 110lb that I get from my local store.  I die-cut a circle from more cardstock and positioned it over my panel to use as a mask.
  • I rubbed the pink crayon from the Warm set of Vicki Boutin Art Crayons onto a piece of acetate, diluted it with water and pressed it over the masked circle.  I repeated that process using some Distress inks next (Picked Raspberry and Spiced Marmalade) until the circle was inked.
  • I got out my Simple Grid stencil from ACLD and rubbed some Picked Raspberry over it (seen in the top left and bottom right)
  • I diluted some more of the Art Crayon and stamped using a Graffiti stamp, Script and the Zig Zag by dipping the stamps into the wet ink.  By doing that, it gives more of a watercolour look.
  • I removed the circle mask and let the piece dry, then placed it into my Misti to stamp the thistles and the sentiment using some Versafine black ink.
  • I splattered with my white Posca pen and then doodled around the circle.
  • I added 3 black gems under the sentiment, then glued the panel onto a heavy white card base.


Here are some of the other panels I created as well so more cards to come.


Thanks so much for coming by and taking a look.
Hope you have a wonderful weekend.

Discount Code for A Colorful Life Designs


Supplies
Stamps- Nature Flowers (Art Journey); Everyday Circle Tags (Avery Elle); Zig Zag Stitch (TH);
Graffiti (Kaisercraft)
Inks- Distress (TH); Versafine; Vicki Boutin Art Crayons
Paper- heavy white (Scribes Nook- Waterloo, Ontario)
Accessories and Tools- Grid Stencil (ACLD); Circle Die (HA); Sakura Black marker; Posca pen;
inking tool; acetate sheet; black gems; Misti (My Sweet Petunia)

Sunday, 11 April 2021

Bubble Wrap Resist


Hello and Welcome
I hope you are all keeping well and safe.
Here in Ontario, Canada, we are into our THIRD wave.  It is such a scary time and the vaccines are rolling out very slowly.  I'm glad for the rollout to be happening, but it is so frustrating that it is taking so long.  I'm generally a patient person but I want to get on with it!  I guess understanding the overwhelming numbers in the system have to appreciated though.

I also want to say a BIG THANKS to all of you that are visiting my blog and always leaving me such encouraging comments.  I do have to apologize for my late responses or visits returned to your blogs.  I am so busy with my 5 little daycare kids (one being  baby) that it keeps me jumping.  By the end of the day, I am tired out and don't usually have time to spend on the computer.  
I promise I will do my best to answer or get back to you as soon as I can!!

Anyways...I made this fun card.  I have to say, having a creative outlets has really helped in these times.

So meet today's card.  A simple mixed media one inspired by Vicki Boutin.  She has FB and YouTube lives every Friday night and has done for a very long time.  Her approach to mixed media is 'try the things'.

So here's what I did to create my card.
  • I began with a piece of mixed media paper.  Using a piece of bubble wrap, I rubbed some Versamark ink over it and pressed it onto the paper.  I took some white embossing powder and heat embossed it as I wanted to create a resist.  
  • Next, I got out the Warm set of Vicki Boutin's Art Crayons and a piece of acetate.  I rubbed the crayons directly onto the acetate and diluted with some water using a paintbrush.  I pressed the acetate onto the panel and dragged it down to cover the paper. 
  • I continued that process until the whole panel was filled with colour.  I set that aside to dry and repeated that process on another white scrap of paper.  I used the leftover wet ink to add some splatters with my paintbrush.
  • I carefully wiped away the colour from the white embossed areas using a baby wipe.  It left a distressed background that I loved.
  • I stamped the Daisy Stem flower from Rubber Stampede onto the small paper panel with some Versafine Clair Noir and clear heat embossed it.  I then glued that over another small piece of white cardstock to give it a bit of a border.  
  • I mounted the dots inked piece onto some white, then onto a heavy white card base.  I pop dotted the flower to the side,


Thanks so very much for coming by and taking a look.

Adding my card to these challenges:
Stinkin' Inkers- RECYCLE/ REUSE
Creative Artiste Mixed Media- ANYTHING GOES MIXED MEDIA

Supplies
Stamps- Daisy Stem (Rubber Stampede)
Inks- Vicki Boutin Art Crayons; Versamark; Versafine Clair
Paper- heavy white (Scribes Nook- Waterloo, Ontario)
Accessories and Tools- bubble wrap; Wow white and clear eb powder; heat tool; piece of acetate

Sunday, 21 February 2021

Art Soul


Welcome
I hope you are all safe in your part of the world.
It's the weekend, so that meant I had some time to play...yeah!
I played with my Distress Oxide inks and a paint brush this time, inspired after watching a live from Vicki Boutin.  

So here's what I did to create this card.
  • I cut a piece of heavy white cardstock to use as my card front and pulled out my Distress Oxide inks.  (Picked Raspberry, Carved Pumpkin, Abandoned Coral and Mustard Seed)
  • I pressed the Mustard Seed Distress Oxide onto my non-stick craft mat and diluted that with some water.  Using a paintbrush, I painted some onto my card base in a circular motion, creating the small circles.  I made sure to dry the first layer of colour using my heat tool before painting on the next colour.  
  • I continued in the same way, painting circles around circles using the other colours mentioned above.  It helps to have the paper a bit wet and the ink very diluted.  
  • When all the circles were painted and I was happy with the design, I stamped in some details in the background with the same inks as the circles.  I used some of the wet ink left over on my non-stick mat and dipped the large script into that and stamped with it to give a more diluted look to the text.
  • I stamped the sentiment from Hampton Arts and clear heat embossed it.  
  • The panel looked so flat, so I doodled around the circles and then splattered using my Posca pen.
  • I glued it onto a piece of yellow cardstock, then onto a heavy white card base.


Thanks so much for coming by and taking a look.

Adding my card to these challenges:
Simon Says Wed.- FAVORITE TECHNIQUE
(watercolouring, just one of the many)
Just Us Girls- RAINBOW COLORS


Supplies
Stamps- Art Soul (Hampton Arts); Faded Text (TH); AALL and Create (338)
Inks- Versafine Clair; DOX inks
Paper- heavy white (Scribes Nook Waterloo, Ontario)
Accessories and Tools- paintbrush; non-stick mat (TH); Posca pen; Wow clear eb powder;
heat tool (Ranger); Pigma Micron pen

Saturday, 18 April 2020

Lead the Way


Hello and Welcome
Today I'm trying my hand at some Mixed Media with this card.  Just playing around is fun.

So here's how my card came to be.
I began with a piece of heavy white cardstock.  I embossed it with my Cuttlebug using a folder from Carabelle Studio.  I think it's called Graffiti but I can't find it at the moment.
* helpful tip:  Lightly spray your paper before placing it inside your embossing folder to get a better impression*
Next, I sprinkled some Brushos onto my embossed card panel, sprayed with just a bit of water and let the colours bloom.  I used some black, lemon and some orange Brushos.  The black is the most amazing as when it is activated with water, you see shades of gray, blue and green.  I dried that with my heat tool. 
When it was all dry, I use the Compass stencil from AAll and Create with some Ranger Archival ink to stencil over to the side of the panel.  Some of the areas looked a bit dark, so I added touches of white acrylic paint using my brayer to lighten them up a bit.  I splattered with some black acrylic paint, then I stamped the sentiment onto a piece of black cardstock, white heat embossed it and pop dotted it over my background.
I glued it over a piece of black cardstock, then onto a white card base.


Thanks so much for coming by and taking a look.

Supplies
Stamps- Everyday Sentiments (YNS)
Inks- Ranger Archival, Brushos, Versamark
Paper- heavy white (Scribes Nook)
Accessories and Tools- EB folder (Carabelle Studios); Compass stencil (AAll Creates);
brayer; pop dots; white eb powder; black and white acrylic paint

Sunday, 4 November 2018

Special Occasion- The Flower Challenge


Hello and Welcome
It's time for more fun at 

Our theme this month is 'A Special Occasion'

My special occasion was a wedding we attended.  I wanted to create a special mixed media card for a special couple.  I did lots of layering and was very pleased with the final results.
So here is what I did.

I began with a piece of white cardstock and using a stencil from TCW, I applied some clear Gesso over it and set it aside to dry.
When it was all dry, it was time to apply a few different layers of ink.  I rubbed on some Worn Lipstick, Seedless Preserves, Peeled Paint and a touch of Picked Raspberry Distress Oxide inks using a foam applicator.  I wanted the flowers to be the star of the show, so to mute down the colours a bit, I took some white acrylic paint and rubbed it on using my finger.  I set is aside to dry and got working on my flowers next.
I die-cut the flowers, leaves and branches from white cardstock then using the same colours as mentioned above, I dabbed them into some wet ink I placed onto my non-stick craft mat.  To give them a bit of extra interest, I splattered them with some more white acrylic paint.  
When the bkg was all nice and dry, I laid out the leaves and branches until I liked the configuration, then I glued all the die-cuts in place, layering them to give lots of dimension. 
The white roses made from paper, were purchased at Michaels.  They were very stark white so I rubbed some Worn Lipstick onto them to add just a hint of pink, then glued them over the leaves and branches.  I added some pearls and then pierced around the whole front edge of the panel which really helped to frame it all in.  The sentiment was nestled in beside the flowers.


Thanks so much for coming by and taking a look.
I hope you get a chance to check out the wonderful creations the DT's have made.

Supplies
Stamps- Stampin Up (sorry, don't know the name of the set)
Inks- Distress Oxides (TH)= Tuxedo Black Memento
Paper- heavy white (Scribes Nook)
Accessories and Tools- Media Clear Gesso (Ranger)= Mini Sketch Grid stencil (TCW)=
pearl dots- Sponge applicator (TH)= white acrylic paint= Scrolls Half Edger (PB)= 
Wildflowers 1 & 2 dies (TH)= piercing tool (Ranger)

Friday, 7 July 2017

Words to Live By


Happy Friday!
Meet today's card.
 Playing around with some new-to-me stamps from STAMPlorations and Distress Oxide inks.

 I went sort of mixed media with my card today.  I began by lightly painting the Mini Circles stamp with white acrylic paint, pressed onto my heavy weight cardstock and let dry.  
(Be sure to wash your stamp right after so the paint doesn't get all stuck to your stamp)
When that was dry, I inked over the whole piece with Broken China Distress Oxide ink.
Next, I lightly sanded over the circles to help reveal them a bit better then stamped in the background using Faded Jeans Distress Oxides.  Love how the Oxides layer and leave a chalky appearance.
I stamped the sentiment which I have had for years, then added the single die-cut flower.


Have a great weekend and thanks so much for coming by and taking a look.

Adding my card to these challenges:

Craft Stamper Magazine- ANYTHING STAMPED GOES 
STAMPlorations- NEVER ENDING 
4 Crafty Chicks- STAMPING, NO DIGIS
Moving Along with the Times- ENGAGEMENT, WEDDING
 (I made this card for friends of mine that just got engaged)
Crafty Girls- ANYTHING GOES


Supplies
Stamps- Live Well (Inkadinkadoo); Mini Circles (Kaisercraft); 
Mixed Media Elements (STAMPlorations)
Inks- Faded Jeans, Broken China Distress Oxides (TH); Tuxedo Black Memento
Paper- heavy white (local store)
Accessories and Tools- white acrylic paint; die- TH; sandpaper; Cuttlebug