Showing posts with label roses. Show all posts

Saturday, 4 July 2020

Summer Roses- The Flower Challenge


Welcome
A new month means a new theme at
The Flower Challenge

This month our theme is:


Our Guest Designer this month is Mac Mable from thesweetestofpeas. Do check out her blog if you have a minute as she makes such fabulous cards.


I chose Summer for the theme of my card so here is what I did to create my card.
I began by making the background using my Gel Plate.  I wanted a white border on my card so I positioned my Rectangle Acrylic Mask onto my heavy white cardstock first, then I brayered some Salty Ocean DOX ink onto the plate, splattered with some diluted Blueprint Sketch DOX ink and pulled my print.
Leaving the mask in place, I stamped the roses along the top then coloured them using my Zig Waterbrush markers.  I dried that and then stamped the sentiment and clear heat embossed it.
I mounted the panel onto a pale mauve piece of cardstock, then onto a heavy white card base.


Thanks so much for coming by and taking a look.
I hope you will come and play along with us.

Discount Code for A Colorful Life Designs

Supplies
Stamps- Flowers Are the Music (Rubbernecker); Bouquet Large (AALL and Create)
Inks- Versafine Clair; Distress Oxides; Zig markers
Paper- heavy white (Scribes Nook)
Accessories and Tools- Rectangle Acrylic Mask (A Colorful Life Designs); paintbrush;
pearl dots; clear eb powder; heat tool

Wednesday, 4 March 2020

Anything Goes- The Flower Challenge

Hello and Welcome

A new month means a new theme over at 

An easy one this month and there is a prize offered.
ANYTHING GOES


We are very happy to announce that we are being sponsored by one of our own Design Team members this month. The amazing Rachel Vass is now designing beautiful floral digital images. Do check out her Etsy shop at Rachel Vass Designs as she has  wonderful designs there.
Rachel has kindly agreed to give our lucky winner two digital images of their choice
We are using her wonderful designs on our cards this month too!

Our Guest Designer this month is Joe S. He doesn't have a blog but do check him out on Instagram at vjsjoey if you have a minute as he makes such fabulous cards.

So onto my card details.
I began by printing off this gorgeous digital image by Rachel called Trio of Roses onto some heavy white cardstock.  Next, using my Zig Waterbrush markers, I watercoloured in the flowers. 
After I was happy with the inking, I splattered it with some diluted ink to add interest. 
I really wanted the roses to pop so I fussy cut them out at the top and mounted them onto a piece of black cardstock.  I love the contrast it gave.
The bottom looked a bit stark, so I used some drywall tape to add a bit of stencilling.
I mounted it onto a piece of white cardstock, then onto a pink card base to help bring out the colour of the roses.  I left it without a sentiment so I could add one later for any occasion.


Thanks so much for coming by and taking a look.


Supplies
Stamps- Trio of Roses Digi (Rachel Vass)
Inks- Zig Waterbrush Markers
Paper- heavy white (Scribes Nook); black and pink cs
Accessories and Tools- Canon Printer; paintbrush; drywall tape

Sunday, 29 September 2019

Rose Garden- Acrylic Block Coloring

Welcome
Today, I have the pleasure of hosting the TLC Challenge over at Splitcoast Stampers.
The challenge I chose is called Acrylic Block Stamping.

So awhile back, I watched a video by Lydia Fiedler and was so intrigued by the look that she achieved using this technique.
Here is the video that explains about how she did it:

So I began by stamping the Rosa Eden Roses stamp onto my card front with the black Verafine ink.
I didn't have a block that was big enough to colour the whole flower so I used a smaller one and worked in sections
I placed my small block over the stamp upside down and coloured directly onto my acrylic block with my Zig markers.  I sprayed with a bit of water and then pressed onto the stamped image.
I continued that process until my whole flower was inked.
I love the unique look it gives to a stamped image with little effort.

I stamped the sentiment with more black ink and simply mounted it onto a white card base.


Thanks so much for coming by and taking a look.
I hope you will give this easy, fun technique a try!!

Adding my card to these challenges:
Simon Says Wed.- ANYTHING GOES
Addicted to Stamps- FOR A LADY/GIRL
Crafty Friends- SPECIAL OCCASION

Supplies
Stamps- Rosa Eden Roses (Picket Fence); Scripted Bold Sentiments 2 (Pinkfresh Studio)
Inks- Zig Watercolour pens; Versafine Clair Nocturne
Paper- heavy white (Scribes Nook)
Accessories and Tools- acrylic block; Mister (TH)

Saturday, 15 June 2019

Rose Garden- The Flower Challenge

Good Morning.
Time for another card for 

Our theme this month is to create a flower stamped background card.

We also have a wonderful floral stamp PRIZE worth $15 this time.
Deepti Malik is our Guest Designer this month. She has her own stamp designs and is giving us a PRIZE for our winner so come and play along with us!


So onto my card details.
I began with a piece of heavy white cardstock and placed that inside my Misti.
I positioned the first rose over the corner and stamped with some black Memento ink.  I did clear heat emboss it as I knew I wanted to add watercolouring to my flowers and I didn't want the black ink to smear.  I masked the first rose and stamped again in the other corner, then one more time using that same process.

Next, I rubbed some Worn Lipstick and some Spun Sugar DOX inks onto my non-stick craft mat and painted in the flowers with the diluted inks and a paintbrush.
I rubbed on some Spun Sugar along the edges, then splattered the leftover inks on my mat onto the background with my paintbrush.  I did add some water splatters as well, it lifts the ink and adds such great interest.
While that dried, I stamped the sentiment with Versamark ink onto a strip of black cardstock, then white heat embossed it.
I used some foam adhesive to adhere my sentiment over the flowers, added some shiny Nuvo Drops (almost impossible to see from the pictures), then mounted the piece onto some pink cardstock and then onto a plain white card base.


Thanks so much for coming by and taking a look.

Adding my card to these challenges:
Seize the Birthday- ANYTHING GOES
Simon Says Wed.- WEDDING/ANNIVERSARY
Alphabet Challenge- 'F' FOR FLOWERS


Supplies
Stamps- Tag Banner Sentiments (Your Next Stamp); Painted Rose (Concord and 9th)
Inks- Tuxedo Black Memento; DOX (TH); Versamark
Paper- heavy white (Scribes Nook); pink cs
Accessories and Tools- Misti (My Sweet Petunia); white eb powder; clear eb powder; paintbrush;
non-stick craft mat (Ranger); paintbrush; heat tool; foam adhesive, Cl Nuvo Drops


Thursday, 4 April 2019

Rose Garden- The Flower Challenge


Good Morning
It's time for another fun theme at 


This month we are challenging you to create a card using this simple sketch.
Please be sure to check out all the great cards created by our DT's.

So onto my card.
I had a piece of Alcohol inked Yupo that I thought would make for some beautiful roses so I die-cut the roses with some heavy white cardstock first then cut again with the inked Yupo.  I carefully glued the die-cut pieces back into the white outline and set them aside.  (I should mention that I did modify the die by cutting it down a bit before adding it to my card.)
Using my Grid embossing folder, I embossed the long panel of the sketch you see to the left side.  Since I was leaving my card white, I wanted to add as much texture and interest as possible. 
Next, I die-cut the Swirl Square twice and glued them to another piece of cs to use as the smaller piece on the sketch.  I love how they look.
I then glued it all together as per the sketch, pop dotted the roses and added some little pearls as the finishing touch.


Thanks so much for coming by and taking a look.


Supplies
Stamps- None
Inks- Alcohol ink
Paper- heavy white (Scribes Nook)
Accessories and Tools- Swirl Squares die (Penny Black); EB grid (Darice); 
Rose Cluster (Kaisercraft); pop dots; sm pearls; Tombow Mono Aqua glue


Sunday, 4 November 2018

Special Occasion- The Flower Challenge


Hello and Welcome
It's time for more fun at 

Our theme this month is 'A Special Occasion'

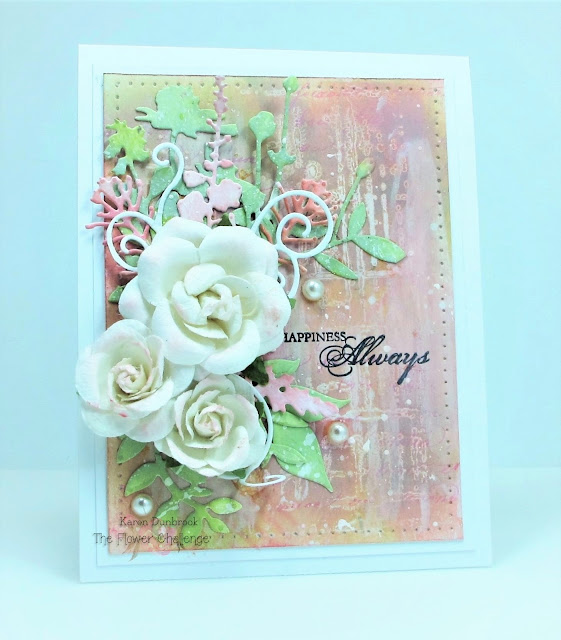
My special occasion was a wedding we attended.  I wanted to create a special mixed media card for a special couple.  I did lots of layering and was very pleased with the final results.
So here is what I did.

I began with a piece of white cardstock and using a stencil from TCW, I applied some clear Gesso over it and set it aside to dry.
When it was all dry, it was time to apply a few different layers of ink.  I rubbed on some Worn Lipstick, Seedless Preserves, Peeled Paint and a touch of Picked Raspberry Distress Oxide inks using a foam applicator.  I wanted the flowers to be the star of the show, so to mute down the colours a bit, I took some white acrylic paint and rubbed it on using my finger.  I set is aside to dry and got working on my flowers next.
I die-cut the flowers, leaves and branches from white cardstock then using the same colours as mentioned above, I dabbed them into some wet ink I placed onto my non-stick craft mat.  To give them a bit of extra interest, I splattered them with some more white acrylic paint.  
When the bkg was all nice and dry, I laid out the leaves and branches until I liked the configuration, then I glued all the die-cuts in place, layering them to give lots of dimension. 
The white roses made from paper, were purchased at Michaels.  They were very stark white so I rubbed some Worn Lipstick onto them to add just a hint of pink, then glued them over the leaves and branches.  I added some pearls and then pierced around the whole front edge of the panel which really helped to frame it all in.  The sentiment was nestled in beside the flowers.


Thanks so much for coming by and taking a look.
I hope you get a chance to check out the wonderful creations the DT's have made.

Supplies
Stamps- Stampin Up (sorry, don't know the name of the set)
Inks- Distress Oxides (TH)= Tuxedo Black Memento
Paper- heavy white (Scribes Nook)
Accessories and Tools- Media Clear Gesso (Ranger)= Mini Sketch Grid stencil (TCW)=
pearl dots- Sponge applicator (TH)= white acrylic paint= Scrolls Half Edger (PB)= 
Wildflowers 1 & 2 dies (TH)= piercing tool (Ranger)

Monday, 3 July 2017

Thank-You Roses

Morning.
Today I am playing with some lovely stamps from Penny Black, my Zigs and of course some drywall tape.
I really like the whimsical look of these roses from the PB Flower Medley set.  They are very fun to watercolour and there are a few different flower varieties in that set with the same qualities.

So onto my card.
I began by stamping the roses around the edges of my watercolour paper using my Misti and black Memento ink.  I added some colour at the flower centers with my Zigs, then using a wet paintbrush I pulled the color into the flowers.  While that dried, I die cut an oval using a die from Spellbinders and stamped the sentiment from the  Happy Wishes sentiment set onto it.
Keeping with my pink theme, I pulled out some Spun Sugar Distress ink and using some drywall tape, stenciled onto my card front.
I continued the stenciling onto my oval die-cut then pierced the edges for interest.
The last thing I did was add some Nuvo clear drops.


Thanks so very much for coming by and taking a look!


Adding my card to these challenges:

Simon Says Wed.- ANYTHING GOES
CAS on Friday- FLOWERS
Love to Craft- ANYTHING GOES


Supplies
Stamps- Happy Wishes, Flower Medley (PB)
Ink- Tuxedo Black Memento
Paper- Canson Watercolour paper 140lb
Accessories and Tools-  MISTI; Zig Realbrush Markers; die- Spellbinders; piercing tool;
 drywall tape; Nuvo clear drops; paintbrush