Showing posts with label YNS. Show all posts

Sunday, 16 January 2022

Winter Hugs


Welcome
Meet today's card.
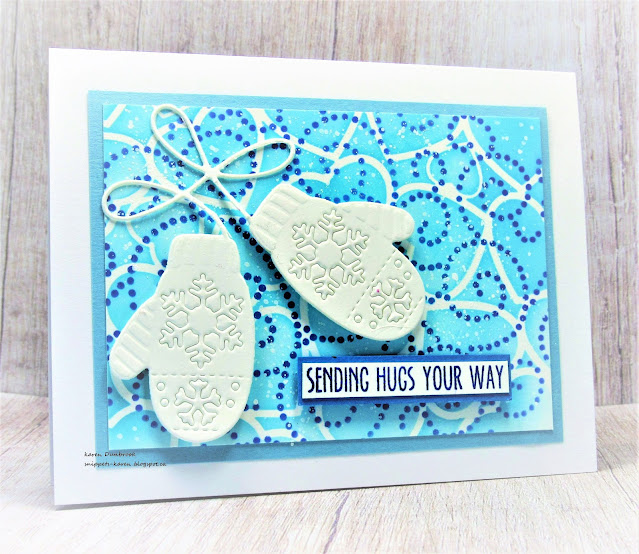
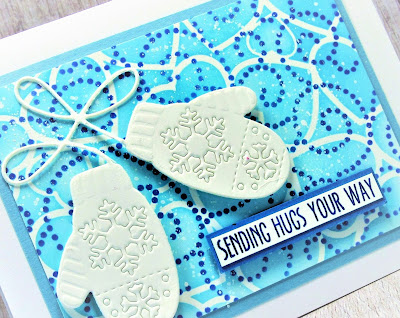
I combined 2 new stencils from A Colorful Life Designs with this sweet mitten die one of my boys gave me for Christmas.

So here's what I did to create my card.
  • I cut a piece of heavy white cardstock and placed it onto my Stencil Mat (I have mentioned this new to me product in previous posts and I am really love it.)
  • I placed the All Over Hearts stencil onto my cardstock and rubbed on some Peacock Feathers Distress Oxide ink.  
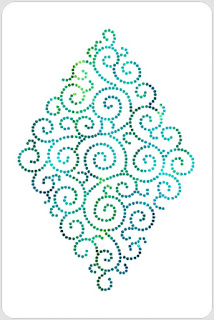
  • I removed that stencil and positioned the Delicate Scroll Stencil over the panel and inked with some Blueprint Sketch DOX ink.  I think it gave a look of blowing snow.
  • I splattered with my white Posca pen and set aside to dry.
  • While that dried, I die cut the mittens from some white cardstock.  My son bought them on Amazon so I unfortunately don't know who makes them.
  • I stamped the sentiment with some more Blueprint Sketch ink and clear heat embossed it. I glued that onto a matching cardstock scrap of paper.
  • I glued the stenciled panel onto a piece of light blue cardstock, then onto a white card base.
  • I added foam tape to the back of the mittens and also to the sentiment.

Here are the stencils I used:
All Over Hearts


Discount Code for A Colorful Life Designs
(affiliate with no extra cost to you)


Thanks so much for coming by and taking a look.

Supplies
Stamps- Everyday Sentiments (YNS)
Inks- Distress Oxides (mentioned above)
Paper- heavy white (Scribes Nook; Waterloo, Ont.)
Accessories and Tools- stencils (ACLD); mitten die (Amazon); TE Blending Brushes;
Stencil Mat (Waffle Flower); white Posca pen; foam tape; eb powder; heat tool

Tuesday, 7 September 2021

Who Needs a Hug?


Welcome
Meet today's card.
I like the sunny, warm colour I was able to achieve on my card.
I did that by using Distress Oxide inks on my Gel Plate.

So here's what I did to create my card.
  • I began by getting out my Gel Plate, brayer and Distress Oxide Inks. (Carved Pumpkin, Fossilized Amber)
  • I pressed the Carved Pumpkin DOX ink pad directly onto the plate then pressed the Fossilized Amber along the outside edges.  Using my brayer, I blended the colours together on the plate.
  • Using a stamp from AALL and Create, I stamped onto the plate to remove some of the ink, wiped off the stamp and repeated that process.  It is hard to see but you can faintly see the square stamping in the background. 
  • I splattered the plate with some diluted Carved Pumpkin ink then using a piece of white cardstock, I rubbed it over the plate to lift the print.  It had a nice warm glow.
  • When the print was dry, I rubbed over with an anti-static bag.  
  • I placed the print into my Misti and stamped the hearts, then white heat embossed them.
  • Using my black Posca pen, I coloured in the open areas of the hearts.
  • I splattered with my white Posca pen and set aside to dry.
  • While that dried, I stamped the sentiment in my Misti with some black Versafine ink.
  • I glued the inked panel onto a piece of black cardstock, then onto a white card base.
  • I pop dotted the sentiment over the hearts.

Thanks so much for coming by and taking a look.

Adding my card to these challenges:
Simon Says Wed.- STAMP IT
Use Your Stuff- ANYTHING GOES
Crafting Happiness- ANYTHING GOES

Supplies
Stamps- Everyday Sentiments (YNS); Hearts Entwined (MFT); Squares (AALL and Create)
Inks- Distress Oxide inks; Versamark; Versafine Clair
Paper- heavy white (Scribes Nook- Waterloo, Ont.); black cs
Accessories and Tools- Misti (My Sweet Petunia); white eb powder; Posca pens; foam tape;
Gel Plate; brayer

Sunday, 29 August 2021

Flowers for a Friend


Welcome
Meet today's card.
So glad to be using some of the Gel Plate prints I made....you know the ones that didn't quite work out the way you had planned.  
They work so well for die-cutting.

So here's what I did to create my card.
  • I began by cutting the front panel from some white cardstock and embossed it using a folder from Sizzix.
  • I glued that onto an A2 card base and set it aside.
  • Next, using one of my 'not so good' Gel Plate prints, I die cut the flowers using Brushstrokes 1 & 2 die from Tim Holtz.  I stacked them together in order and glued them all down over the white card base.
  • Using some matching cardstock, I cut out the leaves with dies from the same sets and glued them behind the flowers.
  • I stamped the sentiment onto another small piece of cardstock with some black Versafine and pop dotted it over the embossed background near the top.

Thanks for taking a look.

Supplies
Stamps- Everyday Sentiments (YNS)
Inks- Versafine Clair black
Paper- heavy white (Scribes Nook- Waterloo, Ont.)
Accessories and Tools- Brushstrokes 1&2 (TH); Spellbinder Platinum machine; 

Friday, 27 August 2021

Missing You


Hello and Welcome
Meet today's simple card.  
It's so fun to try something new...again, another challenge over at Splitcoast Stampers.
As so many of us are missing our friends and family, I thought this card would be great to send out to a special friend.

So here's what I did to create my card.
  • I began by looking through my stash of backgrounds.  This one was done with a brayer and some Distress Ink as I rolled off ink from my Gel Plate....I love the little hint of the purple down in the corner.
  • I got out a large size paper clip and fashioned it into a heart shape.  I placed that onto a piece of white cardstock and ran it through my die-cutting machine. (each machine is different so you will have to play around to find out what sandwiches work best in your machine)  I was left with this impression.
  • Next, I rubbed some Blueprint Sketch Distress Oxide directly onto my non-stick craft mat, sprayed with water and then using my brayer, I picked the ink up and rolled it over the embossed paper clip heart.  
  • I placed the main panel into my Misti and stamped the sentiment with some Versamark ink, then white heat embossed it.  
  • I die-cut a circle from some white cardstock, then die cut the heart into a smaller circle and glued them both together.
  • I splattered with my white Posca pen before pop dotting it over the main panel.
  • I glued it onto a heavy white card base.

Thanks so much for coming by and taking a look.

Supplies
Stamps- Everyday Sentiments (YNS)
Inks- Distress Oxides, Versamark
Paper- heavy white (Scribes Nook- Waterloo, Ont.)
Accessories and Tools- paper clip; Spellbinders Platinum; brayer; Lawn Fawn white eb powder;
pop dots; white Posca pen

Sunday, 17 January 2021

Snowflake Thanks


Good Morning
I hope you are well during these difficult times.  
After Christmas I like to take some time to make thank-you cards and this is one I came up with.
I've really tried to think of the many ways I can use this snowflake stamp to create different looking card designs.  This one was pretty simple to do.

So here's what I did to create my card.
  • I began with a panel of heavy cardstock and got out the Marvelous Masks Circles from A Colorful Life Designs.  This set has the stencils and the masks included.  I placed the smallest stencil to the side of my card base and rubbed on some Peacock Feathers Distress Oxide ink using a blending brush.
  • I covered the area I just inked with the circle mask and laid down the next size of circle and inked that with some Shaded Lilac DOX ink.  I repeated that process using a bigger and bigger circle stencil and mask and applied more DOX inks; Cracked Pistachio and finally more Peacock Feathers.
  • I dried the ink, then placed it into my Misti and stamped the snowflake from Colorado Craft using some Versafine Clair ink.  
  • Next, I stamped the sentiment from Your Next Stamp right down in the corner.
  • To add interest to my card, I randomly stamped some text and then added some markings using an old gift card and more Versafine Clair ink.  
  • I splattered using my Posca pen, then added a black gem to the snowflake center. *it's amazing how much these little additions add to the interest of the card!*
  • Lastly, I mounted it onto a piece of black cardstock, then onto some soft lilac then onto a heavy white card base.

Thanks so much for coming by and taking a look.

Discount Code for A Colorful Life Designs

Adding my card to these challenges:
Simon Says Wed.- LAYER IT UP
As You Like It- FAV COLOUR COMBO and WHY?
(I love blue with greens and purple...feels so soothing to me)
Sweet Stampers- SNOW/ WINTER


Supplies
Stamps- Warm Wishes Snowflake (Colorado Craft); Everyday Sentiments (YNS); 
Overlapping Texture (ALL and Create)
Inks- Versafine Clair Noir; DOX 
Paper- heavy white (Scribes Nook); coloured cs 
Accessories and Tools- Marvelous Masks Circles (ACLD); blending brushes (TE); old gift card;
Misti (My Sweet Petunia); Posca pen; black gem

Monday, 21 December 2020

Little Christmas Scene


Merry Christmas and Welcome
Meet today's card.
A simple one featuring a cute little die and this leftover piece of blue inked paper that I used for the sky.

So here's what I did to create my card.
  • I began with a piece of heavy white cardstock that would become the base panel of my card front.  I found this piece of inked blue paper in my stash that would become the sky for my little winter scene.  I think???? I used Distress Oxides to ink it up but it's been sitting in my pile for so long I'm not sure.  (I need to get better at writing on the back of my leftover pieces what I actually did).  I glued that onto the white cardstock.  
  • Next, I die cut the Houses on the Hill die from Your Next Stamp and glued that over the blue sky.
  • To give the look of snow, I tore some more white cardstock and layered it over to look like little snowbanks.
  • Using my white Posca pen, I added the white snow.
  • I placed the piece into my Misti and stamped the sentiment from Penny Black with some Versafine Clair ink and clear heat embossed it.  I added 3 black gems under the sentiment.
  • For the background blue panel, I took a piece of blue cardstock and scored some lines using my ScorPal.  It really made a difference and added a lot of interest.
  • I rounded the corners with my Corner Rounder and then pop dot mounted it over the scored background.
  • Lastly, I glued it all onto a heavy white card base.


Thanks so much for coming by and taking a look.


Supplies
Stamps- Penny Black
Inks- Versafine Clair
Paper- heavy white (Scribes Nook); blue (Michaels)
Accessories and Tools- ScorPal; die (YNS); black gems; Cuttlebug; Misti (My Sweet Petunia);
clear eb powder; pop dots; Posca Pen

Sunday, 15 November 2020

Fall Wishes


Good Morning.
Another Fall themed card before all the leaves in my backyard are gone.  
This is a fun technique using real leaves and some acrylic paint.  I love the results.

So here's what I did to create my card.
  • I went out into my backyard and picked out some leaves that would not be too big for my card front panel.  I have a shrub that still had these lovely leaves intact, so I picked a few to use for my card.  
  • I die-cut the panel with the Wonky Stitched die so I knew what size I was working with.
  • Using the raised veined backside of the leaf, I brayered on some acrylic paints in reds and oranges being sure to cover the whole surface.  I carefully picked up the leaf and pressed it onto my panel.
  • I repeated that process with another leaf that was a bit bigger and placed it along the side for interest.
  • I set that aside to dry which didn't take long as there was a thin coat of paint used....that's important so you don't lose the detail of the leaf.
  • While that dried, I pulled out some Distress Oxide inks that I thought would match the orange and reds.  I ended up with some Barn Door, Candied Apple and Carved Pumpkin inks.
  • I randomly stamped and filled in all the areas around the leaves using a variety of stamps from AALL and Create.  They have such wonderful stamps for creating a collage style background on cards.
  • When I was happy with all the stamping, I placed the piece into my Misti and stamped the sentiment and clear heat embossed it.  
  • I splattered with my black Posca pen, then I mounted the piece onto some red, then orange cardstock and then onto a heavy white card base.


 Thanks so much for coming by and taking a look.

Adding my card to these challenges:
Simon Says- THANKSGIVING
Inkspirational- FRAME IT
Crafty Calendar- ANYTHING GOES


Supplies
Stamps- Everyday Sentiments (YNS); Splattered Numbers #350 (AALL and Create); 
Overlapping Texture #307 (AALL and Create)
Inks- Distress Oxides (colours above); acrylic paint (Dollar Tree)
Paper- heavy white (Scribes Nook)
Accessories and Tools- brayer (Speedball); leaves from the garden; 
Wonky Stitched Die (Avery Elle); Cuttlebug; Posca pen

Tuesday, 1 September 2020

Snowy Days


Welcome
I have 2 cards for you today.
I've been playing along with the Dare to Get Dirty Challenges at Splitcoast Stampers.  Every year they have a huge challenge with many great prizes to be won.  I'm also trying to get ahead of the game with making Christmas cards so it all works.

So onto my card details.
  • I began by creating the main popped up panel.  I cut down an inked piece I had in my stash that was inked using my Distress Oxide inks. (I think I used some Salty Ocean, Peacock Feathers and Cracked Pistachio but I'm not totally sure as it was done a long time ago)
  • While that dried, I die-cut the little village from Your Next Stamp, placed it into my Misti and stamped the sentiment with some black Versafine Clair and clear heat embossed it. 
  • Before I glued the die cut over the inked bkg., I splattered the blue sky with some white and black using my Posca pens.
  • I wanted the little panel to have some kind of border, so I die cut a piece of white using the Diagonal Stitched die from MFT and glued it all together.  
  • Using another sheet of white cardstock, I placed it into my Misti and stamped the Houndstooth from Hero Arts using some Peacock Feathers Distress ink.  I thought it made for a nice matching background.
  • I glued the stamped panel onto a heavy white card base, then pop dotted the small panel over that.
 

Supplies
Stamps- Houndstooth (HA); Peace, Love, Joy (Right at Home)
Inks- Distress Oxides (TH); Versafine Clair Noir
Paper- heavy white (Scribes Nook)
Accessories and Tools- Posca pens; Diagonal die (MFT); village die (YNS);
Inking Tool (TH); Cuttlebug; clear eb powder; heat tool; pop dots; Misti


Here's what I did to create this card.
  • I began with a piece of heavy white cardstock, my Gel Plate, brayer and acrylic paint.
  • I brayered some purple and blue acrylic paints over my Gel Plate in a loose application so there would be some white areas.  I laid my cardstock panel on top of the paint and rubbed firmly, getting a good print.  I lifted it off the plate and set aside to dry. *I just used some acrylic paints that I picked up at the Dollar Tree.  They are more watery and help give the more distressed look to the background.
  • When dry, I placed the snowflake die from Simon Says over the painted panel and cut it out in my Cuttlebug.  I also cut 3 more of the snowflakes on some more plain white cardstock and glued them all together, making a thick snowflake.
  • I placed the painted piece into my Misti and stamped the sentiment from MFT with Versafine Clair Noir ink and clear heat embossed it.
  • Next, I glued the painted panel that had the snowflake cut out of it onto a piece of purple cardstock and glued the snowflake back into the die cut area, fitting it in perfectly.  
  • I added a purple gem to the center of the snowflake and then glued it all onto a heavy white card base.

Supplies
Stamps- Hand Lettered Holiday (MFT)
Inks- Versafine Clair Noir; acrylic paint
Paper- heavy white (Scribes Nook); purple cs
Accessories and Tools- Misti (My Sweet Petunia); Gel Plate; Speedball Brayer; purple gem; 
clear eb powder


Thanks so very much for coming by and taking a look.
So sorry for the messed up spacing in this post....Blogger was just not cooperating at all this morning!!

Friday, 28 August 2020

For You

 Good Morning Friends
I hope you are all doing well out there.
I am back to work this week....a first since the middle of March.  
I made this background weeks ago and finally got around to making a card using it inspired by a sketch challenge over at Splitcoast Stampers.


So here's what I did for creating my card.
  • I began with a piece of Yupo paper (yupo is a plastic coated paper and great for alcohol inks)
  • I dropped some blue Ranger Alcohol ink onto the Yupo starting right at the center of my panel.
  • I dropped some Rubbing Alcohol onto the drop of AI then using my small blower, I blew the inks outwards from the middle.  This is what my blower looks like:


  • I repeated that process using some purple Alcohol inks and more Rubbing Alcohol. 
  • I cut the panel down to fit onto my card base and glued it all in place. 
  • Using the Zinnia flower stencil from A Colorful Life Designs, I stenciled the smallest flower using Salty Ocean and Seedless Preserves Distress Oxides onto a piece of white card and die cut it into a circle. I splattered the flower with water to lift some of the ink and when dry, I traced around the flower using a fine line pen. 
  • I stamped the sentiment from Your Next Stamp and then clear heat embossed it.
  • I glued on the sentiment, then pop dotted the flower over to the side.
  • I added a black gem to the flower center.


Thanks so much for coming by and taking a look.

Discount Code for A Colorful Life Designs

Adding my card to these challenges:
Simon Says Wed.- ANYTHING GOES
Cardz 4 Galz- JUST SAYING HELLO


Supplies
Stamps- Everyday Sentiments (YNS)
Inks- DOX, Versafine Clair, Ranger Alcohol ink
Paper- Yupo, heavy white (Scribes Nook)
Accessories and Tools- World's Smallest Blower; Rubbing Alcohol; clear eb powder;
Zinnia Stencil (A Colorful Life Designs); black gem; inking foam, black Signa Pen