Showing posts with label tree. Show all posts

Thursday, 19 December 2024

It Beginning to Look a Lot Like Christmas


Good Morning
I had fun playing with this stencil from A Colorful Life Designs called
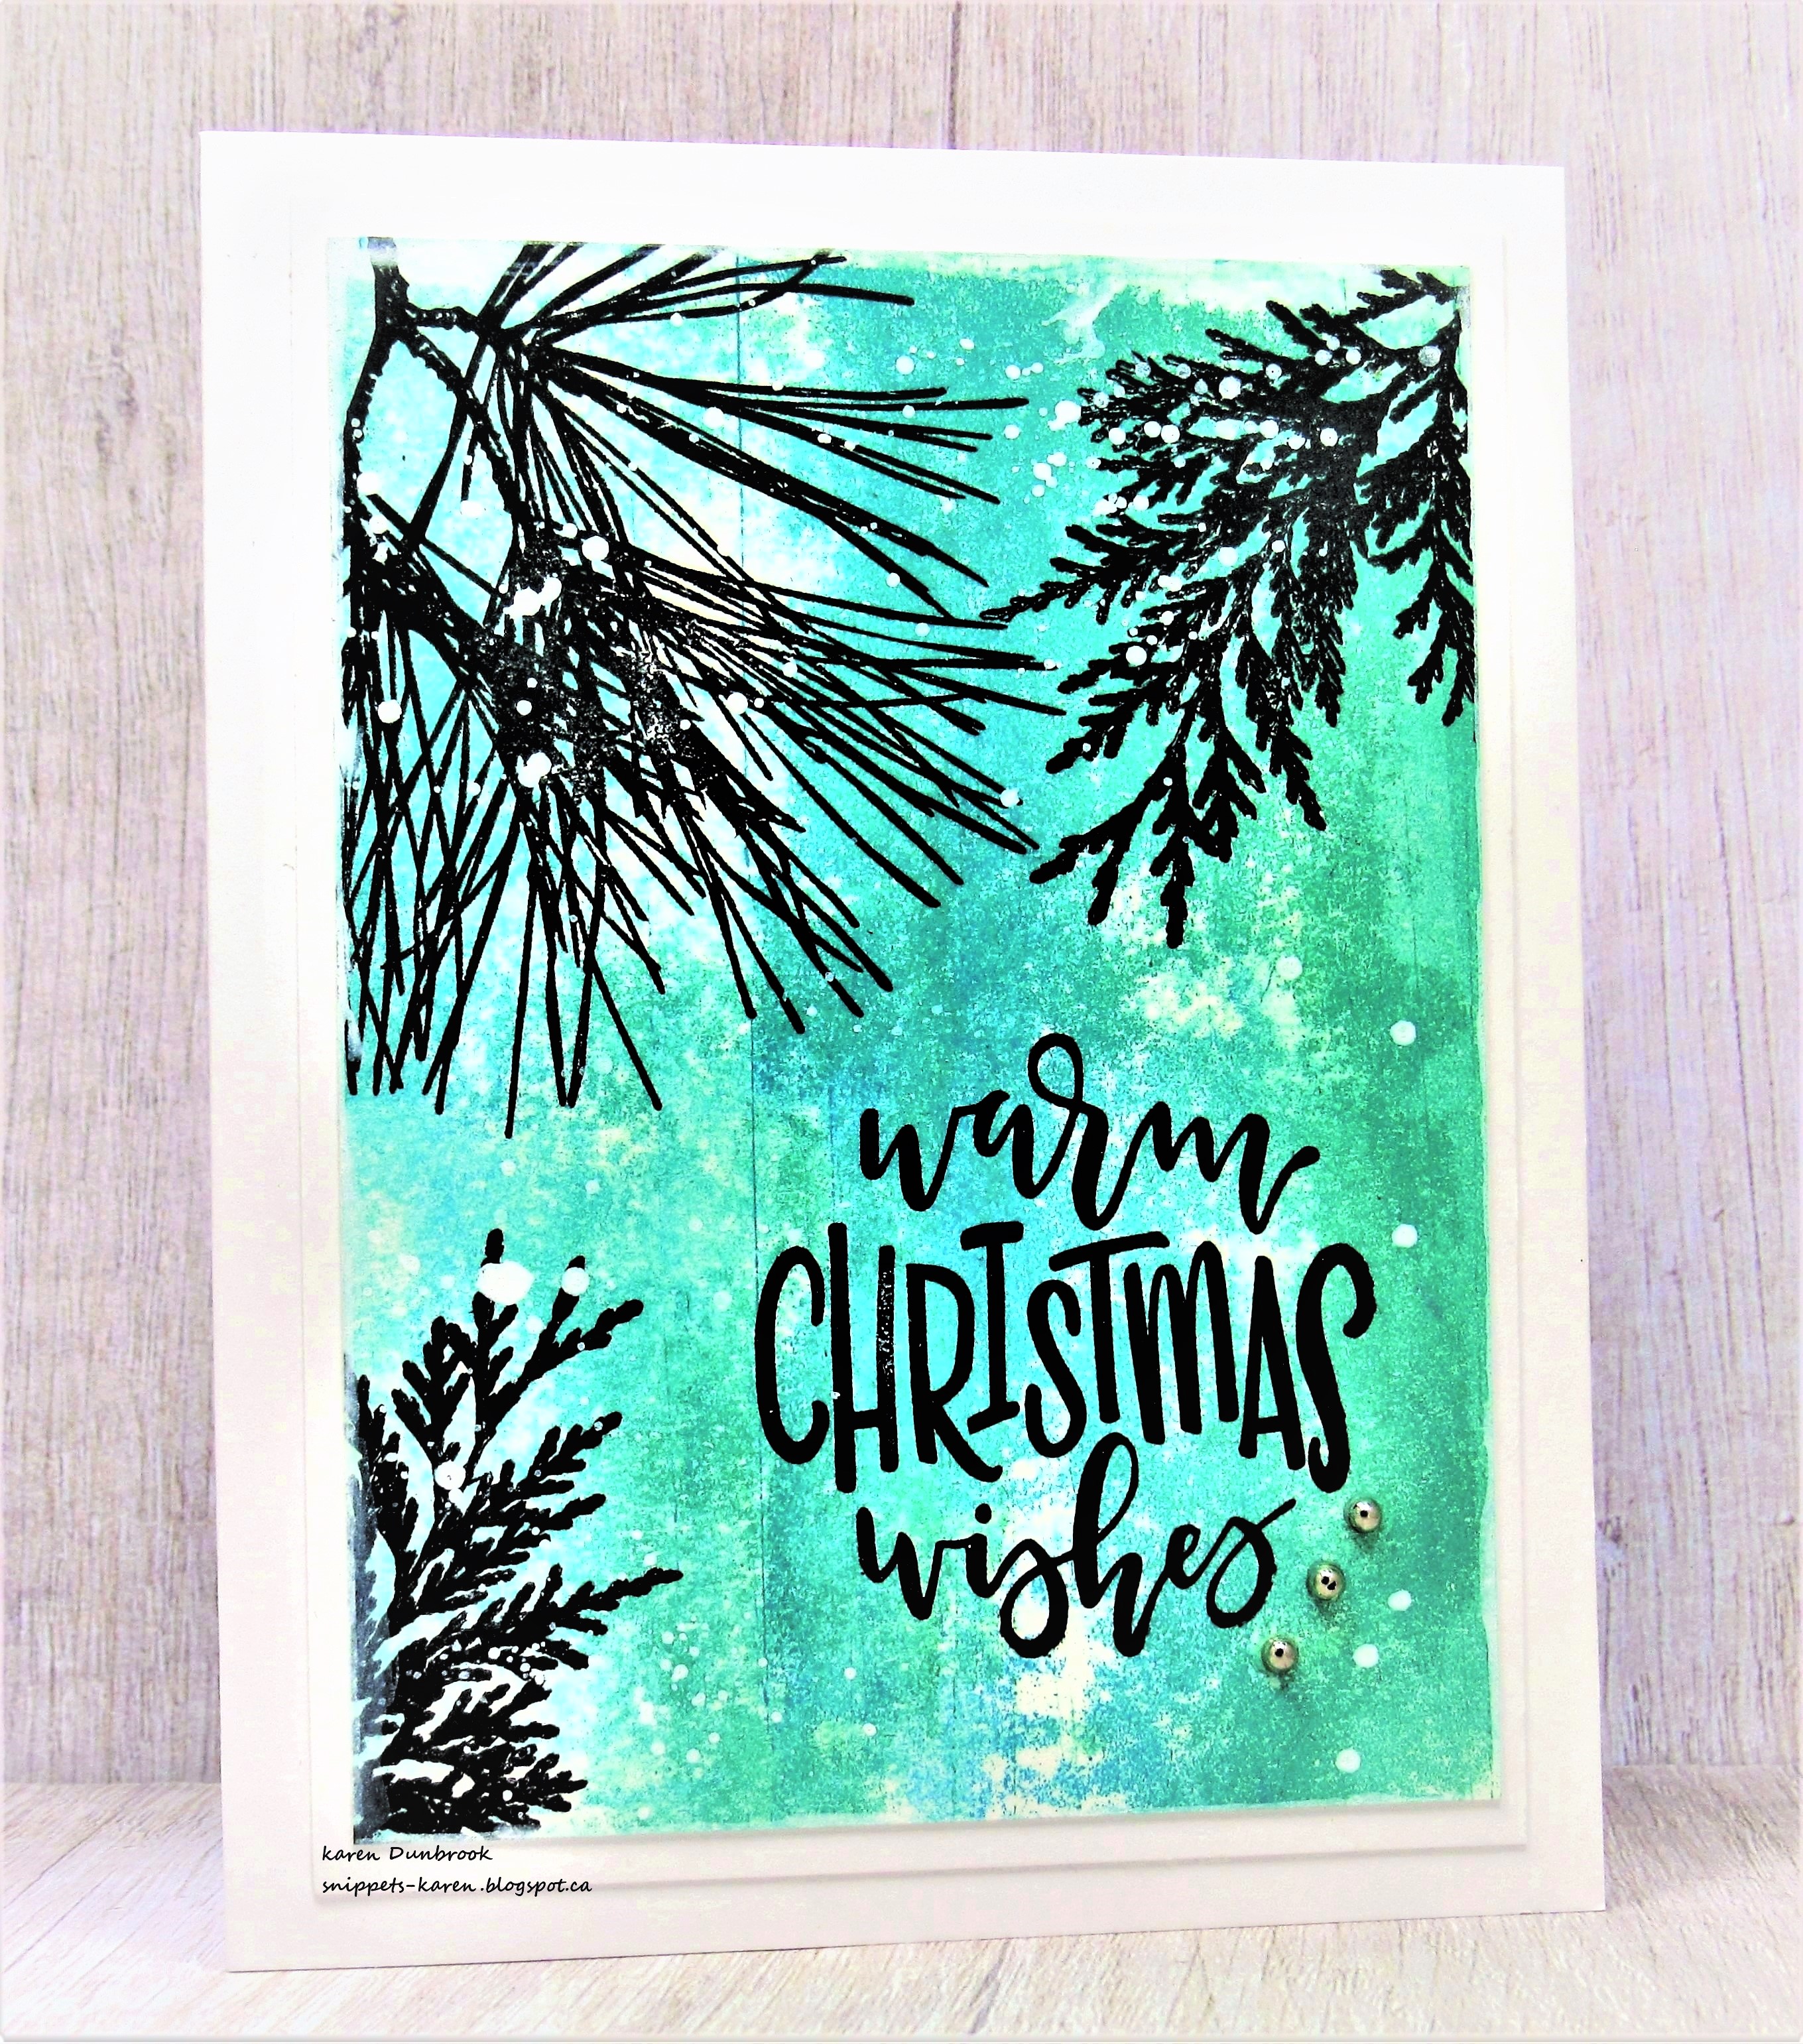
A bit of inking and some embellishments, made for a happy feeling holiday card.

So, here's what I did to create my card.
  • I placed the Iron Cross stencil over a piece of white cardstock and inked it up with some Rustic Wilderness Distress Oxide ink.  This stencil is a 3 x 6" stencil, not as wide as other stencils and great if you want to just create a border or ink portions of your project.
  • I lifted the stencil off and turned it sideways across the middle of my panel and matched the pattern up.  I inked with the same green then splattered the whole panel with my white Posca pen.
  • I glued the stenciled card front onto a piece of dark green cardstock, then onto an A2 sized white card base.
  • I added the embellishments with foam tape to finish off my card.

Here is the stencil I used:

My Discount Code for A Colorful Life Designs:
KarenFan10

Thanks so much for coming by and taking a look.

Adding my card to these challenges:
Little Red Wagon- MERRY CHRISTMAS
The Male Room- ANYTHING GOES
The Holly and Ivy Christmas- ANYTHING CHRISTMAS GOES

Supplies
Stamps- none
Inks- DOX
Paper- heavy white (Scribes Nook, Waterloo, Ont.)
Accessories and Tools- stencil (A Colorful Life Designs); TE Blending Brushes;
white Posca pen; Vintage Holly Jolly Bits (Simple Stories)

Sunday, 17 November 2024

Geometric Christmas Duo


Welcome
Meet the fun new stencil from A Colorful Life Designs called
I has 2 different trees to stencil with so many possibilities.
I decided to use both the trees from the set to create a geometric design.

So, here's what I did to create my card.
  • I placed the tree at the top of the Geometric Christmas Duo stencil onto a piece of white cardstock sideways (it's the largest inked area in the middle under the sentiment) and inked it up with some Cracked Pistachio and some Rustic Wilderness Distress Oxide ink.
  • I lifted the stencil, moved it to the top and inked the same tree again with the green inks.
  • I lifted the stencil off, cleaned it and then repositioned the tree at the bottom of the stencil along the top edge of my card front and inked again creating a plaid pattern.  I repeated the process for the bottom edge next.
  • To add more interest to the design, I used a fine line black marker and a ruler to add the lines.
  • I splattered the whole panel with my white Posca pen and set aside to dry.
  • I die cut the sentiment from some green foil paper and added that over a with die cut shadow. 
  • I glued the stenciled card front panel onto a piece of white cardstock, then green, then onto an A2 sized card base.
  • I used some foam tape to pop the sentiment over the panel and then added 2 silver die cut snowflakes and some silver gems.

Here is the stencil I used:
Geometric Christmas Duo

My Discount Code for A Colorful Life Designs:
KarenFan10

Thanks so much for coming by and taking a look.

Adding my card to these challenges:
Little Red Wagon- WINTERTIME
Krafty Chicks- CHRISTMAS

Supplies
Stamps- none
Inks- DOX
Paper- Scribes Nook- Waterloo, Ont.; foil paper (Dollarama)
Accessories and Tools- stencil (A Colorful Life Designs); white Posca pen; 
fine line black marker; Merry Christmas die (Creative Expressions)

Saturday, 24 August 2024

Happy Holidays


Good Morning
When I saw this new stencil for August from A Colorful Life Designs, I thought Christmas.  
And since it's never too soon to start on our holiday cards meet the new 
This stencil has so many possibilities.

So, here's what I did to create my card.
  • I began by putting a piece of white cardstock onto my Make Art Station and put the Changing Triangles stencil over my paper.  
  • I inked it up with some Cracked Pistachio and some Rustic Wilderness Distress Oxide ink.
  • I splattered the panel with my white Posca pen and set aside to dry. 
  • Next, I inked up another panel exactly the same way as I wanted to cut up the triangles for my design.
  • While that dried, I stamped and die cut the sentiment using some more of the Rustic Wilderness DOX ink.
  • I cut the stenciled panels up to create the design.  I wanted a large tree in the middle to represent Christmas tree.
  • I glued the cut pieces onto a piece of white cardstock, then onto a piece of dark green and then finally onto an A2 sized card base.
  • I use some foam tape to pop the sentiment over the bottom and then found this silver snowflake in my stash to add to the top of the tree.

Here is the stencil I used:

Discount Code for A Colorful Life Designs
(Affiliate with no extra cost to you) 

Thanks so much for coming by and taking a look.

Adding my card to these challenges:
Cut it Up- ANYTHING GOES

Supplies
Stamps- Holiday Sentiments (Photoplay)
Inks- DOX
Paper- heavy white (Scribes Nook- Waterloo, Ont.)
Accessories and Tools- stencil (A Colorful Life Designs); Make Art Station (Ranger);
small inking brushes (Amazon); white Posca pen; foam tape; snowflake die (SSS)

Friday, 15 December 2023

Merriest Wishes

Good Morning
Today's card features some stencil layering and stamping.
I used the 16 Circle Shadow and the Mixed Bars stencils 
from A Colorful Life Designs.

So, here's what I did to create my card.
  • I began with a piece of white cardstock on my Make Art Station and placed the 16 Circle Shadow stencil over that.  I inked it up with some Cracked Pistachio and I shaded with some Peacock Feathers Distress Oxide ink.
  • Leaving the circle stencil in place, I put the Mixed Bars stencil over the top of that and inked with some Rustic Wilderness DOX ink.
  • I removed the stencils but repositioned the circles into the open areas and inked with some more Cracked Pistachio DOX ink.
  • I placed the stenciled panel into my Misti to stamp the pine boughs and the grid patterns into the corners.
  • I splattered the whole panel with my white Posca pen and set aside to dry.
  • I die cut the sentiment from some green cardstock 2 times and then once from some beige cardstock and glued them all together.
  • I glued the stenciled card front onto another piece of beige cardstock, then onto an A2 card base.
  • I glued the sentiment onto the front panel and added 3 silver gems.

Here are the stencils I used:


Discount Code for A Colorful Life Designs
(Affiliate with no extra cost to you) 

Thanks so much for coming by and taking a look.

Adding my card to these challenges:
Little Red Wagon- MERRY CHRISTMAS
Krafty Chicks- CHRISTMAS
Fab 'n' Funky- CHRISTMAS

Supplies
Stamps- Ornamental Pine (SU); Off the Grid (SU)
Inks- DOX
Paper- heavy white (Scribes Nook- Waterloo, Ont.)
Accessories and Tools- stencils (A Colorful Life Designs); Make Art Station (Ranger);
white Posca Pen; Misti (My Sweet Petunia); TE Blending Brushes; 
die and shadow (Photoplay)

Sunday, 30 October 2022

CAS Christmas


Welcome
Today's card is a quick, clean and simple one.
The background was a piece I found in my stash.

So, here's what I did to create my card.
  • Like I mentioned above, I found this background in my stash.  It was a sheet I used to roll Distress Oxide inks off of my brayer while Gel Plate printing.  I always save those sheets as they are easy to stamp onto and the blended inks left behind are beautiful. I will have to guess at the colour combo though....Peacock Feathers, Cracked Pistachio and some Peeled Paint.
  • I placed the previously inked panel into my Misti and stamped the tree boughs and the sentiment.
  • I splattered with a generous amount of ink, then added 3 silver gems.
  • I glued it all onto an A2 sized card base.

Thanks so much for coming by and taking a look.

Adding my card to these challenges:
Simon Says Wed.- ANYTHING GOES
 CHNC Challenge- ANYTHING CHRISTMAS- MAKE YOUR OWN BKG
Winter Wonderland- LET IT SNOW


Supplies
Stamps- Evergreen (Darkroom Door); Encircled in Warmth (SU); 
Ornamental Pine (SU)
Inks- Distress Oxides; Versafine Clair
Paper- heavy white (Scribes Nook- Waterloo, Ont.)
Accessories and Tools- Speedball Brayer; Posca pen; Misti (My Sweet Petunia)

Sunday, 28 August 2022

Embossing Folder Stamping with a Twist


Welcome
It's my turn to host the TLC (Technique Lovers) Challenge over at Splitcoast Stampers.
I always try my best to come up with challenges that are accessible to everyone and uses supplies we all most likely have in our stashes.
So I'm calling my challenge:

I have been trying to work on getting some Christmas cards made, so this one is another to add to the collection, all ready to mail out for the holidays.  

So here's what I did to create my card.
  • I began by looking through my supplies and found an embossing folder and a stencil that would work well together.  That really helps to make a more cohesive card front panel.
  • I opened the Texte Grunge Embossing Folder and rubbed some Cracked Pistachio Distress Oxide ink just on portions of the folder front, sprayed with water and then pressed my cardstock panel into the wet ink.  *For this technique, it is important not to cover the whole eb folder with ink as you want some white areas to be left behind*
  • I dried that, then using the Indian Blanket stencil from A Colorful Life Designs, I filled in the open areas randomly with the same above ink, merging the two patterns together. 
  • Next, I place the pine bough stamp in my Misti, inked it up with some Evergreen Bough DOX ink and stamped.  To add interest and more depth to the boughs, I used a Tombow marker to colour on just parts of the bough, sprayed with water and stamped again.
  • I repeated that process 3 more times, spacing out the greens over the card front.
  • When I was happy with the stamping, I splattered using my white Posca pen.
  • I stamped the sentiment between the boughs using my Misti again.
  • I used the end of a stylus to add the berries to the branches with some Barn Red DOX ink.  It helped brighten the branches a bit.
  • I glued it onto a piece of white cardstock, then onto an A2 card base.
  • Finally, I added 3 red gems near the sentiment.

Here is the stencil I used:

Discount Code for A Colorful Life Designs
(affiliate with no extra cost to you)

Thanks so much for coming by and taking a look.

Supplies
Stamps- Ornamental Pine (SU)
Inks- DOX; Versafine Clair, Tombow marker
Paper- heavy white- Scribes Nook- Waterloo, Ont.
Accessories and Tools- Embossing Folder (Carabelle); Indian Blanket stencil (ACLD);
TE Blending Brushes; Misti (My Sweet Petunia); white Posca Pen; red gems

Tuesday, 9 August 2022

Simple Stamping


Good Morning
If you are a stamper or card maker, you get it.
It is the middle of summer but if you send out cards for Christmas, we need to start well in advance creating them before all the hustle and bustle the holidays bring, are upon us.

Today's card is done with some simple stamping.  I picked up this Ornamental Pine set recently.  
It's an older one I've admired for a long time and a great one for the holidays.

So here's what I did to create my card.
  • I began by looking through my stash of inked backgrounds.  I found this one done as I rolled the ink off my brayer.  To get the hint of a design in the background with the Blueprint Sketch Distress Oxide ink, I sprayed the brayer with water before rolling it onto the paper.
  • I placed the inked panel into my Misti and stamped the tree boughs near the top and the sentiment from the same set, near the bottom.
  • To give it a wintery look, I splattered with my white Posca pen.
  • I glued it onto a piece of white cardstock, then onto an A2 card base.

Thanks so much for coming by and taking a look.

Adding my card to these challenges:
Simon Says Monday- SPRITZ AND SPLATTER
(my son and I go and cut evergreen boughs every yr to fill our urns)


Supplies
Stamps- Ornamental Pine (SU)
Inks- Versafine Clair, DOX
Paper- heavy white (Scribes Nook, Waterloo, Ont.)
Accessories and Tools- Misti (My Sweet Petunia); white Posca pen; Speedball Brayer

Saturday, 2 October 2021

Oh Christmas Tree


Hello and Welcome
Time is just going by so fast.  
With sweater weather arriving so quickly here where I live, it reminds me that I need to get going on making some more holiday cards.  
So into my stash I went and this is what I came up with.

Here's what I did to create my card.
  • As I went through my stash of inky backgrounds, I found all the practice sheets that I had done on my Gel Plate with acrylic paint while taking a class from Vicki Boutin.  They certainly weren't my favourite so I decided to change that.  I found this one that had blue and green paint on it.  Kind of streaky and not great.  I scratched my head and wondered what to do.  I just picked up a new embossing folder by Spellbinders called Forevergreen and thought I would give it a try.  
  • I placed the painted piece inside the Embossing folder and ran it through my machine a few times to get a good impression.  TIP: Lightly spray your paper with water before embossing to get a better impression.
  • Next, using a small sanding block, I gently rubbed over the raised area to remove some of the blue and green paint. Now to figure out how I would make the details more noticable.
  • I squeezed out a small amount of white acrylic paint onto my non-stick craft mat and using my brayer, I rolled some white paint gently over the top of the sanded areas.  I loved the results.
  • I splattered with more of the white paint that was left on my mat and set aside to dry.
  • I die cut the sentiment from Simon Says from some white cardstock twice and glued them together for stability.
  • When the panel was dry, I glued it onto a piece of green cardstock, then onto a white card base.
  • I glued the sentiment onto the panel, then added some green gems.


I was happy with the results of my card using the embossing folder and this otherwise 'throw away' piece of painted cardstock.
I hope this inspires you to look through your stash and use an otherwise rejected piece.
To see some of my other cards using this technique, go HERE and HERE.

Thanks so much for coming by and taking a look.

Supplies
Stamps- none
Inks- none, Basics Acrylic paint
Paper- white cardstock (Scribes Nook- Waterloo, Ont.)
Accessories and Tools- Forevergreen EB folder (Spellbinders); Speedball Brayer; 
Merry Christmas die (SSS); Spellbinder Platinum die cutting machine; green gems; sanding block

Thursday, 30 September 2021

Welcome Fall


Hello and Welcome
This card was just a fun one done during some spare time I had, trying out some new to me products.

So a bit of a story.......
In my neighbourhood, a local artist, Meredith Sexton, has decided to set up a Free Little Art Gallery.
It has been a wonderful addition to our area.  It is based on one she saw on social media set up in the States.  Anyone can contribute to the Gallery to share and anyone can take a piece of art to appreciate.  
I really like that it is all inclusive and lots of the kids in our neighbourhood have been adding special little art pieces as well as the artists.  
I've had the pleasure of adding some cards to the box, just a great little way for our community to connect and share some love during which has been a difficult year and a half.

Here are some pictures showing the box...I think more neighbourhoods should have this.


So onto my card details.
  • I began by creating what I would use for my background.  I cut a white cardstock panel, then using my Vicki Boutin Art Crayons, I inked it up.  I rubbed the crayons onto a piece of acetate, diluted with water and pressed onto my cardstock.  You can see this technique and how I used it in the Tutorials section above.
  • I added layers of colour to the background, drying between layers and dripping the extra ink to add interest.
  • I set the inked piece aside to dry, then took out another piece of white cardstock to stencil onto.  I place the Layered Fancy Leaf stencil over the cardstock and used some more of the crayons to ink it up.  I rubbed the crayon onto my sheet of acetate, then picked up the colour with a stencil brush.
  • I splattered with my black Posca pen and simply die cut the 'fall' letters from white cardstock.
  • I cut a white border using the Memory Box stitched dies, to create a frame.  I glued the first panel behind that frame then onto a heavy white card base.
  • Next, I cut another piece of white, a piece of matching orange, then the stenciled leaf using the stitched die again.  I glued them all together and foam mounted them over the inked background.
  • Finally, I glued on the 'fall' letters.

Here is the stencil I used:
Layered Fancy Leaf Stencil

Discount Code for A Colorful Life Designs
(affiliate with not extra cost to you)

Thanks so much for coming by and taking a look.

Adding my card to these challenges:
Simon Says Wed.- ANYTHING GOES
As You Like It- WINTER OR AUTUMMN
(no question...Autumn with all the inspiring colours that nature has to offer)

Supplies
Stamps- none
Inks- Vicki Boutin Art Crayons
Paper- heavy white (Scribes Nook- Waterloo, Ont.)
Accessories and Tools- Layered Fancy Leaf stencil (ACLD); Stencil brush (TH); Posca pen;
Stitched Fame die (Memory Box); alphabet letters (Photoplay); sheet of acetate