Welcome
It's my turn to host the TLC (Technique Lovers) Challenge over at Splitcoast Stampers.
I always try my best to come up with challenges that are accessible to everyone and uses supplies we all most likely have in our stashes.
So I'm calling my challenge:
I have been trying to work on getting some Christmas cards made, so this one is another to add to the collection, all ready to mail out for the holidays.
So here's what I did to create my card.
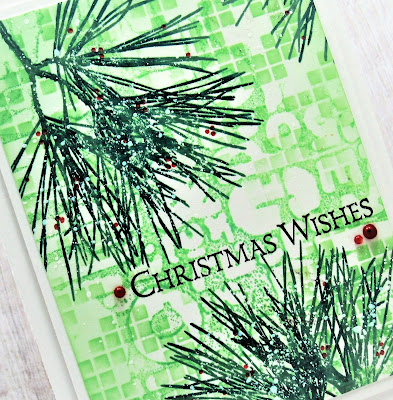
- I began by looking through my supplies and found an embossing folder and a stencil that would work well together. That really helps to make a more cohesive card front panel.
- I opened the Texte Grunge Embossing Folder and rubbed some Cracked Pistachio Distress Oxide ink just on portions of the folder front, sprayed with water and then pressed my cardstock panel into the wet ink. *For this technique, it is important not to cover the whole eb folder with ink as you want some white areas to be left behind*
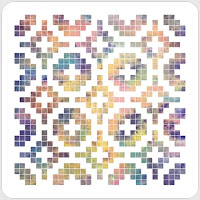
- I dried that, then using the Indian Blanket stencil from A Colorful Life Designs, I filled in the open areas randomly with the same above ink, merging the two patterns together.
- Next, I place the pine bough stamp in my Misti, inked it up with some Evergreen Bough DOX ink and stamped. To add interest and more depth to the boughs, I used a Tombow marker to colour on just parts of the bough, sprayed with water and stamped again.
- I repeated that process 3 more times, spacing out the greens over the card front.
- When I was happy with the stamping, I splattered using my white Posca pen.
- I stamped the sentiment between the boughs using my Misti again.
- I used the end of a stylus to add the berries to the branches with some Barn Red DOX ink. It helped brighten the branches a bit.
- I glued it onto a piece of white cardstock, then onto an A2 card base.
- Finally, I added 3 red gems near the sentiment.
Here is the stencil I used:
Discount Code for A Colorful Life Designs
*Just use the code KarenFan10 to get a discount on stencils and masks.*
(affiliate with no extra cost to you)
Thanks so much for coming by and taking a look.
Supplies
Stamps- Ornamental Pine (SU)
Inks- DOX; Versafine Clair, Tombow marker
Paper- heavy white- Scribes Nook- Waterloo, Ont.
Accessories and Tools- Embossing Folder (Carabelle); Indian Blanket stencil (ACLD);
TE Blending Brushes; Misti (My Sweet Petunia); white Posca Pen; red gems


8 comments:
Love the effect of the stencil and EF ♥
Wow...Gorgeous layered dry embossing, stenciling and stamped Christmas card, Karen. Thank you soooo much for sharing your detailed description. I plan to try your technique. TFS my very creative friend. Love and Hugs...Nancy
Brilliant technique Karen, you come up with the most wonderful ideas and cards.
Faith x
Such a fun card, love the background’s depth. I must say I was shocked at the prices when I researched this stamp…!! I am sure there is something similar out there that’s not at a collector’s price. The search is on! Your work is always so fresh and inspiring,! TY for sharing it with us! :-) 🧑🏼🎨
I love the idea of combining two different patterns and using an inked text EF and also the mosaic type pattern on the stencil which have merged together beautifully to make a wonderful background Karen, and the pine branches work brilliantly over the top..love the added berries too, and finished perfectly with the red gems. x
What a great technique Karen, and a beautiful card. Thanks ofr the inspiration
Blessings
Maxine
It's an absolutely gorgeous card and a fab technique - thank you for the idea! Take care. xxx
YOu have a way with stencils, Karen, but combining it with an embossing folder is such a great way to stretch them both. I didn't realize you didn't actually emboss the cardstock but used the folder as a stamp. I will never look at my folders and stencils as one-way use again.
Post a Comment