Showing posts with label Butterfly. Show all posts

Friday, 6 September 2024

Your Special Day!

Welcome
Today's card features this beautiful butterfly and the new stencil from A Colorful Life Designs called:

So, here's what I did to create my card. 
  • I cut a piece of white cardstock and placed the Flower Globe stencil over that.  I inked with these Distress Oxide colours:  Salty Ocean, Uncharted Mariner, Shaded Lilac and some Villainous Potion.
  • Next, I cut the stenciled flower circle in half and die cut the background of the wings from each side of the circle.
  • I die cut the outline of the butterfly with some black cardstock and then glued it over the piece I had cut from the circles to complete the look of the butterfly.
  • I glued the 2 halves of the circles onto a piece of white cardstock and then onto a piece of black and then onto an A2 sized card base.
  • I used some foam tape to add the butterfly over the circles, matching up the pattern.
  • I added some bling all along the butterfly body and then stamped the sentiment with Versamark and white heat embossed it.  I used some foam tape to pop the sentiment underneath the butterfly.

Here is the stencil I used:

Discount Code for A Colorful Life Designs
(Affiliate with no extra cost to you) 

Thanks so very much for coming by and taking a look.

Adding my card to these challenges:
A Cut Above- ANYTHING GOES
Try It On Tues.- MAKE IT COLORFUL
Crazy is our Fame- Stencils are our Game- ANYTHING GOES (option: Fall)

Supplies
Stamps- Simple Sentiment Strips (TE)
Inks- Versamark; DOX
Paper- heavy white (Scribes Nook- Waterloo, Ont.)
Accessories and Tools- stencil and gems (A Colorful Life Designs); TE Blending Brushes;
Detailed Butterflies die (TH- Sizzix); foam tape

Saturday, 1 June 2024

Butterfly Collage


Welcome
Today, I am showing you the new stencil from A Colorful Life Designs called 
I didn't use them as suggested by their name as waves, but instead by overlapping the inking I was able to create a fun background for my collage.

So, here's what I did to create my card.
  • I began by placing a piece of white cardstock onto my Make Art Station.  I added the Orderly Waves stencil over that and inked it up with some Cracked Pistachio Distress Oxide ink.
  • I removed the stencil, cleaned it off and then put it down again in the other direction and inked with some Peacock Feathers DOX ink.
  • I removed the stencil and rubbed the whole panel with my Anti-static powder.
  • I placed the stenciled piece into my Misti and stamped the Butterfly Collage with some black Versafine Clair ink and clear heat embossed it.
  • I glued the panel onto a piece of white cardstock, then onto a piece of black then onto an A2 sized card base.
  • Finally, I added 2 black gems inside the stamped images.

Here is the stencil I used:

Discount Code for A Colorful Life Designs
(Affiliate with no extra cost to you) 

Thanks so much for coming by and taking a look.

Adding my card to these challenges:
Simon Says Wed.- ANYTHING GOES
Time Out- MAGICAL
Krafty Chicks- ANYTHING GOES

Supplies
Stamp- Butterfly Collage (Prima)
Inks- DOX; Versafine Clair
Paper- heavy white (Scribes Nook- Waterloo, Ont.)
Accessories and Tools- stencil (A Colorful Life Designs); Make Art Station (Ranger);
TE Blending Brushes; Misti; black gems; Anti-static powder; clear EB Powder

Saturday, 28 May 2022

Collaged Butterfly


Welcome
Meet today's card.
I am loving this new Drippy Butterfly stencil from A Colorful Life Designs.  
This one comes with a stencil and a mask and I used both for my card.

So here's what I did to create my card.
  • I began by cutting a piece of white cardstock 3 3/4" x 5" for my card front.  I laid the Drippy Butterfly stencil over the paper, and inked it up with some  Broken China Distress Oxide inks.  
  • I removed the stencil and placed the mask over the butterfly and lightly inked around the outside edges of my card with some Peacock Feathers DOX ink.
  • Next, leaving the mask in place, I randomly stamped the Friends Script and the Texture around the outer edges with some Blueprint Sketch DOX ink.
  • I place the panel into my Misti and stamped the sentiment with some black ink.
  • I added some white splatters using my white Posca pen.
  • Lastly, I glued it onto a heavy white card base and added 3 black gems under the sentiment.

Here is the stencil I used:

Discount Code for A Colorful Life Designs
(affiliate with not extra cost to you)

Thanks so much for coming by and taking a look.

Adding my card to these challenges:
Simon Says Wed.- ANYTHING GOES
Little Red Wagon- SENTIMENT AS MAIN FOCUS
Try it on Tuesday- BUTTERFLIES
Double D - MONOCHROMATIC


Supplies
Stamps- Texture (Carabelle); Footprints (Inkylicious); Friends Bkg (Hero Arts)
Inks- DOX ink; Versafine Clair
Paper- heavy white (Scribes Nook- Waterloo, Ont.)
Accessories and Tools- Drippy Butterfly stencil (ACLD); Misti (My Sweet Petunia);
black gems, Posca pen

Sunday, 22 May 2022

Stencil Layering


Welcome
I love trying to use the things I have in my craft stash in a different way.  
For today's card, I layered 2 newly released stencils from A Colorful Life Designs together to give this beautiful Drippy Butterfly a brand new look.  The Summer Flowers stencil was just perfect layering to get the look I wanted.

So here' what I did to create my card.
  • I cut a piece of white cardstock and positioned the Drippy Butterfly stencil over my cardstock on my Waffle Flower Stencil Mat.  I then placed the Summer Flowers stencil right on the top of the Butterfly.
  • Using some Peacock Feathers Distress Oxide ink, I inked up just the center of the flowers using my TE Blending Brushes.  I moved outwards and inked the flowers with some Blueprint Sketch Distress Oxide inks and then finally added some Cracked Pistachio DOX to the rest of the stencil. 
  • I removed the flowers stencil and added just a bit more Cracked Pistachio ink to the open areas left behind on the butterfly.
  • I splattered with my white Posca pen and set aside to dry.
  • I stamped the TE sentiment onto a piece of black cardstock with some Versamark ink and white heat embossed it.  
  • I used the die that goes with that sentiment set to cut it out.
  • I glued the butterfly onto a piece of navy cardstock, then onto a heavy white card base.
  • I pop dotted the sentiment over the center of the butterfly.


Here are the stencils I used:


Discount Code for A Colorful Life Designs
(affiliate with not extra cost to you)

Thanks so much for coming by and taking a look.

Adding my card to these challenges:
Little Red Wagon- WITH A LITTLE HELP FROM MY FRIENDS
CASology- BOTANICAL

Supplies
Stamps- TE Simple Strips
Inks- DOX; Versamark
Paper- heavy white (Scribes Nook- Waterloo, Ont.)
Accessories and Tools- stencils (ACLD); TE Blending Brushes; TE Simple Strips die;
Posca pen; foam tape; Waffle Flower Blending Brushes

Sunday, 15 May 2022

Courage


Welcome
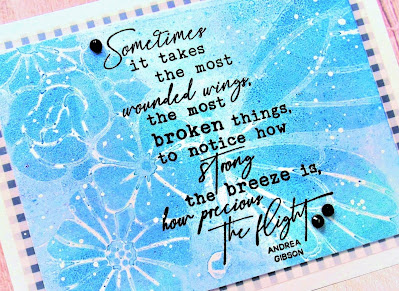
I'm back today with a card using this beautiful Layered Mixed Butterfly stencil from A Colorful Life Designs.
A very simple card made using my Gel Plate.

So here's what I did to create my card.
  • I began by cutting a piece of white cardstock and then got out my Gel Plate.
  • I pressed some Peacock Feathers and some Broken China Distress Oxide ink onto my plate and then used a brayer to smooth it all out.
  • I placed the Layered Mixed Butterfly onto the plate and gently pressed it into the plate using the rounded end of a paintbrush, being sure the stencil made good contact with the plate.
  • Then, I carefully removed the stencil, lifting off some of the ink and rubbed my piece of cardstock onto the plate to lift the print.
  • I splattered with my white Posca pen and set aside to dry.
  • When the print was dry, I placed it into my Misti to stamp the sentiment.
  • I glued the print onto a piece of checked cardstock, then onto a heavy white card base.

Here is the stencil I used:

Discount Code for A Colorful Life Designs
(affiliate with not extra cost to you)

Thanks so much for coming by to visit.

Adding my card to these challenges:
Beyond the Blue- GEL PRESS TIME
Shopping Our Stash- POWER OF PASTELS
We Love Stamping- LADY/or GIRL

Supplies
Stamps- Wounded Wings (Impression Obsession)
Inks- Distress Oxides, Versafine Clair
Paper- heavy white (Scribes Nook- Waterloo, Ont.)
Accessories and Tools- stencil (ACLD); Gel Plate; Speedball Brayer;
Misti (My Sweet Petunia); black gems