Showing posts with label PTI. Show all posts

Thursday, 6 January 2022

Feeling Blue


Welcome
I am trying to replenish my sympathy cards...always good to have a few on hand.
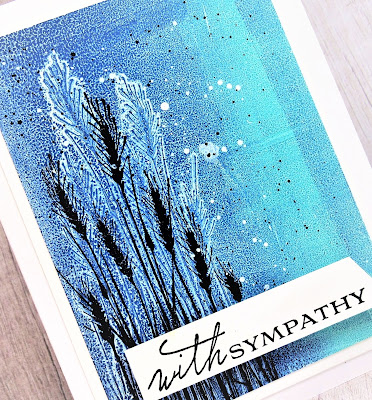
This one was a very simple design, made on my Gel Plate using Distress Oxide inks and a stamp.

So here's what I did to create my card.
  • I began with a piece of white cardstock, my Gel Plate, brayer and 2 Distress Oxide inks....Blueprint sketch and Salvaged Patina.
  • I pressed the Blueprint Sketch ink pad directly onto my Gel plate on the left and the Salvaged Patina on the right.  Using my brayer, I blended the colours together. 
  • I stamped the Tall Wheat directly onto my Gel Plate to remove some of the ink and then rubbed my piece of cardstock over the plate to lift the print. I got a cool looking shadow effect from stamping onto the plate.
  • When the print was dry, I inked up the  stamp again with some black Versafine Clair ink and stamped over the ink lifted area of my print.
  • I splattered with my black and white Posca pen and set aside to dry.
  • I stamped the sentiment from PTI onto a piece of scrap white cardstock in my Misti.
  • I glued the printed panel onto a heavy white card base, then pop dot mounted the sentiment along the bottom.


Thanks a lot for coming by and taking a look.

Adding my card to these challenges:
Shopping Our Stash- STARTS WITH 'S' (sympathy)
Krafty Chicks- STAMP ACT


Supplies
Stamps- Tall Wheat (Hero Arts); Sentiments (PTI)
Inks- Versafine Clair; Distress Oxides
Paper- heavy white (Scribes Nook- Waterloo, Ont.)
Accessories and Tools- Gel Plate; Speedball brayer; Posca pens; foam tape; Misti

Sunday, 12 July 2020

My Friend


Hello and Welcome
Here is another card using one of my favorite stencils called Big Leaves from A Colorful Life Designs.
I chose some fun shades of green and just a hint of blue for a pleasant looking card.
I am trying something a bit different in my blog post today.  I am going to add the steps to creating my card in a 'bullet' form to see if it makes it a bit easier for you to follow what I did.
Please let me know if you prefer this type of format when I post and if it makes it easier for you to follow.

So onto my card details.
Here are the steps:
I am using my Gel Plate so be sure to have all your supplies ready if you are going to recreate this.
You will need a brayer, Gel Plate, paper, stencil, acrylic paint

1.  I began with a piece of heavy white cardstock.  I squeezed out some paint onto my non-stick craft mat then rolled my brayer through the wet paint until it was covered.  
2.  I laid the stencil on a flat surface and rolled my brayer over the stencil starting at one side and rolling to the other.  Be sure not to go back and roll again....you just need to roll once.
3.  Now the stencil image is transferred onto your brayer, roll from top to bottom onto your Gel Plate.  Only roll once with firm pressure. 
4.  Set your brayer aside and lift or pull the print.  That means you rub firmly with pressure all over you paper to transfer the paint to your paper.  If it dries before you have a chance to pull it, add paint over the top with the brayer to pull the print for a different effect.

When the print was dry, I glued it onto a piece of coordinating cardstock then onto a heavy white card base.  I stamped the sentiment and pop dotted it over the panel.


Thanks so much for coming by and taking a look.

Discount Code for A Colorful Life Designs


Supplies
Stamps- Friend (PTI)
Inks- Versafine Clair; acrylic paint (Dollar Tree)
Paper- heavy white (Scribes Nook)
Accessories and Tools- Gel Plate; brayer (Speedball); pop dots; 
Big Leaf Stencil (A Colorful Life Designs)

Saturday, 27 June 2020

Peace and Joy


Welcome
Meet today's card.
Since I am still not working yet, I've been trying to be productive in my extra time.  I thought it was a good time to start working on a few holiday cards when I heard the guy on the radio said it was 6 months until Christmas.  lol
On another note, I have been watching the Facebook Lives by Vicki Boutin.  I love her fun attitude about creating and 'making magic happen'.  The other night she challenged us to create a background with some blending and watermarking and that is how my background was created. 
If you are interested in seeing any of her 'lives' she posts them all on her FB artist page and also on YouTube.

Here is what the piece looked like:


So onto my card details.
I began with a piece of heavy white cardstock.  I loosely covered it with some Gesso using a palette knife.  Not all the areas are covered, I applied it like I was buttering my toast.  I set that aside and let the whole thing dry.  It dried quickly as the layer of Gesso was pretty thin.  
(you can tell if it's dry when it doesn't feel cool to the touch)
Next, using a piece of acetate, I rubbed some of Vicki's Art Crayons directly onto the acetate, diluted it with water and pressed it onto my panel which you can see on the left hand side.  On the right hand side, I rubbed some VB crayons in blues onto my acetate and without diluting it, I picked up the colour using a stencil brush and rubbed it along the side and up into the green, blending the colours together.
Since the crayons are water soluble, I was able to remove some of the ink with a baby wipe and add some watermarking to the piece using the Messy Dots stencil from A Colorful Life Designs.
I used the Hemstitch die to cut the inner frame then stamped the sentiment from PTI and clear embossed it.
Using a scrap of inky paper, I die-cut the evergreen boughs and glued them at the top.
I finished it off by splattering using my white Posca pen and added the bow at the top of the bough.


Thanks so much for coming by and taking a look.

Adding my card to these challenges:
Simon Says Wed.- ANYTHING GOES
Creative Artiste Mixed Media- ANYTHING GOES
Fab 'n' Funky- CHRISTMAS

Discount Code for A Colorful Life Designs


Supplies
Stamps- Tis the Season (PTI)
Inks- VB Art Crayons; Versafine Clair
Paper- heavy white (Scribes Nook)
Accessories and Tools- Hemstitch die (Spellbinders); Everygreen dies (TH)
Messy Dots stencil (A Colorful Life Designs); sheet of acetate; Mister (TH)