
Good Morning
So much on the go but finding some time to 'play'. It's good for the soul.
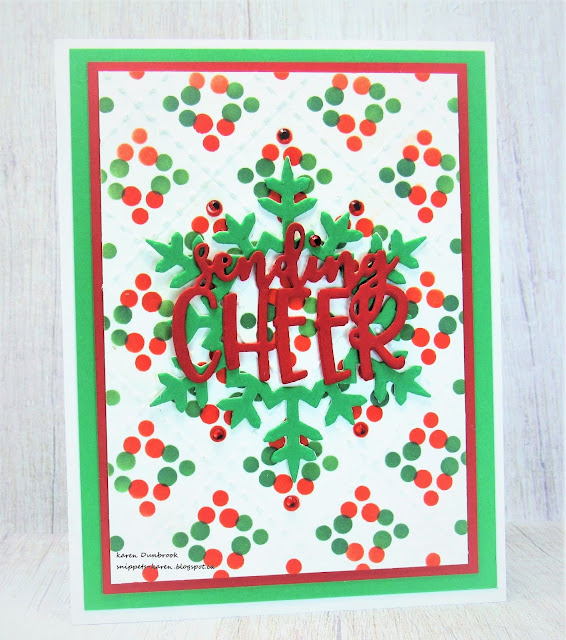
So during my play time, here's what I came up with.
A simple background using just one part of a stencil...I like to try new things and see what I can make.
I'm also playing with a new to me tool from Waffle Flower called the Stencil Mat. It's a silicone mat that grips your stencil and has a corner edge detail that is very helpful when using layering stencils. You can tuck the stencil right into the corner and it won't move. Then when you are ready to layer, just place the next stencil into the corner for perfect placement.
So here's what I did to create my card.
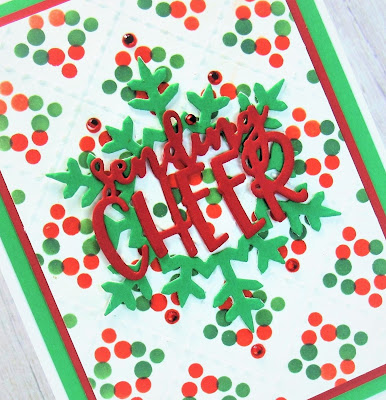
- I pulled out my Stencil Mat and a piece of white cardstock and placed the second part of the Layered Holly stencil onto my paper and rubbed on some Candied Apple Distress Oxide ink. That gave me the first set of 3 dots in red.
- I lifted the stencil and rotated it 180 degrees so the berries were now under the first ones I stenciled and applied more of the red DOX ink.
- I cleaned the red ink off of my stencil and repositioned it with the dots to the left side of the red ones I had already done. I rubbed on some Rustic Wilderness Distress Oxide ink, lifted the stencil and rotated it again to add the berries on the right hand side.
- After all the stenciling was done, I was left with this fun dot pattern.
- To help add interest and define the areas of the dot patterns, I placed the piece into my ScorPal and using my ScorBug, I added the perforated dots that sort of looked like some 'faux' stitching and gave a quilted look.
- I die cut the snowflake/wreath from some green cardstock and glued that over the dot background.
- I die cut the sentiment 2 times from some heavy red cardstock and glued them together. I then glued that over the wreath.
- I added some red gems to help jazz it up a bit.
- I glued the finished panel onto some more red cardstock, then onto the green and then finally onto a heavy white card base.
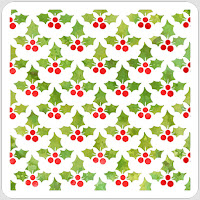
Here is the stencil I used...(just the berries part)
Discount Code for A Colorful Life Designs
*Just use the code KarenFan10 to get a discount on stencils and masks.*
(affiliate with not extra cost to you)
Thanks so very much for coming by and taking a look.
Supplies
Stamps- none
Inks- Distress Oxides (TH)
Paper- heavy white (Scribes Nook, Waterloo, Ont.)
Accessories and Tools- Layered Holly stencil (ACLD); Stencil Mat (Waffle Flower);
Inking Brushes (TE); Wreath and Snowflake die (Sizzix); Sending Cheer die (WPlus9);
gems (Dollar Store); ScorPal; ScorBug, Stencil Mat (Waffle Flower)
6 comments:
Great way to use the stencil on your vibrant and happy card Karen x.
Love this bright and cheery card Karen
Faith x
A lovely bright cheery card Karen, the colours and design are fabulous, Kate x
great use of the stencil Karen, and love the traditional colours ♥
How innovative and clever Karen, and I love the two colours for the pattern of dots and the added snowflake frame with the strong red sentiment..I love the red and green matted layers too. x
Amazing use of the stencil Karen, and a wonderful result - love the way you gave the card a quilted look too. A fabulous result
Stay safe
Blessings
Maxine
Post a Comment