Wednesday, 3 January 2024

Happy New Year!


Happy New Year!!
I hope you enjoyed a wonderful Holiday Season and that you were able to find much peace and happiness.


Meet today's card.  
Time to show you one of the new stencils for the New Year from A Colorful Life Designs called 
I love doing stencil layering to create unique and interesting designs so I paired it up with the Jewel Snowflake to see what I could come up with.

So, here's what I did to create my card.
  • I got out a piece of white cardstock and placed it onto my Make Art Station.  I positioned the Fancy Doily stencil over the cardstock and inked it up with some Broken China Distress Oxide ink.
  • Leaving that stencil in place, I put the Jewel Snowflake right over it and then inked it again but this time with some Uncharted Mariner DOX ink.
  • I removed both stencils and was left with this lovely design.
  • Next, I splattered with my white Posca pen and let dry.
  • When it was dry, I placed the stenciled panel into my Misti, stamped the sentiment and then clear heat embossed it.
  • I glued the panel onto some white cardstock, then onto a piece of navy and then onto an A2 sized card base.
  • Finally, I added 3 silver gems around the sentiment.

Here are the stencils I used:


Something new as well.  A Colorful Life Designs will be also selling these:

Discount Code for A Colorful Life Designs
(Affiliate with no extra cost to you) 

 A big thanks to all of you that take the time to come and have a look and leave me such kind comments.  All are so very appreciated.  

Adding my card to these challenges:
Little Red Wagon- WHAT'S NEW
Simon Says Monday- A NEW START
Paper Minutes- SOMETHING NEW

Supplies
Stamps- Christmas Cheer (retired)
Inks- Versafine Clair; DOX
Paper- heavy white (Scribes Nook- Waterloo, Ont.)
Accessories and Tools- stencils (A Colorful Life Designs); Make Art Station (Ranger);
white Posca pen; TE Blending Brushed; silver gems

Monday, 25 December 2023

Merry Christmas


Wishing you the most special Christmas!!

I hope you day is filled with special moments and many happy memories made.

Saturday, 23 December 2023

Joyful Moments


Good Morning
Just a few days until Christmas arrives.  I hope you holiday plans are going well!
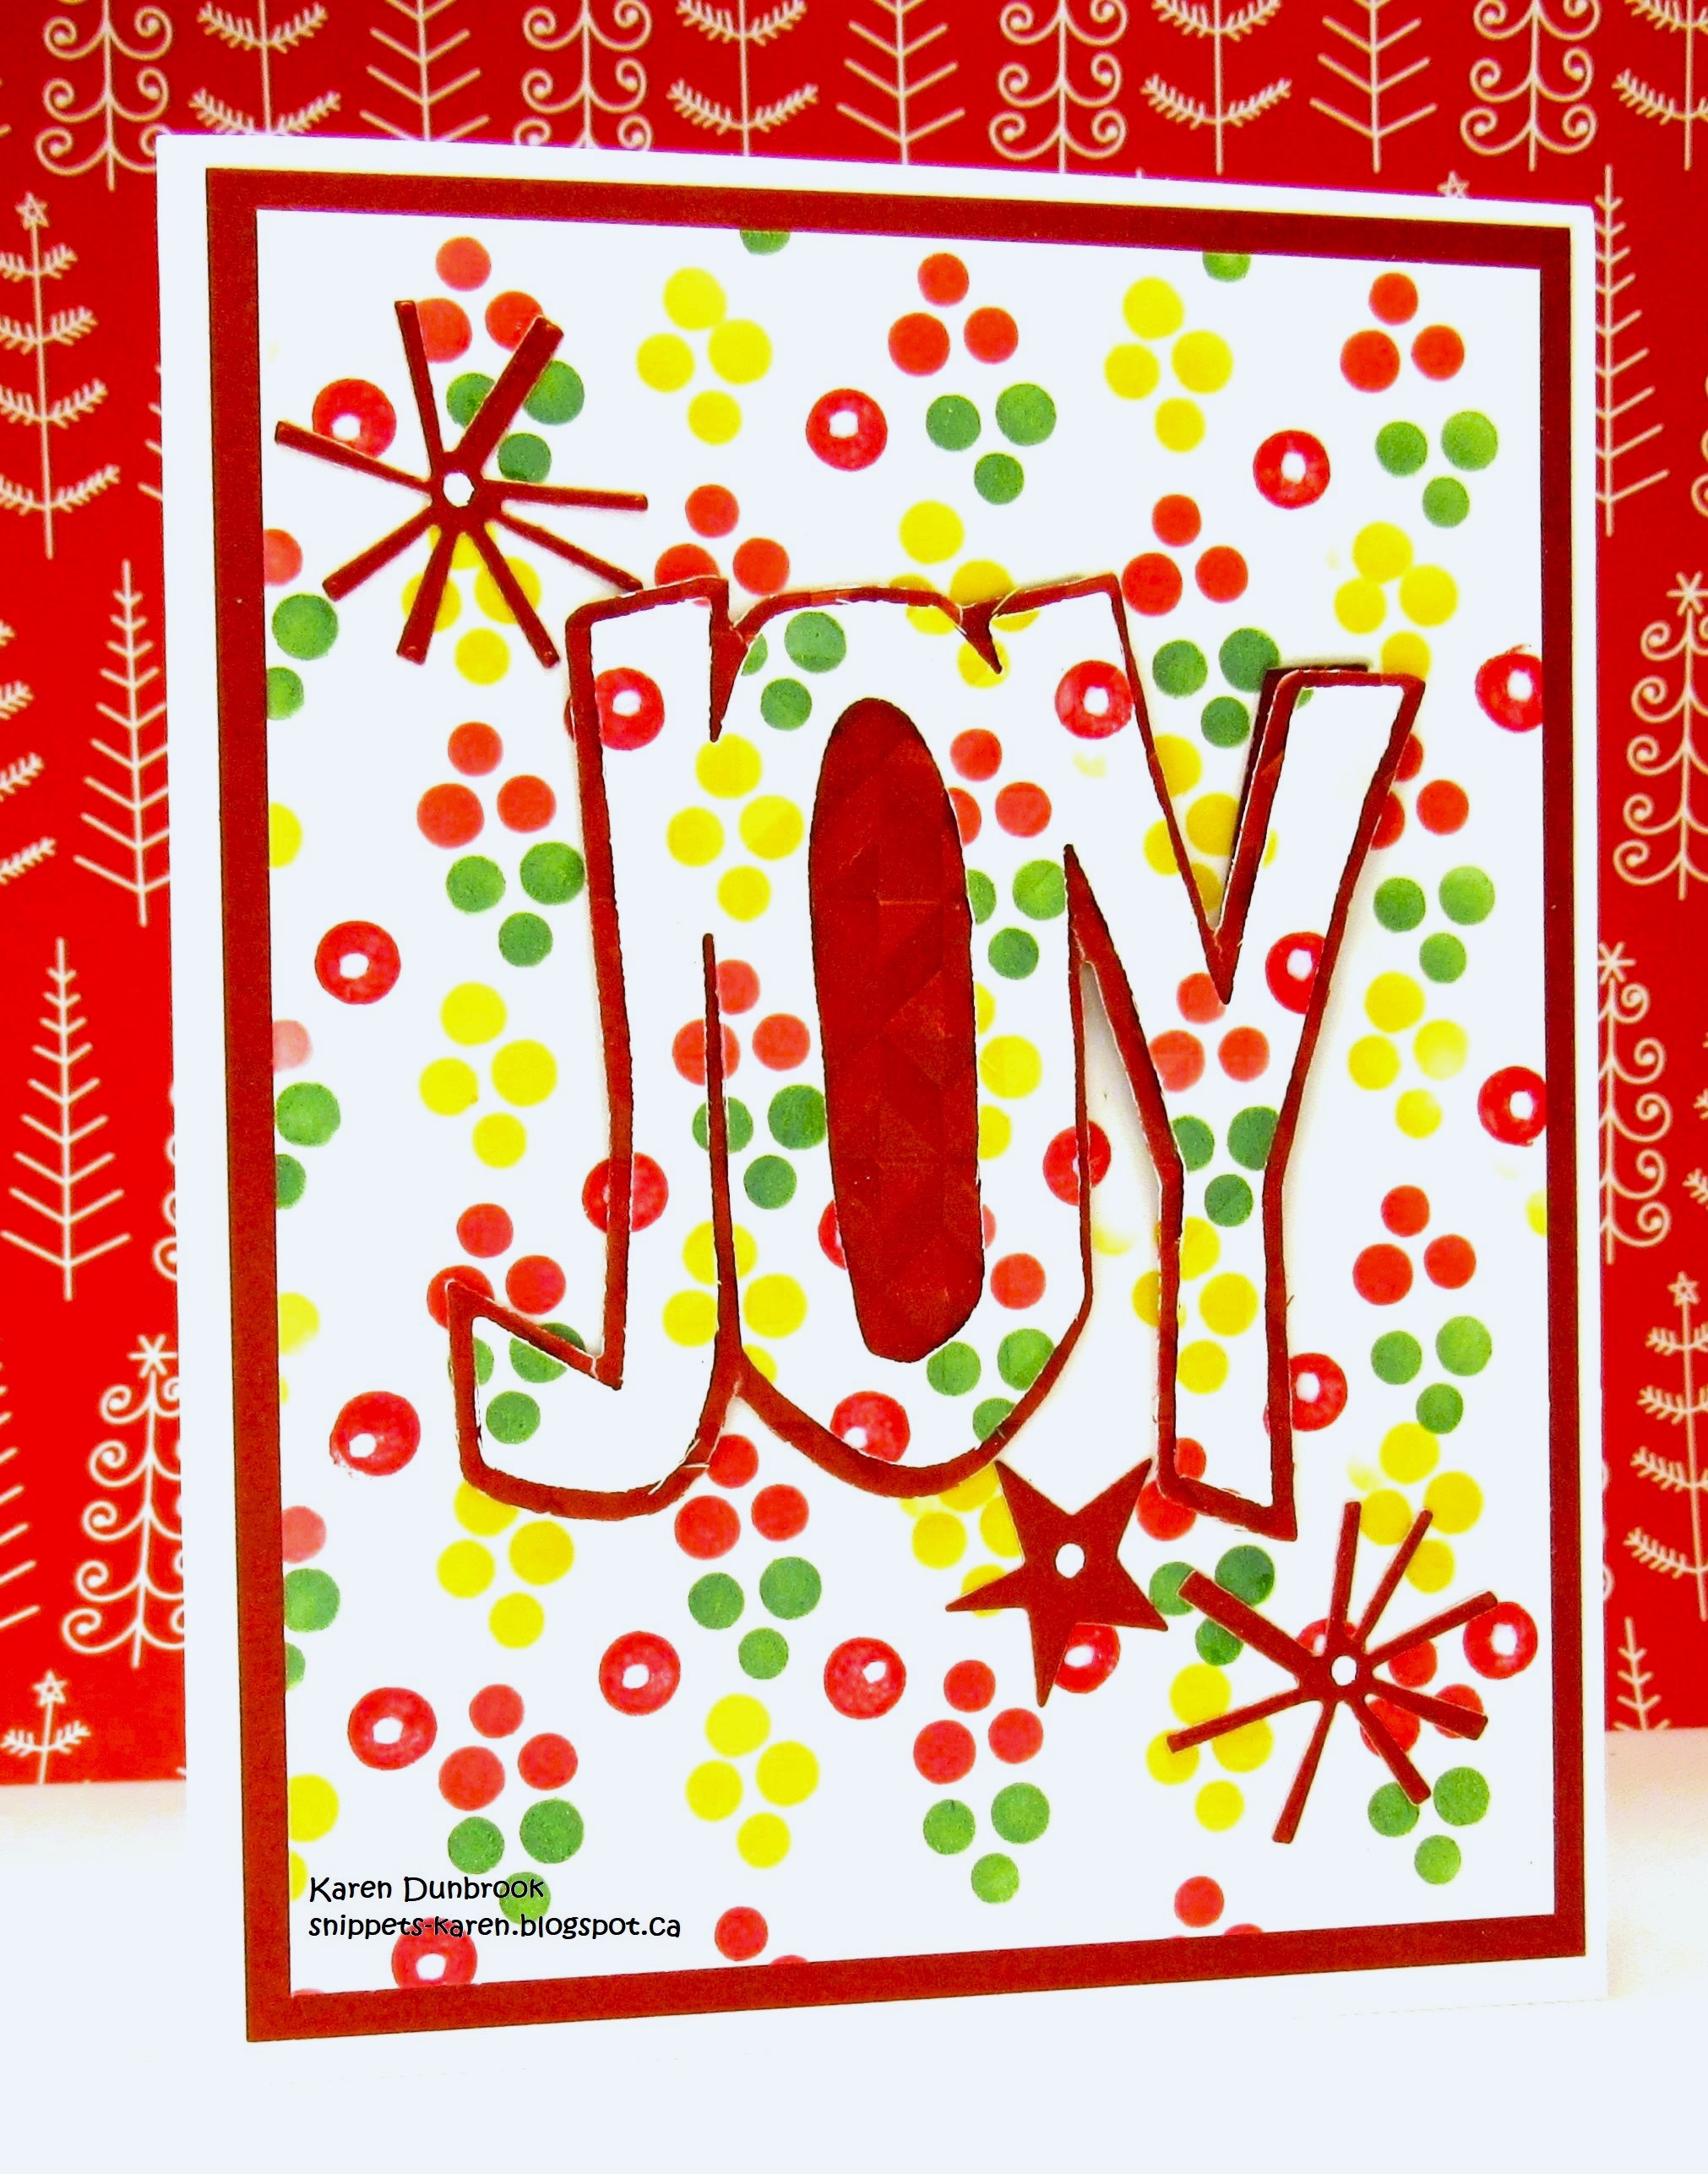
Today's card is a fun one using just one part of a layering stencil from A Colorful Life Designs called

So, here's what I did to create my card.
  • I placed a piece of white cardstock onto my Make Art Station and then placed just the berries part of the Layered Holly stencil over that.  I inked it up with some Lumberjack Plaid Distress Oxide ink.
  • I removed the stencil, cleaned it off and flipped it around upside down and placed it back onto my cardstock.  I inked again with some Rustic Wilderness DOX ink.
  • I wiped the stencil clean and then decided to add some more of the dots using some Squeezed Lemonade DOX ink.
  • I still wanted more dots, so using the eraser on the end of a pencil, I added more dots using the red.  Those were a bit bigger then the stenciled ones, which helped balance out the design.
  • Using a white Posca pen, I put dots into the eraser stamped ones to add more interest.
  • When my card front was dry, I die cut the "JOY" sentiment from the center.  I die cut the shadow with some red cardstock and glued the 2 together.
  • I dry embossed a piece of red cardstock as I wanted to add interest to the open part of the sentiment, then I glued the stenciled card front over that and then onto an A2 sized card base.
  • I used some foam tape to pop the sentiment back into place, matching up the stenciled pattern.
  • I added some die cut pieces around the sentiment to finish my card off.

Here is the stencil I used:
(I used just the berries)

Discount Code for A Colorful Life Designs
(Affiliate with no extra cost to you) 

Thanks so much for coming by and taking a look.

Adding my card to these challenges:
Little Red Wagon- UNDER PRESSURE
Cardz 4 Galz- CHRISTMAS CARD

Supplies
Stamps- none
Inks- DOX
Paper- heavy white (Scribes Nook- Waterloo, Ont.)
Accessories and Tools- stencil- A Colorful Life Designs, white Posca pen, 
Make Art Station (Ranger), Big Tidings Dies- (Tim Holtz), Mosaic Angles eb folder (Altenew)

Thursday, 21 December 2023

Sending Holly and Jolly


Welcome
Todays card is a fun one using a stencil from A Colorful Life Designs called

So, here's what I did to create my card.
  • I placed a piece of white cardstock onto my Make Art Station and positioned the Flurries stencil over that.
  • I began in the middle of the panel and inked it up with some Peacock Feathers Distress Oxide ink.  I inked on either side of the middle next with some Salty Ocean DOX ink and then some Villainous Potion along the top and the bottom edges.
  • Using the eraser on the end of a pencil, I added some dots into the open areas using the same colours mentioned above.
  • When the panel was dry, I added white dots to the snowflake and then splattered using my white Posca pen.
  • I die cut the sentiment shadow from the center of the card front and then cut the letters from some matching inked cardstock.  I glued the sentiment onto the shadow die cut.
  • I glued the panel onto a piece of purple cardstock, then onto an A2 sized card base.
  • Finally, I added the sentiment with some foam tape, matching up the inked pattern.

Here is the stencil I used:

Discount Code for A Colorful Life Designs
(Affiliate with no extra cost to you) 

Thanks so much for coming by and taking a look.

Adding my card to these challenges:
Little Red Wagon- UNDER PRESSURE
Simon Says Monday- LET IT SNOW

Supplies
Stamps- none
Inks- Distress Oxide
Paper- heavy white (Scribes Nook- Waterloo, Ont.)
Accessories and Tools- stencil (A Colorful Life Designs); TE Blending Brushes;
Make Art Station (Ranger); Holly Jolly die (Catherine Pooler); foam tape;
white Posca pen

Sunday, 17 December 2023

Very Merry

Welcome
Another snowflake card using this lovely stencil from A Colorful Life Designs called

So, here's what I did to create my card.
  • I looked through my stash and found a piece of cardstock with a faint image on it.  I think it was most likely done on my Gel Plate with a stencil as I rubbed ink off while making a print.
  • I placed it onto my Make Art Station and inked up the Jewel Snowflake with some Mermaid Lagoon Distress Oxide ink.  You can see the faint image from the Gel Plate print in the background.
  • I removed the stencil and splattered heavily with some water to lift some of the ink.  I set the piece aside to dry.
  • When it was dry, I die cut the shadow of the 'very merry' from the middle of the panel and the sentiment from some white cardstock.
  • I glued the card front onto a piece of navy cardstock, then onto an A2 sized card base.
  • I put the sentiment back into the cut away on the card front, matching it up with the pattern.
  • Lastly, I added some silver gems around the sentiment.

Here is the stencil I used:

Discount Code for A Colorful Life Designs
(Affiliate with no extra cost to you) 

Thanks so much for coming by and taking a look.

Adding my card to these challenges:
Little Red Wagon- CHRISTMAS
Simon Says Mon.- DIE CUT
My Time to Craft- CHRISTMAS WITH LETTER 'S' WORDS
(snowflake, snow, splatter, silver gems)

Supplies
Stamps- none
Inks- DOX
Paper- heavy white (Scribes Nook- Waterloo, Ont.)
Accessories and Tools- stencil (A Colorful Life Designs); Make Art Station (Ranger);
TE Blending Brushes; silver gems (Dollar Store); Holiday Sayings die (Concord and 9th)

Friday, 15 December 2023

Merriest Wishes

Good Morning
Today's card features some stencil layering and stamping.
I used the 16 Circle Shadow and the Mixed Bars stencils 
from A Colorful Life Designs.

So, here's what I did to create my card.
  • I began with a piece of white cardstock on my Make Art Station and placed the 16 Circle Shadow stencil over that.  I inked it up with some Cracked Pistachio and I shaded with some Peacock Feathers Distress Oxide ink.
  • Leaving the circle stencil in place, I put the Mixed Bars stencil over the top of that and inked with some Rustic Wilderness DOX ink.
  • I removed the stencils but repositioned the circles into the open areas and inked with some more Cracked Pistachio DOX ink.
  • I placed the stenciled panel into my Misti to stamp the pine boughs and the grid patterns into the corners.
  • I splattered the whole panel with my white Posca pen and set aside to dry.
  • I die cut the sentiment from some green cardstock 2 times and then once from some beige cardstock and glued them all together.
  • I glued the stenciled card front onto another piece of beige cardstock, then onto an A2 card base.
  • I glued the sentiment onto the front panel and added 3 silver gems.

Here are the stencils I used:


Discount Code for A Colorful Life Designs
(Affiliate with no extra cost to you) 

Thanks so much for coming by and taking a look.

Adding my card to these challenges:
Little Red Wagon- MERRY CHRISTMAS
Krafty Chicks- CHRISTMAS
Fab 'n' Funky- CHRISTMAS

Supplies
Stamps- Ornamental Pine (SU); Off the Grid (SU)
Inks- DOX
Paper- heavy white (Scribes Nook- Waterloo, Ont.)
Accessories and Tools- stencils (A Colorful Life Designs); Make Art Station (Ranger);
white Posca Pen; Misti (My Sweet Petunia); TE Blending Brushes; 
die and shadow (Photoplay)

Wednesday, 13 December 2023

Much Joy


Welcome 

Meet today's card.  Traditional colours but a non-traditional pattern using the 
stencil from A Colorful Life Designs.

So, here's what I did to create my card.
  • I cut a piece of white cardstock and placed it onto my Make Art Station.  I centered up the Flower Grid stencil and inked it up with some Lumberjack Plaid Distress Oxide ink.
  • When I was happy with the inking, I lifted the stencil off and cleaned it off.
  • I repositioned it, shifting it to the side to fill in the open areas and then inked it with some Rustic Wilderness DOX ink.
  • Next, I removed the stencil and die cut the JOY sentiment right from the middle of the stenciled panel.  I cut the shadow for the sentiment with some white cardstock and glued the 2 together.
  • I glued the stenciled panel onto a piece of green cardstock, then onto an A2 sized card base.
  • I popped the sentiment back into place over the card front with some foam tape, matching up the pattern.
  • Finally, I die cut 2 snowflakes with some red cardstock and the star with some green and glued them into place.  I added some white dots using my Posca pen.

Here is the stencil I used:

Discount Code for A Colorful Life Designs
(Affiliate with no extra cost to you) 

Thanks so much for coming by and taking a look.

Adding my card to these challenges:
Little Red Wagon- CHRISTMAS

Supplies
Stamps- none
Inks- DOX
Paper- Scribes Nook (Waterloo, Ont.)
Accessories and Tools- stencil (A Colorful Life Designs); Make Art Station; 
TE Blending Brushes; Joy Die (Tim Holtz); foam tape