Saturday, 26 November 2022

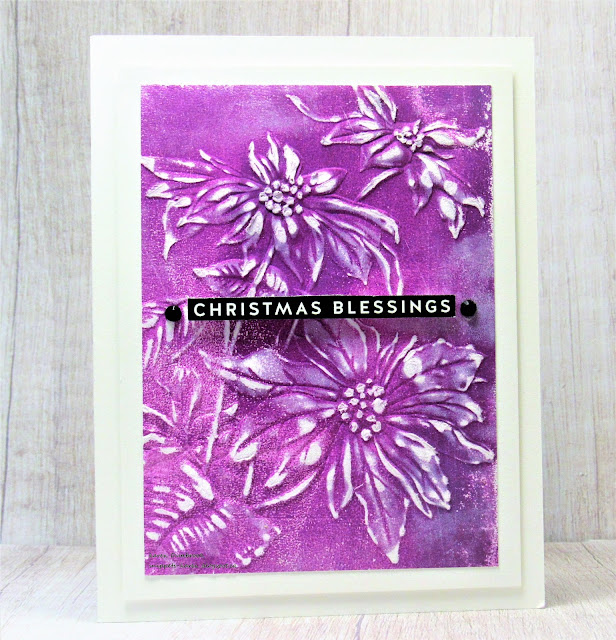
Christmas Blessings


Welcome
Today's card came together very quickly, a good thing at this time of year when the final push is on for the holidays.
I used another one of my roll-off sheets I had done when I was Gel Plate printing.

So, here's what I did to create my card.
  • Like I mentioned above, this card started with a piece of cardstock that I had rolled excess paint off of when I was Gel Plate printing.  I save all the 'roll offs' to make simple backgrounds.
  • I placed the panel into the Tim Holtz Poinsettia embossing folder and ran it through my machine.
  • Next, I got out my sanding block and sanded off all the raised areas to reveal the flowers.  
  • I glued it onto a piece of white cardstock.  I also glued a piece of cardboard behind so when I glued it to my A2 card base, it would be raised.
  • I added the pre-printed sentiment and 2 gems on either side.


Thanks so much for coming by and taking a look.

Adding my card to these challenges:
Can You Handle the Pressure?- ANYTHING GOES-OPTION THANKS
The Sisterhood of Crafters- ANYTHING CHRISTMAS OR WINTER
Craft Rocket= CHRISTMAS/WINTER


Supplies
Stamps- none
Inks- paint
Paper- heavy white (Scribes Nook- Waterloo, Ont.)
Accessories and Tools- Poinsettia EB folder (TH); Christmas sentiment strips (SSS); 
foam tape, cardboard; gems

Monday, 21 November 2022

Lots of Holiday Cheer


Welcome
Today, I am playing with 2 new stencils from A Colorful Life Designs.
On the background I used the Dotted Poinsettia and for the bow I used the Christmas Cover stencil.

So, here's what I did to create my card.
  • I cut a piece of white cardstock and placed it onto my Make Art Station with the Dotted Poinsettia stencil over that.
  • I inked it up with some Rustic Wilderness and some Candied Apple Distress Oxide ink.
  • I got another piece of white cardstock and placed the Christmas Cover stencil over my paper and inked that up with more Candied Apple and added a bit of shading to the bow with some Barn Door DOX ink.  I repeated that process as I wanted the bow to be layered up.
  • Next, I fussy cut the bows out, one I cut the whole thing out and the other one just the bow portion without the tails.
  • I splattered with my white Posca pen.
  • I used some foam tape to pop the largest bow over the front of my stenciled panel, then foam taped the bow part from the second piece I had cut out, over that.  It really added great dimension to the overall look of the bow.
  • I glued the main panel onto a piece of red cardstock and then onto an A2 size card panel.
  • I die cut the sentiment and inked just parts of it so it wouldn't get lost against the background.
  • Lastly, I added some red gems for interest.


Here are the stencils I used:


Discount Code for A Colorful Life Designs
(Affiliate with no extra cost to you) 

Thanks so much for coming by and taking a look.

Supplies
Stamps- none
Inks- DOX
Paper- heavy white (Scribes Nook- Waterloo, Ont.)
Accessories and Tools- stencils (ACLD); TE Blending Brushes; Die (WPlus 9)
Make Art Station (Ranger); red gems; foam tape; Posca pen

Saturday, 19 November 2022

Christmas Snowflakes


Welcome
Today's card features a technique I did earlier that I called Stripped Down.
I thought this new Dotted Flakes stencil from A Colorful Life Designs, worked so well for the theme of the card I was making.

So, here's what I did to create my card.
  • I began with a piece of white cardstock and inked it up with some Broken China, Peacock Feathers and Tumbled Glass Distress Oxide ink.
  • Next, I die cut the inked panel into strips and carefully set them aside.
  • I cut another piece of white cardstock and glued the strips onto that, flipping every other one in the other direction.  It really adds a lot of interest.
  • I set that aside to dry and I die cut the round Christmas Token sentiment with some white cardstock.
  • When the glue was dry on the strips, I placed the Dotted Flakes stencil over the panel and inked it up with some Unicorn white ink.
  • Next, I splattered with my white Posca pen.
  • I popped the strips panel onto an A2 card base using some foam tape.
  • I glued the sentiment circle over the finished card front and added a blue dot to the center.
 

Here is the stencil I used:


Discount Code for A Colorful Life Designs
(Affiliate with no extra cost to you) 

Adding my card to these challenges:
Simon Says Wed.- STENCIL
Cardz 4 Galz- USE A STENCIL

Supplies
Stamps-  none
Inks- DOX, HA
Paper- heavy white (Scribes Nook- Waterloo, Ont.)
Accessories and Tools- Dotted Flakes stencil (ACLD); TE Blending Brushes; 
Slim Strips die (Pinkfresh Studios); Posca pen; Christmas Token (SSS)

Friday, 18 November 2022

Sanded Snowflake


Welcome
Today's card was truly a fast one to make using a piece of cardstock that I rolled my brayer off onto while Gel Plate printing.  I find it's so great to have them on hand and I always keep some scrap paper nearby when I've got my plate and brayer out.

So, here's what I did to create my card.
  • I began by pulling this inked background out of my stash.  I had rolled my brayer off onto it while Gel Plate printing.
  • I placed it into this Snowflake Embossing Folder and ran it through my machine.  
  • Next, I took out my sanding tool and sanded off the raised areas to reveal more of the design.
  • I did some second generation stamping around the edges of the panel by inking up my stamp with some Blueprint Sketch Distress Oxide ink, stamping off onto a scrap paper and then stamping on the card panel.
  • I splattered with my white Posca pen to give a more snowy look.
  • I glued that onto a white A2 size card base.
  • I used some foam tape to add the sentiment strip across the middle of the snowflake.
  • Lastly, I added some silver gems to add interest.


Thanks so much for coming by and taking a look.

Adding my card to these challenges:
Can You Handle the Pressure?-  Anything Goes Embossing With A Twist of Wreaths
Creative Knockouts- ANYTHING GOES
As You Like It- NON-TRADITIONAL COLORS
(love the blues, so calm and soothing)

Supplies
Stamps- Friendship (Hero Arts)
Inks- DOX
Paper- Scribes Nook- Waterloo, Ont.
Accessories and Tools- Snowflake EB folder (Stampin Up); sanding block; 
white Posca pen; Christmas Sentiment strips (SSS); foam tape; silver gems

Thursday, 17 November 2022

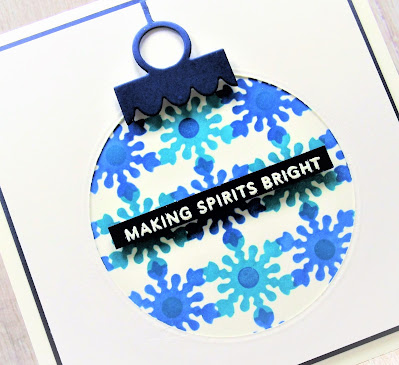
Christmas Ornament


Welcome
Meet today's simple card for the Holidays.
I wanted to play with this newly released stencil called Dotted Flakes.
By shifting the stencil after the first inking, I was able to create a whole new design.

So, here's what I did to create my card.
  • I began by placing a piece of white cardstock onto my Make Art Station and placed the Dotted Flakes stencil over that.  
  • Using some Peacock Feathers Distress Oxide ink, I inked up the whole stencil.  
  • I wanted to see what kind of design I could create using this stencil, so after inking, I shifted the stencil and inked again with some Blueprint Sketch Distress Oxide ink.  It made a really pretty design for my background.
  • I cut a square piece of white cardstock and then die cut a circle from the center of it.
  • Next, I took a larger piece of white cardstock and inked all along the edges with more of the above mentioned colours to use as the larger background.  
  • I glued the white die cut circle panel over the stenciling and then glued that onto the larger inked background piece.  You can see all the colour variations along the edges of the card.
  • I inked another small piece of cardstock and die cut the ornament hook from that.  
  • I stamped the sentiment on some dark navy cardstock with Versamark and white heat embossed it.  I popped that over the middle of the circle.
  • Finally, I popped dotted the ornament hanger at the top of the circle.


Here is the stencil I used:

                                                         Discount Code for A Colorful Life Designs
(Affiliate with no extra cost to you)

Thanks a lot for coming by and taking a look.

Adding my card to these challenges:
Sunday Stamps- ROUND AND ROUND
Crazy is Our Fame- Stencils are Our Game- ANYTHING- OPTION FALL COLORS

Supplies
Stamps- Christmas Strips (MFT)
Inks- Versamark, DOX
Paper- Scribes Nook- Waterloo, Ont.
Accessories and Tools- stencil (ACLD); Holiday Toppers die (Gina K); 
Infinity Circle die (HA); TE Blending Brushes; foam tape; white EB powder; heat tool