Sunday, 29 December 2024

Pencil Meets Stencil

Welcome
It's my turn to host the TLC again over at Splitcoast Stampers.
I'm calling this simple technique 

This technique requires a stencil, a pencil with an eraser on the end and some ink pads that will blend with water.

So, here's what I did to create my card.
  • I placed a piece of white cardstock onto my Make Art Station and put the Argyle stencil over it.  
  • Using the eraser on the end of the pencil, I pressed it onto  my Wilted Violet Distress Oxide ink pad and then pressed it onto the stencil.  I repeated that a number of times all over the stencil.
  • I wiped the pencil eraser off and then continued the same process with some Villainous Potion and some Picked Raspberry DOX ink.
  • Leaving the stencil in place, I took a wet paint brush and dragged it across the stencil, blending and muting the colours a bit and giving it a more watercoloured look.
This is what it looked like.
  • I wiped off the stencil, shifted it over and then inked again using the same technique as above.
  • I set it aside to dry before continuing with the next steps.
  • I die cut the sentiment shadow from the dry panel and then die cut the sentiment with some dark purple and glued those together.
  • I glued the stenciled panel onto a piece of white cardstock, then onto a piece of dark purple and then onto an A2 sized white card base.
  • I used some foam tape to add the sentiment back into place in the middle of the card front and finally added 3 purple bling gems around it.

Here is the stencil I used:
(I just used one of the stencils in this set for my card)

My Discount Code for A Colorful Life Designs:
KarenFan10

Thanks so much for coming by and taking a look.

Adding my card to these challenges:
Simon Says Wed.- USE DIES
Crafty Chicks- ANY OCCASION
Inkspirational- USE STENCILS 

Supplies
Stamps- none
Inks- DOX
Paper- heavy white (Scribes Nook- Waterloo, Ont.)
Accessories and Tools- stencil and bling (A Colorful Life Designs); pencil with eraser;
Bold Birthday die (TE); Make Art Station (Ranger)

Wednesday, 25 December 2024

MERRY CHRISTMAS


MERRY CHRISTMAS
Wishing you and yours a holiday season filled with many blessings.

Thanks so very much to all of you for the support and most kind comments you leave here
for me.  So very appreciated.

Looking forward to a New Year filled with lots of creative inspirations!


Sunday, 22 December 2024

Filled With Joy

Welcome

I had fun creating today's card using stencils and masks from A Colorful Life Designs.
I used the Falling Snow stencil and the Marvelous Circle Masks for the background.
The sentiment was cut from a piece that I made using the Intersection stencil.

So, here's what I did to create my card.
  • I placed the Falling Snow stencil over a piece of white cardstock and inked it up with some Broken China Distress Oxide ink.
  • I placed the stenciled panel into my Misti and stamped the large snowflake background right over the stenciling with some black ink.
  • Next, I used the Marvelous Circle Masks to add the darker shade of circles over the snowflake using some more of the Broken China DOX ink and some Salty Ocean DOX ink.
  • I splattered the whole panel with my white Posca pen and set aside to dry.
  • I took another piece of white cardstock and inked up the Intersection stencil with some Broken China DOX ink, then turned the stencil around and inked again creating this plaid pattern.  I added some black lines over the stenciling to add more interest.
  • I die cut that out using the JOY die and cut the outline of the sentiment with some black.  I glued those all together.
  • I glued my stenciled card front onto a piece of white cardstock, then onto a piece of dark blue and then onto a white A2 sized card base.
  • I used one silver gem for the middle of the top of the ornament and some foam tape to add the JOY.

Here is what I used:


My Discount Code for A Colorful Life Designs:
KarenFan10

Thanks so much for coming by and taking a look.

Adding my card to these challenges:
Little Red Wagon- MERRY CHRISTMAS
Simon Says Wed.- USE DIES
Aloha Friday- CHRISTMAS/WINTER

Supplies
Stamps- Snowflake Outline (SSS)
Inks- Versafine Clair; DOX
Paper- heavy white (Scribes Nook- Waterloo, Ont.)
Accessories and Tools- stencils (A Colorful Life Designs); TE Blending Brushes;
white Posca pen; Misti (My Sweet Petunia); Christmas Bauble Joy (Paper Rose); 
silver gem; fine line marker

Saturday, 21 December 2024

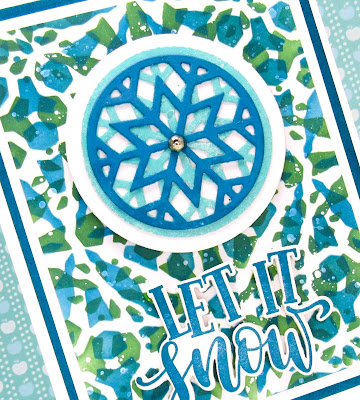
Snow for Christmas


Welcome
Christmas Greetings
Today's card features a stencil from A Colorful Life Designs called:

Here's what I did to create this card.
  • I placed the Driven Snow stencil onto a piece of white cardstock and inked it up with some Rustic Wilderness Distress Oxide ink.
  • I lifted the stencil, cleaned it off and turned it to the side so I could ink again but this time with some Uncharted Mariner DOX ink.  It made a fun kaleidoscope looking background.
  • I splattered the whole panel with my white Posca pen and set aside to dry.
  • I die cut the snowflake with some blue and then some navy cardstock and glued those together.  I glued that onto a white circle. 
  • I glued the stenciled card front onto a piece of white then navy cardstock and then onto an A2 sized card base.
  • I stamped and die cut the sentiment and then added the snowflake and the sentiment with some foam tape.
  • Finally, I added a silver gem to the middle of the snowflake.

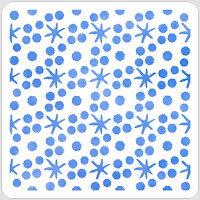
Here is the stencil I used:

My Discount Code for A Colorful Life Designs:
KarenFan10

Thanks so much for coming by and taking a look.

Adding my card to these challenges:
Little Red Wagon- MERRY CHRISTMAS
Simon Says Wed.- USE DIES
Cut it Up- USE MORE THEN ONE DIE CUT

Supplies
Stamps- Holiday Sentiments (Photoplay)
Inks- DOX
Paper- heavy white (Scribes Nook- Waterloo, Ont.)
Accessories and Tools- stencil- A Colorful Life Designs; TE Blending Brushes;
white Posca pen; Outside In Stitched Snowflake (Lawn Fawn); silver gem

Thursday, 19 December 2024

It Beginning to Look a Lot Like Christmas


Good Morning
I had fun playing with this stencil from A Colorful Life Designs called
A bit of inking and some embellishments, made for a happy feeling holiday card.

So, here's what I did to create my card.
  • I placed the Iron Cross stencil over a piece of white cardstock and inked it up with some Rustic Wilderness Distress Oxide ink.  This stencil is a 3 x 6" stencil, not as wide as other stencils and great if you want to just create a border or ink portions of your project.
  • I lifted the stencil off and turned it sideways across the middle of my panel and matched the pattern up.  I inked with the same green then splattered the whole panel with my white Posca pen.
  • I glued the stenciled card front onto a piece of dark green cardstock, then onto an A2 sized white card base.
  • I added the embellishments with foam tape to finish off my card.

Here is the stencil I used:

My Discount Code for A Colorful Life Designs:
KarenFan10

Thanks so much for coming by and taking a look.

Adding my card to these challenges:
Little Red Wagon- MERRY CHRISTMAS
The Male Room- ANYTHING GOES
The Holly and Ivy Christmas- ANYTHING CHRISTMAS GOES

Supplies
Stamps- none
Inks- DOX
Paper- heavy white (Scribes Nook, Waterloo, Ont.)
Accessories and Tools- stencil (A Colorful Life Designs); TE Blending Brushes;
white Posca pen; Vintage Holly Jolly Bits (Simple Stories)

Monday, 16 December 2024

So Merry


Welcome
Today's card is very simple and easy to recreate using these stencils from A Colorful Life Designs called

So, here's what I did to create my card.
  • I placed the Merry Christmas stencil over a piece of white cardstock and inked it up with some Lumberjack Plaid Distress Oxide ink.
  • Next, I masked off some of the snowflakes from the Flurries stencil, and added them randomly around the text using some Rustic Wilderness Distress Oxide ink.
  • Using a white Posca pen, I added the dots to the letters and the green snowflakes to help define them a bit more.
  • While that dried, I die cut the snowflake with some white cardstock and then glued it onto a red die cut circle.
  • I glued the stenciled panel onto a piece of dark red cardstock, then onto an A2 sized card base.
  • I used some foam tape to pop the sentiment over the background and finally added a green gem to the center of the snowflake.

Here are the stencils I used:


My Discount Code for A Colorful Life Designs:
KarenFan10

Thanks so much for coming by and taking a look.

Adding my card to these challenges:
Simon Says Mon.- USE DIES FOR DIECEMBER
Creative Crafting Uncles- CHRISTMAS/NEW YEAR
Sparkles Christmas- CHRISTMAS SONG OR CAROL
(song: We wish you a Merry Christmas)

Supplies
Stamps- none
Inks- DOX
Paper- heavy white (Scribes Nook- Waterloo, Ont.)
Accessories and Tools- stencils (A Colorful Life Designs); TE Blending Brushes;
Outside In Stitched Snowflake (Lawn Fawn); green gem, white Posca pen; 
Infinity Circle die (HA)

Saturday, 14 December 2024

All the Joy


Good Morning
Today's card features this wonderful stencil from A Colorful Life Designs called:

So, here's what I did to create my card.
  • I found a piece of white cardstock in my stash that I had rolled off onto with my brayer when using my Gel Plate. Since I had used Distress Oxide colours, I knew it would be easy to stencil over the top of it.
  • I placed the Christmas Flowers stencil over the background and inked with some Lumberjack Plaid Distress Oxide ink.
  • I lifted the stencil off and using my white Posca pen, I added a white dot to all the flower centers and then splattered the whole thing.
  • I set that aside to dry and die cut the sentiment with some dark red and splattered that with my white Posca pen.  I glued that onto the white shadow die cut.
  • Next, I used my Versamark ink pad and rubbed it along all the edges of my card front and then white heat embossed it to give a snowy look to my card.
  • I glued the panel onto a piece of dark red cardstock to match the sentiment and then onto a piece of pale pink, then onto an A2 sized card base.
  • Finally, I used some foam tape to add the sentiment and 3 silver gems.

Here is the stencil I used:

My Discount Code for A Colorful Life Designs:
KarenFan10

Thanks so much for coming by and taking a look.

Adding my card to these challenges:
Simon Says Mon.- USE DIES FOR DIECEMBER
Word Power- WORDS AS FOCUS
TicTackToe- (DIE CUTS/ EMBOSSING/ METALLIC
As You Like It- ANYTHING CHRISTMASS
(love the look of red and white for Christmas)

Supplies
Stamps- none
Inks- DOX
Paper- heavy white (Scribes Nook- Waterloo, Ont.)
Accessories and Tools- stencil (A Colorful Life Designs); TE Blending Brushes;
White Posca pen; white EB powder; silver gems; All the Joy die (SSS); foam tape

Friday, 13 December 2024

Falling Snow


Welcome
I can't believe how close we are to the big day!
I had fun creating this card...doing some stencil layering again.
I used 2 stencils from A Colorful Life Designs called:

So, here's what I did to create my card.
  • I cut a piece of white cardstock for my card front, then embossed it using a Dot Embossing Folder. Using some Tumbled Glass Distress Oxide ink, I gently rubbed over the embossing to make it show up.
  • Next, I placed the Falling Snow stencil over my embossed background and inked with some Peacock Feathers DOX ink.
  • I lifted that stencil off and replaced it with the Glittering Heavens stencil and inked again with more Peacock Feathers DOX ink.
  • I placed my stenciled card front into my Misti and stamped the large snowflake with some Uncharted Mariner DOX ink right up into the corner.
  • While that dried, I stamped the sentiment and then die cut it out.
  • I glued the stenciled panel onto a piece of white cardstock, then a piece of navy and then onto an A2 sized card base.
  • I used some foam tape to pop the sentiment up near the bottom and finally, added a silver gem to the middle of the snowflake.

Here are the stencils I used:


My Discount Code for A Colorful Life Designs:
KarenFan10

Thanks so much for coming by and taking a look.

Adding my card to these challenges:
Simon Says Monday- USE DIES FOR DIECEMBER
CRAFT- CHRISTMAS, THE LAST STRETCH
(the snow is here now so ready for Christmas)

Supplies
Stamps- Let it Snow (Visible Image); Holiday Sentiments (Photoplay)
Inks- DOX
Paper- Scribes Nook- Waterloo, Ont.
Accessories and Tools- stencils (A Colorful Life Designs); TE Blending Brushes;
Dot EB Folder (Sizzix); silver gem; Misti (My Sweet Petunia); 
foam tape

Wednesday, 11 December 2024

Christmas is Coming

Welcome
Christmas is coming quickly, so I decided to make a simple cas card.
It's so disappointing this year as Canada Post is on strike and no Christmas cards can be sent.  

For today's card I used this fun stencil from A Colorful Life Designs called

So, here's what I did to create my card.
  • I placed the Dot Duo stencil over a piece of white cardstock and got out the inks I wanted to use.
  • I wanted to give my card front a unique look, so I cut another piece of white cardstock to use as a mask while stenciling.  I placed the mask along the top corner over the stencil and inked with some Lumberjack Plaid Distress Oxide ink.
  • I moved the mask down on an angle and inked again with some Twisted Citron DOX ink.  
  • I repeated that process again using some Rustic Wilderness DOX ink next and just continued that process until my whole card front was inked up.
  • I removed the stencil and splattered with my white Posca pen and set aside to dry.
  • I die cut the 'Jingle Bells' sentiment with some greens and red cardstock and glued that all together.
  • I glued my card front onto a piece of red cardstock, then green, then onto an A2 sized card base.
  • I used some foam tape to add the sentiment and added 3 red gems around it.

Here is the stencil I used:

My Discount Code for A Colorful Life Designs:
KarenFan10

Thanks so much for coming by and taking a look.

Adding my card to these challenges:
Simon Says Mon.- USE DIE CUTS FOR DIECEMBER
The Male Room- ANYTHING GOES
Crazy is Our Fame- Stencils are Our Game- WINTER/CHRISTMAS

Supplies
Stamps- none
Inks- DOX
Paper- Scribes Nook- Waterloo, Ont.
Accessories and Tools- stencil (A Colorful Life Designs); TE Blending Brushes;
Jingle Bells die (A Pocket Full of Happiness); white Posca pen; red gems

Tuesday, 10 December 2024

All the Joy


Hello and Welcome
Today's card features a lovely stencil from A Colorful Life Designs called

So, here's what I did to create my card.
  • I placed the Christmas Quilt stencil over a piece of white cardstock and inked it up with some Lumberjack Plaid Distress Oxide ink.
  • I moved the stencil and inked again, filling in the open areas with the same ink.
  • Using the eraser on the end of a pencil, I added the dots with some Rustic Wilderness DOX ink.
  • I splattered the whole panel with my white Posca pen and set aside to dry.
  • Next, I die cut the 'JOY' sentiment with some red cardstock, then the border with some black and then with a piece of green.  I glued all the pieces together and then added some details with my white Posca pen.
  • I glued the stenciled panel onto a piece of white cardstock, then onto a piece of red and then onto an A2 sized card base.
  • I used some foam tape to pop the sentiment up over the background and added a red gem to the top of the ornament.

Here is the stencil I used:

My Discount Code for A Colorful Life Designs:
KarenFan10

Thanks so much for coming by and taking a look.

Adding my card to these challenges:
Simon Says Mon.- USE DIES FOR DIECEMBER
Mix it Up- ANYTHING GOES/option: Paper Piecing
Word Power- WORDS AS FOCUS
Allsorts- IT'S BEGINNING TO LOOK LIKE CHRISTMAS

Supplies
Stamps- none
Inks- DOX
Paper- Scribes Nook- Waterloo, Ont.
Accessories and Tools- Christmas Quilt Stencil (A Colorful Life Designs); TE Blending Brushes;
white Posca pen; Christmas Bauble Joy (Paper Rose)

Saturday, 7 December 2024

Let's Get Holly and Jolly


Welcome
Today's card was a fun one using a simple stencil from A Colorful Life Designs called 

So, here's what I did to create my card.
  • I began with a piece of white cardstock and placed the Puzzle Pieces stencil over that and inked with some Dusty Concord Distress Oxide ink.
  • I wiped the stencil off, repositioned it and inked again with some Villainous Potion DOX ink. I repeated that again using some Uncharted Mariner DOX ink this time.
  • I splattered with my white Posca pen and set aside to dry.
  • Next, I took another piece of white cardstock and embossed it with a Burlap Embossing Folder and then cut a circle from that.
  • I glued the embossed piece over the stenciled background.  I stamped and fussy cut out the bear and coloured his scarf with my Copic markers.
  • I glued the card front onto an A2 sized card base and used some foam tape to add the bear in the corner and the pre-printed sentiment over the top corner.
  • The last step was to add 3 silver gems under the sentiment.

Here is the stencil I used:

My Discount Code for A Colorful Life Designs:
KarenFan10

Thanks so much for coming by and taking a look.

Adding my card to these challenges:
Simon Says Wed.- WINTER BLUES
Simon Says Mon.- MAKE IT SPARKLE
The Holly and Ivy Christmas- ANYTHING CHRISTMAS GOES
Alphabet Challenge- R for Round

Supplies
Stamp- Polar Pals (MFT)
Inks- DOX; Versafine Clair
Paper- heavy white (Scribes Nook- Waterloo, Ont.)
Accessories and Tools- stencil (A Colorful Life Designs); TE Inking Brushes;
Infinity Circle dies (HA); white Posca pen; Foiled Sentiments (Pinkfresh);
Burlap EB folder (Honeybee)

Saturday, 30 November 2024

Let's Celebrate

Welcome
Today's card features a stencil from A Colorful Life Designs that I showed a few weeks ago called 
I decided to try and use it in a totally unique and different way.

So, here's what I did to create my card.
  • I took the Pop the Cork stencil and placed it over a piece of heavy white cardstock on the diagonal, eliminating the bottle portion of the stencil and inked it up with these Distress Oxide colours:  Fossilized Amber, Salty Ocean, Picked Raspberry, Cracked Pistachio and some Dusty Concord.
  • I lifted the stencil off, clean it and then repositioned it just to the top corner.  I masked off the area I had already stenciled before inking again with more of the above mentioned colours.  I repeated that process in the bottom corner as well until my card front was covered with ink.
  • Using a fine line marker, I drew a border around the outside edge and added some lines along the stenciled areas.
  • I die cut the sentiment from some black cardstock and the sentiment shadow right from the middle of my card base and glued those two together.
  • I glued my card front onto a piece of blue cardstock, then onto a piece of purple and then onto a white A2 sized card base.
  • I added the sentiment back into place using some foam tape and placed 3 black gems around it.

Here is the stencil I used:

My Discount Code for A Colorful Life Designs:
KarenFan10

Thanks so much for coming by and taking a look.

Adding my card to these challenges:
Simon Says Wed.- ANYTHING GOES
Just Us Girls- STENCIL

Supplies
Stamps- none
Inks- Distress Oxides
Paper- Scribes Nook- Waterloo, Ont.
Accessories and Tools- stencil (A Colorful Life Designs); TE Blending Brushes;
black gems, Fine line marker, die- TE

Thursday, 28 November 2024

Happy Christmastime

Good Morning
More snowflake fun as I play with this newly released stencil again from A Colorful Life Designs called 

So, here's what I did to create my card.
  • I placed the Snowflake Grid stencil onto a piece of white cardstock and inked it up with some Uncharted Mariner Distress Oxide ink.
  • Next, I die cut it out with the Christmas Snowflake die and set aside.
  • I then took a piece of pale gray cardstock and inked up the Snowflake Grid again using more of the Uncharted Mariner DOX ink.
  • I glued the die cut snowflake (the white one that I had stenciled first) and glued it over the gray, matching up the pattern.
  • I glued that onto an A2 sized white card base.
  • I found a scrap of blue cardstock and die cut the small snowflake to glue over the center of the large coverplate snowflake.  
  • Finally, I added the pre-printed sentiment with some foam tape right over the middle of the two snowflakes.

Here is the stencil I used:

My Discount Code for A Colorful Life Designs:
KarenFan10

Thanks so much for coming by and taking a look.

Adding my card to these challenges:
Simon Says Wed.- ANYTHING GOES
Double D- WINTER
Paper Minutes- STENCIL

Supplies
Stamps- none
Inks- DOX
Paper- Scribes Nook- Waterloo, Ont.
Accessories and Tools- stencil (A Colorful Life Designs); TE Blending Brushes
Christmas Snowflake Coverplate die (Paper Rose); Stackable Snowflakes die (MFT);
Pre-printed greeting (SSS)