Good Morning
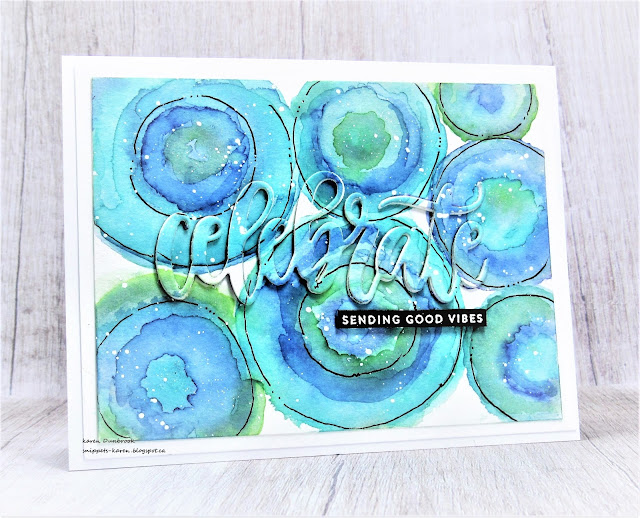
Meet today's card...painted circles.
I tried my hand at painting some more circles with some of my favourite Distress colours.
So here's what I did to create my card.
- I began with a piece of Strathmore Bristol watercolour paper, a paintbrush #10, a cup of water and my Distress Oxide inks.
- I began by pressing my ink pads directly onto my Tim Holtz Glass Mat to transfer some ink there. Using a wet paint brush with no ink on it, I painted the first circle ring with water at the bottom of my card panel. By doing that first, before adding the ink, I was better able to move the inks around when I added them in multiple layers.
- The rest was pretty much straight forward. I painted a round ring shape then moved to another area of the card panel to paint another while the first one dried. *to get a good mix of the colours and to be able to blend them well, you must let each one dry before adding the next colour.* Use your heat tool to dry if you are impatient like me!
- I finished painting all the rings of the circles using the different colours seen in the photo below.
- Using a fine line markers, I doodled lines around all the circles just to give them more presence.
- I splattered the panel with my white Posca pen for more interest.
- When the panel was totally dry, I die cut the Celebrate sentiment from MFT in my Cuttlebug right from the center of the circles. I die cut the sentiment again 3 more times from white cardstock. I stacked and glued those all together and glued them back into position on the main panel.
- I stamped the sentiment strip with some Versamark ink, then white heat embossed it. I pop dotted that just below the sentiment.
- I mounted it all onto a heavy white card base.
Thanks so much for coming by and taking a look.
Adding my card to these challenges:
Happy Little Stampers- WATERCOLOR
A Bit More Time to Craft- ANYTHING GOES
Creative Artiste Mixed Media- ANYTHING MIXED MEDIA
Supplies
Stamps- Tiny Words (SSS)
Inks- Distress Oxides; Versamark
Paper- Strathmore Bristol; heavy white (Scribes Nook)
Accessories and Tools- paintbrush; Celebrate die (My Favorite Things); Wow eb powder;
heat tool (Ranger); Signa fine line pen; Posca white pen; Cuttlebug; pop dots


19 comments:
What a fun combination of techniques, Karen! Not only are your colors extra vibrant, but the doodling looks like fun, too! It's a perfect card for celebrating any kind of special occasion! Thanks for your tutorials and detailed explanations. I always leave knowing exactly what you did! hugs, de
Karen, this is fabulous! Thanks for the 'drying' tip!
=]
You are so talented and creative! This is an awesome design and a beautiful card. I love the colors too!
Karen, this is a fabulous technique resulting in a more fabulous card! Thank you for sharing, very clearly, your steps to creating that day's piece. I can always count on inspiration from your work.
Great freehand work creating a background! It looks like a lot of fun too! Love the mix of colours you chose.
This is STUNNING!! I never think to do anything like this but it is just amazing!!! STUNNING design!
This is a great process! I especially love the way you made the word pop out from the painted background. Before I got to read how you did that I was trying to work it out. Very cool! I am rather impatient too. I always think the inks will blend anyway but they don’t work that way. Thanks for sharing your process.
I LOVE this card! Fabulous colors for those wonderful circles.
Your circles of color are so pretty, Karen, and the doodling adds so much! A fun card, my friend!
Great abstract background Karen and I love how you outlined the the circles :)
What a unique and glorious effect. Thank you for the step by steps with this amazing and vibrant card Karen x.
That's fantastic. LOVE it. Thanks for sharing how you did it.
Hugs, Sarn xxx
Those circles are just so beautiful Karen, thanks for the tip about the blending and drying, something new to me! That's why I have to throw mine hahaha Such Beautiful work with a gorgeous combination of colours.
Faith x
These circles work beautifully as a background to the dimensional large die cut sentiment cut out from this patterned piece and love the white on black sentiment and the doodling around the circles using black pen and the white spattering finish it perfectly. x
Just so beautiful Karen, lovely design and coloured, I love the the sentiment cut form the same coloured background, Kate x
Really love this card Karen! The circles are amazing with the different shades of blue/green. It's really interesting how adding the black doodles seems to bring the circles to life and add depth and dimension. The hidden sentiment is another fantastic technique to add to your design. xx
Hi Karen, hope you are doing well. This is a fabulous techniques and makes a gorgeous card. xoxo
This is such a great card Karen, the outlines and spatters make the circles pop and I love the hidden sentiment, Cathy x
A fabulous serendipity result with your playing with colour and circles. Thanks for joining in the challenge at Happy Little Stampers. Caz. DT
Post a Comment