Showing posts with label woodgrain. Show all posts

Tuesday, 18 October 2022

Scripty Congrats


Welcome
Today's card was made using a white crayon and an embossing folder to create a unique background.

So, here's what I did to create my card.
  • I cut a piece of white cardstock, placed it into the Woodgrain embossing folder and ran it through my die cutting machine to emboss it.
  • With the raised side facing up, I rubbed over it with a white crayon.  The crayon acts as a resist when I apply the ink.
  • Next, I rubbed some Hickory Smoke Distress Oxide ink pad over the embossed background.  To add a bit more definition, I rubbed on a small touch of Black Soot DOX ink.
  • While I set that aside to dry, I die cut the sentiment and the flourish from some plain white cardstock a few times and then stacked and glued them all together.  
  • I glued the woodgrain panel onto another piece of white cardstock, then onto an A2 card base.
  • I glued the sentiment and the flourishes in place.


Thanks so much for coming by and taking a look.

Adding my card to these challenges:
Crafty Friends- USE MORE THEN ONE DIE
Crafts Galore Encore- ANYTHING GOES
Happy Little Stampers- ANYTHING GOES

Supplies
Stamps- none
Inks- DOX
Paper- white cs (Scribes Nook- Waterloo, Ont.)
Accessories and Tools- Woodgrain EB folder (Sizzix); Flourish die (Dollar Tree); 
Congrats die (Paper Smooches- closed); white crayon

Thursday, 16 September 2021

Happy Anniversary


Welcome
I so appreciate you came to see what I have been up to.

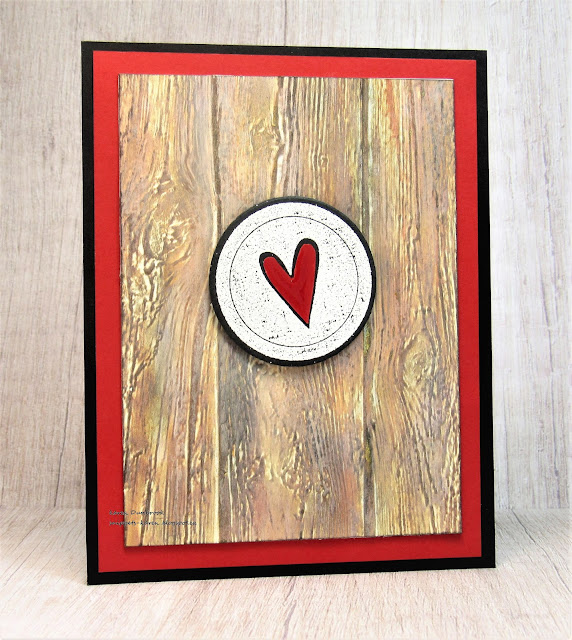
I made this card a couple months ago for my husband when we celebrated our 38th Anniversary.  
He loved the simplicity of it and the wood background.

So here's what I did to create my card.
  • I began with a piece of white cardstock and I rubbed different colours of Distress Oxide inks  directly onto the paper, spraying with water and blending as I added more and more colour.
  • When I was happy with the inking, I embossed the inked panel using the Tim Holtz Lumber embossing folder.  This folder is amazing and gives deep woodgrain impressions on your paper.
  • I rubbed some Black Soot DOX ink randomly over the top to highlight the grain of the wood, then set it aside to dry completely.
  • I stamped the heart from Studio G onto a piece of black cardstock with some Versamark ink, then white heat embossed it.
  • Using a red Copic Marker, I coloured in the heart and then added some Nuvo Crystal Glaze over the heart to help make it pop.
  • I glued the woodgrain panel onto a piece of red cardstock, then onto a black card base.

Well that's all for today.
Thanks so much for coming by and taking a look.

Adding my card to these challenges:
Simon Says Wed.- LOTS OF LAYERS
Watercooler Wed.- ALL ABOUT OCCASIONS (Anniversary)


Supplies
Stamps- Heart in Circle (Studio G)
Inks- Distress Oxide ( Antique Linen, Frayed Burlap, Rusty Hinge, Black Soot), Versamark
Paper- Michaels; Accessories and Tools- Lumber EB folder (TH); Nuvo Crystal Glaze; heat tool; 
Lawn Fawn white embossing powder

Saturday, 28 August 2021

Monochromatic Christmas


Welcome
Another holiday card coming your way inspired by one of the challenges over at Splitcoast Stampers.
The challenge was to use only ONE piece of cardstock, any colour.
I went for this navy piece I had in my stash.

So here's what I did to create my card.
  • Like I mentioned above, I got out one piece of navy cardstock.  I cut and scored one piece to make a A2 size card.  
  • Using the other  piece of that cardstock, I embossed it with the Lumber 3D Embossing folder (Tim Holtz). I rubbed over it with my Versamark ink pad and added some clear embossing to add interest.
  • Next, I took the embossed panel and die-cut it using the Nordic Winter die and set all the pieces aside.
  • I glued the die-cut/embossed piece onto the card base I had made from the navy cardstock and pop dotted a few of the elements I had die cut from the panel back in place.  It gave a lot more interest and added dimension to my card front.
  • I stamped the sentiment on a small leftover piece of the navy cardstock with Versamark and then white heat embossed it.  I pop dotted that over the background.  
  • This turned out to be a fun challenge....so fun to see how we can challenge ourselves to try something different.


Thanks so much for coming by and taking a look.

Adding my card to these challenges:
Simon Says Wed.- ANYTHING GOES
Just Add Ink- STARTS WITH 'N'  (Nordic die)

Supplies
Stamps- Warm Wishes (TE)
Inks- Versamark
Paper- navy cardstock 
Accessories and Tools- Nordic Winter die (TH); Lumber eb folder (TH); Lawn Fawn clear eb powder;
pop dots; heat tool

Monday, 11 December 2017

Christmas Wishes

Meet today's card.
This one is more on the masculine side.

I had a piece of woodgrain paper leftover that I had made, tutorial HERE, and die-cut it into an oval shape using a Spellbinders die.  I die-cut the deer head twice and glued the pieces together for stability and added it over the woodgrain bkg.  I cut the leaves, also from the deer set, in red and glued it below the head.
I just picked up this new stamp from SSS called the Christmas Sweater and used it for my background.  I used my Misti to get the perfect stamped impression.
Lastly, I stamped the Hero Arts sentiment and pop dotted the deer head piece with pop dots.


Thanks so much for coming by and taking a look.

Adding my card to these challenges:
The Male Room- CHRISTMAS/WINTER WISHES
Addicted to Stamps and More- ANYTHING GOES
Use Your Stuff- CHRISTMAS IS COMING
Time Out- PHOTO INSPIRATION


Supplies
Stamps- Season's Greetings (HA); Christmas Sweater (SSS)
Inks- Tea Dyed, Vintage Photo, Antique Linen Distress (TH); Tuxedo Black Memento
Paper- heavy white
Accessories and Tools- deer and leaf die (Recollections); oval die (Spellbinders); 
Cuttlebug; Misti; Elmer's glue; ScorPal

Sunday, 12 November 2017

Twelve Tags of Christmas

Hello and Welcome.
I am just thrilled to be a part of Loll Thompson's 


http://www.stampingwithloll.com/2017/11/twelve-tags-of-christmas-day-seven.html

This is day seven, so if you haven't seen the rest of the tags this week you need to go check them out.
You will be so inspired!  There are prizes too!

So for this event, you must create a tag any size or shape and it must be a mixed media Christmas tag  which includes stamping, plus two mixed media elements (techniques or products).


So onto what I did for my tag.
For the base of my tag, I used my Woodgrain Tutorial that so many of you have used in the past.  It is a fun way to create a wood looking background with readily available supplies.  I went for blue of course!
(a step by step tutorial can be found on my blog by clicking the above link)
I used a tag die to cut out my tag shape then started added the details.
To add some sparkle to the woodgrain, I stamped some script randomly and embossed it with silver powder.  I added a snowy feel by splattering white acrylic paint all over as well.
Next, I die-cut the snowflakes leaving one white then silver embossing the smaller one.  I layered them then added a drop of blue Nuvo to add interest and pull up the blue of the base.
I die-cut the 'be jolly' and glued it over a piece of silver ribbon along the bottom.  
I cut a blue base to give it more stability then added silver twine and a white bow.

I hope you will be much inspired and come and play along with us.
These tags are like little treasures.


Adding my tag to these challenges:
Simon Says Wed- SNOW WHITE
(snow)
Love to Create- ANYTHING CREATIVE MIXED MEDIA
STAMPlorations- MIXED MEDIA


Supplies
Stamps- Script (PB)
Inks- Peacock Feathers, Stormy Sky, Tumbled Glass, Iced Spruce Distress (TH); Versamark
Paper- heavy white (local store)
Accessories and Tools- Elmer's Glue; ScorPal, Caribbean Ocean Gloss Nuvo;
Silver eb powder; heat tool; snowflake dies- IO, PB; 
be jolly die- STAMPlorations; tag die- MFT; silver ribbon; white acrylic paint; paintbrush

Monday, 15 May 2017

Casing Myself- The Flower Challenge

Good Morning.
This month at The Flower Challenge we have something fun for you to play along with.
It's time to Case a DT and you should see the inspiring cards there to case!


Some of you may have seen my first card I added to the challenge to be cased.


I began by die cutting out the framed area.  First, I cut out the opening for the frame using my Cuttlebug. Then to get the embossed stitched edge, I placed the next larger size of die from the same set into my machine but placed it onto a silicone pad instead of directly onto a cutting plate.  You may have to try it using a few different types of shims but it will emboss you paper instead of cutting through it.
This time, instead of doing the folds on my inky paper like my original card, I created a piece of woodgrain paper using Elmer's glue and Distress inks.  To see my full tutorial about how to do this go here:
 Again like my first card, I die cut flowers from white cardstock to keep it simple and stamped the sentiment.


Also adding my card to these challenges:

Addicted to Stamps and More-ANYTHING GOES

Craft Stamper Magazine- ANYTHING STAMPED GOES

As You Like It- FAV DIE AND WHY
(I love hollyhocks but can't grow them in my garden as it is too wet.
I just love their majestic, tall and beautiful blooms)


Thanks so much for coming by and taking a look.
Supplies
Stamps- Happy Birthday (Studio G)
Inks- Weathered Wood, Faded Jeans, Salty Ocean, Stormy Skies Distress (TH), Memento black 
  Paper- Strathmore Bristol
Accessories and Tools- Cuttlebug, silicone mat, Elmer's glue, ScorPal, hollyhock die (Impression Obsession),
stitched frame die (Memory Box)

Saturday, 5 March 2016

Seaside

Happy Saturday!

Meet today's card inspired by the challenge at Splitcoast Stampers this morning and the wonderfully done miniature paintings by Lorraine Loots.  There is also a video to watch of her being inspired while painting these miniatures.  I chose a seaside painting as my inspiration.

I began by creating the woodgrain paper which is so easy to make using glue and a scoring tool.  This time, I used Tumbled Glass, Peacock Feathers and Weathered Wood Distress inks to colour the paper.  Using those colors gave my woodgrain such a 'beachy' feel which was perfect for the images I wanted to use.  For those of you that may have missed how to create your own woodgrain, go here:

Next, I stamped the panel using my MISTI and stamps from Gina K and Flonz Stamps with Memento black ink.  Then, I sponged on Mermaid Lagoon, Peacock feathers and Seedless Preserves Distress inks giving the panel a feel of a sunset.  

Adding my card to these challenges:

Seize the Birthday- ANYTHING GOES 

Simon Says- TOUCHY, FEELY

Craft Stamper- ANYTHING GOES


 Thanks so much for coming to visit.
Hope you have a great weekend!

Supplies:  stamps- Gina K, Flonz/ inks- Memento, Distress/ Elmer's Glue/ ScorPal/ MISTI/ sponge applicator tool


Saturday, 23 January 2016

Elegant Woodgrain


Morning.
Meet today's card inspired by the challenge at Splitcoast today and the website called Uncommon Goods.  
I posted a tutorial this week about how to create woodgrain paper and was thrilled that so many of you had a chance to try it out.  For those of you that may have missed it here is the link:

 In the tutorial, I used Distress inks to colour the faux barnboard but I have been trying different types of inks to get a different woodgrain look.  I was pleasantly surprised to see the great look I got by using Colour Box Cookie Dough Die ink, Versafine Vintage Sepia Pigment ink and just a touch of Antique Linen Distress ink.  It reminded me of a beachy, summery scene so I decided it needed to have some flowers added which gave the card some elegance.
The flowers from Stampin Up are stamped with black Memento ink, then sponged with Antique Linen Distress ink.  The sentiment is from the same set and I added a black rhinestone to the flower centers.

I am adding my card to these challenges:

The Card Concept- FLORAL ELEGANCE


Sisterhood of Crafters- SOMETHING OLD, SOMETHING NEW
(old stamp set, new to me technique)


Thanks so much for coming by and taking a look.
Have a great weekend.

Supplies:  stamps- SU/ Elmer's Glue/ inks-Distress, Verafine, Colour Box/ ScorPal/ Mini Mister/ sponge dauber/ rhinestones


Friday, 15 January 2016

Snowflakes on Woodgrain

Morning.


Here is a card that I made using a glue and scoring technique to create the woodgain background paper.  I went with a grey colour palette using Weathered Wood and Black Soot Distress ink.


I will be posting a tutorial about how to create the woodgrain paper tomorrow so stay tuned!


The snowflake panel is from the Peddler's Pack that I just got the other day.  Isn't it so gorgeous against the woodgrain?  I stamped the image with Versamark, embossed the snowflakes with white and then rubbed on the same colours I used on the background.  I also splattered on a bit of water to add some depth to the snowflake panels (the water removes some of the ink). 
I glued on some pearls then pop dot mounted that piece onto the woodgrain.

Adding my card to these challenges:

Seize the Birthday- ANYTHING GOES

Craft Stamper-TAKE A STAMP

Addicted to Stamps- ANYTHING GOES

Crafting With Attitude- ANYTHING GOES


Thanks so much for coming by and taking a look and hope you will come back tomorrow to
check out the tutorial.

Supplies:  stamp- Peddler's Pack/ Versamark/ wh eb powder/ Distress ink/ glue/ ScorPal/ rhinestones