Saturday, 23 November 2024

Layered Poinsettia


Good Morning
This new stencil from A Colorful Life Designs is so pretty and it's called;

It's easy to ink up onto a piece of cardstock, but I took it a step further to give my flower more interest and dimension.

So, here's what I did to create my card.
  • I placed the Layered Poinsettia stencil over a piece of white cardstock and inked it up with some Barn Door, Candied Apple and some Picked Raspberry Distress Oxide ink.
  • I repeated that process on another piece of white cardstock, splattered both flowers with my white Posca pen and set aside to dry.
  • While that dried, I placed the Poinsettia leaves onto another piece of white cardstock and inked that up with some Rustic Wilderness DOX ink.
  • Next, I placed the Merry Christmas stencil over the stenciled leaves and inked that up with some more of the Barn Door DOX ink and splattered that as well.
  • I fussy cut out both of the poinsettias, then used some foam tape to position one of them over the leaves.  
  • I took the second poinsettia and cut out just some of the flower petals, rolled them with a pencil and then used some foam tape to pop them over the larger one.  It really gave lots of great dimension to the flowers by layering the petals.
  • I glued the card base to a piece of burgundy cardstock and then onto an A2 sized card base.
  • Finally, I added some Glossy Accents to the flower center.

Here are the stencils I used:


My Discount Code for A Colorful Life Designs:
KarenFan10

Thanks so much for coming by and taking a look.

Adding my card to these challenges:
CRAFT- CHRISTMAS
Craft Rocket- CHRISTMAS
Time Out- INSPIRED BY WORDS

Supplies
Stamps- None
Inks- DOX
Paper- Scribes Nook- Waterloo, Ont.
Accessories and Tools- stencils (A Colorful Life Designs); white Posca pen; 
Foam tape; TE Blending Brushes; Glossy Accents

Sunday, 17 November 2024

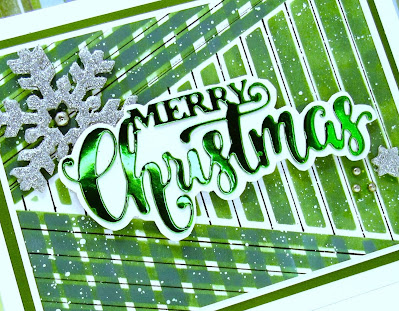
Geometric Christmas Duo


Welcome
Meet the fun new stencil from A Colorful Life Designs called
I has 2 different trees to stencil with so many possibilities.
I decided to use both the trees from the set to create a geometric design.

So, here's what I did to create my card.
  • I placed the tree at the top of the Geometric Christmas Duo stencil onto a piece of white cardstock sideways (it's the largest inked area in the middle under the sentiment) and inked it up with some Cracked Pistachio and some Rustic Wilderness Distress Oxide ink.
  • I lifted the stencil, moved it to the top and inked the same tree again with the green inks.
  • I lifted the stencil off, cleaned it and then repositioned the tree at the bottom of the stencil along the top edge of my card front and inked again creating a plaid pattern.  I repeated the process for the bottom edge next.
  • To add more interest to the design, I used a fine line black marker and a ruler to add the lines.
  • I splattered the whole panel with my white Posca pen and set aside to dry.
  • I die cut the sentiment from some green foil paper and added that over a with die cut shadow. 
  • I glued the stenciled card front panel onto a piece of white cardstock, then green, then onto an A2 sized card base.
  • I used some foam tape to pop the sentiment over the panel and then added 2 silver die cut snowflakes and some silver gems.

Here is the stencil I used:
Geometric Christmas Duo

My Discount Code for A Colorful Life Designs:
KarenFan10

Thanks so much for coming by and taking a look.

Adding my card to these challenges:
Little Red Wagon- WINTERTIME
Krafty Chicks- CHRISTMAS

Supplies
Stamps- none
Inks- DOX
Paper- Scribes Nook- Waterloo, Ont.; foil paper (Dollarama)
Accessories and Tools- stencil (A Colorful Life Designs); white Posca pen; 
fine line black marker; Merry Christmas die (Creative Expressions)

Saturday, 16 November 2024

Happy New Year


Welcome
I know it's early but I wanted a chance to play with this newly released stencil from A Colorful Life Designs called 

So, here's what I did to create my card.
  • I placed the Pop the Cork stencil onto a piece of white cardstock and beginning with the bottle part of the stencil, I inked it up with some Black Soot and some Hickory Smoke Distress Oxide ink.  
  • Next, to give the bottle a more mottled looking texture, I touched it with a wet cloth that lifted off some of the ink.  
  • I moved onto the rest of the stencil, inking areas one at a time and overlapping them to blend the colours together. I used some Shaded Lilac, Cracked Pistachio and some Peacock Feathers Distress Oxide inks.
  • I splattered the panel using my black Posca pen.
  • When my card front was all dry, I placed it into my Misti to stamp the sentiment into the corner.
  • I glued the card front onto a piece of pale blue cardstock, then onto some black and then finally onto an A2 sized white card base.
  • Finally, I added bling all over the front to add a more festive look to my card.

Here is the stencil I used:

My Discount Code for A Colorful Life Designs:
KarenFan10
Thanks so much for taking a look.

Adding my card to these challenges:
Try it on Tues.- SPARKLE ALL THE WAY
Crazy is Our Fame- Stencils are Our Game- STENCIL FUN/Optional: Make It Sparkle or Shine

Supplies
Stamp- Health, Wealth and Happiness (Lesia Zgharda)
Ink- DOX
Paper- Scribes Nook- Waterloo, Ont.
Accessories and Tools- stencil and bling (A Colorful Life Designs); black Posca pen;
small inking brushes (Amazon); Misti (My Sweet Petunia)

Friday, 15 November 2024

Swirling Snow


Good Morning
We are having a mid-month new release so meet the new stencil from A Colorful Life Designs called:
When you see the stencil pictured below, you will see that I used it in a totally different way then intended.

So, here's what I did to create my card.
  • I cut a piece of white cardstock and then placed just part of the Pop the Cork stencil over half of my paper and inked it up with some Broken China and a bit of Salty Ocean Distress Oxide ink.
  • I lifted the stencil off and repositioned it over the other half of my card front and inked again with the same colours.
  • I diluted some of the ink with water and splattered over the whole card base. After that dried, I splattered again with my white Posca pen.
  • While that dried completely, I took another piece of white cardstock, inked it up with some more of the blue inks and then die cut the snowflakes from it.
  • I glued the stenciled card front onto a piece of dark blue cardstock, then onto a pale blue piece and then onto an A2 sized white card base.
  • I used some foam tape to add the snowflakes across the top. The sentiment was also added with some foam tape under the snowflakes.
  • Finally, I added some silver gems to the middle of the snowflakes.

Here is the stencil I used:

My Discount Code for A Colorful Life Designs:
KarenFan10
Thanks so much for taking a look.

Adding my card to these challenges:
Little Red Wagon- WINTERTIME
Unicorn Challenge- CHRISTMAS and/or WINTER
Craft Rocket- CHRISTMAS and/or WINTER
Crafty Chicks- CHRISTMAS

Supplies
Stamps- none
Inks- DOX
Paper- Scribes Nook- Waterloo, Ont.
Accessories and Tools- stencil (A Colorful Life Designs); TE Blending Brushes;
white Posca pen; Drifting Snowflakes die (Memory Box); foam tape; 
Pre- printed sentiment (SSS); silver gems 

Sunday, 10 November 2024

Christmas Postmark


Welcome
Today's card features a lovely new stencil from A Colorful Life Designs called 
I paired it up with an older stencil called Merry Christmas to create my card.
Postal dies, stencils and stamps are all so hot right now and this one is perfect for your holiday cards.

So, here's what I did to create my card.
  • I placed the Merry Christmas stencil over a piece of white cardstock and then inked it up with some Lumberjack Plaid and some Rustic Wilderness Distress Oxide ink.
  • I used the Postal Collage die to cut it out, added more green ink along the edges and set aside.
  • I die cut another piece of white cardstock with the Postal Collage die and then placed the Christmas Postmark stencil over that and inked it with some more of the same ink as mentioned above. I cut a small part of the die cut out as I only wanted the stenciled area.
  • I glue my stenciled card front onto a piece of red and then onto a piece of green cardstock and then onto a white A2 sized card base.
  • I used some foam tape to pop the postmark over the background.
  • I die cut the foliage, glued that to one side and added the pre-printed sentiment. 

Here are the stencils I used:


My Discount Code for A Colorful Life Designs:
KarenFan10
Thanks so much for coming by and taking a look.

Adding my card to these challenges:
Allsorts- CHRISTMAS
Word Power- WORDS AS THE FOCUS

Supplies
Stamps- none
Inks- DOX
Paper- Scribes Nook- Waterloo, Ont.
Accessories and Tools- stencils (A Colorful Life Designs); TE Blending Brushes;
Postal Collage die (Waffle Flower); Foliage dies (SSS); Pre- printed sentiment (SSS)

Saturday, 9 November 2024

Decorate the Tree

Welcome
Meet today's card using the newly released stencil from A Colorful Life Designs called
Great stencil with a total of 5 unique ornament designs.

So, here's what I did to create my card.
  • I got out a piece of white cardstock and placed the Watercolor Ornaments stencil over that.  I decided that 3 of the ornaments would fit best across my card front panel so after I chose the 3 I wanted, I inked them up with some Lumberjack Plaid, Rustic Wilderness and some Broken China Distress Oxide ink.
  • I splattered the ornaments with my white Posca pen and when they were all dry, I fussy cut them out and set them aside.
  • I used the Season's Greetings Embossing Folder to emboss a piece of white cardstock, then glued that onto a piece of red cardstock and then onto a white A2 sized card base.
  • I used some foam tape to add the ornaments over the embossed background and cut some thin strips of black paper to add to the top of the ornaments.
  • I die cut the sentiment and used some more foam tape to add it over the bottom.
  • Finally, I added some red bling around the ornaments.

Here is the stencil I used:

My Discount Code for A Colorful Life Designs:
KarenFan10

Adding my card to these challenges:
Addicted to Stamps and More- STENCILS AND DIE CUTS
Craft Rocket- CHRISTMAS / WINTER
My Time to Craft- STENCIL ONLY

Supplies
Stamps- none
Inks- DOX
Paper- heavy white (Scribes Nook- Waterloo, Ont.)
Accessories and Tools- stencil and bling (A Colorful Life Designs); white Posca pen; 
Season's Greetings EB Folder (Tonic Studios); foam tape

Thursday, 7 November 2024

Crossed Candy Canes

Welcome
Candy canes are always such an iconic sight for the arrival of Christmas.
This new stencil from A Colorful Life Designs is just perfect for creating some fun designs.
So meet the newly released 

So, here's what I did to create my card.
  • I began by placing the Crossed Candy Canes stencil over a piece of white cardstock and inked it up with some Lumberjack Plaid and some Rustic Wilderness Distress Oxide ink.  I masked and alternated the inking to give a fun look to the candy canes.
  • Before I fussy cut them out, I used a fine line black marker and a ruler to add the lines between the colours.
  • I took another piece of white cardstock and placed the Simple Grid stencil over that and inked with more of the Lumberjack Plaid DOX ink.
  • I removed that stencil and placed the Buffalo Plaid stencil over the Grid and inked again with more of the red ink.  By layering the stencils, I got a fun looking pattern for my card front. Next, I splattered the panel with my white Posca pen.
  • I glued the card front onto a piece of white cardstock, then onto a piece of green and then onto a white A2 sized card base.
  • I used some foam tape to pop the candy canes over the background.
  • I added some ephemera over the candy canes to finish off my card.

Here are the stencils I used:


My Discount Code for A Colorful Life Designs:
KarenFan10
Thanks so much for coming by and taking a look.

Adding my card to these challenges:
Addicted to Stamps and More- DIE CUTS AND STENCILS
(PIN)spirational- NUMBERS

Supplies
Stamps- none
Inks- Distress Oxides (Ranger)
Paper- heavy white (Scribes Nook- Waterloo, Ont.)
Accessories and Tools- stencils (A Colorful Life Designs); white Posca pen; 
TE Blending Brushes; foam tape; Holly Jolly Ephemera (Simple Stories)

Sunday, 3 November 2024

Snowflake Grid

Good Morning

Meet the newly released stencil from A Colorful Life Designs called
It really made for a fun background for this holiday inspired card.

So, here's what I did to create my card.

  • I placed a piece of white cardstock onto my Make Art station and put the Snowflake Grid stencil over it.  I inked it up with some Salty Ocean Distress Oxide ink.
  • I removed the stencil and to add a bit more interest to the stenciled background, I took the eraser end of a pencil and some Tumbled Glass DOX ink and added the dots into the open areas between the grids.
  • Next, I took the panel and die cut the Drifting Snowflakes right across the top part of the inked cardstock.  I die cut the shadow portion of the snowflakes with some blue cardstock and glued them together.
  • I stamped the sentiment with more of the Salty Ocean ink and then die cut it out.  
  • I glued the stenciled panel onto a piece of matching blue cardstock, then onto a white A2 sized card base.
  • I used some foam tape to pop the snowflakes back into place at the top and then added the sentiment in the bottom corner.
  • The final touch was to add some silver gems to the middle of the snowflakes.

Here is the stencil I used:

Thanks so much for coming by and taking a look.

Adding my card to these challenges:
Simon Says Wed.- ANYTHING GOES
Simon Says Monday- STENCIL IT
Merry Little Christmas- ANYTHING GOES

Supplies
Stamp- Holiday Sentiments (Photoplay)
Inks- Distress Oxides
Paper- heavy white (Scribes Nook- Waterloo, Ont.)
Accessories and Tools- stencil (A Colorful Life Designs); Make Art Station (Ranger);
Drifting Snowflakes die (Memory Box); foam tape; silver gems